Parts of the safety module and rules for their use
The fuse box diagram of the VAZ model 2106 is quite simple: two lines with fuses (there are no circuit boards, resistances, diodes, etc.).
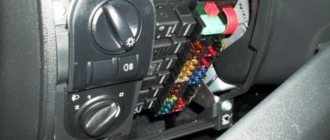
The entire structure is attached to the car body using two nuts. Almost all electrical circuits of this car are protected by fuses with ratings of 8 amperes and 16 amperes. However, there are also unprotected electrical devices, for example, the solenoid relay at the starter. A conventional safety unit is a set of devices for protecting the electrical system of a vehicle, assembled into a single module. In a car it is located on the right, at the bottom of the instrument panel on the driver’s side, next to the handle for opening the space under the hood. Proper connection of this element is carried out according to the previously marked connection sequence (diagram) on the new fuse box installed during repair or replacement.
The conditions for proper operation of the machine's safety module are as follows.
In order for the car to function properly, preventive attention should be paid to the fuse module. At least a couple of times a year you should clean the contacts from dust and dirt.
It is advisable to carry out this procedure in winter, when the voltage in the circuit is highest.
Fuse box problems and troubleshooting
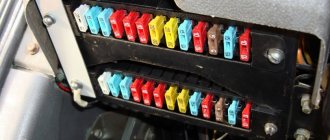
On the VAZ "six" fuses are installed in two blocks - the main and additional ones. Structurally, they are made of a plastic case, fusible inserts and holders for them.
Both devices are located in the cabin to the left of the steering column under the dashboard.
How to identify a blown fuse
When a “six” has a malfunction with one of the electrical appliances (windshield wipers, heater fan, etc.), the first thing you should pay attention to is the integrity of the fuse links. Their serviceability can be checked in the following ways:
Visual inspection
The design of the fuses is such that the condition of the fuse link can be used to determine the operability of the part. The cylindrical elements have a fusible connection located outside the housing. Even a car enthusiast without experience can determine its destruction. As for the flag fuses, their condition can be assessed by looking through the light. A burnt-out element will have a broken fusible link.
Diagnostics with a control and a multimeter
Using a digital multimeter, the functionality of the fuse can be checked by voltage and resistance. Let's consider the first diagnostic option:
- We select a limit on the device to check the voltage.
- We turn on the circuit being diagnosed (lighting devices, wipers, etc.).
- We touch the fuse contacts one by one with the probes of the device or control panel. If there is no voltage at one of the terminals, it means that the element being tested has failed.
Video: checking fuses without removing them from the car
The resistance test is carried out as follows:
- We set the dialing mode on the device.
Table: VAZ 2106 fuse ratings and circuits they protect
Causes of fuse failure
If the car fuse is blown, this indicates some kind of malfunction. The element in question may be damaged for one of the following reasons:
- poor connection to the block contacts. If the connection is unreliable, it is possible not only to damage the protective element, but also to melt the plastic elements of the fuse box as a result of overheating;
- installation of an element with a lower rating. If a fuse is used in a circuit with more current than its rated rating, it will simply blow;
- current surge in an electrical circuit;
- an error was made during the repair.
A short circuit, which leads to a sharp increase in current in the circuit, is also the cause of blown fuses. This often happens when a consumer breaks down or the wiring is accidentally shorted to ground during repairs.
Replacing the fuse link
If the fuse is blown, then the only option to restore the circuit's functionality is to replace it. To do this, press on the lower contact of the failed element, remove it, and then install the working part.
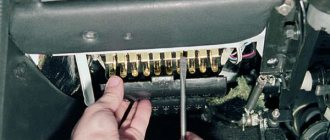
How to remove the fuse box "six"
For dismantling and subsequent repair or replacement of blocks, you will need an extension cord with an 8-mm head. The procedure consists of the following steps:
Replacing fuses and block VAZ 2106
YouTube funnels and fuses for the Lada Largus
Replacing the fuse blocks of the VAZ 2106 is carried out if you are armed with a mounting block of blade fuses from the GAZ 3110, which is perfect. Additionally, you need to prepare a wire with a cross-section of about 3.5 square meters. mm, which will serve to create jumpers.
Replacing the VAZ 2106 fuse box with blade ones.
Replacing blade fuses on a VAZ 2106 begins with the following steps:
- the block is unscrewed and pulled down as far as the wires allow;
- jumpers are prepared at home (only 5 of them need to be made);
- replacing VAZ 2106 fuses with knife fuses involves making homemade jumpers according to the diagram;
Video tutorial on replacement
blocks
VAZ
2101-06. my affiliate program!
Recommendation. It is worth keeping in mind that the Volgov version has 13 fuses, the VAZ version has 16, with three spare ones. The new mounting block will not have spare fuses, so number 11 will correspond to number 14 (see the diagram above), numbers 12-15, and so what next. Replacing fuses with blade VAZ 2106 therefore involves working with homemade jumpers.
we make jumpers like this;
Homemade fuse jumpers
- fill the block with jumpers;
- replacing the fuse box with blade VAZ 2106 should ultimately look something like this;
KEY-DOP
Replacing the fuse box for a new VAZ 2106
- we remove the Z-shaped fasteners, because they are no longer useful;
- we turn the old block
towards us and carefully examine it in order to understand which wires go where;
Advice. It’s useful to know that where one connector is located is the input, and where two are located is the output. Moreover, the replacement of the VAZ 2106 safety block should be carried out according to the characteristics of the following principle. Because the new mounting block will mainly use two connectors, the placement of the wires will be very close to each other. Therefore, when throwing jumpers, it is necessary to insulate the branches with heat shrink to avoid short circuits.
- First, we install the input of the first fuse in the new mounting block;
- later we connect the first of the fuses;
- We evenly transfer our client the fuses from the old unit to the new one;
- the end result is a block with 5 jumpers, which go into the connectors in pairs;
- replacing the safety block on a VAZ 2106 is certainly carried out by transferring it from the previous block;
- when the work is completed, you need to secure the block;
- the block has mounting lugs on the right and left, which are perfect on the VAZ 2106 (you just need to bend one of the lugs slightly to the side);
- the new mounting block is fixed with standard nuts;
- You can change the fuse box of a VAZ 2106 by bending it down, as it is also called up, as you like, it’s not easy.
KEY-DOP
Recommendation. It should be noted that it is no longer possible to change the fuse box on a VAZ 2106 by setting fusible ratings. The standard GAZ 3110 has fuses with a current strength of 5 to 25 A. For the VAZ 2106, such ratings are not suitable, because eight-amp and sixteen-amp fuses are included here. But there are no fuses of that rating, and therefore they are installed instead of eight-amp fuses - 7.5 A, coffee-colored, and instead of 16-amp fuses - 15 A blue. This is an aspect that should be taken into account.
If you compare it with the diagram above, the new version will look like this:
- numbers 1, 11 and 12 – 15 A;
- numbers from 2 to 10 and 13 – 7.5 A.
Replacing the fuse box
In rare cases, the VAZ 2106 fuse box burns out. Sometimes it is easier to replace it with a new one than to carry out repair work. Replacement is very easy and quick:
- Unscrew the nuts that secure the block
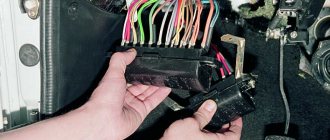
- Let's take him out. Please note that a large number of multi-colored wires stretch to the block.
- To avoid confusion, keep a new block nearby. We connect each wire that we disconnect from the old one to the new one.
- We install the new block and secure it to the body with nuts.
After the work has been completed, you need to diagnose the system and determine whether all wires are connected correctly. Diagnostics is carried out experimentally. For example, to check fuse F5, you need to turn on the low beam. We take out the fuse and look at the left headlight. It should go out. We check all systems in a similar way. If, when you pull out the fuse, the power supply does not open, it means that the jumper was installed incorrectly.
- If you plan to carry out any manipulations with electrical equipment, be sure to remove the negative terminal of the battery. At this moment the ignition should be turned off.
- Take your time to simply replace the blown fuse with a new one. First you need to determine the cause and eliminate it.
- Never install a fuse with a higher rating than specified in the instructions. You should not install homemade devices either. This can not only lead to the failure of all electrical wiring and electronics, but also cause a fire.
Types of fuses
Hyundai Accent Fuses
The choice of fuses must always be approached carefully. This video will help you find out a lot of interesting things about fuses. If you select fuses incorrectly, this can lead to serious problems that can even lead to a car fire
Additionally, the majority of motorists will agree that a lot of time is wasted on the selection of expensive parts that our client needs to do, and special attention is rarely paid to fuses. First, you need to be able to identify the fuse
So, they have a certain current strength, expressed in Amperes. In the photo below we see fuses of various ratings:
Electrical network of a VAZ 2106 car
Fuses and relays
Thanks to this design solution, the wiring of the VAZ 2106 is made as follows:
- The vehicle's main electrical circuits are activated only through the ignition switch;
- Electrical safety mechanisms are connected directly to the battery via the fuse box;
- The housings of all main components of the car are conductive.
Egnition lock
When servicing a car with your own hands, you often have to find out the reason for the failure of one or another electrical system. It is best to start searching for failures with the ignition switch, since this device performs several functions in the car:
- It is the control mechanism of the ignition system;
- Acts as a security and anti-theft system;
- Allows you to tow a car with the hazard lights on.
Wiring diagram for VAZ 2106 - electrical starting system
The diagram shows:
- Rechargeable battery with connection of the negative terminal to ground (car body);
- Electric starter with terminal “50” from the ignition switch through the starting relay;
- Generator;
- Fuse box;
- Egnition lock;
- Start relay.
How does the wiring of a VAZ 2106 work, connected to the ignition switch?
The ignition switch has 4 positions, when activated, re-switching occurs:
- In position “0”, power from the battery is supplied only to terminals 30 and 30/1. All other systems are disabled;
- In position “I”, terminal 30-INT and 30/1-15 are energized. In this mode, only side lights, windshield wiper, and heater fan can operate;
- In position “II”, terminal 30-50 is added to those already connected. The ignition system, starter, instrument panel, side lights and turns are activated;
- In position “III” only the side lights, horn and windshield wipers remain active. Power is supplied to terminals 30-INT and 30/1.
Additional (non-standard) devices and equipment
Some modifications of the VAZ 2106 car are equipped with:
- rear window heating system;
- windshield washer equipped with an electric drive;
- relay for low beam headlights.
Replacing the wiring of a VAZ 2106 on an electric washer
Accordingly, the wiring on the VAZ 2106 is different for such modifications. In particular, power is supplied to these devices via a separate wire through the ignition switch. It can only be activated in key positions “I” and “II”.
Protected circuits and fuse numbers in the VAZ 2106
The headlight, heater fan, interior light and similar faults do not work, it is worth starting to repair them by checking the reliability of the contact on the fuse protecting this circuit.
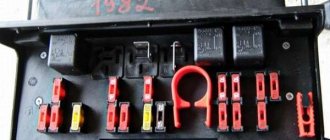
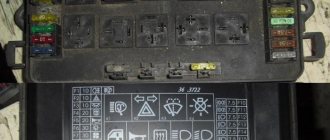
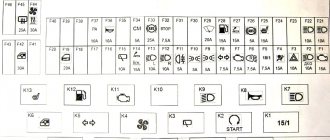
So, let's start, the photo below shows a standard VAZ 2106 fuse box, numbering, as you can see, starts on the left side, from the driver's door. In VAZ 2106 older years of production, as well as in VAZ 2103, VAZ 2101, there is no additional fuse block. It is available in new models that have additional consumers - heated glass, electric cooling fan, etc.
Fuse box for VAZ 2106 car
- Fuse No. 1 protects the horn, clock, brake lights, cigarette lighter, and front door open alarm circuits. Fuse rating is 16A.
- Fuse No. 2 protects the circuits of the windshield washer, windshield wipers, and heater motor. Fuse rating is 8A.
- Fuse No. 3 left high beam headlights, as well as the high beam indicator lamp in the speedometer (blue). Fuse rating is 8A.
- Fuse No. 4 protects the right high beam headlights. Fuse rating is 8A.
- Fuse No. 5 protects the left low beam headlights from short circuits. Nominal 8A.
- Fuse No. 6 protects the right low beam headlight circuit. Nominal 8A.
- No. 7 protects the trunk light circuit, instruments, license plate, cigarette lighter, left front side light and right rear side light. Nominal 8A.
- Fuse #8 protects the parking light circuit, license plate light, engine compartment light, right front side light, and left rear side light. Nominal 8A.
- Fuse No. 9 protects the tachometer circuit, the winding of the rear window heating relay, the reverse lamp, the glove compartment light, the battery charge warning lamp, the parking brake, the brake fluid level, the carburetor choke control, the oil pressure gauges, the coolant temperature and the fuel level, turn. Nominal 8A.
- Fuse No. 10 protects the battery charging circuit, namely the generator excitation circuit and the relay regulator. Nominal 8A.
- Fuses No. 11, 12,13 in the basic configuration are in reserve and can be used for additional equipment. The denomination is selected depending on the consumer.
- Fuse No. 14 protects the rear window heated element circuit, if installed. Nominal 16A.
- The protection circuit of fuse No. 15 contains an electric engine cooling fan, if one is installed in the vehicle. Nominal 16A
- Fuse No. 16 protects the turn signal and hazard warning light circuits. Nominal 8A.
We hope that problems with fuses in the VAZ 2106 will no longer bother you. You can write down the diagrams and numbers or print them on your printer, because sooner or later this can always come in handy. We wish you good luck and fewer problems with fuses in your car.
A thorough inspection of the block and its diagram
On a VAZ 2106, replacing the fuse box, which is also called the black box, is carried out after a thorough check of it and the relay. As you know, any mounting block consists of a circuit that the driver can find on the inside of the cover. For example, the circuit diagram of the mounting block on a VAZ 2106 car consists of fuses running from left to right:
VAZ 2106 fuse box diagram
- number 1 – responsible for lamps, sound signals, cigarette lighter and front door alarm lights, as well as a clock (the power of this type of fuse is 16 A);
- numbers 2 with a power of 8 A - is responsible for the operation of the windshield wiper and relay, as well as the operation of the windshield electric motor and heater;
- 3 – responsible for the left high beam headlights and the indicator light;
- fuse 4 is responsible for the right high beam headlights;
- fuse 5 – monitors the operation of the left low beam headlights;
- fuse 6 – responsible for the operation of the right low-beam headlights;
- numbers 7 – controls the left front side light and the right rear side light, as well as the license plate lamp;
- numbers 8 are responsible for the right front parking light and the left rear, as well as the engine compartment lamp and warning lamp;
- numbers 9 - responsible for the oil pressure indicator, coolant temperature, brake light, turn signals, battery warning light, tachometer, reverse lamp, trunk lamp;
- numbers 10 – responsible for the voltage regulator and the generator excitation winding;
- fuses 11-13 – which are backup;
- fuse 14 – regulates the rear window heating element;
- numbers 15 are responsible for the electric motor of the engine cooling system fan;
- numbers 16 are responsible for the emergency signal indicators.
Which fuses in the six blow most often?
If you happen to be the owner of a VAZ-2106, then you probably know that most often those fuses that “pull” energy-intensive devices are susceptible to failure. These are, for example, fusible links that protect the cigarette lighter, rear window defroster, and electric motors.
The cigarette lighter is a leader in this sense, since recently it has been used not only to light a cigarette, but also to connect various additional electricity consumers to the vehicle’s on-board network. These include electronic devices (recorders, navigators, radar detectors), compressors, and vacuum cleaners. It is because of them that the cigarette lighter fuse suffers, because in most cases none of us pays attention to the current consumed by the devices we use. If it exceeds the rating of the protective device, naturally it will withstand the load and melt, saving other elements of the circuit.
Some tips on VAZ 2106 fuses
Cleanliness of landing nests. I think everything is clear here, the cleaner the fuse socket, the less resistance in this circuit and, as a result, less heating. If the contacts are dirty, the fuse heats up and melts, a short-term loss of contact is possible, which is quite dangerous, for example in the case of light. Compliance of fuse ratings with the manufacturer’s recommendations
It is also quite important not only to keep the contact groups clean, but also to use fuses of the ratings recommended by the manufacturer. Ignoring these requirements threatens the failure of electrical equipment in the network or, even worse, a fire.
Under no circumstances should you replace a fuse in a VAZ 2106 or another car with a so-called “bug”, coin, screw or other thing. I think you yourself understand that a fire is not far away here. The fuse has tripped. This is a fairly common situation and there is no need for hasty decisions; first you need to find out which circuit this fuse protects (below is a list of protected circuits and fuse numbers for the VAZ 2106, I hope there will be one for other models soon). Then try to remember, understand what could have caused the short circuit; it is highly not recommended to insert a new fuse in place of the blown fuse if the cause of the blown fuse has not been eliminated. If you find the cause, then eliminate it, insulate the wires, insert a new fuse. Fuses are blowing. If the conductive section melts, then this is understandable, most likely a short circuit. But if a plastic insert melts, then this is a signal of poor contact in the socket or an overload of the circuit protected by this fusible insert. Additional consumers have their own fuse! You should not connect many third-party consumers (radio, heating, etc.) to one fuse!
Installation of blade fuses in VAZ 2101, 2103, 2106
The previous post was about the disadvantages of standard fuse blocks, in this same post we’ll talk about installing blade fuses on the VAZ 2101, 2106. The difference in installation on the “kopek” and on the “six” is not too big, the whole difference is in the presence of an additional fuse block in the sixth models that contain backup fuses and fuses for the turn signal and hazard warning circuits, as well as the cooling fan circuit.
Knife fuses have a number of useful properties that are actually better than standard ones, but all the advantages come down to one thing - better contact of the fuse with the socket in which it is installed. That's all. But thanks to this, there are no fuse melting, heating and other joys.
What is needed for installation:
- Key to "8"
- A screwdriver if it is difficult to remove the terminals from the standard unit
- Heat shrink is like a more “touchable” version of electrical tape, although you can also use electrical tape, but it won’t look very good
- Tester, may be needed
- Female connectors are 6.6 mm, for VAZ 2106 you will need 12 pcs, for VAZ 2101, 2103 - 8 pcs
- Actually, the blade fuse block itself is suitable for a Volga 3110 with 13 fuses
- Wires for making jumpers
- Straight arms, attentiveness
To begin the installation, I recommend starting by disconnecting the battery mass; this is a prerequisite for starting work and guarantees the safety of the work for you and your car. Next, using the “8” key, unscrew the fasteners of the fuse box, making sure that the wires do not come loose from the terminals.
We unscrew it here (VAZ 2106), in the VAZ 2101 there is no lower block, but everything is the same
After you have unscrewed the block, you need to move it down as far as the wires allow. No need to pull all the wires in a row! There is a possibility of mixing something up, and subsequent problems cannot be avoided. The entire installation is carried out according to the following diagram, which shows the markings for connecting the wires.
Wiring diagram for blade fuses in VAZ 2106
This diagram clearly shows in which places to install jumpers; they allow you to reduce the number of wires and simplify the electrical circuit.
Important!!! Jumpers need to be installed on those wires that carry voltage from the engine compartment, that is, from the voltage source wire, installed before the fuse. If you connect a jumper after the fuse, it turns out that current flows through one fuse, which powers two consumers
Next you need to start making the jumpers, their length is about 10cm, it can vary, it all depends on how you want to make them.
They look like this:
Jumpers
Next, you need to connect the contacts of such fuse numbers with these jumpers, for the VAZ 2106 the connection order is:
Thanks for subscribing!
3-4, 5-6, 7-8, 9-10, 11-12, 12-13
For VAZ 2103, VAZ 2101 and all others without an additional fuse box:
Let me remind you that it is necessary to connect the incoming wires on which there is circuit voltage; the current from them goes through the fuse to the on-board network.
Well, then it’s a matter of technique, we remove one wire at a time (starting from 1 fuse) from the old block and rearrange it to the new one, and so on until the last block. After installing all the wires, you need to check the correct connection; this is quite easy to do. For example, turn on the low beam and pull out fuse No. 5, accordingly the left headlight should go out, put the fuse in place, pull out fuse No. 6, the right headlight should go out. If this happens, then these circuits are connected correctly. By analogy, it is necessary to test the remaining circuits.
If, when you remove one fuse, two headlights still light up (for example, or the equipment is working), then the jumper is not installed correctly, check the connection diagram.
Euro fuse block in VAZ-2106 – diagram, installation process
Dear friends. Today we are tuning the VAZ-2106 a little, namely we are installing a European fuse block instead of the standard one. I think that no one needs to be convinced of the usefulness of this procedure - everyone who is tired of the constant lack of contacts in the standard unit, then one fuse will fall off or another one will come out, in general, it’s essentially a cheap modification, but it’s worth it! So, what we need is the block itself, which is positioned on the market as a block from the Volga or specifically as a Euroblock for the VA-2106. Which seller likes it better? Looks like that:
We will also have to rivet these jumpers to connect the block according to the diagram:
This is how we use them later:
But to understand what we are doing, here are two completely working diagrams for connecting the European fuse block to the VAZ-2106:
We carefully “smoke” these circuits and, having connected the jumpers in the right places, we go into the car to remove the old block, it’s simple, you need to unscrew four nuts (there are essentially two blocks):
Mounting block with blade fuses for VAZ-2101, VAZ-2106, VAZ-1111
Replacement of old design mounting blocks with more modern ones with blade fuses on VAZ-2101, VAZ-2106, VAZ-1111
Indeed, owners of cars with old mounting blocks often complained about failures of electrical equipment, especially of powerful consumers.
At the point of unreliable contact of the fuse, so much heat can be generated that it can melt the housing of the mounting block - at best, an electrical failure, at worst, a fire.
Blade fuses with wide legs, which have a larger contact area, reduce this danger to a minimum. In addition, they operate much more accurately during overloads. Finally, unlike only two ratings (8 and 16 A) of the old fuses, blade fuses can be purchased in a variety of sizes - up to 30 A.
The mounting block from the GAZ-3110 is perfectly suitable for replacing the block on the VAZ-2106: the same seats. In addition, 13 fuse slots eliminate the need for an additional mounting block. By the way, on the Oka VAZ-1111 there is a mounting block from the VAZ-2106. Therefore, its owner can replace the block with a “Volgov” one in the same way. Except, of course, electrical connections. Since the new mounting block is more compact, all removed standard connectors must be insulated. It is convenient to use heat-shrinkable cambric for this purpose.
Using an “8” wrench, unscrew the two nuts securing the main and additional mounting blocks and...
...remove the blocks from the studs. When disconnecting connectors from the unit, write down the colors of the wires that go to them so as not to be confused during reassembly.
Naturally, the standard fuses of the Volga need to be removed and new ones with different ratings installed, taking into account the more accurate operation of blade fuses against overloads. So. for example, an inrush current when the cooling system fan is turned on. reaching 14 A, the old 8 A fuse could handle it. Now it is better to install a knife rated at 20 A in this circuit.
The circuit that turns on the cigarette lighter, sound signals, and plug socket is protected with a 20 A fuse. The high beam circuits are 15 A. The same should be used to protect the rear window heating circuit. We install 10 A fuses in the remaining circuits, and 5 A fuses are sufficient for the side lights.
To main
Services Prices Contacts Useful information
Scheme
On the VAZ 2106, fuses are installed in two blocks: main and additional. They are located next to each other under the instrument panel at the driver’s feet.
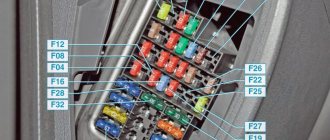
The fuse diagram shows the location of the two blocks. The top one is the main one, the bottom one is the additional one. Each fuse has its own designation from F1 to F16. For safety, these blocks are covered with plastic covers. On them you can find a diagram with the designation of each fuse.
We bring to your attention a table with which you can determine what each element is responsible for (click to enlarge!)