How to change the hood hinge on a Prior?
To carry out this procedure you will need:
- screwdrivers - figured and flat;
- marker;
- a piece of fabric;
- set of socket wrenches.
This is a sufficient set for the procedure. Open the engine compartment cover (hood) and secure it well with the stop. Unscrew and remove the windshield wipers. Pull out the decorative plugs holding the air intake panel of the Priora heater. You will have access to the base of both loops. Carefully place the fabric on the glass, under the lower edge of the Priora hood. Now unscrew the nuts securing the hinge to the lid itself. The second person must fix it so that it does not fall. When all four nuts are unscrewed, remove and carefully set the hood aside to avoid damage. Now you can remove the hinges themselves for replacement or repair.
Attention! Under them there are special gaskets that also need to be changed.
Be sure to use a marker to mark the points where the old hinges stood and dismantle them. Under them there are rubber gaskets that also need to be replaced. Remove any dirt that has accumulated under the base of the loop and wipe the area. The main thing is not to erase the marks. Install according to the marks and carefully fasten the new hinges. Lubricate moving parts well with grease. Now, together with your partner, carefully put the Priora’s hood back in place.
Important! Do not immediately tighten the nuts on it. A small gap may occur, and it will have to be corrected by adjustment.
When the cover is in place, without large gaps and evenly, tighten all the nuts well. Reinstall the air intake panel and wipers. Close the decorative caps.
Sometimes, if the wear on the Priora hood hinge is not too great, some craftsmen make do with improvised means. Without replacing the unit, various shock-absorbing materials made of rubber and plastic are installed under the mounting arms.
Locksmiths call this “fooling” the Priora. Also an interesting option. Sometimes it's worth considering it too. The video shows a way to “deceive” the Priora’s hood hinges for a while:
- Malfunction of the Priora crankshaft sensor (DC)
- How to adjust, remove, clean windshield washer nozzles
- Bleeding the power steering
- Airbag restoration: their repair and replacement
Lada Priora Sedan SNOW WHITE › Logbook › hood stop technomaster
Today I started installing nishtyaks from Tolyatti, I started with the hood stop. I admired this stick for the last time
I’ll describe in detail how I did it - first you need to remove 19 of these pistons
old stop retainer
I tried to remove the casing but the lock didn’t work, I didn’t tear it, I unscrewed the two nuts by 10
for some reason I decided to glue it with a vibrator, washed the hood, degreased it and stuck on a little more than a sheet
Through the hole in which there used to be a hood latch, we insert a bracket, after that we put the trim on and secured it to several pistons near the bracket. The second end of the bracket should come out through the hole in the hood a little to the right into which the piston was inserted, we secure with two nuts and washers the upper mount of the stop on the hood, the lower one I didn’t buy the mount, the brace was already on the brace, I screwed a bolt with a round head from the stop into the hole of the brace, the stop itself was securely packaged and instructions were included to install the hood stop on the fasteners, it’s best to use two people, since you first need to remove the standard stop, and then click the gas gas into the mount stop. now opening the hood is a pleasure
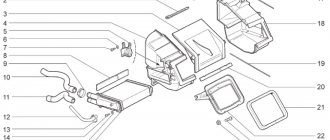
Hood: removal, installation and position adjustment
The hood can be removed as an assembly with the elements installed on it. To do this, simply disconnect the hose from the windshield washer pump. In this way, the hood is removed to dismantle the engine using a hoist or winch.
But if necessary (for example, to paint the hood or replace it), the work can be done with preliminary disassembly: removing the hood trim, windshield washer nozzles, and decorative trim.
We carry out the work with an assistant.
1. We prepare the car for work.
2. Remove the casing from the left hinge of the hood.
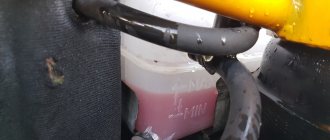
3. Disconnect the hose from the windshield washer pump.
To remove the disassembled hood, use a 10 mm socket wrench to unscrew the two nuts securing the safety hook and remove the hook.
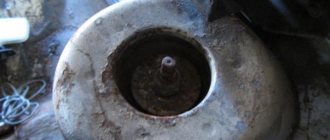
We turn out the two hood buffers.
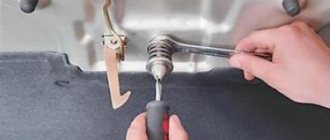
Using a screwdriver or a puller, we remove the hood trim holders.
Remove the hood trim.
Disconnect the hose from the windshield washer nozzle.
Using a screwdriver, press the two latches
remove the nozzle from the hood hole.
Similarly, remove the second injector and remove the hose from the hood.
We perform the following operations together with an assistant.
4. Holding the hood on both sides, use a 13 mm socket wrench to unscrew the two nuts securing the hood on each hinge and remove it.
Assembly and installation:
We assemble and install the hood in the reverse order.
We attach the upholstery to the hood with 19 holders.
Damaged holders must be replaced. If the hood closes poorly (you have to press hard) or moves to the side when closing, you need to adjust the position of the hood latch. The holes for the hood lock mounting bolts are made large, which allows you to slightly change the position of the lock.
practical guide
To complete the work you will need:
- nylon cord at least 5 m long;
- ballpoint pen body;
- a piece of thin steel wire 10 cm long or a paper clip.
To replace the hood lock drive rod (together with the shell), it is necessary to perform labor-intensive work - remove the instrument panel. Here we describe a method that allows you to replace the hood lock rod with minimal disassembly of the car. On vehicles equipped with an air conditioner, the work is made difficult by the condenser installed in front of the radiator of the cooling system. It is necessary to move the condenser along with the radiator into the engine compartment. This can easily damage the air conditioning system pipes. It is recommended to carry out such work at a service station with the removal of the capacitor elements.
If the rod moves easily in the sheath, but you have to change it because it has broken off, you can only replace the wire by pushing it into the old sheath.
We carry out the work with an assistant.
1. Remove the front bumper.
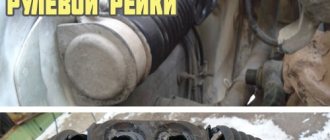
2. Using an 8 mm open-end wrench, unscrew the nut of the rod clamp.
The nut is located above the clamp loop, so it is difficult to unscrew it (the photo shows the view from below).
3. We remove the rod through the slot from the bracket stop and disconnect the front end of the rod from the hood lock.
4. Remove the clamp first from the threaded rod and then from the rod shell.
5. Pull the rod shell into the resulting opening.
6. Fold the nylon cord in half and put the resulting cord loop on the bent end of the cable. We tuck the end of the cable into the sheath.
Access to the hood release lever is made difficult by the instrument panel, so the work will have to be done by touch. In the photo the instrument panel has been removed.
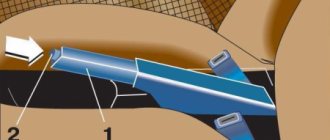
7. Under the instrument panel, remove the tip of the rod shell 1 from the bracket and pass the rod through the slot in the bracket. By similarly removing the rod through the slot of the lever, we remove the plastic tip of the rod 2 from the hole in the lever.
8. Pull the rod sheath into the car interior (until the cord appears).
9. Disconnect the cord from the rod and remove the rod assembly with the shell.
10. Using a piece of steel wire, bending it in half, we pull the cord loop through the body of the ballpoint pen (the tapering part of the pen body should be directed in the direction opposite to the cord loop).
11. Using pliers, bend the end of a new rod 3-4 cm long. We put a cord loop on the bent end of the rod. To securely fix the cord on the rod, we wrap the rod with insulating tape.
12. Slide part of the handle body tightly onto the shell of the new rod. Apply a little soap solution to the handle body.
13. Insert the plastic end of the new cable into the hood opening handle (see above).
14. From outside the car, use the cord to smoothly pull the hood lock drive rod, while at the same time directing the handle body from the passenger compartment into the hole in the rubber seal of the engine compartment partition and pull the cable out.
15. We fix the lock opening handle on the axis, remove the cord and attach the rod to the hood lock (see above).
When attaching the drive rod to the hood lock lever for fitting, first put the lock in place. Make sure that the rod is routed correctly: there is no twisting or creasing of the shell. Using pliers, fully extend the rod and place a mark where the rod bends. Bend the rod with pliers.
16. Further assembly is carried out in the reverse order of removal.
Add a comment Cancel reply
You must be logged in to post a comment.
Replacing the hood on a Prior
Welcome! The hood is installed in the front part of the car, but there are exceptions, for example, if you take the Cossacks, then on these cars the hood is located in the rear part, this part covers the engine compartment and, accordingly, the car engine itself, in cars where the hood is installed in the front part, it It also gives aerodynamic characteristics, thanks to which the car becomes more stable at high speed and faster.
Note! You need to undertake replacing the hood with a new one, provided that you have: A second assistant, wrenches, screwdrivers and side cutters, instead of which, by the way, you can use a knife (This is if you don’t have side cutters)!
When should you replace the hood? In general, rarely does anyone change it, only if it becomes deformed, and in general it is only removed to gain full access to the car engine, for example, in some cases it also has to be removed when replacing the windshield, since it is very in the way and perhaps everything is In this case, we have listed the main reasons why the hood of a car is affected; in other cases, it can be left alone.
practical guide
To complete the work you will need:
- nylon cord at least 5 m long;
- ballpoint pen body;
- a piece of thin steel wire 10 cm long or a paper clip.
To replace the hood lock drive rod (together with the shell), it is necessary to perform labor-intensive work - remove the instrument panel. Here we describe a method that allows you to replace the hood lock rod with minimal disassembly of the car. On vehicles equipped with an air conditioner, the work is made difficult by the condenser installed in front of the radiator of the cooling system. It is necessary to move the condenser along with the radiator into the engine compartment. This can easily damage the air conditioning system pipes. It is recommended to carry out such work at a service station with the removal of the capacitor elements.
If the rod moves easily in the sheath, but you have to change it because it has broken off, you can only replace the wire by pushing it into the old sheath.
We carry out the work with an assistant.
1. Remove the front bumper.
2. Using an 8 mm open-end wrench, unscrew the nut of the rod clamp.
The nut is located above the clamp loop, so it is difficult to unscrew it (the photo shows the view from below).
3. We remove the rod through the slot from the bracket stop and disconnect the front end of the rod from the hood lock.
4. Remove the clamp first from the threaded rod and then from the rod shell.
5. Pull the rod shell into the resulting opening.
6. Fold the nylon cord in half and put the resulting cord loop on the bent end of the cable. We tuck the end of the cable into the sheath.
Access to the hood release lever is made difficult by the instrument panel, so the work will have to be done by touch. In the photo the instrument panel has been removed.
7. Under the instrument panel, remove the tip of the rod shell 1 from the bracket and pass the rod through the slot in the bracket. By similarly removing the rod through the slot of the lever, we remove the plastic tip of the rod 2 from the hole in the lever.
8. Pull the rod sheath into the car interior (until the cord appears).
9. Disconnect the cord from the rod and remove the rod assembly with the shell.
10. Using a piece of steel wire, bending it in half, we pull the cord loop through the body of the ballpoint pen (the tapering part of the pen body should be directed in the direction opposite to the cord loop).
11. Using pliers, bend the end of a new rod 3-4 cm long. We put a cord loop on the bent end of the rod. To securely fix the cord on the rod, we wrap the rod with insulating tape.
12. Slide part of the handle body tightly onto the shell of the new rod. Apply a little soap solution to the handle body.
13. Insert the plastic end of the new cable into the hood opening handle (see above).
14. From outside the car, use the cord to smoothly pull the hood lock drive rod, while at the same time directing the handle body from the passenger compartment into the hole in the rubber seal of the engine compartment partition and pull the cable out.
15. We fix the lock opening handle on the axis, remove the cord and attach the rod to the hood lock (see above).