Tools for disassembling the interior
- Basic set for the motorist. Sometimes such kits can be purchased as additional interior equipment for an additional payment when purchasing a car. This kit includes everything you need to disassemble the interior yourself.
- Vehicle Operation Manual. The diagrams presented in the manual will greatly simplify the disassembly process, and from there you can find out which tools to use for certain parts of the machine.
- A device that allows you to remove plastic clips. Many interiors are attached to each other with plastic connecting elements. Of course, you can use a regular screwdriver to dismantle them, but it can damage or deform the plastic parts.
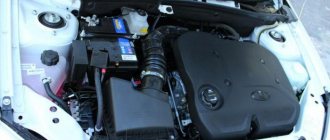
Sound insulation of the engine compartment from the engine side and the Grant hood
Soundproofing the floor of Lada Granta
Many people do Shumka, but not many think about whether they are doing it correctly, and whether there will be a result? Is this result worth the money? Previously, like everyone else, I glued it according to this scheme - STP vibra + splen (4-8mm). There is little result from this. I decided to try it the way they do it at the factory, namely:
Vibration - when I disassembled the trunk, I saw a lot of standard vibration, and it did not fall off like on old basins, but was well glued and did not crack. I added vibration to the rear fenders and rear arches, closed some of the holes and that was it. Vibra 3.5 mm thick - it took 4 sheets.
As for the noise, there was none at all, there was nothing under the rear sofas and on the trunk floor, and there was nothing on the arches either. As a noise-absorbing material, I used non-woven fabric, also known as technical felt, thermal felt, batting, etc. there are many different names, but the essence is the same - the same garbage as a standard soundproofing carpet that lies on the floor and dampens noise quite well. Thickness -6mm, laid 2 layers, in some places even 3 layers. I glued it with regular glue.
The result is not yet very noticeable due to the lack of noise on all other elements - the floor, the doors. I’ll do them and describe whether there will be a difference. But I can say one thing for sure - you shouldn’t glue the splenium, it definitely doesn’t reduce the noise.
I’ll say right away that I didn’t waste my energy and money and didn’t do it as they usually do - instead of the traditional Vibra+splen I did this:
1 layer. — vibration 4mm — covered the opening areas (voiced)
2nd layer - synthetic felt (non-woven, does not rot, but gets wet) - 2 layers of 6mm each.
The 3rd layer - 1.5mm vibration - covered almost 100% of the floor of the front passengers. I laid it on top of the felt - it is needed as a screen to reflect sound + protects the felt from water getting in from the rugs.
Layer 4 - standard carpet - which was very wet during 1 winter, got very wet, I dried it and put it back.
I also covered the door cards with felt...
Everything returned to normal, because... the felt can be compressed if necessary.
Result. — I’ll say right away that this sandwich is much better than Vibra + Splen. but I didn’t receive the Mercedes.
Lay the third layer on the floor
I decided to add another layer to the floor - I wanted to make it even quieter. I chose a 2mm noise block. It took 18 sheets, but this was not enough under the back seat, it was left a little unfinished.
In general, let's look at the photo. I'm happy with the work, but I expected more.
I was doing heated seats, and since I took them off, I decided to add a little noise. Used felt with felt on top. Thickness is approximately 6-7 mm. This material is sold on auto markets, such as standard carpet. I put it only under the front seats and brought it under the panel as much as possible, there was some result.
standard carpet... it's not bad, by the way, it's very thick.
I cut it out of this material... and put it on top... on top because I wanted to create a layer like a noise block above the standard Shumka.
on the driver's side... really it was necessary to cut off the fender liner... it makes it a little difficult to press the clutch... but I know over time it will get better and it will be fine
Soundproofing the ceiling of Lada Granta
1st layer - vibroplast glued not 100% but approximately 80%, this was enough for the ceiling to stop rattling and become dull.
2nd layer - synthetic felt (8mm) - I glued it directly to the ceiling trim, because... I couldn’t take it out of the car, and it wasn’t easy to glue it to the roof - it was constantly getting in the way. I think it doesn’t make much difference whether you glue the sound absorber to the roof or to the sheathing, I left gaps between the pieces. There are stiffening ribs near the roof, otherwise it will not fall into place.
Soundproofing the hood of Lada Granta
I concluded that a hood shvi is needed - the arguments are as follows:
1. At high speeds, as I understand, high-frequency noise from the internal combustion engine penetrates through the hood, then through the windshield into the cabin.
2. It also vibrates from the oncoming air flow and this is all noticeable in the cabin.
The process is not complicated
The first layer is 3mm vibration
The second layer is the material - Acoustic - as I understand it, this is almost the same as Biplast from STP - the same foam rubber with a relief - made specifically for noise absorption - I bought 1m2 - 300 rubles.
Results - I rarely spin the engine above 3000 rpm - so I didn’t notice any difference. More noise comes from the engine shield at such speeds. I think we need to install more hood hinges so that the noise from the engine does not get into the area of the stove... maybe this will give some result.
Reducing engine noise in Lada Granta
I made a small picture in paint for clarity. The idea is to fill the entire space inside the panel with a sound absorber.
The material chosen was Acoustic. According to the manufacturer, it is a noise absorber, in particular it absorbs high and medium frequency noise. Externally - acoustic foam rubber, with a relief like Biplast - thickness 20mm
costs 350r m2. spent 2 meters.
The effect - believe it or not, but it exists. Everything is as promised - it is the high-frequency noise that has decreased (audibly) - let's say, the effect is comparable to pasting a motor shield with splen. That is, there is an effect, but it’s not really WOW. But it’s cheap, and the installation is simple - I didn’t just disassemble the panel and that’s it - I didn’t have to remove anything.
Actually, the layers are: green - vibration yellow felt, red - noise block brown - standard Shumka and most importantly - gray. This is my sound absorber.
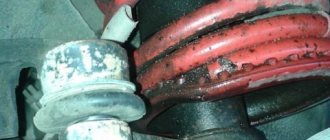
Sound insulation of wheel arches of Lada Granta
Actually, there is a lot of information on the topic... everyone glues vibration to the fender liners, and I did the same, but there are no photos, because... There are so many of them on the net.
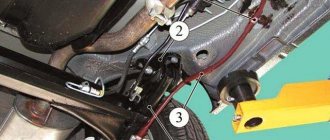
But this is what distinguished me. I saw on a Toyota Camry that the gap between the front fender and the spar was closed with foam... I think maybe for noise, so I did the same for myself, only I used vibration instead of foam...
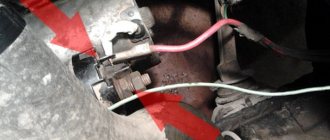
I also covered the place where the wiring harness enters the interior, because... there is a thin rubber band, and underneath it there is already a interior... I think maybe a lot of high-frequency noise comes from there.
This is actually the gap I’m talking about, I thought that high-frequency noise passes through it, and then through the door seal enters the cabin.
this wiring entry into the cabin... some kind of plush thin seal.
Well, the finished look... the place where the wiring enters the interior is covered with vibration + noise block (it won’t fall off) the fender liner is also covered with vibration.
https://www.drive2.ru/l/5773040/, https://www.drive2.ru/l/6012653/, https://www.drive2.ru/l/7356923/, https://www .drive2.ru/l/8608273/, https://www.drive2.ru/l/6578765/, https://www.drive2.ru/l/7310914/, https://www.drive2.ru/ l/7556536/, https://www.drive2.ru/l/7749174/
Illuminated handles of Lada Granta
Additional interior lighting for rear
Leave your comment
Login to leave a comment
Leave a comment on behalf of the guest
- No comments found
Pinned
Liked
Lada Granta
news – Lada Granta
- heated seats
Contents of the article: 1. Installation of standard heated seats from the VAZ 2115.
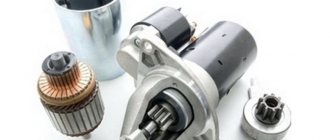
- starter
Contents of the article: Removing the Lada Granta starter (step-by-step instructions) Ch.
- sound signal
- HELLA
- Radiant Elegance
- S308/S309
Contents of the article: Installation of sound signals C308/C309 in Grantu Zvuko.
- LEDs
- lampshade
Contents of the article: Removal and installation of the interior lighting lamp Granta P.
- DRL
Contents of the article: 1. Making DRLs with your own hands for the Lada Granta 2.
- subwoofer
- stealth
- Kixc ICQ
Contents of the article: Installation of the Ural subwoofer under the MMC2190 in the Lada Granta P.
- suspension
Contents of the article: Tuning from “Lada-sport” for Lada Granta Tuning suspension.
- release bearing
Contents of the article: Release bearing Gearbox 2181, Clutch release clutch.
- engine repair
Elimination of unpleasant squeaking in the timing belt area when warming up a cold engine.
- steering column
Contents of the article: Steering mechanism structure of the Lada Granta Removal and removal.
Materials: https://spike.su/index.php/%D0%A8%D1%83%D0%BC%D0%BE%D0%B8%D0%B7%D0%BE%D0%BB%D1%8F %D1%86%D0%B8%D1%8F-%D0%9B%D0%B0%D0%B4%D1%8B-%D0%93%D1%80%D0%B0%D0%BD%D1%82 %D0%B0.html
Tools for surface preparation and treatment
After the interior has been disassembled, it is important to put the exposed surfaces in order by cleaning and degreasing them properly.
To do this you will need the following.
- Brush. Regardless of the age of the vehicle, a large amount of debris and dust remains in the side panels and on the floor. For sound insulation to work correctly, you should get rid of debris using a vacuum cleaner, brush or rags.
- Degreaser. To ensure that the soundproofing materials adhere tightly to the surface of the interior, the surfaces should be degreased. It is important that the product is not too toxic, since you will have to work with it in a limited space.
- Emery and spatula. To level the working surfaces, you need to remove the remnants of old insulation from them, clean off any stuck pieces using sandpaper and a spatula. At the same time, try not to damage the protective layer of paint, as this will lead to subsequent corrosion of the body. Installation and measuring tools
- Construction hairdryer. Most vibration-absorbing materials are installed on surfaces exposed to high temperatures. A hair dryer can also be used to dry the surface when installing the material. The recommended specifications for this tool are 2000 Watts (power) and 350°C (operating temperature).
- Roller for rolling. It will make it possible to combine the insulating material with the surface as tightly as possible, especially at the bends.
- Tape measure, ruler and marker. Used for measurements and marking.
- Scissors. It is important that the blades of the scissors are sharp, which will ensure the correct contour of the cut parts
- A stationery knife as an auxiliary tool for scissors.
You will also need work gloves and trash bags.
Soundproofing engine shield Grants
| At first, there are no creaks in the LADA Granta, but after a while the crickets begin to wake up and rattles appear inside the cabin. Sound insulation of the front panel will help to kill all the crickets in the dashboard and reduce engine noise . |
Car soundproofing technology is the same for all brands and types of cars, however, specific cases have their own characteristics.
In the case of the Lada Granta, the whole process begins with dismantling the panel (dashboard). It's worth noting right away. that this process requires time and patience. Make sure the room is heated with good lighting. It is better to remove and remove the Granta dashboard with an assistant; take your time so as not to scratch or break anything. The torpedo space of Grants differs significantly from VAZ cars of previous years. Under the panel, amplifiers, heater blocks and air ducts immediately catch your eye. This whole structure makes access to the engine panel much more difficult. Making our way through all the obstacles, we must thoroughly clean and degrease the work surface; White Spirit is suitable for this. By the way, the surface of the front panel for noise insulation treatment is much smaller than that of the same “ten”.
Soundproofing installation It starts with vibration-isolating material. We cut out soundproofing sheets of a suitable size (the larger the pieces, the better), and heat the bitumen side with a technical hair dryer. Then we glue the “vibra” onto the cleaned metal of the body, and roll out the sheet with a hard (plastic/iron) roller. We apply the next sheet of vibration material with an overlap. Glue second layer of sound insulation or make do with a regular one, it's up to you. In general, it is customary to use an accent or BiPlast (sound-absorbing material) or SPLEN (more heat-insulating material) as the second layer of sound insulation. They all have a self-adhesive backing, so there will be less fuss with the second layer. If you decide to use a second layer, then cover 100% of the surface to get the maximum effect. We lay standard Granta under-torpedo sound insulation on top.
The plastic in the Granta's interior is not of good quality; it is very hard, and therefore creaks, rattles and rattles. Especially in those places where the fastenings are tightened with screws. We use an anti-creak (for example, modelin) to get rid of panel squeaks . We glue all rubbing and contacting places (parts of the dashboard, sub-panel wiring, air ducts, etc.). If desired, you can make the dashboard a little heavier by gluing a piece of vibration material onto it.
The final stage — assembly. It will not be easy to install the panel in place; seek the help of an assistant. As a result, it is very difficult to soundproof the front panel with your own hands alone. If you do the work with the help of a friend, you can actually get it done in 12-15 hours (or better yet, count on several days). Not a lot of material is required: 3 sheets of vibration material, and the same amount of sound insulator/absorber.
an effect from sound insulation behind the dashboard :
- The noise of the engine is reduced; after soundproofing it is noticeable not at 2, but at 4 thousand revolutions.
- The panel no longer creaks or rattles.
Remember that the best sound insulation is when a set of works has been carried out aimed not only at insulating from external noise (noise from wheels, engine, wind, etc.), but also eliminating creaks and crickets inside the car.
Photo source:
- sabit logbook
- Yarrick logbook
Keywords:
- panel grants
- soundproofing grants
Causes of noise in a car
First you need to determine the nature of the noise in the cabin, it could be:
- airborne - transmitted through the air in the audible frequency range;
- structural - propagate in a solid environment (engine vibration, body panels).
Airborne noise occurs when the gaps of doors, glass, or the presence of technological openings are not sealed.
Structural - cause vibration of almost all elements of the engine, chassis, exhaust systems, which in turn are transmitted through the body and floor to the car interior.
What's the result?
- If all the work was done correctly, then soundproofing the engine shield can significantly reduce the noise level in the vehicle interior. In medium load modes, noise from the engine and transmission (provided that the units are in full working order) practically does not penetrate into the “capsule” of the interior space.
- At the same time, the level of vibrations from the engine is reduced, the vibrations are transmitted less strongly to the steering wheel, they are less reflected on the steering wheel when driving over bumps, etc. The engine shield itself acquires additional rigidity, and creaks in the dashboard area and along the contour of the windshield disappear.
- The main disadvantage of this operation is rightly considered to be the removal of the instrument panel. In some cases, there is a significant risk of damaging expensive elements of electrical equipment, breaking latches, and ruining the appearance of plastic and other inserts.
- Also, a number of problems may arise during or after reassembly. It is not uncommon that after the process of soundproofing the engine shield, malfunctions or failures in the operation of the climate control, audio system, on-board computer and other devices are observed. The reason is errors during assembly and damage.
The material is a non-flammable fabric that is resistant to oil, fuel and technical fluids. There is also a heat-resistant adhesive layer. In summer, the material can be secured to the hood with pistons (based on the principle of factory sound insulation). In winter, stp heatshield is placed on the engine, performing the function of a car blanket. This additional protection will further isolate engine noise, increasing acoustic comfort.
Insulation of the engine compartment. How and how to properly insulate a car’s engine and hood before winter: materials for insulation. Tips and tricks.
What is a car blanket for an engine: when is it needed and the main features. How to make a car blanket yourself, selection of materials, production. Useful tips.
The engine warms up slowly at idle or while driving: why does this happen? Possible malfunctions of the cooling system, other reasons.
Features of choosing a car blanket for an engine. Materials for making engine insulation: felt or synthetic. Basic properties and parameters, other criteria.
Why does the engine overheat? What should the driver expect and what damage may occur if the engine overheats. What to do if the internal combustion engine overheats.
The engine temperature does not rise, the internal combustion engine temperature needle drops while driving. Why does the temperature drop after turning on the stove? Diagnostics and repair, advice.
Sound insulation of the engine shield on the engine side
Sound insulation of a car engine compartment is the most specific work, which depends on the design of the car, and is not solved only by the choice of materials for vibration insulation and noise absorption. It is important to immediately make a significant reservation if you need a tangible result, and not its beautiful appearance. Unfortunately, many car owners (especially diesel ones) do not understand simple truths - you need to start soundproofing by checking the condition of the engine, then the suspension and body parts, you need to repair the car, which itself makes less noise in good technical condition, without which, Soundproofing the engine partition will not give the desired effect.
Soundproofing materials
They can be roughly divided into three categories:
| Vibration-absorbing | Sound-absorbing | Soundproofing |
| Standard – covering using a fabric base | Accent - material represented by foamed polyethylene | Vibroton. Has a polyethylene base and a bitumen coating |
| Bomb or BiMast. Mastic and bitumen have excellent vibration insulation characteristics | Isoton is a material based on polyurethane and plastic | Barrier. The basis of the material is polyethylene in foam state |
| Vizomat - foil-based coating allows you to absorb more vibration | Bitoplast. Characterized by resistance to contact with water and long service life | |
| Vibroplast. It has an adhesive surface and a polymer base. | Splen is a polyethylene-based material, self-adhesive, simplifying installation work | |
| Madeleine. Fabric base, used for compaction |
To soundproof a roof or trunk, you will need different materials or a combination of them.
Treating the interior with soundproofing materials
Vibration-absorbing materials should be placed on all metal elements of the car. Even if the part does not vibrate at the moment, such a measure will protect the driver in the future.
Sound insulating materials act as an obstacle to the propagated sound; they are good for filling all small structural elements. Sound-absorbing materials are an additional layer applied to vibration insulation.
Algorithm for carrying out noise insulation work
First of all, Granta Liftback doors are soundproofed. This is explained by the fact that the main cause of noise lies precisely in them. Even if this work does not bring results and you have to continue installing the Shumka further, the cabin will become much quieter.
Before gluing, the sound insulation should be heated with a hairdryer, applied to the area to be glued and smoothed with a roller or other method. This will allow the material to take shape, literally merge with the surface being treated, repeating all its curves, which will improve noise absorption.
Conclusion Installing sound insulation yourself is not such a difficult job. Why overpay? Hone your skills on your car, maybe this will become your additional income in the future? There are a lot of people willing!
We isolate the engine compartment and trunk
A mandatory aspect of acoustic tuning of a car interior is soundproofing the engine compartment.
The majority of sounds enter the cabin from a running engine. An elastic sound wave moves inside the car, repeatedly reflecting from the walls. In this case, the sound waves themselves can cause secondary noise. The effect is undesirable and needs to be eliminated.
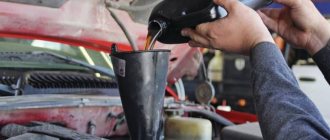
To do this, the floor of the cabin and the wall of the engine compartment are freed from the coating, cleaned and degreased. Before gluing the vibration-proofing layer, it is recommended to treat the surfaces with a primer. This way the gluing will be better, and the metal will have more reliable protection. The only exception is the Lada Granta liftback, where the metal already has a reliable anti-corrosion treatment. We make sure that there are no gaps between the glued sheets. We glue noise-absorbing material onto the vibration isolator layer and return the floor covering. Anti-creak for this treatment is used only in the holes for the control pedals.
Double layer luggage compartment insulation
A similar two-layer “Shumka” should be placed on the partition separating the car interior from the trunk. Often the cause of irritation for passengers and the driver is noise from objects moving in the trunk. Fixing objects inside will only partially save the situation, but a layer of noise insulation will not only protect you from extraneous sounds, but will also make the sound of music from the speakers clearer.