There are hundreds of different parts on a car, the cost of which can range from several hundred to several thousand rubles. Each of them plays a role in the ability to move along the road.
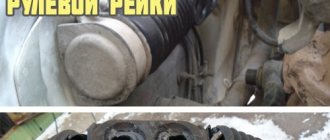
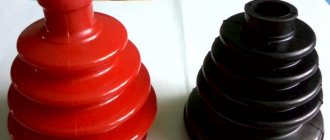
One of the inexpensive parts of VAZ cars is the steering rack boot. The same protective parts are installed on steering rods. Their failure leads to premature wear of the protected hinge.
The boot on the steering rack looks like a corrugated hose. As soon as the driver discovers that it is torn, replacement should begin. This operation is not classified as complex or time-consuming, so almost all car owners can perform it.
Monitoring the condition of these parts is not difficult. It is enough to periodically inspect the steering rack, rods, and other parts with protective covers. As soon as it is discovered that one of them is torn, it should be replaced.
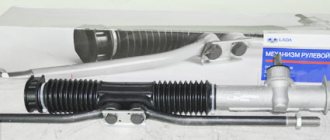
DIY steering rack repair
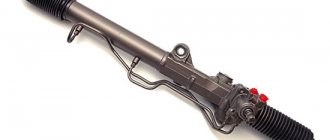
The steering rack transmits rotation from the steering wheel to the wheels. It affects handling, and any malfunction of this unit makes the car less obedient. Steering rack elements are subject to natural wear and tear, and they are also subject to shock loads from driving on rough roads. This leads to the fact that by the mileage of 200–250 thousand km, the steering rack of almost every car requires replacement or repair.
8 signs of a faulty steering rack
- When driving over uneven surfaces and when turning the steering wheel, a knocking sound is heard in the area of the steering rack.
- Handling has deteriorated, the car “throws”, this is especially felt at high speed.
- The free play of the steering wheel (play) has been increased.
- The steering wheel turns harder than usual or jerks.
- The steering wheel does not return to its original position after turning, you have to turn it manually.
- The power steering pump is noisy and the sound gets louder when you turn the steering wheel.
- The oil level in the power steering reservoir drops.
- Oil leaks are visible on or near the rack.
| Almost all the signs from the list above do not directly indicate wear on the steering rack, so before repairing, you need to make sure that this is the problem. |
Suspension elements - ball joints, steering ends, silent blocks, bushings and stabilizer links - can knock. Wear of these parts leads to poor handling and increased play in the steering wheel. The suspension needs to be checked and faulty elements replaced.
Heavy rotation of the steering wheel, non-return or slow return to its original position may be the result of incorrect rack adjustment or wheel alignment problems. If you have recently adjusted the rack, do it again, but this time correctly, check the wheel alignment angles at a service station.
For cars with electric power steering, the cause of a “heavy” steering wheel may be a failure of the electric motor, an open or shorted circuit, oxidation of contacts in the connectors, a malfunction of the system control unit, or blown fuses.
Fluid leakage from the power steering system and the noise of the power steering pump are connected - oil leaks through worn oil seals and seals. Through them, air enters the system, which causes the pump to make noise. Inspect the pump housing, hoses and connections; if you find a leak, fix it.
How to determine the wear of parts inside the rack?
With the car turned off, rock the steering wheel left and right with a small amplitude. If you hear a knock, it needs repair. If you have an assistant, let him grab the steering rod with his hand at this time, this way you can more accurately determine where the play is.
Repair or change?
Replacing a faulty rack with a new one is easier than repairing it. But more expensive. Let's consider the costs of repairing the rack of a 2009 Ford Focus II. A new original rack costs 45,000 rubles. They offer to buy substitutes at a price of 20,000 rubles, but their service life, according to reviews from car owners, is unpredictable.
A repair kit for a Ford Focus II rack costs 2,500 rubles, boots with clamps cost 600 rubles. The savings are obvious, but it will take about 2 days to remove, repair and install the unit. For dismantling and installation, a regular set of wrenches is suitable, but to disassemble and assemble the rail you need a special tool that you will have to buy or make yourself.
Before starting repairs, try to soberly assess your strengths and capabilities, compare the benefits of self-repair and the upcoming labor costs.
Removing the steering rack
Removing the rack has its own characteristics for each car, but in general, the procedure is as follows:
- Place the front of the car on stands and remove the wheels.
- Press the steering ends out of the steering knuckle axles (use a special puller).
- Remove the rack heat shield.
- For cars with hydraulic power steering, unscrew the oil supply and return hoses (place a container under the hoses to drain the fluid), for cars with electric power steering, disconnect the connector or remove the steering shaft position sensor.
- Unscrew the bolts securing the steering rack to the subframe or engine shield (depending on the make and model of the car).
- Loosen the coupling bolt of the universal joint between the rack and the steering shaft.
- Pull the rack in the direction of the steering shaft to release the spline joint (if the rack does not go, you can knock it down with light blows of a hammer).
- Pull the rack out through the left or right wheel arch (depending on the layout of the engine compartment).
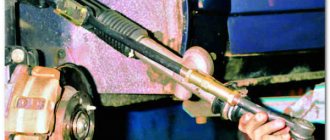
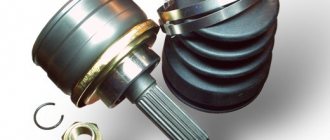
Pressing out the steering tip with a puller
Advice: not in every car you can get the rack just like that - the subframe may get in the way. Removing it completely is long and difficult; try unscrewing only the rear bolts and the engine mount, then move the subframe down. Often this is enough and the rail is released.
To remove the rack in the Peugeot 308, you need to unscrew the rear bolts of the subframe and move it down, this is easier than removing the subframe completely.
After dismantling, the rail must be cleaned of dirt and washed.
Disassembling the rack
It is better to disassemble and reassemble the steering rack cleanly, without sand and dust. If abrasive particles get inside, the surfaces and seals will quickly wear out, and the rack will leak. Secure the rail in a bench vise; if you don’t have one, place clean cardboard or other material in the disassembly area.
Important: do not clamp the rail in a vice too tightly - its body, made of a fragile aluminum alloy, may burst or become deformed.
Procedure for disassembling the steering rack
- Remove the clamps and pull off the tie rod boots.
- Securely fix the rack body and unscrew the steering rods (there are grooves for an open-end wrench on the threaded coupling).
- Unscrew the lock nut and the adjusting mechanism nut, remove the washers and the pressure sleeve from the mounting socket.
- Unscrew the drive shaft housing or nut (a special wrench may be needed) and remove the shaft from the housing.
- Pull out the rack gear rod.
- Remove the sealing collars, bushings and fluoroplastic rings from the rack body.
We prepare the car and necessary materials
To replace the boot, you need to prepare the following tools:
In addition to a new boot, you should stock up on clamps for attaching the adsorber, lithol, WD fluid and gloves. We will also need a jack and two supports for the car (“goats”). Replacing the steering rack boot on a VAZ 2110 should be done on a cold engine, as there is little space and there is a chance of getting burned or scratched your hands. Therefore, protective gloves will come in handy. It would be a good idea to wash the car well before repairing. To make it easier to replace the boot, you should use a pit or a pair of stands (“goats”). First, set the car to the parking brake. Be sure to put chocks or blocks under the rear wheels. Then we jack up the car and install supports under the front end so that it is convenient to get to the steering mechanism.
Note: There will be no problems with bolts and nuts if they are pre-treated with WD fluid.
Removing protection
To replace the boot, you must provide access to the steering rack. First, we dismantle the engine protection. Then, using a 10mm wrench or a ratchet with a small wrench, unscrew the fastening of the rack protective screen from the manifold. One nut is at the bottom and two at the top.
Note: To make it easier to remove the screen, you must first rotate it 180 degrees and then pull it out.
Steering rack protective screen
Removing the old boot
To make it easier to continue working, you need to remove the adsorber. The adsorber mounting clamps, as a rule, cannot be removed. Their price is low, so we simply cut off the clamps in passages, then install new ones. After this, remove the steering rods in the following order:
- We flare the tie rod bolts using a screwdriver, hammer and pliers. Then use a 22 mm wrench or a ratchet with a wrench to unscrew them.
- We remove the steering rods from the rack.
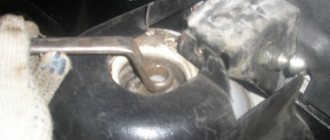
Steering rod disconnected from rack
- Using a 13mm wrench, unscrew the steering rack from the right side, which is secured with two nuts at the top and bottom.
- We take out this fastener along with the side rubber of the steering rack.
- Remove the damaged boot.
Note: To make it more convenient to remove the boot, first slightly unscrew the steering rack on the left using a 13mm wrench.
We install a new boot
- Before installing a new boot, the steering rack on the VAZ-2110 must be well cleaned of dirt. Then lubricate it well with lithol. If the surface of the rack is well lubricated, the boot will be easier to install. The rubber cover should be put on carefully so as not to tear it. The boot must not be twisted.
Read more: Nissan primera wagon p11
New steering rack boot
- We put the tie rods with bolts back into the steering rack. Sometimes this can be difficult to do, especially if someone turned the steering wheel while removing the boot, but if this is not done, then installing the rods with bolts will not be difficult.
- Tighten the tie rod mounting bolts using a 22mm wrench or a ratchet with a wrench. After this, we roll the bolts using a hammer, screwdriver and pliers.
- We install the side elastic band and fastening.
- Using a 13 mm wrench or a ratchet, carefully tighten the steering rack fastenings on the right and left.
- We put the adsorber in place, screw it in with a 10mm wrench and secure it with clamps.
We put up protection
To make it easier to install the protective screen, first turn it upside down and push it through. Then we turn it 180 degrees to the desired position and screw it with a 10 key along with an elastic band. After replacing the boot is completed, we once again check the correct installation and prepare the car for a test drive.
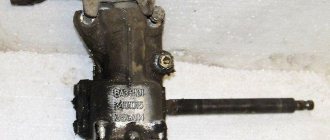
Steering rack: design, principle of operation, typical problems
In passenger cars, a steering rack is used as one of the steering components. Comfortable driving, safety on the road, and the very possibility of somehow driving your car depend on its normal operation. Understanding the operating principle of the steering rack is necessary for rational vehicle maintenance and, ultimately, reducing the cost of its operation.
History of the creation of power steering
Because the first cars drove slowly and turned on a wide radius, they did not require any kind of power steering. In older cars, it was the rack and pinion mechanism that transmitted steering wheel rotation to the wheels. With the development of the automotive industry, the force that must be applied to the steering wheel gradually increased.
The designers compensated for this by increasing the diameter of the steering wheel and reducing the gearing, but these improvements could not last indefinitely.
New transmission mechanisms were developed, but over time it became clear that the steering rack is the best option both in terms of simplicity and accessibility, and in compatibility with power steering (power steering).
Consequences of damage.
Damage to the boot leads to water, dust and dirt getting onto the steering rod. Then all the dirt gets into the working unit and acts there as a powerful abrasive. Contamination leads to an increase in micro-tears, and after water enters the unit, it causes corrosion. If the problem is not noticed in time, the unit may suffer greatly. This approach will provoke the appearance of extraneous noise (even a slight deviation from the norm will lead to the appearance of extraneous sounds) or loss of control. In order not to spend money on replacing or repairing more steering parts, it is much easier, and more financially profitable, to change the anthers. This will help prevent the replacement of the entire steering and specifically such parts as bearings, springs, piston and others.
The difficulty of this problem is that it is impossible to determine when the break occurred. Thus, you can drive and not suspect that the element is damaged and needs to be replaced. The problem can be determined by checking the play in the parts, or by visual inspection. If this problem is discovered, the damaged element must be replaced immediately.
How to replace the boot on the steering rack of a VAZ 2110
Steering rack boot
The performance of the steering rack mechanism is primarily determined by reliable protection from dirt, moisture and other debris. For this purpose, a special corrugated rubber cover (boot) is provided. The VAZ-2110 steering rack will last a long time if the condition of the boot is regularly monitored.
Periodically, using a bright flashlight, check the integrity and tightness of the protective cover and then you can avoid problems with steering rack repair for a long time. If any defects in the boot are detected, you should immediately replace it. Replacing steering rack boots is a rather troublesome procedure. However, this activity can be done with your own hands.
To do this you will need a tool, a new boot, a couple of hours and desire. This article provides detailed instructions on how to replace the steering rack protective cover yourself.
How to change the boot
First of all, it is necessary to purchase new anthers to replace the failed ones and clamps to secure them. Tools you will need:
- car jack;
- car body stands;
- a set of wrenches, screwdrivers, hammer, pliers;
- joint lubricant.
When the steering rack boot is changed, the clamps securing the protective cover are usually changed. It is advisable to carry out the work on a cold engine, otherwise you can burn your hands.
After jacking up the car, be sure to install stands for safety. This will prevent the machine from lowering inadvertently. VAZ cars with front-wheel drive have a steering rack and two tips, and the VAZ “classic”, for example 2107, already has four tips and a longitudinal rod with protective covers.
For convenient replacement, access to the mechanism should be provided. On a VAZ, this is prevented by the protective cover of the rack from the exhaust manifold. The adsorber, which will have to be removed, will also interfere.
There may be a problem with removing the clamps that secure it. They are not expensive, so many owners simply eat them and install new ones during assembly. The next procedure will be something like this:
- A hammer with a screwdriver and pliers come into play. With their help, the tie rod locking pin is removed;
- after this, use a 22mm wrench or a socket to unscrew the nut on it and remove it from the mechanism;
- The boot is torn and needs to be removed. To do this, remove the steering rack mount from the right side of the mechanism. It is secured with two nuts that are unscrewed;
- Now it is possible to remove the damaged boot for replacement.
It is necessary to pay attention to the correct installation of the boot so that it does not twist.
Sometimes the steering wheel turns, this does not make it possible to install the tip in its place; you should turn it a little and the rods will take their places in the steering rack.
Read more: Car removal from Russia to Europe
Next, screw a nut onto the screw part, tighten it with a wrench, lock it with a cotter pin, and straighten its antennae with a screwdriver. After the nut is tightened, install the rail in its place, install the fastener and tighten it.
At the same time, check the clamp on the left side of the mechanism and, if necessary, tighten the nuts. Then you can put the removed parts back in place. » alt=»»> Taking advantage of the fact that the car is raised and partially disassembled, check the rods, their condition and the integrity of the protective covers. If the slightest damage is noticeable, replace the anthers, otherwise you will have to replace the entire rods.
The operation of replacing the traction boot is similar to the process of working on other VAZs, for example, 2107 and the like.