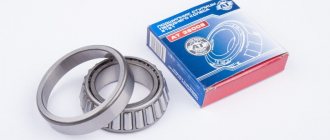
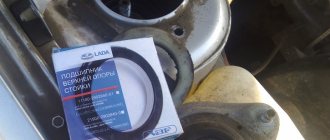
Analogue bearings
As an alternative, you can consider the products of two manufacturers:
- "Weber", product catalog code - "BR 1118-3020";
- "Pilenga", part number - "PW-P1313".
The products of these companies have proven themselves well. The cost is approximately 1 thousand rubles. The contents are identical to the original delivery.
In practice, it has been revealed that a bearing from a VAZ-2108 may be suitable for the LADA Kalina hub, but it is a few hundredths of a millimeter narrower. Experts do not advise leaning towards this alternative, since there have been cases when the product rotated inside the hub.
Replacing the release bearing of Priora
In order to change the part, you will have to remove the gearbox. You can find detailed instructions for removing the gearbox here (link to page).
After removing the box, you need the following:
- The first step to removing the bearing is to find the antennae of a special spring retainer. Next, remove the two ends of the antennae from the bearing holder. To do this, you need to apply a little force and pull the antennae out of the two holes.
Now you know how to change the release bearing on a Priora!
Important points
Please note that there are counterfeit auto parts on sale today. Please note that most new, original release valves contain light-colored factory-applied lubricant. In addition to the above, we recommend that you purchase release levers that are made only of metal. In addition to the presence of a metal body, make sure that in the places of fastenings, the so-called lugs (clamps), the metal coating is of a uniform color without signs of hardening at high temperatures. Pay special attention to checking the part for the so-called backlash (should be absent or minimal). Rotate the product, listen to see if there is any noise when it rotates.
In order to choose a Priora clutch release bearing, you need to know what clutch system you have installed (which manufacturer). For example, Valeo also has its own, original bearings that are not interchangeable. And on the contrary, it guarantees full compatibility and correct operation with various clutch systems on Kalina and Priora cars. Plus, there are good reviews about the quality and long service life.
Tips, tricks and repair videos from specialists
1. The parts of the front wheels wear out evenly, so when replacing one side, be sure to check or change the other.2. If you do not have a puller, as well as a vice (press), it is recommended to take the assembly to a car workshop for pressing / pressing.3. It is recommended to press-fit using non-impact methods.4. Life hack: heat the steering knuckle before inserting p/w.5. Be sure to lock the hub nut after tightening.6. When assembling, treat threaded connections with graphite lubricant.7. Before installation, check the amount of lubricant inside the unit by carefully opening the rubber seal.8. Buy spare parts from certified stores, ask for documents for original products.9. This video collection presents a detailed replacement process.
The Prior release bearing is an integral element of the clutch system, which is involved in the gear shifting process. The part is involved in the process of pressing the clutch pedal and changing gear, and is responsible for disconnecting the clutch discs.
If we talk about the service life of the bearing, in most cases it is quite long and amounts to at least 100 thousand kilometers of the vehicle. However, during operation in difficult conditions (off-road, constant switching in traffic jams, lack of lubrication), faults are diagnosed even after 15 thousand mileage.
Advice from a practical master
I would like to give you some practical tips that will help you replace the part without any problems.
The tips are:
— use WD40 fluid when dismantling. It will give you the opportunity to more easily separate parts from each other;
- if you have replaced the wheel bearing on one side, replace it on the other. The parts wear out at the same time. Will soon fall into disrepair
and a second bearing;
— having dismantled the entire assembly, pay attention to the condition of the parts around it. They may also need replacement;
- not every garage has a press. Perform one operation to remove the bearing and press it in at a service station. You need to resort to this if you do not have both a puller and a vice;
— for easy pressing of the bearing, heat the fist. The metal will expand when heated and the part will easily fit into it;
— do not forget to lock the hub nut upon completion of installation;
- treat all threaded parts and fasteners with graphite lubricant;
- If you don’t have a torque wrench, do this. Tighten the bolts and nuts until they stop. Next, loosen them by turning the key in the opposite direction by 20 degrees.
After studying this article, I think you will easily cope with the repair. However, if you have any questions or problems while working, please contact me.
I am always happy to help with practical advice.
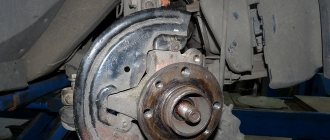
Replacing the rear wheel bearing on a Priora
Before we begin the repair, the following preparations must be completed:
- Raise the rear of the car with a jack
- Remove the rear wheel
- Remove the brake drum
- Now you can proceed further with the repair. Using a socket and a wrench, unscrew the hub mounting nut, as shown in the photo below.
2. When this is done, you can begin to remove the hub and bearing assembly. To do this, it is most convenient to use a special device - a puller with rotary grips.
3. Now, using a wrench, we turn the puller rod clockwise, thereby pulling the hub off the axle, as it were:
The result of the work done is shown in the photo below.
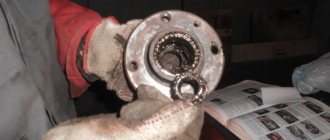
4. Next comes the most difficult thing - removing the bearing from the hub itself. To do this, turn it over with the inside facing up and clamp it in a vice. Then, using pliers, tighten the locking ring and remove it.
5. And then we turn the hub over to the other side so that the bearing can be “squeezed” out of the hub downwards, or carefully knocked out using a spacer or other available tool. Of course, for good measure, you will need a press, but you must admit that not every car owner has such equipment in the garage.
Personally, in this example, a 30 mm socket was used, and a knob was paired with it to hold it. With small blows of a hammer, the bearing is easily knocked out of the hub.
The result of this procedure is shown clearly below.
6. The inside of the hub must be thoroughly cleaned and a Litol-type lubricant applied to the inside.
7. After which you can replace the bearing - the new one is installed in the reverse order. To press it in, it is convenient to use an old bearing, and carefully use a hammer to install everything in place.
Let's see what it looks like in practice.
Also, instead of a hammer, you can do everything more accurately and correctly by using a vice instead of a press. I think that the meaning of this manipulation is quite clear to everyone. We press the bearing until a groove appears for installing the retaining ring.
8. Again, using pliers, install the ring in its place and you can put the hub on the axle, having previously lubricated it.
What front wheel bearing is in Priora: dimensions, number, prices, characteristics
Before you begin the repair, you need to know which front wheel bearing is on the Priora, as well as which one is better in terms of price, reviews, quality, and manufacturer. The designers at the manufacturing plant included in the design an angular contact double-row sealed ball bearing with lubricant inside (LITOL-24).
According to reviews and statements from VAZ owners, the best option would be original products from VBF or foreign manufacturers: SKF, SNR, SWAG, FAG.
The dimensions of the front wheel bearing, as well as the catalog numbers of recommended manufacturers, are presented in the tables in a similar article on replacing the wheel bearing in a Lada Granta car; look for detailed information there.
Priora front wheel bearing number:
- GOST: 6-256707А1КЭ12
- ISO: 256707A1KE12.P6Q6/L2
- Factory article: 11180-3103020-00
- SKF: VKBA1414
- FAG: 713 6140 30
BEARING SIZE CHART 6-256707
| Characteristic | Unit | Value according to GOST (TU) |
| Hole diameter | mm | 35 |
| Outside diameter | mm | 68 |
| Installation height | mm | 37 |
| Dynamic load capacity | kH | 40,0 |
| Static load capacity | kH | 32,0 |
| Nominal speed | rpm | 3500 |
| Axial clearance | mm | 0,04-0,08 |
| Steel type | — | SHH-15 |
| Hardness of steel and rollers | H.R.C. | 61-65 |
| Contact angle | hail | — |
| Torque | kN*M | 190 |
| Ring roughness | Ra | 0.32 |
| Number of balls | PC. | 28 |
| Weight | G. | 295 |
How to diagnose the front wheel bearing on a Priora and the causes of failure
At the beginning of the article, signs of a malfunction were already mentioned, if they occur in the VAZ 2170, it is necessary to check the hub assembly. To diagnose a breakdown, it is enough to do several operations:
- Raise the car with a jack;
- Check the play of the suspended wheel with your hands;
- Rotate the wheel and listen for noise;
- Watch several videos on the principle of diagnosing the front wheel bearing of a Priora.
Faulty wheel bearing:
An example of the operation of a failed wheel bearing:
How to check the ball bearing of a wheel hub:
Wheel bearing diagnostics:
Why does the front wheel bearing of a VAZ 2170 (Priora) fail:
- Expiration of service life;
- Incorrect operation of the suspension, aggressive driving style, road quality;
- Poor quality ball bearing (defect, counterfeit, manufacturing defect);
- Depressurization (dust, moisture, dirt);
- Malfunction of adjacent components (brake disc imbalance, etc.);
- Road accidents, collisions with deep potholes in the asphalt or holes.
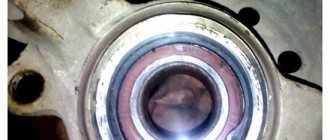
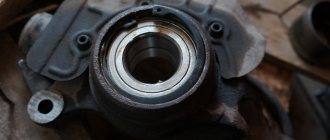
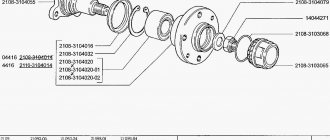
Priora hub design
These Priora parts are available both rear and front. Therefore, replacing the bearing bearing on them is somewhat different due to design features and differences. Therefore, it is first worth considering their differences before talking about replacing the rolling mechanism itself.
Front hub "Priors", device
The front hub of the Priora, like on other cars, has an independent suspension. That is, it is not tightly fixed to the body, but has a certain freedom of movement being in the steering knuckle. In addition, the front wheels are driven and swivel. This is what causes certain differences in design. Although it is quite simple, replacing the bearing on it is a rather complex procedure. The front hubs of the Priora are metal discs with a neck, inserted into the steering knuckle with devices and devices designed both for their movable connection with the body and for the free movement of the wheel in the direction of rotation. In addition, the drive shaft from the gearbox enters the center of the hub. Therefore, slots are cut inside it. A lever system and a shock absorber strut make this connection. And the ball joints of the steering mechanism control the steering knuckle, into which the hub is pressed.
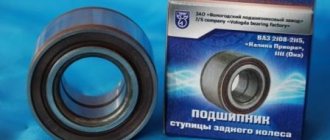
Rear wheel bearing for Priora - part price
A new bearing for the rear hub on a Priora can cost differently, and it all depends on the manufacturer:
- QML 636 rub.
- SDR 720 rub.
- ANDYCAR 690 rub.
- VBF 1050 rub.
- AvtoVAZ 980 rub.
Of course, you can buy the cheapest bearing for the Priora, but it is not a fact that it will safely last the period you expect.
The appearance of a dull knock in the rear wheel, especially pronounced when driving over rough terrain, indicates wear of the rear wheel hub bearing on a Lada Priora car. In addition to knocking, wear is also indicated by the presence of a howling noise when moving. To finally make sure that the bearing is faulty, you need to hang the rear wheel and try to rock it with both hands; if there is play, you will immediately feel it by characteristic knocking sounds. As a rule, this bearing does not require adjustment, but if play is detected, you can try tightening the hub nut; if this step does not help, then we proceed to repair.
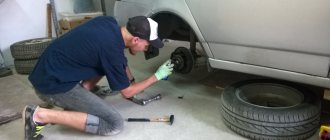
To perform dismantling work, prepare a standard set of tools and perform the following sequence of actions:
- Loosen the wheel bolts, but do not remove the wheel itself.
- Remove the plastic decorative cap of the hub nut, and then unlock the retaining ring.
- Using a socket with an extension, loosen the tightening of the nut.
- Now, having engaged first gear and placing wooden blocks under the front wheels, jack up the car and remove the wheel.
- Unscrew the two guide pins and then remove the brake drum.
- Remove the brake pads.
- Now we finally unscrew the hub securing nut and remove it together with the thrust washer.
- Install a three-pin puller and compress the hub.
- Wash it with kerosene, wipe it, then clamp it in a vice and, using pliers or another suitable tool, remove the locking ring.
- Use a special puller to press out the bearing, then press in a new one and install the retaining ring.
- Reinstall the hub, making sure the final tightening of the hub nut is done after the vehicle is on the ground.
- Check the condition of the brake pads and drum and replace them if necessary.
At this point, the repair work on removing and replacing the rear suspension hub bearing on the Lada Priora car has been completed. Perform subsequent assembly in reverse order.
Sources
- https://for-priora.ru/?p=1610
- https://priora-remont.ru/zamena-podshipnika-zadnej-stupicy/
- https://zubilovaz.ru/lada-priora-podshipnik-stupicy-zadnej-podveski
Replacing the front wheel hub bearing
There are two ways to replace a bearing. The first is by removing the steering knuckle assembly, the second is without removing it from the car. The work is shown on the right wheel bearing. The left wheel hub bearing is replaced in the same way. We remove the wheel.
Using a screwdriver, remove the protective cap from the hub. We install the wheel and tighten the two bolts that secure it. We lower the car onto its wheels.
Use a bevel to straighten the dented collar of the hub bearing nut in two places. Apply the parking brake, engage first gear and place shoes under the wheels.
Use a 30mm socket to loosen the hub bearing nut. The nut is tightened with a large torque, so the head and driver must be strong enough to transmit the necessary force. We hang up the front part of the car (namely both front wheels, because otherwise the anti-roll bar interferes with dismantling, pushing the suspension elements up). We remove the wheel. Unscrew the hub bearing nut completely...
...and remove the puck. Remove the front wheel brake disc (see “Removing the front wheel brake disc”). Disconnect the right wheel drive from the hub (see “Removing the front wheel drives”). In order not to disturb the wheel alignment angles, you can replace the bearing without removing the steering knuckle. To do this, connect the ball joint to the knuckle...
...and compress the hub by striking it through a soft metal drift. You can also compress the hub using the front wheel brake disc.
We pass M12 × 1.25 mm bolts about 130 mm long through two diametrically opposite holes in the disk and screw them into the holes of the hub to a depth equal to its thickness. By sharply hitting the bolt heads with a disk, we compress the hub. Then use a cup puller to press the bearing out of the knuckle, as shown below. If it was not possible to remove the hub in this way, remove the steering knuckle. To do this, unscrew the nuts of the bolts securing the shock absorber strut to the steering knuckle, remove the bolts (see “Removing the shock absorber strut and disassembling it”) and remove the steering knuckle.
We install the steering knuckle on the jaws of the vice and press the hub out of the knuckle through a mandrel or head of a suitable diameter, applying force to the end of the hub.
We remove the hub from the fist. In this case, the outer part of the inner ring of the bearing remains on the hub.
Remove the mud ring from the hub.
We insert a blunt chisel between the ends of the inner ring of the bearing and the hub and, striking the chisel with a hammer, move the inner ring.
Use a puller to compress the inner ring of the bearing.
Using circlip pliers, remove the circlip.
Use a cup puller to press the bearing out of the steering knuckle...
...and take it out with the puller.
Remove the bearing from the puller. Clean and lubricate the inner surface of the steering knuckle. Using a needle file, we clean out the nicks from the chisel on the hub. We press the new bearing into the steering knuckle, applying force to the outer ring of the bearing. We install a retaining ring in the groove of the steering knuckle socket. When pressing the hub, we use the puller washer to rest on the inner ring of the bearing. We carry out further assembly in the reverse order, tighten the bearing nut to the prescribed torque (see “Appendices”) and be sure to lock it by jamming the collar. If the bearing was replaced with the steering knuckle removed, then it is necessary to check and adjust the wheel alignment angles at a service station.
The front wheel bearing on the Priora VAZ 2170, as on other VAZ cars, often fails, especially when the mileage exceeds 80,000 km. First there is noise from the wheel, which can increase during acceleration.
Vibration also often occurs, wheel play increases, and in some cases the noise turns into a grinding sound - all these signs mean that the front wheel bearing of the Lada Priora requires immediate replacement. If you delay repairs, the consequences can lead to wheel jamming, which leads to unsafe situations on the road.
This article will tell in detail about the principles of replacing wheel ball bearings (hereinafter referred to as SP) on cars of the VAZ family, in particular on the Lada Priora. The instructions are accompanied by many photos and videos. The material also provides information on how to choose a front wheel bearing for a Priora by number, size, price, and manufacturer.
After reading the article, you will understand that replacing the front wheel bearing is done with your own hands without special skills, experience, or special tools, and the price for repair work of this type in a car repair shop is very high.
Replacement
The work must be carried out using the necessary tools. There are two options for replacing the wheel bearing - with subsequent wheel geometry and without its need. The replacement is similar for all VAZ cars (front-wheel drive).
Tool you will need:
- Ratchet with head "7", "10", "13", "17", "19" or E30;
- A key for unscrewing the CV joint or a head at “30”;
- Powerful flat head screwdriver;
- Gas torch or wheel bearing puller;
- Hammer;
- Steering wheel end puller (may not be needed);
Replacement with subsequent wheel geometry
You need to start by unscrewing the CV joint nut; the car should be installed on a horizontal plane with the steering wheel turned slightly to the side. Using a wrench, unscrew the grenade nut counterclockwise.
We unscrew the caliper from the steering knuckle and hang it by the wire (under no circumstances hang the caliper by the brake hose).
We dismantle the brake disc by unscrewing the guides.
Unscrew the two bolts securing the strut to the steering knuckle.
Unscrew the bolts securing the ball joint.
We remove the steering knuckle from the car.
We take out the retaining rings on both sides of the fist.
Next we need to knock out the old bearing; for this you can use a punch of the required diameter or use a puller.
Then, once the bearing is removed, a new one must be installed. Pre-install one retaining ring and press in a new one on the opposite side.
If you have a puller, then carefully press in the new bearing, avoiding distortion.
If you don’t have a puller, you first need to put the new bearing in the freezer for a couple of hours.
Preparing for work
This process is best carried out in the light if we are talking about the street. A bearing is a miniature component. It will be ideal if you drive Priora into the inspection hole. We will disassemble the front hub part, since this is more difficult than carrying out the same operation with the rear hub, especially without removing the strut. And now to the tools:
- Spanners for 17, 19.
- A bearing puller is the main tool, so without it you will have to dismantle the strut and perform a wheel alignment.
- The head is 30, it is desirable that it be equipped with a reliable wrench.
- The frame is usually a homemade tool, which is a cut of a pipe of a certain size. With its help we will knock out the hub.
- WD-40 lubricant.
Lada Priora, like other passenger models of this brand, is a front-wheel drive vehicle. There are many more parts in the front, hence the more complex process of removing the bearing. The rear support component of the hub is removed in the same way; you will need less time to do it, so the instructions describe the rear support bearing.
Symptoms of a bad wheel bearing
The first sign indicating a wheel bearing failure is a characteristic sound. This is a distinct crunching, knocking or grinding sound in the wheel area. You will hear it both in the car and outside when the car passes by.
Another sign of a bad wheel bearing is vibration, which is transmitted to the steering wheel and the entire car. Therefore, it is also unlikely to miss this symptom.
If the car pulls to the first or left side, this could also be the result of wheel bearing problems. The point is that when one wheel jams, straight-line movement, alas, is impossible. In such cases, the bearing must be replaced immediately.
Bearings for cars of the Russian automobile industry
The domestic auto industry, which produces passenger cars, still uses old types of bearings in production - single-row roller bearings. Only AvtoVAZ switched to two-row closed hub type HUB-1. HUB-1 means there are no flanges on the body for mounting to the hub. Therefore, owners of Russian car brands have a question about which wheel bearings are better. The most common vehicles on Russian roads today are VAZ 2110, GAZelle, and UAZ Hunter. Of course, you can purchase original parts, but they are often twice as expensive as similar ones from other factories. Let's look at the example of these particular brands of companies that produce the necessary parts.
Bearings for VAZ 2110
For the modern line of VAZ passenger cars (except Niva 4x4, Chevy Niva), three standard sizes of wheel bearings are produced:
- 256907 - for front-wheel drive VAZ 2108-2112;
- 256707 - on Granta, Kalina;
All these models belong to HUB-1, double-row, ball, closed, angular contact. Lada Granta and Kalina differ only in height.
Traditional suppliers of bearings for cars from Togliatti are 5 factories:
- CJSC "LADA Image" - manufactures and sells original Lada wheel bearings through secondary markets;
- Saratov plant - produces parts under the SPZ brand;
- Volzhsky Plant - uses the Volzhsky Standard brand;
- Vologda plant - sells products under the VBF brand;
The price-quality ratio of these factories is optimal. The cheapest products are those from the Samara plant (less than 200 rubles), other companies on average sell parts costing 230-275 rubles.
How to determine whether a wheel bearing is faulty
In principle, the symptoms of wheel bearing wear themselves are quite eloquent and allow us to predict the source of the problem with high accuracy. However, it is possible to check the condition of the bearing, almost one hundred percent. To do this, you need to jack up the car, put supports under it, and then swing the wheel in a vertical plane. If you feel play, the wheel bearing needs to be replaced. You can also rotate the wheel and if there is a problem with the bearing, you will hear specific noises or feel uneven rotation.
Should I change the wheel bearing myself? At first glance, replacing a wheel bearing is not such a complicated procedure. But this is only at first glance. It is enough that two of the four reasons for premature wear of a wheel bearing relate to errors during its installation. Therefore, if you are not a professional mechanic, it is not recommended to change the hubs yourself. The same special pullers may need much more than one. Based on this, we advise you to pay for the work of a specialist, because if the wheel bearing is installed correctly, it will not be necessary to change it soon.