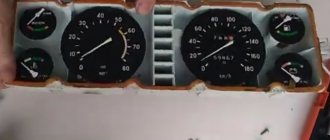
The VAZ dashboard has an electronic combination, as well as conveniently located backlighting. The lamps are illuminated from the inside, which is a feature of the 14th Lada.
Thanks to the instrument panel, the driver knows all the information he needs, what is the reserve and consumption of gasoline, mileage, etc. The panel should be easy to operate with a clear overview of the icons, scale, gauge and indicators.
What is the state of the automobile systems responsible for road safety, driving speed, the rest of the way to the intended object, rational engine operation and gasoline consumption, the operation of the suspension and electrical equipment - all this should be reflected on the control panel.
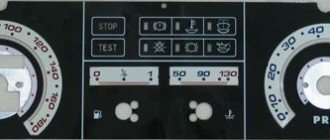
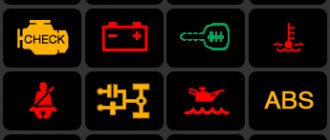
Signal lamps and equipment control devices must be required on the panel. There are a total of 19 symbols on the panel.
Control panel design
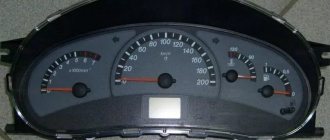
The main symbols include the fuel level, speedometer, tachometer, and sensors for cooling the liquid. The temperature sensor is indicated by an arrow on the left side of the panel.
If the sensor needle is in the zone from 105 to 130 degrees, you should immediately stop the car and wait until the engine cools down, otherwise the engine will simply boil. The tachometer is presented in the form of a dial scale on the instrument panel.
Engine speeds from 2 to 5.5 thousand per minute are considered the norm. If the needle falls into the red zone, fuel consumption may increase sharply, and the load on engine parts will become greater. The panel must have a speedometer.
With its help, the driver controls the speed, which directly affects road safety. The speedometer is an important part and should show clear data.
The sensor is located in the form of an arrow, which shows the fuel level in the car tank and is usually located on the right side of the device. Although it will not measure exact data about gasoline, you can find out the approximate fuel remaining at any time.
The panel design is quite simple, and at the same time highly informative; removing it is not difficult.
With the help of sensors and meters, the driver is aware of all the information about his car. The VAZ tidy is made of plastic, which gives it an aesthetic appearance; it does not creak at all, unlike the same nine.
The device is simple, easy to disassemble and assemble.
Tuning options
You can perform tuning in several ways:
- cover the panel with leather;
- paint;
- install overlays;
- combine materials.
Before tuning the dashboard yourself, you need to familiarize yourself with the rules and the car’s passport. You cannot use fur or ordinary fabric to cover the panels; the paint must be automotive grade. This is due to the operation of the stove, since as a result of high temperatures, ordinary paint and the described materials will begin to disintegrate and release harmful substances.
You also need to take the choice of colors seriously. The color of the covers and interior trim are taken into account. If black and white are combined in any way, then when selecting other shades you need to use special tables of color combinations.
Panel painting
One of the simplest and most affordable options for tuning the VAZ 21114 dashboard is painting it. Here you can do everything yourself.
The procedure for painting the dashboard:
- The surface is thoroughly cleaned from dust and dirt. To do this, use a soft sponge and a regular soap solution.
- Sanded with fine sandpaper (P240, P280, P320, P360), this will help improve paint adhesion. The panel is also degreased using a special product for plastic; if this is not available, you can use compositions based on white spirit, dishwashing detergent or wet hand wipes.
- The sealant is applied. This is done at the points where the panel comes into contact with other body elements.
- Painting in progress.
The paint can be applied with a brush, roller or spray. In any case, if the panel is not removed from the car, it is necessary to completely cover all areas that will not be painted. To do this, use masking tape. To properly paint the dashboard, it is recommended to remove it from the car. Although this is an easy way to remodel a dashboard, the work must be done carefully, and if you doubt your abilities, it is better to leave it to the professionals.
Panel cover
Another option for tuning the dashboard is covering it with artificial or natural leather or carbon fiber.
The procedure for covering the dashboard:
- The dashboard is being dismantled.
- The pattern is being prepared. To create a pattern for a specific panel element, remove it and cut out the required piece of material in accordance with the shape that will be pasted over, doing this with a small allowance.
Video: covering the panel with rubber material
Installation of overlays
You can transform the dashboard of a VAZ 2114 using special overlays. davydvolodin: 06/12/2019, 1:04 pm I removed the point about the price because I also didn’t understand what exactly the author wanted to say. On Avito the overlay is sold for 200 rubles. In online stores, plastic panel covers, yes, from about a thousand. “>They are sold in almost all auto stores. This tuning option allows you to change the color of the backlight. This occurs through the use of transparent elements and light filters of different colors. Such overlays must be installed correctly so that there is no distortion or displacement, otherwise the illumination of the devices will be uneven. It should also be taken into account that if light filters are too dark, the power of the factory light bulbs will not be enough, and they will not be able to properly illuminate the devices through such overlays.
In addition, you can install soft pads on the instrument panel. Unlike a rigid standard panel, they have better sound absorption, are more scratch resistant and have a shelf for small items. The cost of the instrument panel overlay is 1200–1500 rubles.
Europanel installation
Relatively recently, European-style dashboards began to be installed on the VAZ 2114. They have a more modern design and are made of high-quality materials, so they have become very popular among owners of the old-style VAZ 2114.
Installing the Europanel is not difficult, since it is designed specifically for the VAZ 2114 and is simply mounted in place of the old panel. The presence of several drawers for small items makes this solution more convenient. Among the disadvantages of the Europanel, owners note that the movement of the heater control levers is rather tight.
Video: installation of europanel
Improved backlight
To achieve a unique visual effect, one of the options for tuning the dashboard is to change the instrument lighting.
Work order:
- Removing the instrument panel.
- Removing protective glass.
- Removing the arrows.
- Removing the standard cover.
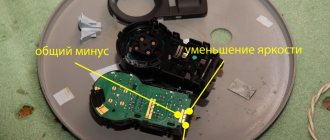
- Replacement of standard light bulbs. Green backlighting is installed at the factory. It can be changed so that the illuminated dashboard is in harmony with the rest of the dashboard and interior of the car. Typically, multi-colored LEDs in a plastic socket, a DSM LED or LED strips are used for this. It must be taken into account that the car's electrical voltage is 12 V, and the LEDs operate on a power supply of 2–3.5 V (this depends on the color) and have polarity. If you mix it up, the LEDs will immediately burn out. You can purchase ready-made clusters designed for 12 V, or make such a cluster yourself. To do this, several diodes are connected in series to achieve the required voltage. If you take 3 diodes of 3.5 V, then you also need to additionally set the resistance to 100–150 Ohms.
Video: Changing the dashboard backlight
Tuning instrument needles
It is quite simple to implement this type of dashboard tuning, such as improving the instrument needles. In the standard design, the lighting of the heating equipment is yellow, the buttons are green, and the indicators are orange. Many people don’t like it because it resembles a parrot and makes it difficult to feel comfortable while driving at night.
To improve the instrument arrows, you need to disassemble the instrument panel and install a red, blue or other color LED under each arrow. To prevent light from scattering, a piece of heat-shrinkable tubing is placed over the diode. The wires from the diode are connected to the heater backlight. As a result of such changes, the instrument needles glow with a rich color.
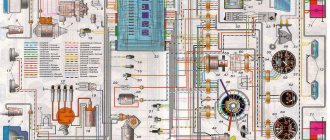
VAZ 2114 instrument panel pinout
Electrical connection diagram for the instrument panel of the VAZ 2114 (Click on the picture to enlarge)
- — rear window heating switch;
- — rear fog lamp switch;
- — switch for headlights and direction indicators;
- — mounting block;
- — windshield wiper switch;
- — fog light switch;
- — display unit of the on-board control system;
- — block of the instrument panel harness to the additional harness;
- — instrument cluster;
- — instrument panel harness connector to the on-board computer harness;
- — block of the instrument panel harness to the ignition system harness;
- — block of the instrument panel harness to the side door harness;
- — fuse 16 A;
- — fuse 16 A;
- — ignition switch;
- — lighting switch;
- — heater electric motor;
- — additional resistance of the heater electric motor;
- — ignition switch unloading relay;
- — Rear fog lights relay;
- - starter relay;
- — socket for connecting a portable lamp;
- - cigarette lighter;
- — block of the instrument panel harness to the wiring harness of the glove box lighting lamp;
- — illuminator;
- — illuminator;
- — illuminator;
- — heater switch;
- — instrument lighting regulator with rheostat;
- — brake signal switch;
- - horn switch;
- - hazard warning switch;
- — backlight lamp for heater control panel;
- — fuse 16 A;
- — seat heating relay;
The panel pinout is a diagram, but the diagram described in words seems easier for many. The contacts located on the instrument panel, and there are only 26 of them, are responsible for the operation of the indicators on the panel itself.
If a plus is applied, then each of the contacts shows information and the state in which the car is currently located. The panel is equipped with sensors and signal indicators, and the panel is controlled using an electronic unit.
Panel modifications, special parts
Every VAZ 2114 owner comes to a point when he gets tired of seeing the factory instrument panel every day and has a desire to install a new, improved modification. This instruction will allow you to perform the task assigned to you with the highest quality possible without contacting technical service centers.
If you want everything in your cabin to be of the highest standard, pay attention to modern torpedo models with digital speedometers. They are produced and sold, albeit at a very significant price,
However, the cost is justified by the unique external data, which allows the instrument panel to be designed in such a way that it meets all the requirements of modern style.
In the meantime, after you've removed the dashboard but haven't yet started installing a new one, consider decorating it to give it as much personality as possible.
Don't forget about the old panel that you removed with such care. If there are no visible cracks on it, you can sell it on the Internet for about 1/3 the cost of a new torpedo
Therefore, in this way you get back part of the money you paid for purchasing a new part for the car interior. If you're serious about making your panel stand out, add neon lighting or backlighting to add variety to the standard factory lighting.
Remember that when you are fixing the panel, special attention should be paid not only to the scale and arrows, but also to the buttons that are located on it. Of course, you shouldn’t sculpt the lighting wherever you have to, here you also need to maintain strict proportions, because bright lights will distract you along the way in any case
Especially if, if necessary, you have to repeatedly drive along difficult sections of the route.
If you want to make the panel perfect, start creating more thorough sound insulation. To carry out the work mentioned in a VAZ 2114 car, you will need to purchase special materials. But it’s best if you do this task in parallel with replacing the panel. After all, if you have already installed a new option, you will have to unscrew everything again.
https://youtube.com/watch?v=snNkb3fda-I
To not only replace the instrument panel, but also refresh the interior trim, you will have to either go to a service station or do the tuning yourself, relying entirely on your own abilities. This will help save a very significant amount of time and money that would have to be spent taking the car to a professional workshop. Good luck!
Tuning the dashboard of Lada 2114
To make their car distinctive, many motorists resort to tuning.
Although this is a troublesome task, it is worth it. Everyone strives to make the salon spectacular and cozy. The dashboard is a favorite place for tuning.
Backlight tuning
To make the panel devices look stylish and modern, they can be modernized. Let's look at how backlight tuning is done.
You can improve the appearance of a vehicle yourself, since the process is not at all complicated.
Everything you need for tuning:
- panel disassembly;
- removing the shield;
- tune the necessary parts;
- put in place.
The first step is to replace regular yellow light bulbs with bright LEDs. Chinese diodes are cheaper, but they will not last long. To ensure that the light comes directly from the diodes, heat shrink is put on them, and the arrows will be clearly visible even in the dark.
The diode wires are connected to the backlight from the machine stove. To change the color of the arrows, a red diode is placed under each arrow. The light from the arrows will acquire a rich, bright red color, which will noticeably update the panel.
Blue light bulbs are popular. The central panel is also subject to tuning, respect is guaranteed. The glow becomes soft and irritates the eyes when driving.
Europanel
To give a modern aesthetic look, you can install a europanel. The material of the panel is soft, rich, and less noisy. The original warning lamps and odometer make the panel modern and fashionable. It is equipped with many signal sensors. A special feature of the Europanel are sensor signals and airbags.
White-blue LEDs also look beautiful. Typically, up to 50 LEDs are needed for tuning. If the glow of the diodes is very bright, then you can try to adjust it. Some VAZ components have this capability.
You can also tint the instrument panel, which will also look great. Improving the panel offers ample opportunities for creativity among car enthusiasts and designers. As a tuning option, you can install a start button, which will give the interior a distinctive style and modernity.
By the way, if the modernization will be carried out with your own hands, in order to avoid problems with the traffic police, you need to write a statement about the planned changes in the design of the car and wait for permission from the traffic police. After making changes, you need to undergo a technical inspection, where appropriate changes will be made to the registration documents.
Changing instrument needles
This is a fairly simple and small change in the appearance of the VAZ 2114 torpedo, but still contributes to the overall appearance of the car. According to the standard, the indicators are orange, the buttons are green, and the heating elements are illuminated in yellow. Many people consider this color to be “parrot-like” and feel discomfort when driving with it.
For installation, you need to disassemble the instrument panel and install diodes of the colors you like under all the arrows. The wires from the diodes are connected to the heating lighting. As a result, the instrument needles will glow in a rich color.
Instrument panel lighting
The role of illumination on the panel is performed by incandescent lamps located at the top of the panel. Even higher, there is a green filter. The standard backlight color can be changed to a beautiful LED color.
To do this, you will need three LEDs, cartridges for them, foil and tape. The green filter can be removed altogether, or replaced with a different color.
And if you put a white LED on top of the filter, the glow will become brighter and more beautiful. The service life of the battery will become noticeably longer if you replace incandescent lamps with diodes. Installing LEDs is easy.
Handle the arrows with care; they are very fragile. To dismantle the console, remove the arrows, glass, tab, and select the lamps. A total of 28 light bulbs are taken, 5 red, the rest - optional.
The top of the lamps must be filed with a file to ensure the correct direction of the light. Solder a resistor to each LED. To the red diodes - a resistance of 1.5 Ohms, to the rest - 1.1 Ohms.
A piece of plastic is taken, a form is cut to size for installing new lamps, holes are made on the form for installing new light bulbs.
The tracks with output to the power supply are soldered on the back side of the form. You can change the backlight of LCD screens in the same way. At the end of the work, connect the power and assemble the panel.
You can also change the backlighting of the buttons on the power windows.
To replace the backlight of the LCD screen, the plastic base is removed along with the bulb. The soldering method can replace the backlight of the indicators.
Complete instructions for removing the control panel
To remove the device correctly, follow the instructions below:
- Using a Phillips screwdriver, remove the three screws that secure the center console;
- remove the cover, the protrusion located at the bottom, remove the protrusion from the bracket;
- Using a nozzle, unscrew the five screws located in the console on the right and remove the screen;
- Disconnect the terminal with the (-) sign from the battery. If there is a radio receiver, you need to remove it, remove the plug from the shield;
- Disconnect the wires coming from the cigarette lighter, remove the cartridge;
- Using a narrow screwdriver, remove the handle from the levers;
- pull the handle towards the heating and fan switch;
- unscrew the two screws above the panel and the two located under it using a screwdriver;
- unscrew the screw located behind the panel;
- Also unscrew the two self-tapping screws securing the cover;
- disconnect the harness and wire connectors. To avoid confusion when installing the panels, you should mark the order in which they are connected;
- unscrew the fastening bolts;
- unscrew the two self-tapping screws, those that secure the bottom bracket using an 8 key;
- unscrew the self-tapping screw securing the light guide and remove it;
- Also unscrew the screws securing the heating unit;
- remove lamp sockets;
- after removing the external parts, remove the decorative insert;
- unscrew all nuts with a 21 key;
- hydrocorrector, remove its lamp;
- Unscrew the screws that are attached to the cross member on the left.
Finally, the panel itself is removed. The panel is assembled accordingly in the reverse order.
It is important to remember the sequence of actions if you are performing this procedure for the first time. When disassembling and assembling you need to be extremely careful and attentive.
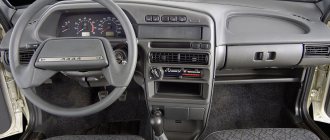
Instrument panel VAZ-2114
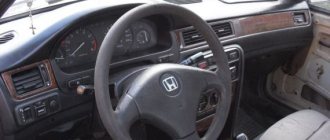
1 – headlight hydraulic corrector; 2 – lever for switching direction indicators and headlights; 3 – instrument cluster lighting switch; 4 – steering wheel; 5 – sound signal switch; 6 – instrument cluster;
7 – alarm switch; 8 – ignition switch; 9 – windshield wiper and washer switch lever; 10 – APS status indicator; 11 – external lighting switch; 12 – key switches; 13 – socket plug for installing a trip computer; 14 – signaling unit of the on-board control system; 15 – central deflectors of the heating and ventilation system; 16 – cover of the upper glove box; 17 – cover of the lower glove box; 18 – side deflector of the heating and ventilation system; 19 – magazine shelf; 20 – heater control unit; 21 – location for installing audio equipment; 22 – ashtray; 23 – diagnostic block cover; 24 – parking brake lever; 25 – gear shift lever; 26 – cigarette lighter; 27 – gas pedal; 28 – heater electric fan switch; 29 – brake pedal; 30 – clutch pedal; 31 – steering wheel position adjustment lever; 32 – hood lock drive lever; 33 – socket for connecting a portable lamp.
Important points regarding replacement
- When removing the right side of the console, be careful. Behind it are wires that can easily get caught on the side and be damaged. So before removing this cover, you should remove the negative terminal from the battery. You should also turn off the car radio by removing its connector from the common wiring harness located behind the upper instrument panel;
- Removing the plastic handles from the stove levers can cause serious difficulties. The fact is that there are protrusions on the stove levers (top and bottom), and holes on the handles. When you put the handle on, it snaps onto the lever. The only way to remove it is to pry it off with a flat screwdriver as shown in the picture. But when prying up the handle with a screwdriver, you should not bend it too much: the plastic breaks very easily;
So, a novice car enthusiast is quite capable of removing the dashboard from a VAZ 2115 and other cars in this line. All that is required is patience and attentiveness. If, after unscrewing all the fasteners, the dashboard stubbornly refuses to come off, you should inspect everything again: it is quite possible that some tiny screw was missed.