07/17/2021 12 801 VAZ 2115
Author: Ivan Baranov
To ensure that your “iron horse” is always on the move, you need to check the functionality of all its components and assemblies from time to time. In particular, we are talking about the gas distribution mechanism. This material will help you learn how to change the timing belt on a VAZ 2115 8 valve - you can also watch a video of this procedure.
[Hide]
Replacing the timing belt of VAZ 2113, 2114 and 2115 with your own hands
Replacing the timing belt with your own hands on VAZ 2113, 2114, 2115 cars, in the cylinder head of which 8 valves are installed, is relevant today for many owners of cars of these brands.
This operation cannot be called complicated, since repairs can be easily carried out in a garage or on any flat area without the use of special equipment. Before starting work, you should prepare the necessary spare parts:
Experts recommend replacing the timing belt, tensioner and pump in the cooling system at the same time, since problems with this unit most often lead to malfunctions in the valve mechanism. You will need tools and accessories:
Preparatory work
To replace the VAZ 2114 timing belt with your own hands, you will need a lift, an inspection hole in the garage. When there is neither one nor the other, any flat area will do.
The car is placed at the work site, the handbrake cable is tightened, and the gear shift lever is placed in the neutral position. Wheel chocks must be installed under the rear wheels. Using a wheel wrench, tear off the wheel bolts on the wheel in the front of the car on the right side, lift the vehicle with a car manual lift, place a reliable stop under the body and dismantle the wheel. Now you can begin the operation of replacing the timing belt on a VAZ 2114 8 valve.
Replacement instructions
Required Tools
Next, we will step by step consider the procedure for replacing a component on a VAZ 2115 injector. It will also need to be positioned correctly. But before carrying out repair work, you should prepare all the tools that you will need:
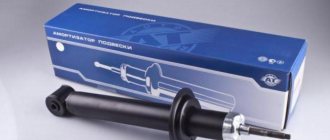
- the strap itself is for 2115;
- new tension wheel;
- spanners;
- special key for installing the element (tensioning);
- screwdriver;
- extension tube.
Photo 1. New element to replace
Photo 2. Tension wheel
spanners
Photo 4. Tension wrench
Photo 5. Screwdriver
Photo 6. Tube extension
Stages of work
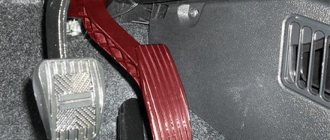
- Put your VAZ 2115 on the handbrake and speed up.
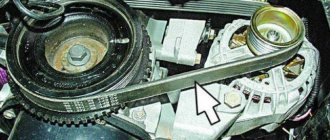
- Open the hood and locate the location where the timing belt is installed. You will need to unscrew the plastic protection of the element with a wrench, and then dismantle it.
- Next, using a wrench, loosen the nut that serves as the generator drive tensioner. Once the nut is loose, remove the drive.
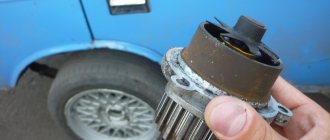
- Take a jack and lift the front right part of your VAZ 2115. Then unscrew the bolts on the wheel and remove it. Next, you need to remove the alternator drive shaft, which is mounted on the crank pulley. When the pulley is removed, the bolt that secures it needs to be screwed into place.
- Next, you can begin dismantling the component. To do this, unscrew the tension wheel nut. Dismantle it. It would also be correct to replace the roller itself, so install a new part in place of the old one. Also remove the old timing belt.
- Now you need to install a new strap. To do this, set the first piston of the engine to the TDC position. To do this correctly, start turning the shaft counterclockwise. Please note that in this case, you must observe the position of the marks on the engine fluid pump, as well as the marks directly on the shaft. In addition, you need to align the mounting tab, which is located on the rear protective casing, as well as the marks marked on the timing pulley. But that’s not all: after these steps, you should align the generator drive shaft. Tension the element to be replaced, while observing the marks.
- After this, the tension wheel should be installed. To do this, lubricate it on both sides with motor fluid or another type of lubricant. Do not fully tighten the roller nut yet. Reinstall the new roller, then pull the strap over it.
- When the strap is tight, the roller nut must be tightened until it stops.
1. Remove the plastic protection
2. Unscrew the tension roller nut
3. Remove the worn element
4. Place the new component on the teeth
5. Put on a new one, observing the marks
6. Tighten the nut on the roller
About the procedure for doing the replacement yourself
Open the engine compartment hood and disconnect the terminals on the battery. Further work is carried out in this order:
Installing a new belt
Installation of the timing belt VAZ 2113, 2114, 2115 8 valves is carried out in the reverse order of removing the worn part. Before starting work, carefully check the position of the timing marks in the timing mechanism drive again. Failure to perform this check may damage valve train components in the cylinder head. There are known cases where, in addition to valves, pistons and, in some cases, connecting rods were damaged. Install the adjusting washer first, then the tensioner roller, screw the nut onto the bolt securing it, but do not tighten it. When the engine cooling system pump is changed, a new spare part is installed. Next, the order of work will be as follows:
At this point, the repair work done by yourself can be considered complete. The belt in the drive can be replaced by contacting a specialized center, but the price for such work will start from 1000 rubles. You can save on repairs by replacing the belt yourself, following the instructions provided and the advice of specialists.
Also watch the video of replacing the timing belt on a VAZ 2113, 2114, 2115:
Source
How to replace a VAZ 2114 timing belt
Replacing the timing belt 8 valve engine VAZ 2108-2109, 2114
Send a donation: https://www.donationalerts.com/r/viknow https://www.donationalerts.com/c/viknow Replacing the timing belt. The timing belt on the VAZ broke...
VAZ 2114 — Replacing the timing belt (8v)
FOR COOPERATION AND ADVERTISING ISSUES, MY CAR REPAIR CHANNEL: ...
Replacing the timing belt on the 8 cl engine VAZ 2108,2109,2110,2111,2113,2114,2115
replacing the timing belt on an 8 cl engine. The belt tension roller was not shown correctly! Everything needs tension in the opposite direction...
replacing the timing belt VAZ 2115. 2114. 2113 on an 8 valve engine and tension pulley
Connecting to the AIR partner media network: https://join.air.io/ProVCE replacing the timing belt of a VAZ 2115 on an 8-valve engine. Took...
Replacing the timing belt VAZ 21099, 2109
The video shows the process of replacing the timing belt on a VAZ 21099 car. Replacement on a VAZ 2109 is carried out in the same way.
Replacing the timing belt on an 8-valve 1.6l engine!
Video report on replacing the timing belt on an 8-valve VAZ engine! Camshaft marks, crankshaft marks, how to set them,...
Replacing the timing belt and rollers on 16 valve VAZ 2110, 2111 and 2112
How to replace the timing belt and rollers on a 16-cl. VAZ 2110, 2111, 2112 cars with engines 2112 and 21124. https://remont-vaz2110.r…
I moved the timing belt to 1 tooth. BOMB,TOOTH I GIVE.VAZ 2115,2114,2113,2199,2109,2108
It’s just super easy to throw the timing belt over one tooth of the VAZ injector.
How to remove the VAZ crankshaft gear if it cannot be removed! How to remove gear crankshaft.
VAZ #2109 #21083 #Ivanova When replacing the crankshaft oil seal, which is located behind the Crankshaft gear, on a car…
REPLACING THE TIMING BELT AND SEAL SEALS VAZ 2108, 2109, 2199, 2113.,2114,2115
VAZ, 2108, timing belt, timing belt, 2115, 2113, repair, timing belt replacement, 2109, do it yourself, 2110, VAZ 2108, auto repair, 2114, oil seal,…
Watch the video How to replace a VAZ 2114 timing belt with your own hands.
In this video, experienced owners share tips on how to replace a VAZ 2114 timing belt yourself.
Video advice from experienced drivers How to replace a VAZ 2114 timing belt based on personal experience
The video shows how to replace a VAZ 2114 timing belt in a garage without the help of specialists.
For those who are accustomed to using regular printed publications, we recommend purchasing car repair manuals in the largest stores in Russia and Ukraine
Automotive literature stores:
krutilvertel
— Electronic books of printing quality in PDF format
autodata
— Online store of the Legion-Avtodata publishing house
autoinform96
— literature on car repair and operation in Russia and Ukraine
How to independently replace the timing belt on an 8 valve VAZ-2115 car
The design of the gas distribution mechanism on the VAZ 2115 car is identical to the previous modifications 2114, 2112, 2110. The main purpose of the timing gear is to transmit torque from the crankshaft to the camshafts for the subsequent movement of the car.
During the systematic operation of a technical device, the drive often fails. At high speeds and rpm, the belt breaks into pieces, blocking the operation of the cylinder head and valve mechanism. There are frequent cases of holes in the block and valve bends.
ATTENTION! A completely simple way to reduce fuel consumption has been found! Don't believe me? An auto mechanic with 15 years of experience also didn’t believe it until he tried it. And now he saves 35,000 rubles a year on gasoline! Read more"
The process of replacing the drive yourself is not at all complicated, but it requires attentiveness on the part of the technician. Violation of technology is not acceptable. If you encounter any difficulties with repairs, contact a service station specialist for help.
On VAZ 2115 cars a toothed belt is pre-installed. Unlike wedge and poly-wedge, it has a long service life. The cost of the belt is 10% higher than analogues.
Early models of VAZs were equipped with chain drives, but they are not as efficient and have a higher noise level during operation.
Signs of belt wear on a VAZ 2115
- Unstable engine starting: excessive wear or weak drive tension leads to malfunction of the ignition system;
- Copious amounts of smoke from the exhaust pipe due to melting of the catalytic filler;
- The appearance of third-party sounds when the engine is running;
- Presence of oily streaks around the perimeter of the drive mechanism;
- Cracks, fiber breaks on the belt, broken teeth, other signs of wear;
- The power unit does not start, the starter rotates.
Consequences of untimely replacement of the timing drive
- Wear of pistons, crankshaft liners, camshaft, valve mechanism;
- Increased engine oil consumption;
- Deformation of gears, cylinder head (cylinder head).
Timing and frequency
According to the regulations for carrying out technical work, on the VAZ 2114 the procedure for replacing the timing belt and rollers should be carried out every 120 thousand kilometers. However, in reality this deadline usually comes earlier. Many car enthusiasts advise preparing for replacement after 90 thousand kilometers. Do not forget about regular inspection of the components of the gas distribution system. If you notice the slightest problem, the defective components should be replaced immediately. Failure to promptly replace faulty parasitic rollers will sooner or later lead to a broken timing belt. During a break, desynchronization of the valves and piston occurs, which leads to breakdowns and deformation of these components.
Belt replacement
First you need to set the timing gear and engine flywheel in accordance with the existing marks.
1. Place the car on a level surface and engage any gear.
2.Use a jack to lift the front right wheel so that it can rotate.
3.Open the hood, use a 10mm wrench to unscrew the 3 bolts securing the timing belt protective cover.
4.Using a 13 key, loosen the generator belt tensioner and remove it.
5. On the camshaft gear we find a mark in the form of a rectangular protrusion on the edge. It should align with the protrusion on the belt cover mount.
6.If it doesn’t match, put the car in gear and turn the right wheel until the marks match.
7.After this, we find a rubber plug on top of the clutch housing. It is located to the right of the cylinder block. Pry it off with a screwdriver and take it out. Below it is the flywheel crown, which also has a mark that should coincide with the triangular protrusion on the left.
8.If there is no such coincidence, use a 17 wrench to loosen the fastening of the tension roller, and using a tension wrench, turn the roller counterclockwise, loosening the belt.
9. Having removed the upper part of the timing belt from the timing gear, use a 17 mm spanner to turn the crankshaft until the flywheel marks coincide.
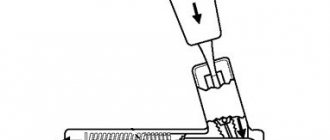
10.Fix the flywheel in this position by inserting a screwdriver between its teeth. It’s great if you have an assistant who will additionally hold it.
11. Dismantle the front right wheel, remove the arch protection.
12.Using a 17 wrench, unscrew the nut securing the generator pulley, making sure that the flywheel does not rotate.
13.Remove the generator pulley and take it out.
14.Now the timing belt can be removed from the crankshaft pulley.
15.Using a 17 wrench, completely unscrew the tension roller fastening and remove it; you can simply loosen it and the belt will come out.
16. Without disturbing the position of the marks, put a new belt on the crankshaft pulley, install the generator drive pulley in place, having first put the belt on it.
17. We put the belt on the timing gear.
18.Install a new tensioner roller, lubricating it on both sides with machine oil (if removed).
19. We tighten the belt by rotating the tension roller with a special wrench (if you don’t have one on hand, you can insert two pins or screws into the grooves and secure them with a screwdriver) counterclockwise. The tension at which one plane of the belt can be rotated 90 degrees horizontally using your fingers is considered normal. In this position, tighten the tension roller mounting bolt.
20. We carry out further installation in the reverse order; if your marks are lost, then you definitely need to set them again.
How is the replacement made?
Before replacement is carried out, you need to buy a new high-quality spare part and a set of car heads and keys. The price of a high-quality timing belt fluctuates around a thousand rubles. For that kind of money you can buy components made in Germany, the USA or Russia.
The cheapest components for the VAZ-2115 eight-valve engine are currently supplied from China, but their quality leaves much to be desired. Car enthusiasts increasingly prefer German spare parts from the BOSCH, Finwhale and ContiTech brands. The American brand Gates is not bad in terms of its quality characteristics. Do not buy cheap components, as they quickly fail. In this case, you will need replacement very often.
Once you have everything to carry out the work, you can proceed to it, following the instructions:
- Using a wrench or spanner, unscrew the three bolts that secure the cover, which prevents lubricant and dirt from getting on the belt.
- Be sure to remove the negative terminal from the battery - this is necessary so that parts of the car are de-energized. Before proceeding with further replacement work, set the pistons of the first and fourth cylinders to top dead center.
- Loosen the timing roller until it begins to rotate. To do this, use a 13mm wrench to slightly unscrew the bolt holding it down. Carefully rotate the roller.
- After this procedure, the belt will loosen and can be easily removed from the camshaft.
- To gain access to the gas distributor from below, it is necessary to remove the right front wheel.
- Using a spanner wrench, unscrew the bolt that secures the generator pulley. This is not so easy to do, since this pulley is constantly spinning. The trick is that there is a special black plug on the left side of the clutch housing; it needs to be removed. Insert a mounting blade or screwdriver into the resulting hole so that it fits between the teeth of the flywheel. After that, unscrewing the bolt from the pulley will not be difficult.
- Once the generator pulley is loose, the belt can be easily removed. After which it is replaced.
After you remove the worn part of the gas distributor drive, you need to install the new one in the reverse order:
- first stretch on the crankshaft pulley;
- then install through all the rollers on the upper (camshaft) shaft.
Important! After you remove the worn belt, do not spin the shafts. Changing the position of the pulleys leads to the need to adjust the phases of the gas distribution mechanism.
To adjust the tension of the GR mechanism belt, there are two small holes on the roller. A special key is inserted into them (you can replace it with a drill or self-tapping screws) to turn the roller. When the tension is correct, the belt in the middle part between the two pulleys turns 90 degrees.
Timing belt tension method
Hello, dear visitors of Drive! The other day I noticed that the timing belt started clicking. I immediately went into the garage and removed the top half of my sawed-off drive cover. Indeed, the belt turned out to be very loose. Inspection showed that the tension roller had moved.
The belt is clearly loose
The fact is that during the previous adjustment of the belt tension, the pin began to rotate along with the roller nut. Having read horror stories about the fragility of the stud, I decided not to touch it, and, having adjusted the tension, I was afraid to tighten the nut too much. I clearly tightened it weakly, and this is the result. It's good that the belt teeth didn't jump. I realized that it is undesirable to touch this unit again, and in order not to unnecessarily rotate the nut, and with it the stud, I need a reliable way to check and adjust the tension. The method proposed in many manuals for checking belt tension by twisting it 90 degrees with a force of 2 kgf does not provide for measuring this force. It is very difficult to evaluate it subjectively. As a result, the belt is either loose and slams, threatening to jump, or it is overtightened and howls like a shot down Messerschmitt in Soviet films.
How to determine that the belt twisting force is 2 kgf?
I remembered that I read somewhere a long time ago that you can tighten the belt with a household dynamometer using a special key. I bought a key on the market for 50 rubles, but it turned out to be impossible to work with it. I had to bend it into an “G” shape, screw the sector in place and make recesses for the dynamometer hook. The length of the arm from the key pins to the point of application of the torque force is 80 mm.
Special key for adjusting the timing belt tension. The distance from the pins to the groove for the dynamometer hook is 80 mm. As it turned out later, the key can be used without an additional sector
And then everything is simple. We put the x17 key on the driven gear nut and, lightly tapping it with your hand, select the slack in the drive belt branch. Next, we insert a special key into the holes of the roller axis, engage the key rod with a dynamometer and create a force of 2.5...3.0 kgf. Holding the special wrench by the sector, tighten the roller nut. The main thing here is not to overdo it and not tighten the nut with a torque of more than 4.2 kgcm, otherwise the stud may bend and the belt will subsequently slip.
How to tighten the timing belt of a VAZ 2114
How to adjust tension?
If everything was done correctly, the belt can be turned half a turn with two fingers, but no more (as in the photo).
Correct tension adjustment
A plug is used for adjustment. If you don't have such a key, pliers will do. Hold the roller with a wrench and tighten the nut.
Read more about further tensioning the alternator belt here.
Timing belt on a VAZ 2115 car
The belt drive on the VAZ 2115 is identical in size to the VAZ 2110 - 2114. Technical characteristics of the drive: length 1306 x number of teeth 116 x width 9.5 mm.
| Name/article | Price in rubles |
| Original | |
| VAZ-2112 / 2110 engine 16 valves, 2112-1006040-83 | From 1600 |
| VAZ 21120 (2110)-1006040-00 | From 1600 |
| VAZ 2112 (2110)-1006040 (16 valves) | From 1600 |
| GATES K015644XS | From 2000 |
| GATES K015536XS (16 valves) | From 2000 |
| GATES K055781XS, K015587, K015564 | From 2000 |
| Analogs | |
| BOSCH 2112-1006040 | From 1200 |
| INA 530055410 | From 1200 |
| CONTITECH CT996 | From 1200 |
| GATES 5539 | From 1200 |
| BOSCH 1987948286 (16 valves) | From 1300 |
| BOSCH 1987946329 | From 1300 |
| CONTITECH CT527K2 | From 1800 |
| CONTITECH CT1137K1 | From 1800 |
| LYNXauto 137FL22 (16 valves) | From 1500 |
| Hola TH1372 (16 valves) | From 1500 |
| BOSCH 198798527 (tension rollers) for VAZ 8 and 16 valves | From 450 |
*check prices with an authorized dealer at the time of purchasing parts.
Before purchasing components, check the compatibility of the part with your technical device. Check the article numbers with the data specified in the operating instructions.
When replacing parts, do not forget to place marks on the crankshaft and camshaft. Many car enthusiasts neglect the rule, as a result of which the engine does not start, operates unstably, and the ignition timing shifts.
Which manufacturer is better: domestic or foreign? Russian analogues are not inferior in quality to imported ones. Whether it’s worth overpaying for “delivery” - decide individually, but you need to listen to the opinion of experts.
Causes of timing belt wear on VAZ 2115
How to determine when it's time to change the timing belt
The most prudent thing to do would be to install a new spare part on your VAZ-2115 before the belt breaks. The following signs may indicate that urgent replacement is necessary:
In a situation with a belt, it is best to spend money on a new spare part and replace it several times than to pay later for a major engine overhaul. Manufacturers often assure that you can drive up to 100 thousand kilometers on one belt on a VAZ-2115; in fact, it is better to change it every 60 or a little earlier.
Check the belt tension regularly; if it sag or distributes the load unevenly, this component may soon need to be replaced. Remember that in this part of the timing belt there is no such thing as self-adjustment during operation. Uneven tension will inevitably lead to breakage. This part of the gas distribution mechanism must be replaced immediately after the first time it is tightened.
Be sure to monitor the battery and ignition system of your VAZ-2115, since starting the engine “from the pusher” has a detrimental effect on the condition of the timing belt. The fact is that with this type of launch, the shafts begin to move with a strong jerk, which stretches the belt and leads to a decrease in its service life.
What is the timing belt responsible for?
This element performs an important function in the operation of the vehicle. Essentially, it links and synchronizes the operation of the crank and timing pulleys. All modern cars are equipped with timing belts, and the VAZ 2115 injector is no exception.
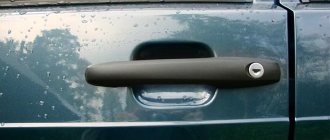
Car Lada 2115 injector
When the engine is running, the crank pulley rotates, and this depends directly on the operation of the pistons. In turn, in order for the engine valves to always open at the right time, the camshaft pulley must work synchronously with the crankshaft. Actually, it is the timing belt that performs the synchronization function. The synchronization procedure itself is carried out due to the teeth, which, as mentioned above, are located on the inside of the element.
However, like any other part, the strap can wear out over time, causing it to simply break.
And if this happens while driving, then there is a possibility that the engine valves may bend. That is why you should check the functionality of this unit from time to time and, if necessary, change it if necessary in order to avoid unpleasant situations on the road.
Loading …
All the steps to replacing the timing belt “from start to finish”
Before replacing, you need to make sure that: neutral gear is engaged, the car is stopped, the minus terminal is removed from the battery (key “10”). The plastic cover is removed from engine 11183 and the part is carefully pulled up. Then remove the drive casing:
Timing casing on motor 2111 and 11183
Marks on the pulley and flywheel
An alternative way to “break” the timing belt
How to move the generator to the engine
Generator pulley on engine
The final step for dismantling
When installing a new belt, the upper pulley is once again aligned according to the marks (see above). The locking screwdriver is removed after installation.
New timing belt installed
How to adjust tension?
If everything was done correctly, it means that the belt can be turned half a turn with two fingers, but no more (as in the photo).
Correct tension setting
A fork wrench is used to make adjustments. If you don't have such a wrench, circlip pliers will do. Hold the roller with a wrench and tighten the nut.
The holes for the key should be located under the nut from below. This is the correct position of the roller.
Read more about post-tensioning the alternator belt here.
Recommendations
How to replace the tension roller on a VAZ 2113-VAZ 2115?
Conclusion: 1) At the beginning of the operation, set the whole tag timing mechanism, detailed information in detail and pictures how to do it is explained in the article called Setting Valve Timing by Tag, so go to this article and do everything as described in it, by the way a little Above, we indicated in this article about the cover that needs to be removed to get to the synchronization mechanism, so how to remove this cover, read in the same article, the link to which is given in this paragraph.
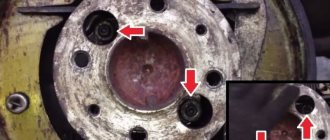
2) Go ahead and go to step 2, now you will need to remove the idler pulley from the car, but before removing it, remove belt from the camshaft and remove the idler pulley from the idler pulley
, to do this, loosen the nut that secures this roller a little (This nut in the photo above is marked with a blue arrow, by the way, by the way, we will run straight ahead, there will still be a washer behind this nut, so do not lose this when you completely unscrew the nut) and return the roller manually so that the belt is untied (the roller itself is made in the shape of an oval, so it regulates the belt tension, i.e. at some point it pulls the belt tightly, and at some point it doesn’t pull at all), then remove the belt from the camshaft as shown in the photo below (Do everything carefully), well, remove it from the roller and let it hang (To completely remove the belt, you need to unscrew the bolt securing the generator drive pulley, you also need to remove the Belt from the generator, there are many brands, and in order not to remove it completely, how we already wrote above, remove it from the camshaft pulley,
tension roller and let it hang with you).
3) Well, at the end of the operation, when the belt no longer interferes, completely unscrew the nut securing the tension roller, remove the nut and the same washer behind it, and then remove the roller along the shaft, as shown in the photo below, after the roller will be removed, check its bearing, to do this, take the central part of the roller and turn the outer part of the roller, it should not jam and should rotate normally, there should also be no play, well, grease should not leak out of the bearing (In this case, the roller will be dirty fat).
The note! When removing the roller, there will be a spacer ring installed behind it, which we also recommend removing and checking for defects if it is in good condition, i.e. If it is not compressed or cracked, then this ring cannot be replaced with a new one. one and install it yourself, the place is repeated, by the way, thanks to this ring, as you already understand, the fact depends on how the tension roller will stand, for example, if the ring is installed large, then the roller will move a little and the belt will not stand level, but under angle, so if the strap doesn't eat you, and also if it doesn't come off while moving, then you won't be able to even touch it, since it does its job as they say in ur!
Installation: The new roller is installed in its place in the same way as it was removed, but only the entire operation is performed in the reverse order of removal, in addition, the roller must still be installed so that it has two holes (see photo below) facing in and out, by the way, if you look closely at the tension roller, which is shown in the photo below, even with the naked eye you can see that it is all greasy, such a roller needs to be replaced and may not be reusable, because there is a possibility that the bearing will soon jam , but a jammed tensioner roller will not lead to a good result (or in this case the timing belt will fly off, or after installing a new roller and fixing its nut, be sure to put on the timing belt and adjust it, for more information on how to do this, read the article: Replacement timing belt, point 1.
READ How Long Does a Timing Belt Last on a Grant
Additional: Just below we have attached a very interesting and visual one for you so that you can look at it and see in more detail how the process of replacing this tensioner is carried out, so watch it and immerse yourself in it.
Removal
1) First, remove the plastic cover that protects the belt from dirt, all kinds of water and grease. Remove the cover as follows: Take a wrench or wrench and unscrew the three bolts of the cover (in the photo below the bolts are already unscrewed). There are two bolts on the side to hold the cover in place, and one. in the center. By unscrewing them, you can remove the cover from the car engine.
2) Now turn off the power to the car by removing the negative terminal from the battery. Then we remove the alternator belt for spare parts, read the article: Replacing the alternator belt on a VAZ. Set the piston of the fourth and first cylinders to TDC (top dead center). Simply put, place both pistons absolutely straight and without any upward angles. The publication will be useful to you: Installing the piston of the fourth cylinder at TDC on a car.
3) Then take a 13mm wrench and loosen the nut that slightly secures the tension roller. Loosen until the roller begins to rotate. Then turn the roller by hand to loosen the belt. Grasp the belt and carefully remove it from the rollers and pulleys. You need to start from the top, with the camshaft pulley. It is impossible to remove all pulleys, so release the belt
only at the top.
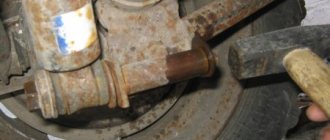
4) Next, remove the front right wheel (removal instructions are available here: Correct wheel replacement on modern cars). Now take a handle with a cap head, or any other key that can be used to unscrew the bolt securing the generator drive pulley (the pulley is marked with a red arrow).
The note! The bolt is unscrewed with the help of a helper (assistant) and a mounting spatula (or a thick screwdriver with a straight blade). Remove the red plug on the left side (in the direction of travel) of the clutch housing. Then a putty knife or screwdriver is inserted between the teeth of the flywheel (the teeth are marked in blue) and keeps the flywheel from turning. You have to use force, that's the main thing. don't overdo it. Unscrew the bolt, remove the pulley and set it aside.!
5) You now have excellent access to the crankshaft pulley and belt. At the last moment, the belt is removed from the lower pulley. Now he's completely removed.
The note! Although this does not apply to 8-valve cars of the Samara family, for general information we will explain: there is no habit of turning the camshaft and crankshaft pulleys when the belt is not installed. Otherwise, you will mess up the valve timing (they are easily adjusted; you need to install the flywheel and pulley according to the marks). Spinning the pulley, for example on a 16-valve actuator, will cause the valve to contact the piston group and may cause a slight fire.
Installation
1. Perform in the reverse order of removal, taking into account some nuances:
- First, we recommend cleaning the pulleys and tension roller from dirt and various types of lubricants that get on them over time;
- After cleaning, degrease the pulley and tension roller with white spirit;
- continue installation.
Attach the strap at the beginning to the pulley at the bottom, going up. It bends when worn, so pull it with your hands and make sure it is straight and does not deform the pulley. After installation, make sure that the marks match, and then proceed to install the tension pulley. Install the belt onto the idler pulley (see Photo 1), then lower and install the alternator drive pulley into place. Make sure the hole in the pulley, marked A, lines up with the mounting sleeve, marked B in the second photo. If you have a torque wrench (a very handy thing that allows you to tighten bolts and nuts in a specific location without overtightening them), tighten the bolt that secures the alternator drive pulley. Tightening torque 99110 N.m (9911.0 kgf.m).
Next, we proceed to adjust the timing belt on the car: insert two drills or screws into the two holes on the tension roller (in photo 1 the holes are marked with arrows). Friendly configuration is performed using a special key. However, not everyone has it, so we are looking at an alternative method of tension. Insert the two screws and insert a screwdriver between them (Photo 3), then turn the roller counterclockwise. Fully tighten the belt, tighten the nut that completely secures the roller until it stops (photo 3). Make sure that the measures taken are correct: manually turn the belt exactly along the middle part between the pulleys with a force of 1.5-2 kg. If it turns approximately 90 (photo 4), then the belt is adjusted correctly. Otherwise, repeat the setup.
The note! An overstretched belt can damage the roller, belt and pump. A weak, insufficiently tensioned belt will jump out of the pulley teeth when driving at high speeds, and the timing will be disrupted and the engine will not work properly.
2. After installing the parts in place, be sure to check the alignment of the marks and the belt tension.
We change the belt ourselves (on the 8 valve model)
Replacing the VAZ 2114 timing belt is strictly regulated in the car's operating instructions. It is recommended to change this part after 30-45 km. But you can’t rely only on recommendations; over time, without running the required kilometers, it slips off the gears, eats, bursts, and may even rupture.
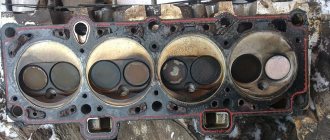
For a car with a 1.5-liter 8-valve engine installed on it, a belt break will not have serious consequences: the car will simply stop and will not start. And in a 1.3 liter engine, the valves may become damaged, which will lead to breakdown of the entire engine. If an injector is installed on the VAZ2114, then when the belt slips, eats or breaks, the dashboard will display: “headlight sensor error.” Solve the question after how many km. This part should be changed after a visual inspection and a replacement should be made if it is in poor condition. Which strap is better to choose is written in the manual for the VAZ 2114.
Required Tools
To carry out the replacement yourself, you need to prepare new spare parts and tools:
New consumables for installation
Stages of work
The DIY replacement sequence consists of the following steps:
Why you should change the timing belt yourself: you will save time and money, you will know what to do if it slips or eats.
Timing roller location
Before you begin diagnosing or replacing the timing belt and rollers on a VAZ 2115 with 8 valves, you need to determine where the system itself is located. You can find it on the left side of the engine if you stand in front of the hood. It is located under a protective cover that prevents debris and dust from entering the system. For visual diagnostics, simply unscrew a couple of bolts and remove the upper part of the casing. However, if you are planning a more serious operation, such as replacing a belt or rollers, this will not be enough.
VAZ 2115: do-it-yourself timing belt replacement
Replacing the timing belt on a VAZ 2115 is a standard procedure that is included in maintenance; replacement should be done every 50,000 kilometers or once every 3 years of operation of the car. If the belt breaks during operation, then you should put on a new one and first determine the degree of damage to the gas distribution mechanisms (check the compression, if not, check the valves, then the condition of the pistons, and so on). To avoid problems, it is better to replace the VAZ 2115 timing belt according to the regulations, regardless of its external condition.
Why change the belt?
In the list of routine maintenance for the VAZ 2114, the manufacturer provides for replacing the timing belt every 60-75 thousand kilometers. However, given the quality of our spare parts, experienced car enthusiasts recommend replacing it after no more than 30-40 thousand km.
The belt should be visually inspected for visible mechanical damage at least once a month. If the slightest problem is detected, it must be replaced immediately.
If this is not done, the tension pulley may fail, as well as the water pump. In addition, there are cases when parts of the belt wrap around the generator pulley, which leads to blocking of its shaft.
But there is also good news. In VAZ 2114 cars with 8-valve engines of 1.5 and 1.6 liters, a broken belt does not threaten bending of the valves and damage to the cylinder head, which cannot be said about sixteen-valve engines, where a similar problem occurs in 90% of cases.