Removal
2. Use any available method (marker, felt-tip pen) to mark the position of the latch on the hood.
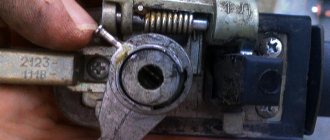
3. While holding the hood latch with a screwdriver, use a 17 mm
loosen the tightening of its lock nut.
4. Unscrew the locking nut and washer.
5. Using a screwdriver, remove the lock washer of the safety hook axis.
6. Remove the axle and remove the drive lever from the two plastic holders.
7. Remove the safety hook assembly with the drive lever from the hood.
8. Using pliers or prying it with a screwdriver, remove the upper end of the hood lock spring from the panel hole (shown from the engine compartment).
9. Disconnect the drive rod from the spring and, turning, remove the spring from the body panel.
Repair
To repair the lock and replace parts, you will need the following tools:
- open-end wrench for 17 and 19;
- liquid oil for lubrication;
- Screwdriver Set;
- pliers or pliers.
Repairing a lock yourself requires some skill and slowness, so you need to count on at least 2 hours. First you need to determine which mechanism in the lock has failed; most often it requires repair:
- springs (zam, hook, latch);
- replacement of traction.
It is unlikely that it will be possible to repair the hood lock in a few minutes for the first time.
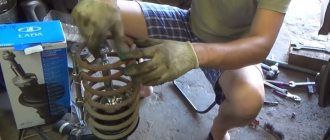
Replacing the lock spring
The lock spring is located on the car frame. Wear of the metal part, deformation and cracks cause the hood to not close tightly. Using the VAZ 2114 as an example, you can install the lock spring in several stages:
- Disconnection from the spring of the traction mechanism. A screwdriver is used.
- Removing the spring.
- Installing a new lock spring.
Replacing the latch spring
If you need to change the latch lock spring, for example, on a VAZ 2114, you will need a flat-head screwdriver and a 19mm wrench. You can change the spring in three stages:
- Kickback (loosening) of the locknut.
- Unscrewing the pin.
- When the locking mechanism is removed, the spring is replaced with a new one and a similar assembly is performed in the reverse order.
After repairs, it is recommended to always check how the hood latches after replacing the part.
Replacing the hook spring
Unlike the previous two spring replacements, replacing the lock spring will require either pliers or fine tweezers. Repair is more painstaking and requires a certain skill. The work is carried out according to the following principle:
- Use a screwdriver to pry off the lock washer that holds the hook axis.
- The washer is removed from the grooves with tweezers (or pliers).
- The hook axis is removed.
- The spring is removed.
Adjustment
Note: The lock is adjusted by changing the position of the lock latch.
1. To move the latch to the side, loosen the tightening of its lock nut and move the latch within the hole in the hood reinforcement, ensuring that the latch accurately hits the corresponding hole in the front panel when closing the hood.
2. To adjust the amount of protrusion of the lock latch, unscrew its lock nut and use a slotted screwdriver to tighten or unscrew the latch. Having achieved the desired amount of protrusion of the latch, fix it with a lock nut.
3. We check the operation of the lock and, if necessary, repeat the adjustment, ensuring its smooth operation.
Replacing the hood lock on a VAZ 2108, VAZ 2109, VAZ 21099
Before we start replacing the hood latch, let's take a look: What actually goes into the so-called hood latch? Firstly, the castle includes:
• Two hood release handles. (One handle is installed in the cabin, and the other is located in the engine compartment)
• The lock also includes the lock drive cable itself, as well as the hood latch and safety hook. Read the entire instructions on replacing parts of the lock below.
How to ensure ease of opening and reliable fixation?
For these purposes, a special part is sold that can be installed on the car yourself. This part is called a gas stop. They replace the standard rack and, as a result, the consumer properties of the car increase sharply. The opening of the hood begins as follows. You only need to lift the hood a little with one hand. Next, the gas stop gets to work. He himself will raise the hood to the required height and securely fix it there. The standard stop will no longer be used. During operation, this stop does not require any maintenance.
Many owners of VAZ 2114 cars prefer to install a gas strut on their car, especially since the installation process does not require much effort. To perform this operation you will need:
- The stops themselves;
- Two keys for 13;
- Four nuts with washers for 13mm;
- Drill;
- Eight-millimeter drill;
- A little enamel and bitumen.
First of all, we lift the hood and install it on the still old stop. After this, you need to mark the places where there will be holes that you will need to drill yourself. On both sides of the hood you need to measure 530 millimeters.
In this case, the internal distance between the two holes will be 310 millimeters. The holes will be drilled into the thickening of the hood, inside of which there is a void. Nevertheless, the procedure should be approached with all responsibility, because if you overdo it, you can drill a hole in the hood itself. After making sure that everything is marked correctly, we proceed directly to drilling. Using a drill you need to make four holes. Two in the hood thickening and two under the hood, one on each side of the body cross member. To prevent the possibility of corrosion, it is advisable to treat the resulting holes with an anti-corrosion compound and paint. After this, you can proceed directly to the installation. We take the gas stop and install it in the drilled holes on one side. We do the same with the second emphasis. They will need to be screwed. For those who work without an assistant, it is better to first screw the stops onto the hood, and only then onto the body. If there is someone nearby who can support the hood, then the sequence of actions does not really matter. When everything is done, it will be possible to test the set stops in action. You will need to try opening and closing the hood several times. It should open easily and smoothly, and closing should not be accompanied by significant effort.
Hood lock device
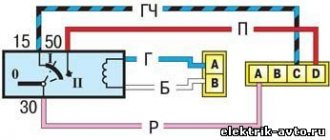
Here is a picture that clearly explains the operation of the mechanism for opening/closing the hood using the example of a G8.
As you can see, the cable passes through a significant part of the perimeter of the engine compartment. The rod that opens the hood of the car is laid with bends and comes into contact with many body parts. The cable is subject to abrasion and stretching even despite the presence of a protective sheath. The principle of operation is simple - the driver pulls the handle (11) and, using the movement of the cable, releases the latch pin. The hood is supported only by a safety hook, which, when folded back, the car owner gains access to the key components of the car.
The adjustment process on the selected car model
The device of the hood lock VAZ 2108/2109/21099
To begin with, open and fix the hood
Let's pay attention to the lock and try to understand the principle of its operation.
Hood lock device
The photo shows the main elements of the castle:
- Lock latch spring
- Lock-nut
- Latch
- Safety hook
- Safety hook handle.
From what we saw, it follows that after we pulled the opening handle in the cabin, the cable opens the latch, which releases the lock latch. Thanks to the latch spring, the hood “jumps” up, but it is still held half-open by the safety hook. And only by pressing the handle of the safety hook, we can fully open it and gain access to the engine compartment. Quite a reliable system. At first sight…
Vertical adjustment of the lock
If the hood does not want to close normally (you slam it, put pressure on it, but it still closes with difficulty, or does not lock in the closed position at all), or a rattling noise appears when driving on our perfectly smooth roads (sometimes it is noticeable even just when the engine), then adjustment in the vertical direction is necessary. Namely, adjusting the length of the lock latch.
To do this, use a 19 mm wrench to loosen the lock nut on the latch, holding the latch itself from turning with a flat-head screwdriver.
Latch length adjustment
If the hood is poorly or not at all fixed in the closed position, then you need to slightly increase the length of the latch, which we will achieve by unscrewing it with a screwdriver.
If the hood rattles, on the contrary, you need to shorten the latch by tightening it several turns inward. The required latch length is determined experimentally.
Got rid of the problem? Then tighten the locknut (don’t forget to hold the latch with a screwdriver), check it again and rejoice!
Horizontal adjustment of the lock
If there are problems with opening, or if there is a metallic knock when closing, the lock requires horizontal adjustment.
Adjusting the latch position
To do this, we also loosen the lock nut and slightly move (not twist, but move) the latch in the desired direction.
When adjusted correctly, everything should close and open well. Without any effort. Ideally, the hood should slam shut completely when released from a height of 20-30 cm and snap open when pulled by the drive handle in the cabin, only being secured by a safety hook.
https://youtube.com/watch?v=UgSVmxtFUTA
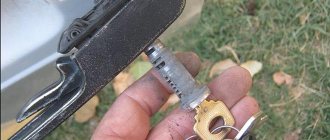
How to open a car hood if the cable is damaged
You can often come across the following request from owners of “fourteeners”: the hood cable of the VAZ 2114 has broken - what to do? Access to the engine compartment of the Samara is possible if the car enthusiast knows a few tricks. The main difficulty is determining the location of the traction break. Often the “thread” breaks directly at the point of attachment to the hood release handle. In this case, you can manually search the indicated area and try to hook the tip of the cable with pliers. If this is successful, then you just need to pull the torn end towards you to open the hood.
Installation of sports locks
Sports hood locks can be installed instead of standard parts or as additional insurance. It is recommended not to abandon the original locking mechanism; this is an additional guarantee that the hood will not be opened by intruders; the latches on VAZ cars are quite strong and can withstand significant mechanical forces if they are opened.
Preparing for installation
Before installing the sports lock, it is necessary to accurately measure the places where the rods are attached on the bar.
- Holes are drilled in the frame above the headlights and rods are installed.
- the tops of the rods are smeared with grease, and the hood lid is covered so that fingerprints remain on the lid.
- On the hood, on the printed marks from the rods, the necessary holes should be drilled.
Hood drilling steps:
- The hood cover is drilled from the inside out.
- Take the smallest drill and drill a hole on a solid wheel.
- The hole is expanded with a large drill.
- Checking holes for additional boring.
- The hole should be 1-2 mm away from the rod.
The preparatory procedure before installing the sports lock is completed.
Lock installation
Installing the lock also requires using a drill to secure it to the hood. Stages of work:
- For example, the protective coating is removed from the plate on the hood lock of a VAZ 2106, the plate is applied to the hood and the four mounting holes for the plate are measured.
- Use a thin drill to drill the cover for the screws.
- The plate is screwed on with self-tapping screws.
- The rods are tightened to the optimal position.
- Studs are inserted into the holes of the rods.
- Installation of safety cables.
- Installation completed.
Of course, repairing and adjusting the lock is not a complicated procedure that you can easily do yourself. A well-reinforced hood means driver safety on the road; it’s hard to imagine what the consequences of a hood suddenly opening on the highway could be.
Didn't find the information you are looking for? on our forum.
We recommend reading:
- The car jerks when starting the VAZ 2114, several main reasons
- VAZ 2110 slowly slows down - causes of malfunction
- Replacing steering tips on a VAZ 2114
- VAZ engine lubrication system
- How to flush the engine cooling system of a VAZ 2114 injector 8 valves
- Speedometer drive VAZ 2115 injector
- VAZ 2109 starts every time, what to do, instructions for beginners
- VAZ 2114 how to change a headlight on a car, choosing optics, replacing a rear headlight, replacing glass on the front...
Replacing the hood cable of a VAZ 2114
Buying a new cable is not a complicated matter - any car store within walking distance is unlikely to ask for more than 150 rubles. On the shelves you can find imported Czech-made rods, which, according to the assurances of “experienced” ones, are of course many times stronger than our “snot”. But, in fact, the difference between the options available on the market is minimal: the strength characteristics are almost identical.
Replacing the hood cable of a VAZ 2114 will not cause any difficulties if you follow the algorithm outlined below. To carry out repairs, the car owner will need: a set of screwdrivers, pliers.
Algorithm (also relevant for models “2113”, “2115”):
- We bend the bent end of the cable at the place where the rod is attached to the hood opening handle;
- Move the locking ring of the handle to the upper position;
- Remove the hood release handle (optional);
- We climb under the hood and remove the O-ring;
- Disconnect the rod clamps in the area of the sealing ring;
- We remove the rubber seals around the perimeter of the engine compartment;
- We drag the rod through the partition of the engine compartment;
- We take out the rod holders that secure the shell with the drive to the body;
- Remove the other end of the cable from the hood lid spring;
- We pull out the drive shells from the clamp;
- Remove the hood cable;
- We perform the steps described above in reverse order with the new cable.
When reinstalling, try not to damage the hood lock spring - if this happens, the hood may begin to open spontaneously while moving. When purchasing a new cable, pay attention to the number of traction strands - monofilament cables are much less durable and are prone to breaking and chafing. If you have any questions, watch this useful thematic video
If you're unlucky
A less good outcome is, unfortunately, more likely. If the hood on your VAZ-2114, VAZ-2115 or VAZ-2109 does not open and you cannot feel its edge from the passenger compartment, you will have to drive onto a pit or overpass. Some dismantling work will have to be done.
Unscrew the engine protection. It is secured with several bolts, and you will need a 10mm wrench. And then reach with your hand between the engine and the radiator towards the hood. The opening mechanism must be moved towards the driver's door. Ideally, someone should help you, because in normal conditions this mechanism will be more difficult to open. If someone or something presses down on the hood, you will be able to open it much easier.
After sliding the mount, fold it back and fix it. If this is not done, it may well slam shut and you will have to crawl under the car again. As we wrote above, start repairs as soon as possible, so that you don’t have to do this procedure every time you need to check the oil due to a broken cable.
As practice shows, the hood opening cable on the VAZ-2115, VAZ-2114 and VAZ-2109 can break for a number of reasons, the main one of which is temperature changes. The steel wire used for it is very sensitive to kinks, and again it does not become stronger due to defrosting/freezing cycles.