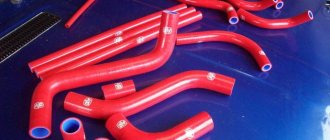
How to replace the heater radiator of a Lada Priora with air conditioning
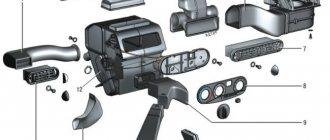
As mentioned above, there can be many reasons why warm air has stopped flowing into the cabin while the heater is on. First, let's briefly look at the design features of the Priora heating system, as well as its main elements. There are no particularly complex electronic devices here - everything is done quite simply, and therefore reliably. The stove on the VAZ-2170 is of a liquid design, and it is combined with the engine cooling system. In fact, here is a classic scheme where antifreeze is heated and warm air is supplied to the car interior. The main elements of the system are:
- radiator;
- fan;
- 2 dampers, with which you can regulate the strength of the flow of warm air and its distribution among the zones of the cabin.
For those who have previously had to deal with the heating systems of VAZ cars, there is essentially nothing new here. The coolant is heated in the radiator, after which the warm air is blown into the passenger compartment by a fan. The driver is able to regulate the intensity of the flow, as well as distribute it throughout the cabin.
It should also be noted that Priora can be found in two different trim levels - with and without air conditioning. In the first case, VAZ installs devices from Panasonic or HALLA on the model 2170. At the same time, cars with air conditioning turned out to be more convenient in terms of maintenance and repair of the heating system, since access to its components was significantly simplified.
In particular, in order to remove the radiator, it is no longer necessary to dismantle the decorative trim of the windshield. In addition, there is no need to remove the wiper arms. There is also no need to remove the brake booster and heater. All this saves a lot of time; accordingly, all the necessary work can be done faster than on a Priora without air conditioning. Yes, there shouldn’t be any difficulties with this.
In order to remove the heater radiator on a Priora with air conditioning, you will need a minimum set of tools. In particular, you should take:
- wrenches - 8, 10 and 13;
- Phillips screwdriver;
- container for draining coolant.
Having prepared everything you need, you can start working.
The first step is to remove the rubber seal from the windshield trim - this is necessary in order to gain access to the components we need. The next stage is dismantling the middle part of the engine compartment sound insulation. To do this, you must first remove the hoses from the mounts. It should be noted that in the upper part the sound insulation in the Priora engine compartment is held in place by 3 self-tapping screws, in the lower part by 3 screws, 2 nuts and a washer. Some of the mounts are quite difficult to reach, so it is recommended to use special tool extensions.
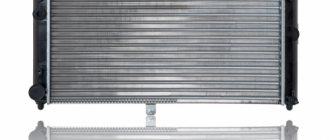
Design and functions of the Lada Priora radiator
The main task of this unit is cooling and maintaining the operating temperature of the coolant. When starting a cold engine, the radiator does not affect the cooling system in any way. Moreover, until the engine warms up, it is not turned on at all, since it is used only when a large circle of the cooling system is opened.
After reaching a certain temperature (on the Lada Priora it is 85–90 degrees), the thermostat opens and antifreeze begins to circulate through the radiator, where it cools. When the engine operates at high speeds (especially when driving at low speeds), the device cannot cope with cooling, and the engine temperature begins to rise again. In this case, the fan for forced cooling of the antifreeze circulating through the radiator is turned on to help.
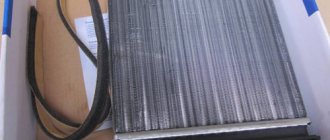
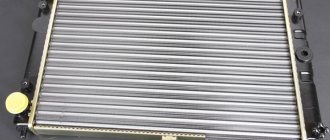
Structurally, it consists of a tank at the top and bottom, the middle part and fastening elements.
The standard cooling radiator on the Lada Priora is made of brass parts. And this is a material with excellent thermal conductivity characteristics. The middle part, or core, is a plate structure through which tubes are passed, connected to the plates by soldering. As the coolant passes through the core, it is distributed into a number of separate streams. This allows antifreeze to be cooled more efficiently by significantly increasing the contact area between the antifreeze and the metal walls of the vertical tubes.
The radiator tanks are connected to the cooling system using rubber pipes. A special tap is used on the lower tank to make it easier to drain the coolant. There is also an additional tap on the cylinder block. With its help, you can easily drain the liquid from the engine water jacket. Overall, a simple but effective heat exchanger design.
How to remove the heater radiator on a Priora without air conditioning
Since the beginning of production, AvtoVAZ has installed a heater from the “ten” on the Priora (catalog number: 21110-8101012). The disadvantage of this design was that the heater radiator is removed towards the vacuum brake booster, which allows this to be done. As a result, the heater assembly has to be dismantled.
The procedure is as follows:
- Remove the wipers.
- Remove the frill (wind flap).
- Remove the soundproofing of the engine shield.
- Disconnect a bunch of connectors with wires.
- Unscrew the heater mountings.
- Divide the heater into two parts (left and right).
- Remove the right side of the heater (in the direction of travel).
- Move the left side to the side to gain access to the heater radiator.
- Drain the antifreeze.
- Replace the heater radiator.
The whole procedure took several hours. This is shown in more detail in the video:
There is another way to replace it. To gain access to the heater radiator, instead of the heater housing, it is necessary to remove the vacuum brake booster along with the brake pedal. This allows access to the left side of the heater (in the direction of travel) and to the radiator itself.
Replacing the heater radiator on a Priora with air conditioning
After some time, the manufacturer began to equip its cars with air conditioning (climate control), for example, HALLA or Panasonic (article: 21703-8101012). The design of the new Priora heater from a maintenance point of view turned out to be much more convenient. Now, to replace the stove, you do not need to dismantle the frill, windshield wipers, heater or vacuum brake booster.
It is only necessary to: remove the sound insulation of the engine shield, remove the engine air filter hose and the seal in the area of the heater radiator hoses. All! Drain the antifreeze and remove the radiator towards you, towards the engine.
Video instructions are attached:
Thus, replacing the radiator of a Priora stove depends not only on the type of heater, but also on the chosen method of replacing it. How did you remove the heater radiator on your car? Which method suits you best? Let us remind you that solutions to other problems with the stove can be found in this article.
Replacing a radiator on a Lada Priora
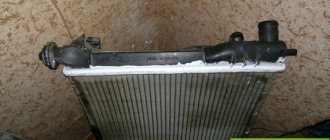
The main unit of the engine cooling system is a relatively reliable and durable part. Accordingly, it changes in rare cases. Antifreeze leaks from damaged radiators are infrequent, and when high-quality coolant is used, clogged or clogged tubes are virtually eliminated.
Cars older than 10 years and with a mileage of over 200,000 kilometers can safely operate with a radiator installed at the factory. This is a common thing, even when it comes to domestic cars.
But there are situations when it is no longer possible to do without replacing this part:
- It is located close to the engine, and if careless actions are taken during the repair of the latter, it is easy to damage the brass tubes.
- If the front part collides with an obstacle, for example, even in a minor accident, the radiator will be the first to suffer, and any penetration will lead to a coolant leak.
- An increase in pressure in the system also leads to the formation of a leak, most often this occurs due to a faulty valve cover of the expansion tank.
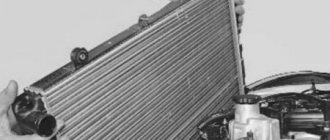
To work on replacing the radiator on a Lada Priora, you will need a socket with a wrench or a 10-socket wrench, long-nose pliers, a curved screwdriver, as well as a suitable container for draining the coolant. Instructions for replacing the radiator on Lada Priora cars are as follows.
- Remove the expansion tank cap, place a suitable container under the radiator and unscrew the drain plug to drain the antifreeze.
- Disconnect the wiring block from the electric fan, unscrew the fastening bolts and remove it along with the casing.
- Unscrew the fastening and remove the signal.
- Loosen the clamps on the lower and upper inlet pipes and pull them off the bends.
- Using a 10 mm wrench or socket, unscrew the bolts securing the radiator to the body.
- Disconnect the expansion tank hose fastening.
- Remove the radiator, then remove the two rubber cushions and mounting bushings (in the case of an air conditioner, the process is complicated by the need to dismantle the latter).
Self-repair of this part is carried out in rare cases and consists mainly of sealing the breakdowns. The process is labor-intensive and requires certain skills, knowledge and tools. Considering that the cost of a new product on Priora does not exceed 3,000 rubles, it becomes obvious that do-it-yourself repairs, which require time and effort, are not practical.
The main differences between a stove with air conditioning and a standard one
The main feature of this device is the presence in the air duct of a heater, an air conditioner evaporator radiator, which cools the air passing through it.
Operating principle of the air conditioner
All cars equipped with these devices have approximately the same set of components. It includes the following elements:
- Control block.
- Relays and fuses.
- Air conditioning radiator with fan.
- Compressor with electric coupling.
- Evaporator.
- Aluminum tubes for connection.
- Sensors and wires.
The main feature of this gas is its ability to lower temperature when strongly compressed. That is, the higher the pressure in the system, the lower the temperature during evaporation. This is such an interesting thing. In general, when turned on, the compressor pumps pressure into the evaporator, located in the heater housing in the path of the air sucked in by the engine. The heated gas goes through the return pipe to the radiator, located in front of the main heat exchanger of the cooling system. And from there, under pressure, again into the evaporator. The air conditioner is turned on from the control panel of the unit, with a button built into the heater mode handle.
Differences
It is the presence of the evaporator that dictates the requirements for the location of the stove components. That is why the electric motor of the Priora heater is located not vertically, as on a standard stove, but horizontally. And the Priora cabin filter takes a vertical position instead of a horizontal one. There is a separate article about this on replacing the Priora cabin filter.
Heater radiator with air conditioner
It was also positioned somewhat differently. The difference is that it does not go towards the vacuum brake booster, as on a simple Priora, but forward. That is, in the direction of the car engine. All this is done so that you do not have to dismantle the entire stove to replace the unit.
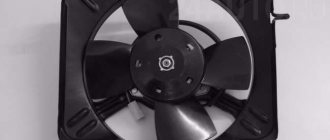
Heater fan
The engine on such stoves, as already mentioned, is located vertically. One detail. If a Panasonic air conditioner is installed, then its electric motor is located on the right side of the stove (along the direction of the car). But on the Hallo system, on the left. Next to the radiator. The Halo air conditioner motor is slightly smaller than the Panasonic motor.
Air conditioner evaporator
And, of course, the evaporator radiator. It is installed in the right half of the heater, right at the air inlet. It is its presence that requires special care when repairing and replacing any part of the climate control system.
Radiator malfunctions and their consequences
A broken device poses a great danger to the entire cooling system, since its instability can lead to overheating of the power plant. The Lada Priora uses a standard combined cooling system, when the liquid system is supplemented by an air system. Thanks to this combination, it is possible to more effectively maintain the optimal engine temperature under various loads and operating modes.
There are not many malfunctions of this element as such. The main problem with the radiator is the occurrence of coolant leakage. This happens due to a violation of the integrity of the tubes caused by damage to the radiator. Another common problem is clogging of its inner surface. This can be determined due to the constant operation of the forced cooling fan.
The temperature drops, but rises quickly and causes the ventilation unit to turn on again, even when driving at high speed. This is due to the fact that the oncoming air flow cannot cool the coolant due to dirty plates. Contaminants can also be deposited on the inner walls of the radiator tubes, which will impede the circulation of antifreeze. And, as a result, the engine will begin to heat up excessively.
When the device is broken, the power unit overheats.
Causes of malfunctions
The main factors causing problems with the radiator are the following:
- wear of elements of a natural nature (any part sooner or later wears out and fails);
- mechanical impacts leading to damage and deformation;
- operating the engine in violation of the manufacturer's requirements and recommendations.
Breakdown can be caused, among other things, by the use of low-quality coolant, mixing antifreeze with other types of antifreeze, and the use of all kinds of sealants that can clog the pipes and affect the circulation of the coolant (coolant). At the same time, the human factor cannot be ignored when, due to incompetence in matters of radiator maintenance and repair, a part has to be replaced.
Diagnostics of climate control equipment "luxury"
Like all electronic control units (ECUs), the heater/air conditioning computer is diagnosed either with a portable scanner or with a full-fledged motor tester. It should be borne in mind that this system is controlled through a separate ECU called the comfort unit.
Just like standard diagnostics, the climate control system scan is connected via the OBD-2 diagnostic connector under the glove box. In general, these tests are carried out in a similar way to diagnosing an automatic heating system. With air conditioning features. That is, checking the actuators and sensors of this device.
Fan doesn't work
But sometimes another problem occurs with the Priora stove. The driver turns the heater switch, and in response there is silence. The electric motor is not working. What is the reason. There may be several of them:
- The fan motor burned out.
- The heater control unit has failed.
- The fan speed resistor has burned out.
- Broken electrical wiring.
The easiest way to determine if a resistor is broken. In this case, only the maximum speed is turned on, and the stove does not respond to other positions of the handle.
The control unit is checked either by computer diagnostics or by a simple replacement. There are no other options.
The condition of the electric motor can be determined by checking with a test lamp. It is enough to remove the top frill and gain access to the motor connector. Disconnect this connector and insert a test lamp instead of the chip going to the fan. When you turn on the stove handle, the light should light up if the unit and wiring are working properly. If there is no signal, start checking the wires sequentially. If the lamp lights up, replace the electric motor.
Replacing the motor
Although Hallo and Panasonic fan electric motors differ in size and installation point, they have one thing in common. Their location is in a vertical position. This allows you to dismantle them without removing the entire heater. As with a standard heater, the heater fan motor on a Priora with air conditioning is secured with 3 screws.
So, replacement. As in the case of a radiator, first of all you need to open access to the stove. That is, remove the frill and protection. Then disconnect the electrical connector. Now just unscrew the 3 fastening screws and remove the fan with the motor. That's it, you can install a new unit in its place. But this is only for the Hallo heater. With the Panasonic compressor, everything is somewhat more complicated. The fact is that it is also separated from the engine compartment by a plastic casing. According to factory documentation, it is necessary to remove the entire heater to replace the electric motor. And this is draining and refilling freon. But our craftsmen found a way out.
Cut the protection at the narrowest point approximately in the middle of the compartment and remove it by unscrewing 2 fasteners. After this, access to the part being replaced is open. Sometimes, however, in most cases, the engine mount prevents you from pulling out the motor. Don't panic. This problem can be solved by disassembling the motor on site. That is, separate it into 2 halves and pull them out separately. Then insert a new one using the same method.
But still, just in case, before replacement, it is better to consult with car service specialists in advance about possible refilling of the air conditioner with freon in case of damage. This is to replace the motor. But with a radiator, such problems, as a rule, do not happen.
Video on the topic of replacing the radiator of a Priora stove with air conditioning: