Repair of hand brake Lada Priora
The parking brake should always be in working order; if you start to notice any problems, you should immediately begin repairs. Today we will publish a guide that describes in detail how to repair the hand brake on a Lada Priora with your own hands.
You will need:
— two keys “13”; — socket wrench (head) “13”; - a screwdriver with a Phillips blade; - pliers.
Repair of hand brake Lada Priora
1. First of all, you need to disconnect the wire from the “-” terminal of the car battery.
2. Remove the floor tunnel lining.
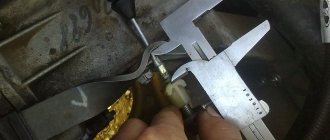
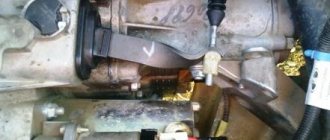
3. From the bottom of the car, using a 13mm wrench, unscrew the locknut and the parking brake adjusting nut and remove the equalizer 1 from the rod 2.
4. Remove the protective cover from the hole in the floor and remove it from the rod.
5. From inside the passenger compartment, remove the screw of the front fastening of the parking brake warning lamp switch bracket. Please note that the ground wire of the switch is secured with a screw.
Note that on our website there are already publications about adjusting the parking brake on the VAZ 2101 and VAZ 2107 with your own hands.
6. Using a 10mm wrench, remove the four bolts securing the parking brake lever (the two front ones also secure the switch bracket).
7. Set the bracket with the switch aside.
8. Remove the parking brake lever by moving the rod out of the hole in the floor.
9. To replace the rod, remove cotter pin 1 and washer 2.
10. Remove the rod from the axle.
11. Replace worn or cracked plastic bushing. Assemble and install the parking brake lever in the reverse order of disassembly. After installing the lever, adjust the parking brake.
Source
Parking brake lever repair
You will need: two 13mm wrenches, a 13mm socket wrench (head), a Phillips screwdriver, and pliers.
The handbrake became tight and did not hold well, so I replaced the parking brake cable and the springs in the brake drum. At the same time, we inspected the pads and brake cylinders and the drum itself, everything is fine)) To replace it is necessary: - remove the wheels and brake drums - unscrew 2 nuts (control and adjusting), remove the cable ends from the equalizer - bend the 2 cable mounting brackets, remove the cable — insert a screwdriver between the block and the parking brake drive lever, move the lever to the forward position and disconnect the cable tip from the lever — remove the cable from the side of the rear shoes.
The old cables stretched out, rusted and began to break.
In general, in practice, handbrake cables on Priora are changed extremely rarely. And if this is necessary, then in most cases for the following reasons:
- Over time, the cables stretch out, that is, they become longer. Accordingly, even with the lever fully raised, the effectiveness of the handbrake will be greatly reduced.
- Failure or complete rupture of the cable, which can occur during sudden braking using the handbrake (there are such amateurs), or when the lever is pulled too tightly for a long time.
Instructions: how to tighten the handbrake on a Priora - price of parts
Since ancient times, some Taz drivers used first gear to prevent the car from rolling away, even with a handbrake, my dad always taught me to set the speed. But this can end badly if you don’t turn off the speed and start the car. Over time, the parking brake, due to constant use, stretches the cable, you can tighten it a limited number of times, then you have to remove it, because tightening it is already useless.
He stops holding the car and is not fixed. You can tighten the handbrake on the Priora with just two 8 keys in the hole. This is usually done in your garage. Replacing the drive and handbrake cable on a Priora will require additional keys. Of all the brake systems of the Priora car, the parking one stands out separately. It saves you from unpleasant surprises - while it is working, the car will not roll away in the parking lot. When the handbrake doesn't hold, you should start repairing it right away, maybe you just need to tighten it. Lada Priora received the part as early as 2108 - it has not been changed since then.
When the driver raises the handbrake handle higher and higher to hold the car in place, this indicates that the parking brake system is not working. Most often this can be solved by tightening it, just tighten the cable and the handbrake will hold. There may be several malfunctions in the parking brake system of a Priora car; read the article to the end and find out about them.
Handbrake (parking brake) on Priora - article number and price
The assembled parking brake system of the Priora car has the catalog name “Handbrake drive” - number C170. Main components:
- cable bracket: 2108-03508214-20, 30 rubles;
- handbrake cable: 2110-03508180-01, price - 400 rubles;
- parking traction axis: 2110-03508073-00, price - 500 rubles;
- laying of parking rod 2110-03508089-00;
- parking drive rod: 2108-03508089-00, price - 250 rubles;
- parking brake lever (assembled): 2110-03508012-00, price - 600 rubles. Button – 2110-03508039-00;
- lever assembly with rod: 2110-03508010-00, price - 1300 rubles;
- traction protective cover: 2108-03508046-00, price – 40 rubles;
- cable equalizer: 2108-03508075-10, price – 50 rubles.
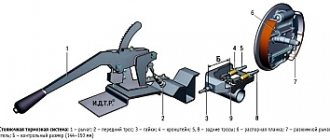
Diagram of the main elements
This diagram shows a handbrake drive with a subsequent description of all the parts involved in the operation of the mechanism.
1 — Cover covering the handbrake mounting parts; 2.14 - front and rear handbrake cables, respectively; 3 — hand brake lever; 4 — button; 5 — button spring; 6 — button pull; 7 — sleeve for securing the lever; 8 — washer; 9 — cable guide; 10 — rear cable bushing; 11 — return spring; 12 — rear pad spacer; 13 — hand brake drive; 15 — rear cable fixation bracket.
Basic faults
According to the law, a malfunction of the handbrake is accepted in two cases:
- If, at a 16% slope, the handbrake does not hold the equipped car (without cargo and passengers, but with a full tank of gasoline, the driver’s weight is taken to be 75 kg).
- If, on a 23% incline, the handbrake does not hold the vehicle at full load (the maximum permissible vehicle weight has been reached).
In reality, more often than not, a malfunction of this brake mechanism of the Lada Priora is noticed not by measuring the steepness of the slope, but by clicks. When another click of the handbrake is added to the usual “set of sounds” when leaving the car, every car enthusiast understands that it’s time to tighten the cable.
But the problems don't end there. For the parking brake system they can be as follows:
- The cable has stretched too far. Over time, it undergoes deformation. It can be tightened, but to a certain extent.
- The cable broke. When the “limit” is reached, the mechanical device will have to be replaced.
- The handbrake indicator on the dashboard does not light up or go off. This is due to the sensors.
- The lever button is stuck.
How to tighten the handbrake on a Priora
Adjusting the handbrake on a Priora car is done in 7 simple steps, see them below. Normal operation of the handbrake lever is considered to be two to four clicks. Typically, an increase in clicks occurs every 20-30 thousand kilometers. The stroke of the lever must remain normal, so it must be tightened in time. It is not at all necessary to immediately buy a new set for Priora, because you can handle the tightening yourself.
Before tightening the cable, prepare the following tools:
- head "13";
- keys “13”, “10”;
- ratchet;
- technical lubricant.
Carry out the work according to the instructions:
- Place the car in a pit. If this is not possible, you can raise the rear of the car and then support it. It will be inconvenient, but this method will also work. Lower the handbrake lever and put the car in gear.
- Remove the metal cover under which the cable equalizer is hidden. Its tension is adjusted there. Remove the cover fastening bolts using keys.
- Coat the handbrake lever rod with lubricant to make adjusting the tension of the mechanical device easier.
- Loosen the stem locknut.
- Pay attention to the stem nut. If the handbrake needs to be tightened, reducing the number of clicks to normal operation, turn the nut clockwise. If you need to increase the number of clicks, turn the nut counterclockwise.
- Try tightening the handbrake. It should prevent the rear wheels from turning.
- Reinstall the metal cover.
How to change the handbrake on a Priora - step-by-step guide
Replacing the handbrake cable is needed when a regular tightening is no longer an option; you will have to change the cable or drive. In order to replace the cable on a Priora car, prepare a Phillips screwdriver and a set of keys.
Replacing the cable is carried out as follows:
- Place the car in the pit, lower the handbrake, and engage the gear.
- Jack up the rear of the car, put supports on it, and remove the wheels. Further actions will be described on one side, they will need to be repeated on the other side.
- Loosen the main muffler and hang it up. Do the same with the resonator.
- Slightly loosen the handbrake rod locknut. Remove the cable equalizer.
- Remove the cable end by pulling it through the special bracket.
- Remove the brackets that hold the cable in place.
- Using a screwdriver, press down on the actuator lever to move it further away from the brake pad. The lever should move to the forward position. After this, you can disconnect the cable tip from the brake lever.
- Loosen the nut on the rear beam that holds the cable, and then pull it towards you.
- Pull the cable through the bracket that is attached to the body, then through the brake shield.
- Check the parking brake and make adjustments. If necessary, tighten the nut more.
In order to change the Priora handbrake lever, you will need a set of keys, pliers, and a Phillips screwdriver.
Source
Causes of malfunction
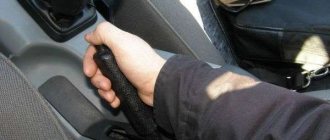
Handbrake lever VAZ 2110 in a leather case
Let's consider the principle of operation of the parking brake (handbrake) on a VAZ 2110 car.
It's pretty simple. One of its main elements is a special cable. When the driver pulls the parking brake handle, this cable is tensioned, which evenly distributes its effect on the brake pads of each wheel of the car.
Adjusting the handbrake: how to tighten or loosen
The parking brake is an integral part of the automobile braking system. Its purpose is to prevent spontaneous movement of the vehicle when parking.
The handbrake is used in extreme cases - for example, when the brake fails. Without a handbrake it is difficult to move on a sloped road. As you can see, the parking brake is a useful mechanism.
Therefore, keep the handbrake in working condition and regularly carry out diagnostics, tighten and adjust it.
Checking the serviceability of the handbrake
Every car enthusiast can carry out the simplest diagnosis of proper operation of the parking brake. Select a section of road with a slope of 23–25%. Stop, put the gear in neutral and tighten the handbrake. If the car does not move after releasing the main brake pedal, then the handbrake operates.
How to use the handbrake
On a note. Car maintenance service workers recommend checking the operation of the parking brake at least once a month.
When tightening the parking brake lever, pay attention to the number of clicks of the ratchet mechanism. If the handbrake is in good condition, there should be from two to four clicks. If there are fewer of them, then you need to release the parking brake drive. Otherwise we tighten it up. Let's look at step-by-step adjustment of the handbrake using the example of a Lada Kalina car.
How to replace the handbrake cable on a viburnum
You can determine that there is something wrong with the parking brake system in the Lada Kalina by placing the car on an incline with the handbrake and observing. If the car starts to roll, it means a check is needed. And only then can you decide whether the system simply needs adjustment or whether specific parts need to be replaced.
You should also pay attention to the sound of the brake drum rubbing against the pads from the rear wheels while driving. They shouldn't exist.
Malfunctions may occur due to:
- wear of parts, for example, drum brakes, the surface of which wears off and needs periodic replacement;
- Also, if the handbrake is in the raised position while driving, this wears down the pads very quickly.
Another reason is changing the necessary elements without subsequently adjusting the handbrake.
How to tighten the handbrake cable on a Priora
Wear on the rear brake pads is inevitable, which is why the handbrake cable has to be tightened over time in order for the parking brake to work effectively. On the Priora, as well as on other front-wheel drive cars of domestic production, the adjustment is performed in the same way, and to perform it you will only need two 13-size keys, preferably open-end ones.
To see all this work clearly, I recorded a video lesson that will show this process in as much detail as possible.
Video guide to adjusting the handbrake on a Priora
So, the first step is to remove the heat shield, if there is one. It is usually held on by 4 nuts. Then loosen the locking nut and tighten the first one until the handbrake works effectively. Typically it should lock the car's wheels well with 2-4 clicks of the lever.
When the required cable tension has been achieved, you can tighten the lock nut and put the protective screen in place. It is worth keeping in mind that you should not overtighten the cable, as this can lead to rapid wear of the rear pads and excessive heating of the drums.
If even with a sufficiently strong tension on the handbrake cable on the Priora, no improvements occur, then it is necessary to replace the pads.
Progress
So, initially you will need to prepare the necessary tool. Fortunately, tightening the cable does not require a lot of tools; you can get by with two 13-size open-end wrenches. Before starting work, you need to drive the car onto an overpass or pit, this will be much more convenient for you. It is important to know that according to regulatory documents, the handbrake must hold the car on a slope of up to 25%!
We recommend: How to drain the coolant and flush the engine cooling system on a VAZ 2114
How to tighten the handbrake on a Priora: design and features
In the article we will talk about the handbrake system and describe how to tighten the handbrake on a Priora. This will help the owners of this car to limit themselves to independent work, without having to pay for the services of a service center. Knowing the design of the system, regulation will not take much time.
What is a handbrake
The parking brake (in other words, the handbrake) is used to stop the car for a long time. It is used in parking lots, stops, on slopes and when maneuvering sharp turns. Such a car part can protect passengers and prevent accidents.
The hand brake is a safety system against unwanted movement. The operating principle is similar to a hydraulic system. In emergency situations, it is this type of vehicle design that ensures a complete stop of traffic.
How to use the handbrake correctly
Before starting to drive, you should check the position of the handbrake. If it is active, you cannot drive. This increases wear and causes problems with overheating of brake pads and discs.
It is also not recommended to leave the handbrake active in winter. Due to the presence of dirt and snow on the asphalt, freezing of the above parts may occur.
The car will not budge, and if force is applied, its individual mechanisms may break.
Parking brake design
Before deciding how to tension the cables and put them into operation, let’s consider the structural features of this system. There are two main elements of the handbrake:
- a lever that activates the brake;
- cables that work on the main braking system and slow down the movement.
There may be several cables in a car. Their number varies from one to three. The quantity depends on the Priora model. The most common option is with three cables. They are placed two at the back and one at the front. The “pair” is attached to the brake mechanism, and the third element is connected to the lever.
The connection of the cables is ensured by lugs that are adjustable. The design is also complemented by nuts placed at the ends of the “wires”. They are designed to change the length of the drive. The return spring ensures that the vehicle returns to its original position. It is located on the front cable and on the brake mechanism itself.
System operation process
- Move the brake lever to a vertical position until a locking sound appears.
- The cables move into a tensioned position.
- Locking the rear wheels for braking.
- Removing the handbrake to loosen the cables.
- Making the transition to driving mode.
Raising the handbrake on a Priora
It is not difficult to tighten this element of the brake system. Adjustment of the system requires the presence of only two keys for 13. It is desirable if they are open-end type.
The process of self-repair is not difficult. For convenience, the repair process is carried out in a pit or using a lift - this makes it easier to get to the system.
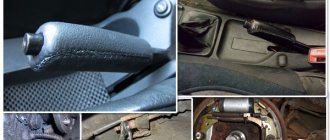
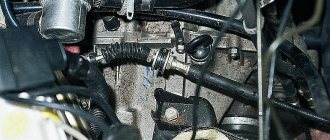
The photo shows a mechanism that requires intervention.
There is no need to lift the hatchback, just look under the car. The following workflow will look like this:
- Removing the heat shield.
- Loosening the lock nut.
- The first one needs to be tightened to the maximum level.
- Open cables are stretched.
- The nuts are tightened and the screen is installed in place.
Do not tighten the cables too much - this leads to improper operation of the entire system. Otherwise, a full repair of the handbrake at a service station will be required.
Brief conclusions
Adjusting the handbrake is a simple process. It should be carried out regularly so that the car does not fail while driving. Many people turn to service centers to carry out such work. It is better to perform the adjustment at home to be sure of the result.
VAZ 2170 | parking brake adjustment | Priora
The parking brake lever activates the brake mechanisms of the rear wheels . A steel cable in a flexible, twisted braid is used as rods. The wear of the parking brake during operation is insignificant. Normally, parking brake adjustment is not required due to the self-adjusting brake disc system.
- The parking brake is adjusted when the working brake system is in good working order in the following cases:
- — after replacing the parking brake cables;
- — after replacing the brake disc brake brackets;
- — after replacing brake pads or brake discs;
- - with a large stroke of the parking lever.
| Warning The cable drive and all moving elements of the parking brake system must move smoothly, and the rear brake mechanisms of the working system must be adjusted. |
- Adjust the parking brake in the following order:
- — press the brake pedal forcefully several times and release it;
- — lower the parking brake lever to the lower position;
- — lift the rear part of the car and place it on a support;
| Rice. 310. Location of the parking brake regulator at the equalizer (shown by arrow) |
| Rice. 311. Position of the handbrake lever on the rear brake caliper when adjusting the parking brake |
— tighten the adjusting nut (Fig. 310) next to the equalizer until the handbrake lever on the rear brake caliper moves from the stop (Fig. 311). The resulting gap can be up to 1 mm;
— set the parking brake lever to its highest position and lower it again. Check if the wheels rotate freely. The brake pad linings should not rub against the brake discs;
— set the parking brake lever to 3-6 clicks and make sure that the wheels do not turn in this case.
If the drive traction cables do not provide proper tension for the entire brake mechanism, then in this case, adjust the parking brake in the following order:
— completely loosen the parking brake adjuster (see Fig. 310) until the parking brake levers on the rear brake calipers move back all the way;
- - draw two small lines opposite each other - one on the parking brake lever, and the other on the rear brake caliper;
- — while slowly tightening the parking brake adjuster, watch the parking brake levers, which should rise. When the distance between the marks is approximately 1.0 mm, set the parking brake lever to its highest position so that the tension in the parking brake cables is equalized;
- — again check the position of the levers on both brake calipers of the rear wheels. If it remains the same, tighten the handbrake adjuster;
- — set the parking brake lever to 3-6 clicks and make sure that the wheels do not turn in this case;
— set the parking brake lever to its highest position and lower it again. Check if the wheels rotate freely. The brake pad linings should not rub against the brake discs.
Replacing the parking brake pawl rod spring
If the parking brake lever does not lock into the selected position, first check the pawl spring.
If the spring is OK, replace the lever.
Unscrew the button from the lever
Remove the pawl spring.
Replace the defective spring
Parking brake lever repair
We install the car on a lift or inspection ditch
From the bottom of the car, unscrew the four nuts 1 securing the body floor protection, remove the spring and flat washers.
We disengage screen 2 from the fastening studs and move it forward in the direction of vehicle travel, thereby freeing up the location of the elements of the manual brake system.
From the bottom of the car, using a 13mm wrench, unscrew the locknut and the parking brake adjusting nut and remove the equalizer 1 from the rod 2.
4. Remove the protective cover from the hole in the floor and remove it from the rod.
How to tighten the handbrake
The handbrake device on the Priora is no different from previous VAZ cars with front-wheel drive. That is why the procedure for tensioning the cable will be the same.
When is it necessary to tighten the handbrake on a Priora?
If you begin to notice that even with the lever raised as much as possible, braking efficiency is low, most likely this indicates that the rear pads do not move apart to the required limit, thereby not blocking the drums properly.
It is worth noting that a lever stroke of 2 to 4 clicks is considered normal. If in this position the handbrake is not able to hold the car on a slope, then it is necessary to tighten the handbrake cables. Usually, this happens after 20-30 thousand kilometers after purchase.
How to tighten the handbrake on a Priora with your own hands
In order to adjust the tension of the handbrake cables, you will need the following tool:
- 13 mm head, preferably deep
- key for 13
- ratchet handle
- penetrating lubricant
- First, you need to drive the car into a pit in order to perform this Priora maintenance more conveniently. If this is not possible, then you can lift the rear of the car with a jack.
- On Prioras, the handbrake cable adjustment mechanism is located under a special metal screen, which must first be unscrewed and removed. To do this, you will additionally need a key for 10.
- We apply penetrating lubricant to the lever rod so that during the process of loosening or tensioning we experience fewer problems.
- Using two 13mm wrenches, or preferably a deep socket, a ratchet and a cardan, we tension the cables as follows. If you need to tighten the handbrake, then turn the rod nut clockwise; if you loosen it, turn it counterclockwise, respectively.
- Since there is a lock nut on the rod, it must first be loosened.
- After a few revolutions have been made, you can check what stroke the lever has. If it ranges from 2 to 4 clicks, and the rear wheels are blocked sufficiently, then the tensioning procedure can be considered complete.
- We tighten the locknut and put the protective heat shield in place.
To understand the full essence of the information presented above, it is better to familiarize yourself with these instructions in the video report.
Video - how to tighten the handbrake on a Priora
The review was recorded on an example of a VAZ car of the tenth family, but the design of this mechanism is no different from the Priora.
If even after watching this video clip you still have any questions, you can ask them below in the comments, we will try to solve the problem collectively!
Handbrake diagram for VAZ-2112
For clarity, here is a diagram of a hand brake
1 - button that fixes the handbrake lever; 2 — hand brake lever; 3 — protective cover; 4 — handbrake rod; 5 — cable equalizer; 6 — adjusting nut; 7 - lock nut; 8 - cable; 9 — protective sheath of the cable.
In this circuit we need element number 6 . It is he, and only him!
What is required for adjustment?
In order to adjust the handbrake you need a platform or lift. If there are no such devices, then you can simply hang the rear wheels on the “goats”. They can be installed under the car using a jack. It’s also worth taking two “13” keys and pliers.
Start:
- The car is installed on an overpass or “goats”.
Hanging out your butt
- The lever position is set to the lowest possible position.
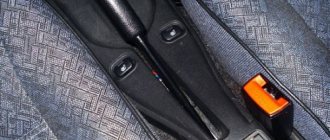
We put the handbrake at the very bottom. Do not pay attention to the scuffs of the console; we conducted an experiment with non-standard armrests. The iron fastenings of the armrest are visible. The photo shows the editorial car
- Use a wrench to loosen the locknut.
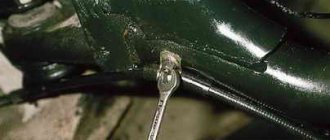
Adjusting nut
- The second wrench holds the adjusting nut.
- The adjusting nut should be tightened until the cable is tensioned. It must be remembered that the rod should be held with pliers when tensioning the cable.
Tighten the adjusting nut
- After this, you should make sure that the full stroke of the handbrake lever is no more than 4 and no less than 2 clicks.
- When the stroke check is completed, the locknut is tightened. The adjustment is held with another key.
- If necessary, change the mechanism to a new one.
Everything is rusty, we changed the adjustment mechanism
- After releasing the adjusted lever down, you should spin the rear wheels. When the lever is in its lowest position, the wheels should spin freely.
We recommend: Air conditioning not working? Causes
If you cannot tighten the cable, then it should be replaced with a new one.
Adjusting the handbrake after tensioning
After adjusting the brakes, you need to check them again. To do this, the car should be placed on a road with a slope of at least 23%! The car should be in neutral gear in this area and with the handbrake pulled up. If the handbrake brakes hold the car in this area, then the handbrake is adjusted correctly.
What to do when adjustment does not work
There are also cases when the above actions are not enough to adjust the handbrake. This can happen, for example, when the handbrake cable is broken. This happens on the VAZ-2112, although rarely. In such situations, the cable must be replaced. The cable also needs to be replaced when:
- The tips are loose.
- The cable itself begins to stretch, which will lead to its breakage during operation.
HAIKU! The old cable is very worn out! For comparison, old and new handbrake cables
- Physical wear (scuffs and cracks) of the handbrake cables.
Heavy wear on the handbrake cable
- It is quite difficult for the cable to move in the casing even after lubrication.
This replacement procedure does not require contacting a service station. Although this will require some time and skills from the driver, such work can be done independently.
It should also be remembered that when replacing the cable, certain conditions must be observed. To do this, the driver will need an assistant who will pull the cable.
Why do you tighten the handbrake?
The cable acts here as a drive. If the driver pulls the handbrake lever, then at the same time he uses the cable, which spreads the pads in the rear wheel.
If the handbrake is faulty, you just need to tighten the cable or replace it with a new one. On a VAZ-2112 it’s quite easy to do this with your own hands.
Need for adjustment
You can determine that the parking brake needs adjustment when checking. It is recommended to do it every 30,000 kilometers. This procedure should be done even if the handbrake seems to be working well.
The device must also be checked in cases where it does not work. For example, a car moves when the brake lever is applied.
How to tighten or replace the handbrake on a VAZ Priora
The parking brake is one of the key elements of the entire braking system. Any motorist understands the exceptional importance of this device. When a unit breaks down, there is no point in delaying repairs. The serviceability of the system is an important condition for safe operation of the vehicle. We will tell you how to tighten the handbrake on a Priora or replace the parking brake.
Worn brake pads lead to the need to regularly tighten the handbrake cable
Adjustment
Wear of brake pads, like other elements of the car, is inevitable. For this reason, the cable also has to be tightened regularly.
During normal vehicle operation, the frequency of adjusting the brake system is every 20–30 km. mileage To set up, you will need two open-end screwdrivers.
It is better to carry out work in a garage pit or on an overpass. Before starting the operation, we clean the bottom of the car from dirt.
- Remove the heat sink (fastened with 4 bolts).
- Loosen the locknut and adjust the cable until its tension ensures effective operation of the handbrake (reliable wheel locking).
- Do not over-tighten the cable (it leads to overheating of the drums and premature wear of all structural elements).
- Tighten the locknut and install the screen.
Reasons why you should replace the cable:
- tips are excessively loose;
- the threads are very worn;
- the cable moves with force in the sheath (even after lubrication).
If replacing the cables does not solve the problem, then you need to change the parking brake
If adjusting the cables does not give the desired result, change the parking brake.
Work order:
- Disconnect the wires from the battery terminals.
- We dismantle the equalizer.
- Unscrew the mounting bolts.
- We move the bracket to the side.
- We remove the rod from the hole in the floor and remove the handbrake lever.
- We take out the cotter pin, washer and remove the rod from the axle.
- We install the new lever and related elements in the reverse order.
- We carry out the adjustments in the above sequence.
After work, all elements must be well lubricated. This measure will protect components and assemblies from corrosion and extend their service life.
Removing elements of the parking brake system
We replace the parking brake cables when they are broken, pulled out, or stuck inside the sheaths, when adjusting the parking brake fails to keep the car stationary on a slope - up to 25% inclusive. We remove the parking brake lever to replace it or to replace the lever rod. The cables should be replaced simultaneously - left and right. We show the replacement of the left cable. Move the parking brake lever to its lowest position. We unscrew the locknut and the adjusting nut from the parking brake lever rod (see “Adjusting the parking brake”).
Remove the cable equalizer from the parking brake lever rod.
We take out the front cable ends from the equalizer and remove the equalizer.
Remove the end of the left cable sheath from the bracket.
The cables cross in front of the bracket.
Using a socket or a 10mm wrench, unscrew, not completely, the nut securing the bracket to the rear suspension beam... ...and remove the cable sheath from it.
We remove the cable sheath from the holder on the rear suspension beam mounting bracket.
Use a screwdriver to bend the bracket... ...and remove the cable from the holder on the body.
We remove the cable from the second holder located on the body in front of the fuel tank. Disconnect the rear end of the left cable from the parking brake drive lever (see “Replacing the rear wheel brake pads”).
We remove the cable tip from the hole in the brake shield... ...and remove the left cable. Similarly, remove the right parking cable cable. We install the cables in the reverse order. After replacing the cables, we adjust the parking brake (see “Adjusting the parking brake”). To remove the parking brake lever, unscrew the locknut and the adjusting nut from the parking brake lever rod (see “Adjusting the parking brake”). Remove the cable equalizer from the parking brake lever rod (see above). Remove the floor tunnel lining (see “Removing the floor tunnel lining”).
Read more: Traffic police fines by VIN number
Using a 10mm socket, unscrew the four bolts securing the parking brake lever bracket to the floor tunnel.
Remove the parking brake lever with bracket and rod assembly, pulling the rod through the rubber sealing boot in the bottom of the body.
Using pliers, we straighten the cotter pin... ...and remove it from the finger.
Remove the washer, axle and rod from the parking brake lever. Install the parking brake lever in reverse order. We adjust the parking brake (see “Adjusting the parking brake”).
The parking brake is one of the key elements of the entire braking system. Any motorist understands the exceptional importance of this device. When a unit breaks down, there is no point in delaying repairs. The serviceability of the system is an important condition for safe operation of the vehicle. We will tell you how to tighten the handbrake on a Priora or replace the parking brake.
Worn brake pads lead to the need to regularly tighten the handbrake cable