The rattling of the gearshift knob of a VAZ 2110 car is not such a rare occurrence. There are several ways to fix this problem.
As is already known, to eliminate any problem, it is necessary, first, to establish the cause of its occurrence. There can be many reasons for the rattling of the VVAZ 2110 gearbox lever.
For example, rattling may appear due to the installation of a backlash-free gearshift lever from LADAKalina, since in the absence of play, all vibration from the gearbox goes directly to the gearbox lever in the VAZ 2110 interior (in the photo below: on the left is a backlash from a VAZ 2110, on the right is backstage without play from LADAKalina).
You can clearly look at the scenes with and without play (from VAZ 2110 and LADAKalina, respectively).
Another reason that leads to rattling of the gearshift knob may be wear of the gearbox and engine mounts, as well as other parts responsible for damping vibration of the gearbox and engine.
It is worth starting to eliminate gearbox lever chatter by replacing the gearbox lever ball joint (produced from the bottom of the car) or the gearbox lever repair kit (carried out from inside the car). This gives a small effect, but it is best to start with this.
Usually, drivers of a VAZ 2110 car solve the problem of gearbox lever rattling by simply pressing the gearshift knob and fixing it with hand, so we will direct the first method in this direction. It consists of installing a locking spring for the gearshift lever.
How to remove vibration and noise from a gearbox (rear bearing from a Priora)
Reinforced rear bearings began to be produced for ten-speed gearboxes, which are not only more reliable, but also quieter due to their design features.
For a long time I was haunted by an article from ZR. I remember reading the Priora test in “60 Hours Behind the Wheel” and came across the following information:
“To avoid similar incidents in the future, the designers decided to replace the standard bearing 6-50305A2ESH1 with a more durable 750305AU. Its dynamic load capacity is 20,800 N versus 19,000 N for the old one. The new bearing has a double-sided seal that prevents wear and tear products from entering the rolling surfaces. It would seem that there is a magnet in the crankcase to collect steel particles. But it cannot control aluminum and brass particles, which are considered the most dangerous. They are firmly pressed into the race tracks, interfering with the balls, which leads to noise and knocking.
Next to the rear bearing of the primary shaft, a similar one works on the secondary shaft. This one seems to be in order, but they decided to replace it with a new one - it’s more reliable, and there won’t be any confusion during assembly.”
From the very first thousand kilometers I was bothered by the noise of the gearbox in second or third gear. And when braking with the engine in fourth or third, it completely blew my mind. And the dream was ripening to change these damn bearings, God willing, at least it would howl less. Moreover, the plant doesn’t even look in this direction.
But what about the owners of cars that have a gearbox with an outdated bearing? Experts say: our case is an isolated one, there is no need to recall the cars. The factory carried out tests several times, and the rear bearing coped with its task.
All units, without exception, are tested at the stand.
The story can end here - the unpleasant story ended quickly and happily. There is, however, one “but”. The unfortunate rear bearing has long been a concern for owners of front-wheel drive VAZs. Even on cars with low mileage, it begins to sing at idle, and by 60 thousand km its noise becomes annoying.
It is unlikely that the factory workers did not know this. Unlike the outdated 1.5-liter carburetor engine with a torque of about 106 N.m, the updated 1.6-liter VAZ-21114 and VAZ-21124 already produce 120 and 131 N.m, respectively. The load on all parts of the box, including bearings, has increased. And if the box modernization described here had been carried out in a timely manner, Priora would have finished our test in triumph, and not on a rope.
We recommend
PS I wonder what the manufacturer of “crooked” bearings thinks about this?
Thanks to “Behind the Wheel”, a weak point in the Lada-Priora box has been eliminated.
In searching for information on these bearings, and just about bearings for VAZ front-wheel drive gearboxes, I couldn’t find anything, I even found a description of how to change them without removing the gearbox, right on the car, I even wanted to buy and change them, but the bearings were not on sale .
And here’s the thing, replacing the clutch, removing the box anyway, why not change the bearings at the same time? They just went on sale.
Well, two 750305AU bearings were purchased and installed to replace 6-50305A2ESH1. More precisely, not 6-50305А2ЭШ1, but, as it turned out after disassembly, I had 63052RS2.
When searching, this catalog number appears in some Chinese catalogs marked SKF analogue and the like.
I will not describe the replacement process; it is described in pictures in any Murzilka. The only thing is that the box does not need to be completely disassembled.
So here it is. After replacement.
There are no enthusiastic cries of “Wow,” but you can’t even say that it remains as it was.
How can I more accurately describe what has changed after the replacement...
We recommend
It’s as if this has now spread across all the gears and has become much quieter.
The box did not stop talking, but began to sing on a different note, moving to a higher frequency part of the range. Approximately the sound now resembles the sound of a howling generator (maybe this is it, and I'm confusing it?)
Source
Why does the manual transmission lever dangle on the Lada Priora and how to fix it
If the gear selector lever of the Priora gearbox rattles and still dangles in a horizontal plane, the problem may be a worn bushing through which it is connected to the rocker. In this case, you need to follow steps 1-5 from the list above.
Let's look at how to determine the cause and eliminate the defect if the gearshift lever on a Priora is loose.
Why does the gearshift lever dangle?
The lever's loss of shift clarity, sluggish return or refusal to enter the neutral position, as well as increased backlash are a consequence of intensive use or malfunctions. If the Priora gearbox lever dangles a lot, this is usually accompanied by one or more signs:
The Priora gearbox lever is loose
Accordingly, after finding out the reason why the gearshift lever on the Priora is not working correctly and is hanging loose, adjustment or repair with replacement of the defective part will be required to restore functionality. A chattering of the gear selector lever of a Priora car can be caused by faults in the transmission, such parts as the clutch or gearbox, which force you to make excessive efforts to shift. Insufficient disengagement of the clutch due to the bearing not being fully pressed is accompanied by a crunching and grinding noise, jerking. This accelerates the wear of all elements of the drive mechanism, it makes a lot of noise, the car begins to shake and movement may be accompanied by twitching.
On the rocker box
The reasons for the disruption of the precise operation of the speed shift knob on cars with rocker-type shift control are its breakdowns and misadjustments.
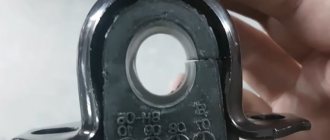
The most common cause of looseness, rattling and vibration of the lever at idle is wear of the bushing between the gear shift knob and the axis of its movement back and forth. A gap appears between the lever and the pressure washers, the quality of fastening deteriorates, vibration from the box is transmitted through the rocker to a loosely tightened hinge and its parts begin to rattle, causing the Priora gearbox handle to rattle.
Loss of stability of the gear selector knob in the neutral position, jerking, knocking and difficulty coordinating gear shifts can occur due to a broken spring on the axis of the gear selector lever in the actuator located in the gearbox housing.
Misadjustment of the rocker and the entire mechanism for controlling its operation due to natural wear of the elements is manifested in increased backlash during gear changes, incorrect activation and increased vibration transmitted to the Priora gearbox lever.
On a cable box
If the gearshift lever on a Priora with a cable box dangles, this may be due to wear of the drive cables and the attachment of their dome tips to the ball pins of the pendulum levers or to the speed selector in the cabin. A faulty ball joint may also be the cause. In this case, noise, crackling and rattling of the Priora gearbox handle may appear when you press the gas.
Replacing a ball joint on a Lada Priora
Before changing the ball joint on a Priora, you should worry about safety: apply the handbrake, securing the rear of the car and preventing a rollback. Additionally, you can put anti-roll bars or bricks. Before installing a new spare part, check it - if the boot is at least half empty, it needs to be filled with lubricant, otherwise the life of the part will be significantly reduced. For these purposes, lubricants for CV joints, graphite lubricants or lithol are suitable.
After this, you can get to work and start changing the spare part:
- We jack up the front of the car, put a support on it for safety - you can’t rely only on a jack for any job;
- We unscrew the bolts with a gas wrench and smoothly remove the wheel;
- Inside, lower the two fastening bolts on the ball joint and remove the ball pin nut;
- Use a special puller to press out the finger. Of course, it will work without a puller, but you will have to use force;
- We free the structure from the two mounting bolts of the support. Now you can remove the part with a pry bar;
- Install a new part in place of the old one. Reassemble the suspension.
It is highly advisable to go through the wheel alignment again: this is not necessary, but incorrect installation will force the driver to again encounter symptoms of malfunctions. Even if the part is lubricated and in perfect condition, any inaccuracy during installation will disrupt all wheel alignment settings. In addition, you should not risk your safety: driving somewhere in a faulty car is not the best idea.
What to do
Depending on the identified cause, it will be necessary to take measures to eliminate it by adjusting serviceable ones or replacing failed components. For cable and rocker structures of manual transmissions, you need to follow the steps described below.
At the rocker checkpoint
If the selector handle dangles and plays in the vertical plane, you need to check the integrity of the ball joint seat and spring. For this:
If the gear selector lever of the Priora gearbox rattles and still dangles in a horizontal plane, the problem may be a worn bushing through which it is connected to the rocker. In this case, you need to follow steps 1-5 from the list above.
The problem may be a misaligned linkage or reaction rod, and in the worst case, a broken spring on the axis of movement of the reverse and forward gear selector lever in the mechanism located inside the gearbox housing. In the latter case, you will have to make the inevitable decision to remove the box and change the mechanism.
If the problem is misalignment of the drive rod due to wear on the joint, then replacement is necessary. To do this you need:
If adjustment of the rocker is required, it is done by first placing (and holding) the gear selector knob in the “reverse speed” position. Then, by loosening the clamp at the junction with the gear shift rod in the box and slightly moving the lever, select its optimal position with reverse gear engaged. Tighten the rocker clamp and carry out a full switching cycle to check. The adjustment is done by two people.
On a cable transmission
If the Priora gearshift knob rattles and the cause is wear or breakage of the ball joint, it is replaced with a new one.
Repairing the gearshift lever on a Priora
The factory recommends replacing the cables with a new pair. It can be expensive. Most often, the sockets in which the spherical tips of the fingers are placed on the pendulum levers of the gear selector mounted on the gearbox are worn out. You can try to replace only them using a repair kit.
The rattling noise that occurs in 3rd and 4th gears can be generated by the metal clamp cable not being properly engaged in the console bracket hole, which will vibrate, producing a strong ringing sound.
Source
Installation process
Let's analyze the installation of the Priora short-stroke rocker with our own hands step by step.
First you need to pull the knob and cover off the box lever. The knob on the lever is not fixed, so it is enough to apply a certain force to remove it.
Using a key set to “13”, loosen the clamp and separate the gearbox lever rod from the cardan.
To release the lever, we release the ball from the spring mechanism, which is necessary to activate the reverse gear with locking. To do this, remove the locking ring.
It is strictly forbidden to sharply pull the lever upward when trying to release it.
Slowly, carefully remove the retaining ring.
We take out the spring and then the lever with the ball inserted into the plastic frame, as well as the locking ring.
The plastic mandrel includes two parts: the lower one, located on the right and the upper one, located on the left, cylindrical in shape. There is a slit at the top. This component fits onto the gearshift lever. At the bottom there is a lever ball. The upper part wraps around the lower part so that the grooves match.
We take out the lever and rod from the interior. For convenience, you can separate the lever from the rod, although this is not at all necessary.
Using a “10” wrench, unscrew the left bolt on the cardan and pull off the rubber boot.
The driveshaft from the Priora differs in length from the driveshaft of the Viburnum. It is necessary to shorten the stem of the viburnum, depending on its type.
We insert the cardan from the viburnum. Lightly lubricate it with lithol from the inside. When screwing in the bolt, you do not need to tighten it.
We insert the rod through the interior. It is advisable to do this not alone, but to take someone as an assistant. Let one hold the elastic band in the cabin, through which the thrust passes, while the second gradually stretches the thrust.
The gear knob rattles on a Priora, how to fix it?
After the car was released, many owners began to notice that the gear knob on the Priora began to rattle in the same way as the gear lever on the Lada Kalina. It's all about the same type of design of the gearbox control drive. Today we will tell you how to independently remove the vibration of the gearshift lever on a Lada Priora.
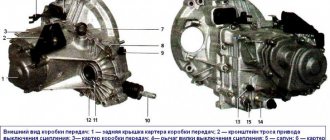
If there was no rattling of the gearshift knob before, then most likely you can get by with a repair kit and replacing the ball joint race of the gearshift knob (in Fig. No. 5). Also, excessive vibration may be due to old gearbox and engine mounts.
If nothing helps, then we go directly to the source of the rattling sound - this is a metal spacer bushing (in Fig. No. 8). It is she who, under the influence of vibrations of the gearshift knob, makes a rattling noise.
Let us recall that in the previous article we looked at installing a spider on the Lada Priora. The spider will give the car a second life, the engine power will become significantly greater.
An example of vibration of the gear knob on a Priora
Removing the gearbox remote bushing
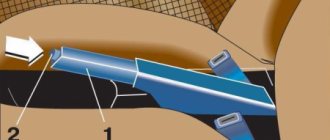
Remove the gearshift knob cover (pick it up with a flat screwdriver).
1. Unscrew the nut with a 13mm wrench
2. Unscrew the two nuts of the rear gear fixing bar using a 10mm wrench.
Replacing the bushings of the gear shift lever axis of a VAZ 2170 Priora
- Repair manuals
- Repair manual for VAZ 2170 (Priora) 2004+.
- Replacing the gearshift lever shaft bushings
You will need: a 13mm wrench, a Phillips-blade screwdriver.
1. Remove the floor tunnel lining (see “Removing and installing floor tunnel linings” ).
| 2. Using a 13mm wrench, unscrew the nut securing the gear shift lever shaft. | 3. Remove the screw securing the lever axis stop. |
| 4. Pressing the lever to the side, remove the lever axis assembled with the stop. | 5. Having removed the lever from the traction fork, remove the two plastic axle bushings and the spacer bushing. |
6. Replace worn or broken bushings. Keep in mind that the plastic bushings are split, which is not a defect.
7. Install all parts in the reverse order of removal, having first lubricated the plastic bushings of the axle with grease.
8. If difficulties arise when installing the lever axis, in order to be able to move the lever further to the side, remove the protective plate from below the car, unscrew the two nuts securing it, and remove the two bolts securing the torque rod. After installing the axle, reinstall the torque rod and adjust the gear shift mechanism drive (see “Adjusting the gearbox control drive” ).
↓ Comments ↓
1. Car structure
1.0 Car structure 1.1 General information about the car 1.2 Passport data 1.3 Car keys 1.4. Controls 1.5. Heating and ventilation of the cabin 1.6 Ensuring a comfortable air temperature in the cabin 1.7. Doors 1.8. Passive safety equipment on the car 1.9. Seats
2. Recommendations for use
2.0 Recommendations for use 2.1. Safety rules and recommendations 2.2 Running in the car 2.3 Operating the car during the warranty period 2.4. Preparing the car for departure
3. Problems along the way
3.0 Malfunctions along the way 3.1. The engine does not start 3.2 Malfunctions of the fuel injection system 3.3 Idle speed has disappeared 3.4. Interruptions in the operation of the 3.5 engine. The car moves jerkily 3.6 The car accelerates poorly 3.7 The engine stalled while driving 3.8. Oil pressure dropped to 3.9. Engine overheating 3.10. The battery does not recharge 3.13. Knocks in the engine 3.16. Wheel puncture
4. Maintenance
4.0 Maintenance 4.1. General provisions 4.2. Inspection work 4.3. Lubrication and filling works 4.4. Diagnostic work 4.5. Repair and adjustment work
5. Engine
5.0 Engine 5.1 Design features 5.2 Possible engine malfunctions, their causes and solutions 5.3 Useful tips 5.4 Checking compression in the cylinders 5.5 Removing and installing the decorative engine casing 5.6 Removing and installing the engine splash guard 5.7 Installing the piston of the first cylinder to the TDC position of the compression stroke 5.8 Replacing the drive belt gas distribution mechanism and tension roller 5.9 Replacing the power unit supports 5.11. Replacing engine seals 5.13. Engine cylinder head 5.15. Engine repair 5.16. Lubrication system 5.17. Cooling system 5.18. Power supply system 5.19. Design Features
6. Transmission
6.0 Transmission 6.1. Clutch 6.2. Gearbox 6.3. Front wheel drives
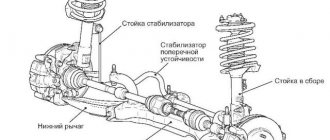
7. Chassis
7.0 Chassis 7.1. Front suspension 7.2. Rear suspension
8. Steering
8.0 Steering 8.1 Design features 8.2 Possible steering malfunctions, their causes and solutions 8.3. Steering column 8.4. Steering linkage 8.5. Steering gear
9. Brake system
9.0 Brake system 9.1 Design features 9.2 Possible malfunctions of the brake system, their causes and solutions 9.3 Bleeding the brake system hydraulic drive 9.4 Removing and installing the vacuum brake booster 9.5 Replacing the brake pedal axle bushings 9.6. Main brake cylinder 9.7. Front wheel brakes 9.8. Braking mechanisms of the rear wheels 9.9. Pressure regulator 9.10. Brake hoses and tubes 9.11. Parking brake
10. Electrical equipment
10.0 Electrical equipment 10.1 Design features 10.2. Battery 10.3. Mounting block (relays and fuses) 10.4. Generator 10.5. Starter 10.6. Ignition switch (lock) 10.7. Electronic engine control system (ECM) 10.8. Ignition system 10.9. Lighting, light and sound signaling 10.10. Windshield cleaner 10.11. Washer reservoir 10.12. Electric fan of the engine cooling system 10.13. Electric motor of the heating and ventilation system fan 10.15. Cigarette lighter 10.16. Instrument cluster 10.18. Electronic anti-theft remote control system 10.19. Immobilizer 10.21. Replacing sensors and switches
11. Body
11.0 Body 11.1 Design features 11.2 Possible body malfunctions, their causes and solutions 11.3 Removing and installing windshield frame lining 11.4 Removing and installing soundproofing upholstery in the engine compartment 11.5. Removing and installing bumpers 11.6 Removing and installing the fender liner and protective wing cover 11.7 Removing and installing the front fender 11.8 Removing and installing decorative sill trims 11.9. Hood 11.10. Trunk lid 11.11. Doors 11.12. Seats 11.13. Seat belts 11.14. Rear view mirrors 11.15. Interior fittings 11.16. Instrument panel 11.17. Heater 11.20. Body care
12. Applications
12.0 Appendix 12.1 Appendix 1. Tightening torques of threaded connections, Nm 12.2 Appendix 2. Fuels, lubricants and operating fluids 12.3 Appendix 3. Nominal filling volumes 12.4 Appendix 4. Basic data for adjustments and monitoring 12.5 Appendix 5. Spark plugs used on vehicles 12.6 Appendix 6. Lamps used on a car 12.7 Appendix 7. What you need to have in a car 12.8 Appendix 8. Tools used when repairing a car
13. Electrical diagrams
13.0 Electrical Diagrams 13.1 Diagram 1. Instrument Panel Harness Connections 13.2 Diagram 2. Vehicle Front Wire Harness Connections 13.3 Diagram 3. Engine Electronic Control System (ECM) Harness Connections 13.4 Diagram 4. Vehicle Rear Wire Harness Connections 13.5 Diagram 5. Light Harness Connections license plate light 13.6 Diagram 6. Left front door wiring harness connections 13.7 Diagram 7. Right front door wiring harness connections 13.8 Diagram 8. Rear door wiring harness connections
How to remove vibration and noise from a gearbox (rear bearing from a Priora)
The vibration of the gearshift lever is shown on the example of a VAZ 2110 car (it’s the same on the Lada Priora): If there was no rattling of the gearshift knob before, then most likely you can get by with a repair kit and replacing the ball joint race of the gearbox knob (in Fig. No. 5). Also, excessive vibration may be due to old gearbox and engine mounts.
If nothing helps, then we go directly to the source of the rattling sound - this is a metal spacer bushing (in Fig. No. 8). It is she who, under the influence of vibrations of the gearshift knob, makes a rattling noise.
Required tools and materials for replacement
Any operation to repair your favorite car cannot be approached spontaneously, unless, of course, there is a goal to harm it. When replacing balls we will need:
- Socket wrenches 18 and 19;
- Hammer;
- Collar;
- Support;
- Jack;
- Socket head;
- Mount;
- Penetrating lubricant (the best option is WD-40);
- Grease (for example, graphite);
- Balloon key.
On those cars where the suspension is already rusty, the parts are noticeably “tired”, a ball joint remover will help. It is expensive in the store, and making it yourself from junk accumulated in the garage can take a long time. You can cope with the replacement without it, but it is more difficult.
Vibration of the Priora gearbox handle
Good afternoon I'm tired of the engine jerking very strongly, as if it was unscrewed, and the constant vibration, accompanied by a crackling sound, in the gearshift knob.
It was decided to install a rear additional engine mount, because... 16 valve priors do not have it installed from the factory. A short-stroke rocker with a Kalinovsky cardan was also installed + a boot for the cardan + a repair kit for the gearbox handle + a gear shift rod oil seal (Balakovo). I also changed the lower engine mount (guitar) to a reinforced one (sport).
On the plus side: they certainly exist. The gearshift knob has stopped twitching. It’s standing still)) I didn’t experience any particular impact from the short-throw rocker, but there was still a little less body movement, especially when turning on speed 5, which is good news.
Of the minuses: there is a slight vibration throughout the car in neutral. It feels a little stronger when the fan is on. The handle has become higher and now you will have to buy a new casing.
I close my eyes to the negatives. It's not annoying. Yes, and I notice it extremely rarely.
Hello everyone, forum members!
Today I decided to start eliminating vibration from the gearshift lever. I'm already tired of taking a break from the holidays, my sides hurt)))
Previously, this vibration was observed in the range of 5500-7000 rpm, and it did not bother me much, but now it has become completely impossible, sometimes on ice, slipping starts in the range of 2000-3000 rpm and there is a terrible vibration from the gearshift lever, also when the reverse gear is engaged It began to vibrate, in short, I had to climb anyway! Having removed the protective casing, it became clear that the plastic washers under were worn out, because there are 1 mm gaps between them on both sides, which causes backlash and subsequently vibration.
I thought the easiest way would be to simply tighten the nut on the right side of the lever
but it didn’t stretch, apparently the spacer was tight. In short, I decided to disassemble it, but not everything is so simple, the casings are in the way and there is very little space, besides, there is a cross bolt on the left that cannot be reached with a screwdriver. Let's remember because I once saw someone in a car do this kind of manipulation which ended with dismantling the tunnel and dismantling the seat, but I didn’t really want to turn over the floor of the cabin, I decided to split hairs, took a screw from raw metal and sharpened it on a sharpener
How to remove vibration and noise from a gearbox (rear bearing from a Priora)
24.02.2019
| After the car was released, many owners began to notice that the Priora gearbox lever began to rattle in the same way as on previous VAZ 2108-2010 cars. It's all about the same type of design of the gearbox control drive. We'll tell you how to remove vibrations in the VAZ 2170 gearbox handle. |
| (Votes: 1, Rating: 5) |
Reinforced rear bearings began to be produced for ten-speed gearboxes, which are not only more reliable, but also quieter due to their design features.
For a long time I was haunted by an article from ZR. I remember reading the Priora test in “60 Hours Behind the Wheel” and came across the following information:
“To avoid similar incidents in the future, the designers decided to replace the standard bearing 6-50305A2ESH1 with a more durable 750305AU. Its dynamic load capacity is 20,800 N versus 19,000 N for the old one. The new bearing has a double-sided seal that prevents wear and tear products from entering the rolling surfaces. It would seem that there is a magnet in the crankcase to collect steel particles. But it cannot control aluminum and brass particles, which are considered the most dangerous. They are firmly pressed into the race tracks, interfering with the balls, which leads to noise and knocking.