Do-it-yourself replacement of rear struts on a Priora
So, first of all, when the car is still on wheels, we remove the plastic plugs from the pillar cups from the interior side. It is under them that the shock absorber mounts are located.
If you have a special wrench, then use it to unscrew the nut securing the strut from above, holding the rod from turning. If there is no device, then we hold the rod with improvised means.
Once the nut is free to rotate, you can move to the lower shock absorber mount. To do this, remove the rear wheel and apply penetrating lubricant to the threaded connections. We wait a few minutes and unscrew the nut securing the rack from below.
We knock out the bolt if it is soured using a hammer and a punch. When you have dealt with this, you need to completely unscrew the upper fastening nut.
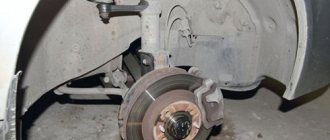
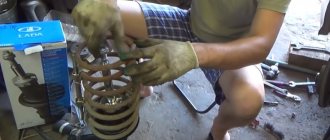
Now you need to pry up the shock absorber and remove it from its seat in the rear beam using a pry bar.
Now you can remove the entire shock absorber assembly, as well as the spring of the Priora rear suspension.
If necessary, we replace the struts with new ones, as well as springs if they are already worn out. The spring can be removed without any problems, after which we remove the boot and reassemble everything in the reverse order with new parts.
Replacement procedure
To make a replacement, it is not necessary to send your hatchback to a service station. All this is easy to do yourself at home, the main thing is that you have the tools and your hands grow from the right place.
For such an event you will need:
- “shoe” for blocking the wheel;
- jack;
- keys at 6, 19, 22;
- rust remover;
- mount.
- Lock the front wheel.
- Open the trunk and move the trim on any rear “glass” at the top fixation point.
- Using a 22 wrench, release the rack mount, holding the rod with a 6 wrench.
- Raise the body with a jack on the side where you plan to replace the element.
- Once under the car, use the 19th key to unscrew the fastening of the lower part of the rack. There it is attached to the rear beam. If the process does not go well, then you will need a rust remover - the nut has oxidized. Wait until it gets wet for about 20 minutes and continue working.
- After unscrewing the nut, remove the freed bolt and remove part of the rack from the fixing bracket. This process may require a pry bar.
- Remove the shock absorber completely.
- Go back to the trunk and remove the support washer and strut pad.
- Remove the spring, bushing, boot and quiet block from the strut in sequence. Check the latter for damage. It is better to replace silent blocks at this moment, so as not to repeat the entire event again later.
- Examine the spring for cracks and other signs of deformation. As soon as you find one, rest assured that it’s worth replacing.
- Reassembling the rack occurs in the reverse order.
- It is worth tightening the connections completely only after the body has lowered.
- It is worth tightening the shock absorber mounting nuts 100-200 km after replacement.
As you can see, everything is extremely simple and you don’t need to spend extra money at the service station, just on new parts. Next time you can repeat this procedure faster, but the first time it’s better to slow down and do it right.
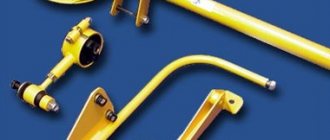
EXTERNAL DIFFERENCES
But here the racks are radically different. Firstly, the rear shock absorbers do not have a special lever for attaching the rotating mechanism, because the rear wheels are always oriented strictly in the direction of travel. And secondly, the lower mount. It is more reminiscent of the classic shock absorber of earlier car models. That is, this is the lower ring with a rubber-metal bushing.
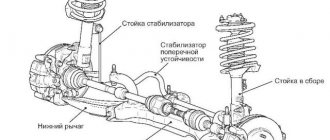
This difference is caused by the way the rear independent suspension is mounted. Both rear pillars of the Priora are attached with the lower part to a special beam, which is fixed to the body with the possibility of vertical movement. On hinges. There are special grooves on the beam where the shock absorber is inserted, secured with a special bolt.
Well, the rod tip has some differences, since the rear supports do not have swivel bearings. In general, it is very problematic to confuse the rear and front struts when purchasing for replacement.
Replacing the rear shock absorber: procedure
Let's take a closer look at the stages of the work. Your first task will be to unscrew the nut that secures the struts to the body. To simplify this matter, it is better to use a special wrench with dimensions 22*13. It is this tool that is used to remove and install shock absorbers in Priora.
After this, you need to securely secure the car, remove the wheel bolts and jack up the car. Never forget to install a safety system in the form of additional support under the wheels of the car
It is important that the stop is installed in the opposite direction to the lift
So, the preparatory process has been completed, this guarantees fast and safe work on replacing each rear strut. Now you have to remove the rear wheel, remove the lower strut mounting bolt and pull it out. Most likely, this process will involve working with a hammer. After this, the faulty strut must be removed from the car along with the spring. The main thing is to correctly identify all faulty rack elements and replace them with new ones.
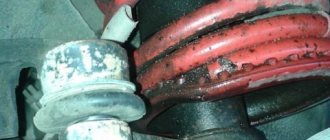
Anthers and bushings often become unusable
And, for example, a bump stop can last a long time, so you need to pay attention to its condition. Replacing the bellows casing is very simple
It is necessary to install the correct size fender washer on top of this element and place a new or old fender in the corrugation. The boot should be put on the rod, on top of which you need to place a donut-shaped rubber element with an iron bushing.
The shock absorber is installed with its upper part into the body, and you need to ensure that the rod fits into the hole provided for it. Then the lower part starts. Everything is fixed with bolts and nuts. The lower connection of the rack must be firmly pressed against the beam itself, using keys.
Actions on the upper mount are carried out after the car body has been lowered slightly. This is necessary so that the spring is compressed under the pressure of the total weight of the machine. Assemble a pyramid from a donut-shaped rubber element and a washer and screw the nut onto the rod. Moreover, the rod must be kept motionless, holding it with a key. Tighten the mounting nut securely. After the upper part of the rack support has been assembled and installed, you can install the wheel in its rightful place and lower the Priora from the jack.
https://youtube.com/watch?v=Y_vWs_YyuSQ
Video review of replacing rear struts on a Priora
The report was prepared using the example of a car of the tenth family, but there will be no differences from the Priora. The price of new racks produced by SAAZ, which are factory-made, starts from 1000 rubles per piece. Springs can be bought for 1000 rubles, a set of 2 pieces.
Today, the Lada Priora car is one of the most popular models in Russia. This simple, laconic and at the same time elegant, dynamic car has gained widespread respect due to its practicality, endurance, and ease of use. The car, which appeared on the market back in the late nineties, more than once underwent serious reformations, which concerned both the appearance and its technical component, and to an even greater extent.
FakeHeader
Comments 9
I don’t even remember what they are from. The store just said stock springs for the Priora. And on the market there were ones with variable pitch pitch, but everything was in the red, and I don’t want an understatement.
I also took springs. I took the Priora catalog and ordered the part from Lada using the number; there were only one of them. 12 turns arrived. with black mark. The label emphasized hardness class B. and who knows what that means.
Symptoms: the front suspension breaks, the front of the car is skewed, knocks, squeaks and rattles when the car hits an uneven surface.
Possible cause: the spring of the front suspension shock absorber strut is damaged or the strut itself is faulty.
Tools: socket set, wrench set, flat-head screwdriver, vice, zip ties, hex wrench.
1. Install wheel chocks under the rear wheels.
Removal
Place the vehicle on a two-post lift and turn off the ignition.
Remove the rear wheels.
Place stands under the rear suspension arms and lower the car until the springs begin to compress.
Tilt the rear seatbacks forward.
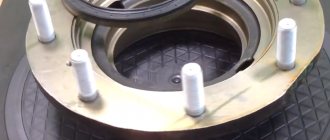
Figure 10-1 — Attaching the rear suspension shock absorber to the car body: 1 — plug; 2 — rear suspension shock absorber rod; 3 — shock absorber rod mounting nut
Figure 10-2 — Rear suspension shock absorber with spring: 1 — protective casing; 2 — compression progress buffer; 3 — casing cover; 4 — bushing of the shock absorber hinge; 5, 9 — shock absorber cushions; 6 — spring washer; 7 — nut for fastening the shock absorber rod; 8 — shock absorber washer; 10 — upper gasket; 11 — rear suspension spring; 12 - bolt; 13 — rear suspension shock absorber; 14 - nut
Remove plugs 1, Figure 10-1, covering the mounting points of the rear shock absorber rods (flat-head screwdriver).
Lock the rods 2 and unscrew the nuts 3 securing the shock absorbers to the body (wrench A.57070, wrench type KL-4071-3117 f. “KLANN”, ratchet wrench).
Remove spring washers 6, Figure 10-2, shock absorber washers 8 and shock absorber upper cushions 5.
Figure 10-3 — Attaching the rear suspension shock absorber to the rear suspension arms: 1 — rear suspension arm; 2 - nut; 3 — rear suspension shock absorber; 4 - bolt
Suspend the car until the springs are unloaded, unscrew nuts 2, Figure 10-3, bolts securing the shock absorbers to the rear suspension arms, remove bolts 4 and disconnect the shock absorbers 3 from the rear suspension arms 4 (wrench 19, replaceable head 19, ratchet wrench).
Remove the shock absorbers and springs.
Remove spring 11 from the shock absorber, Figure 10-2, with gasket 10, lower shock absorber cushion 9, shock absorber hinge bushing 4, casing cover 3, protective casing 1 and compression stroke buffer 2.
Racks, what are they and why are they needed?
The struts have a complex design, but the basis is a hollow piston system. The piston system is equipped with multiple parts that secure the racks to the car body, and inside it is filled with either gas-oil liquid or oil. The principle of operation of the struts is that the piston, when it starts to move, seems to break the impacts falling on it, reducing their force.
On the Priora, as on other cars, problems with struts are expressed in oil leakage, insufficient adhesion of the tires to the road surface, and deterioration in maneuverability. Another sign of problems with the rear strut is a sudden, sharp increase in braking distance. According to professionals, if it is necessary to replace one rear strut, then it is wiser to change both at once, since otherwise there may be a mismatch of parts, which will lead to a significant deterioration in the operation of the entire system and a decrease in the dynamics, maneuverability and controllability of the car.
When to change
Factory SAAZ rear struts usually withstand 70-80 thousand kilometers, after which, according to the factory’s recommendations, they need to be replaced. But there is no point in changing shock absorbers if they do their job perfectly, unless you want to change the characteristics of the suspension.
It is not difficult to determine the serviceability of the racks yourself. As already mentioned, the first sign of their malfunction is a visible oil leak. In addition, faulty shock absorbers give themselves away with a characteristic dull knock in the area of the rear arches. This is also evidence of their depressurization and oil leakage.
You can verify that the racks are faulty in a simple way. Try rocking the left or right rear of the car. If it swung once and froze rigidly, it means that everything is in order with the shock absorber from which you rocked the body. If the car continues to rock, the shock absorber is faulty, and the body lowers and rises due to the spring.
In what case is it necessary to replace the rear struts of a Lada Priora?
Factory elements can withstand a mileage of 70-80 thousand km, and after that they need replacement. This is what the factory model says, but in reality no one will change the struts until they wear out. You can also replace shock absorbers if it is necessary to change the characteristics of the suspension.
It is very easy to determine for yourself how good the racks are. The first reason to pay attention to the performance of these elements is to cause an oil leak from the cylinder. In addition, the malfunction has its own sound - a dull knock in the area of the rear arches, which, in principle, also occurs due to oil leakage due to depressurization.
To confirm your assumptions, rock your sedan. If one of the back sides sagged under pressure and froze, everything is fine.
Rocking is a direct signal that the shock absorber is broken, and the inertial movement of the body part occurs due to the spring.
How to properly increase a car's ground clearance
Russian roads make us think about how to increase the car's ground clearance . Such topics can even be found on forums dedicated to the Chevrolet Niva, to say nothing of cars of the tenth family. raise the suspension in different ways and to different heights, let's try to understand the advantages and disadvantages of all methods. The vehicle's ground clearance is a parameter that does not happen much on our roads. Although, if you look from the other side, it is not uncommon to come across a car on the street with a lowered suspension.
Most often they decide to increase clearance due to the following cases:
In some cases, they decide to raise the rear and front suspension at the same time. It is no secret to many that after such actions some troubles may arise, wear of some components may increase, and the characteristics of the car may change. Let's try to find the answer to the question: how to increase ground clearance without negative consequences .
Features of replacing racks
At the beginning of the two thousandth there was a stage of restyling, which took the car along reformist paths. Now the racks have become more reliable, and the power unit is more powerful. But nevertheless, professionals propose to improve the restyled version by replacing the struts, since then its performance will be significantly improved. Although over time, replacement of parts is necessary in any case.
Before you decide to replace parts, you should be 100% sure of this. You can check the working condition of the racks in a very simple, old-fashioned way. You'll have to rock the corner of the car a little. Now count the number of free jumps. If one, then the system is normal. If there is more than one, then urgent replacement of the racks is required, since the old ones can no longer cope with the task assigned to them.
Replacing Priora struts
- The first step is to remove all the existing nuts that secure the racks to the car. Usually craftsmen use a 22*13 key for this task; it is most suitable in this case.
- Now you should secure the car well in order to work safely.
- The next step is to remove the wheel bolts.
- Raise the car with a jack; without this it will be difficult to carry out such exquisite, painstaking work.
- Never forget about safety rules. In this case, it is necessary to remember that it is necessary to place additional support under the wheels of the car in order to exclude the possibility of it rolling away. The emphasis should be in the opposite direction to the lift.
Once the bolt is removed, you can easily pull out the stand itself. The most important thing here now is to understand the cause of the breakdown and be able to fix it. It is necessary to carefully inspect the strut and spring, looking for deformations. Deformed parts must be replaced. Most often, bushings and anthers become faulty, while the bump stop, on the contrary, lasts longer than other parts, since it has a stronger design. Also, sometimes the corrugation casing becomes unusable, but it is easily replaced.
How to benefit from increased ground clearance?
Of course, neither the doubled nor tripled ground clearance of the Priora can compare with the ground clearance of any SUV. However, we should not forget that, in tandem with the improvement of some other characteristics of the car, the Priora’s ground clearance can give good results. Let's clarify now.
The distance from the ground to the bottom is 165 mm. However, knowledge of this fact alone is not enough to draw any conclusions. The motorist must take into account the following characteristics, such as:
Only working to jointly improve all these characteristics can lead to benefit from increasing the Priora's ground clearance.
practical guide
It is convenient to carry out the work in an inspection ditch. The work is shown on a car with a hatchback body. On a station wagon, the work is performed in the same way. On a sedan car, access to the upper shock absorber mount is through the luggage compartment.
Replace shock absorbers and springs in pairs.
To complete the work you will need:
— inspection ditch or overpass;
— a device for disassembling suspension struts.
We carry out the work with an assistant.
Removal
1. Prepare the car for work and hang the rear of the car on stands.
If there is no inspection ditch or overpass, remove the rear wheel of the car from the side of the shock absorber being replaced.
2. Remove the luggage compartment shelf.
3. Fold down the back seat.
4. In the luggage compartment, use a Phillips screwdriver to remove the four screws securing the upholstery.
5. Use a screwdriver to pry off the trim of the seat back lock.
6. Using a 19 mm wrench, unscrew the lock and remove it.
7. Using a Phillips screwdriver, unscrew the screw securing the luggage compartment lining.
8. Bend down the luggage compartment upholstery.
9. Use a Phillips screwdriver to unscrew the top screw securing the cladding.
10. Using a Phillips screwdriver, unscrew the two lower screws securing the cladding.
11. Move down the luggage compartment lining.
12. Using a 13 mm socket wrench, unscrew the two nuts securing the seat back clamp bracket.
13. Remove the retainer bracket.
14. Using a slotted screwdriver, remove the plug.
15. While holding the shock absorber rod from turning with a 6 mm wrench, unscrew its nut with a 17 mm wrench.
16. Use a magnet to remove the spring washer and the upper support washer from the shock absorber rod.
How to independently replace the rear struts of a VAZ 2110
To independently replace the rear struts of a VAZ, it is recommended to follow the following sequence of actions:
- 1. Remove the plastic plug from the rear pillar cups, opening access to the mounting bolt. First remove the rear seat lock, if necessary;
- 2. Unscrew the nut of the rack rod with a special wrench or hold the tip of the rod with a 6 mm open-end wrench while unscrewing the nut;
- 3. Remove the top washer using the magnetic handle. Under the washer there is a rubber gasket, which we also remove;
- 4. At the next stage, it is necessary to lift the rear part of the car on which we are changing the stand with a jack and remove the wheel. Place the removed wheel under the car as a jack safety net;
- 5. Unscrew the lower shock absorber mounting nut: while holding the nut on one side, turn the bolt on the reverse side with a wrench;
- 6. We knock the rack off its seat in the beam, removing it from the car;
- 7. Remove the rubber gasket from the inside of the glass, most likely stuck to it.
Let's disassemble the rack directly:
- 1. Remove the spring;
- 2. Remove the central bushing, lower cushion, upper cup and casing;
- 3. Remove the bump stop from the rack rod.
We perform assembly in reverse order.
What are rear struts?
The design and principle of operation of the rear shock absorber struts of the Lada Priora are practically no different from other cars.
From the factory, the machine is equipped with SAAZ shock absorbers, which have a two-pipe hydraulic (oil) design. It provides damping of shock loads due to oil resistance to the piston inside the cylinder. In fact, this design resembles a conventional pump, only oil acts as air.
At the front of the Priora there are also oil struts that work on the same principle. They differ from the rear ones only in the size and design of the body. In addition, the front struts have brackets for attaching tie rod ends.
Oil shock absorbers are quite reliable and durable, and in addition, they provide maximum comfort, as they are considered the softest. However, they also have their drawbacks. The fact is that oil is very susceptible to the influence of temperatures, both high and low. When heated, it becomes too liquid, which causes the shock absorber to “soften” even more.
When exposed to low temperatures, the oil hardens, making the racks as rigid as possible. Naturally, this cannot but affect their condition, and it often happens that after a hot summer or cold winter, shock absorbers begin to “sweat”. This is the first sign of their failure.
When to change
Factory SAAZ rear struts usually withstand 70-80 thousand kilometers, after which, according to the factory’s recommendations, they need to be replaced. But there is no point in changing shock absorbers if they do their job perfectly, unless you want to change the characteristics of the suspension.
It is not difficult to determine the serviceability of the racks yourself. As already mentioned, the first sign of their malfunction is a visible oil leak. In addition, faulty shock absorbers give themselves away with a characteristic dull knock in the area of the rear arches. This is also evidence of their depressurization and oil leakage.
You can verify that the racks are faulty in a simple way. Try rocking the left or right rear of the car. If it swung once and froze rigidly, it means that everything is in order with the shock absorber from which you rocked the body. If the car continues to rock, the shock absorber is faulty, and the body lowers and rises due to the spring.
Basic faults
Failures of a part of the Priora suspension can be judged by the following signs:
- Oil leaks under the wheels. The shock absorber consists of a cylinder, valves, a piston with a rod - all parts actively move, so they need lubrication. If there are leaks, it means the device has become depressurized and will work less efficiently.
- Mechanical damage. If possible, visually inspect the parts - if there is any deformation or rust, it means they have “worked their best.”
- Rock the front (and then the back) of the car in different directions - away from you, to the left, to the right. When you release the car, one or two vibrations are considered normal - it is “damped” by a normal shock absorber. If the car stops immediately, the part is jammed; if it continues to wobble, replace it.
- When traveling, the car begins to wobble, the braking distance increases, and when turning, the car wobbles greatly. Also, when driving over speed bumps, or ordinary potholes, broken shock absorbers do not dampen vibrations at all, that is, the car sways as if on waves, and a knock will be heard.
Service station employees check the suspension with a vibration stand or a special stand. The check goes down to small units - they can even tell you how long it will take to approximately replace them.
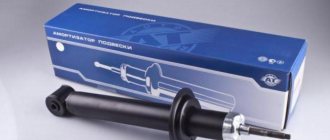
Which ones to choose and their price
Having decided to replace the rear struts, you will have to choose among today's abundance of original spare parts and their analogues on sale. You can, of course, not bother and buy stock oil shock absorbers from the SAAZ plant, exactly the same as those installed on the Priora on the assembly line.
Part numbers:
Their prices vary from 1200 to 1400 rubles (for one rack) .
If you want to change the characteristics of the suspension, namely make it softer or stiffer, you can purchase alternative struts. The most popular shock absorbers among Prior owners are SS20.
They are distinguished by high reliability, and in addition, a variety of designs that allow you to change the stiffness of the suspension. There are four modifications of SS20 for Priora on sale: “Comfort”, “Standard”, “Highway” and “Sport”, differing in rigidity in ascending order. The cost of a pair of such racks is about 3,700 rubles.
"Technology System" – SS20
As for foreign analogues, the best shock absorbers are Japanese products. They also differ in rigidity and size, which also allows you to adjust the ride height. You can buy such racks at a price of 2,700 rubles per piece.
Important: it is recommended to replace shock absorbers in pairs, i.e. if you change it, then change it on both sides of one axis!