11/29/2019 Category: Power system
A failed rear wheel wheel bearing indicates a permanent problem, often. It comes from the rear and does not go away when driving in neutral. As bearing wear increases, this sound may become increasingly louder. The rear wheel bearing needs to be replaced.
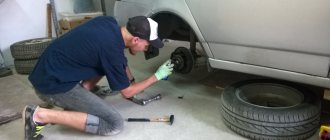
This work can be done most quickly using special devices (pullers). If they are not there, then to achieve the goal, you should use available materials. Let's consider replacing the bearing with this particular slope.
Checking the rear wheel bearing
We hang the wheel on the bearing of which there are suspicions. We rotate it by hand. A wheel with a working bearing rotates almost silently. A faulty bearing reveals itself by noise and a sound “as if balls are rolling in the bearing.” The degree of noise and rolling depends on the degree of wear of the wheel bearing itself. For comparison, you can hang a wheel with a working bearing and listen to the sound it makes.
Required Tools
— An extended 30mm head with a long wrench, or a curved box wrench of a similar diameter (or a similar socket wrench, etc.)
To loosen the wheel hub nut.
— Thin chisel, center punch
To bend back the jammed edge of the hub nut.
— Three-legged puller
(not required)
To remove the hub from the wheel axle.
— Two-legged puller, or a special semicircular one
(not required)
To remove the inner bearing race from the wheel axle.
— Puller – pliers
To remove and install the retaining ring
— Puller for pressing the bearing out of the hub/pressing the bearing into the hub
(not required)
— Open-end or any other wrench for 12
(11, 8, 7 - depending on the type of pin)
For unscrewing the guide pins securing the brake drum.
— Key for 13 (14)
To loosen the parking brake adjusting nut.
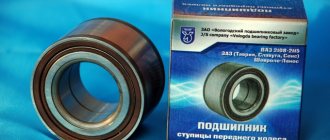
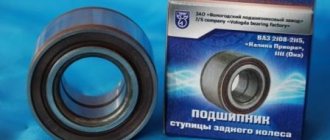
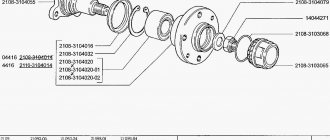
rear wheel bearing for VAZ 2108, 2109, 21099 cars with nut
Preparatory work
It is best to carry out work in a pit (inspection ditch), it is more convenient. But if there is no hole, you can do without it.
— We fix the car
, placing it on a level surface, in first gear, placing wheel chocks under the wheels.
— Under the bottom of the car, loosen the handbrake tightening nut.
If the car is not installed in a pit (inspection ditch), then to perform this operation you will have to jack up one of the wheels, put a safety stop under the car and lie down to get to this very nut.
The procedure for replacing the rear wheel hub bearing on VAZ 2108, 2109, 21099 vehicles and their modifications
— Remove the protective cap on the wheel hub
— Removing the dent on the side of the hub nut
Using a thin chisel or core and hammer, straighten the jammed edge. For greater clarity, the wheel in the image has already been removed.
dent on the edge of the wheel hub nut
- Loosen the hub nut
To do this, use a 30 mm socket with a long wrench (or a special wrench) to unscrew the nut. You may have to apply considerable force and extend the handle of the wrench with a metal pipe, as it may become stuck or rust over time. Also, to prevent the wheel from turning, an assistant inside the car can press the brake pedal.
loosen the rear wheel hub nut
— Remove the wheel
Loosen the rear wheel mounting bolts, jack it up, place a safety stop, unscrew the bolts, and remove the wheel.
- Remove the brake drum
Using a 12 wrench (11, 10, 8, 7 - the pin size may be different), unscrew the two guide pins securing the brake drum. If they don’t want to turn away, lightly tap them with a hammer.
unscrewing the two wheel disc guide pins on the brake drum
Since we have already loosened the parking brake, the brake drum should come off without much difficulty. We rotate it left and right with our hands and at the same time pull it towards ourselves. If it goes badly, tap the drum in a circle from behind with a rubber mallet. This should help.
brake drum removed
— Finally unscrew the hub nut
Remove it and the washer underneath it.
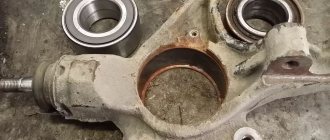
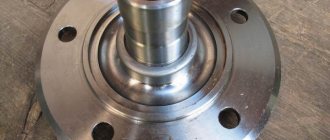
— Remove the rear wheel hub with bearing
We install a three-legged puller on the hub and, by rotating its nut, pull it off the wheel axle.
Removing the rear wheel hub of VAZ 2108, 2109, 21099 cars using a puller
If you don’t have a puller, take the wheel, turn it over with its back side facing you and fasten it to the hub with wheel bolts. We do not tighten the bolts all the way, but several turns (it is advisable, of course, to use elongated bolts, but if they are not available, you can use regular ones). We will use the wheel as a reverse impact hammer. With a sharp movement we move it towards ourselves. If it was not possible to remove the hub from the axle one time, we perform this operation several times.
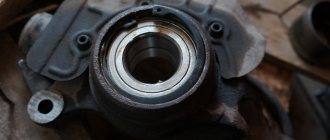
— Remove the inner race of the bearing from the wheel axle
You can use a two-legged or semicircular puller, or you can simply place a large chisel on the back of the ring and hit it with a hammer. The ring will move along the axis, then you can pry it off with a mounting spatula or a large screwdriver and finally remove it. If after working with a chisel there are nicks left on the axle, we clean them with a fine file.
Removing the rear wheel bearing inner race
— Remove the retaining ring securing the bearing in the hub
We use puller pliers for this. If it is not there, remove the retaining ring with a screwdriver.
Removing the bearing retaining ring in the hub using a puller
— Remove the bearing from the hub
Using a special puller, squeeze it out of the hub body. If there is no puller, knock it out with a piece of pipe of suitable diameter. The diameter of the pipe must be equal to the diameter of the inner ring of the bearing. We strike at him.
knocking out the old bearing from the hub
— Clean and lightly lubricate the inside of the hub
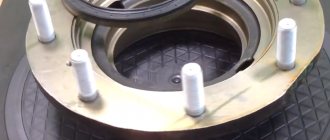
— Press the new bearing into the hub
We do this using a puller or a vice, or simply hammer it in there using a wooden spacer and hitting it in a circle with a hammer. At the final stage of driving, you can use the old bearing as a spacer.
driving a new bearing into the hub
— Install the retaining ring in the groove on the hub
You can use a pliers puller for this, or just a screwdriver.
rear wheel bearing retaining ring
— Install the hub with the inserted bearing on the axle
mounting the hub on the rear wheel axle
— We put on the washer and hub nut.
install the washer and hub nut
— By tightening the nut, press the hub until it stops on the axle.
tighten the nut
— Replace the brake drum and wheel
— Finally tighten the hub nut to a torque of 186.3-225.6 N.m (19-23 kgf.m)
If there is no special wrench for determining the tightening torque, then remember with what force you unscrewed the nut, and with approximately the same force you need to tighten it.
Unfortunately, sometimes our cars break down and need repairs, it is necessary to change various parts, optics, and in some cases the rear wheel bearing needs to be replaced, although, as statistics show, this happens quite rarely.
Detailed instructions for replacing the rear wheel bearing
- The car stops at the front.
- Wheel bolts break off.
- The nut in the center of the hub breaks off, and you must first remove the cap.
- The required side is jacked up and the trestles are positioned.
- The wheel is removed.
- The area for installing the disc brake is filled with WD-40 or other special liquids.
Note!
In this situation, you can use diesel fuel or any brake fluid. The guide bolts are unscrewed, which it is recommended to first tap with a hammer.
Carefully remove the brake drum. If removal is difficult, you need to screw special bolts into the threads on this drum, tighten it and lightly tap it with a hammer. Usually such measures produce positive results.
Note! You can buy specialized drum pullers, but this is the last option when you can’t do anything on your own.
The central nut is completely unscrewed. Of course, you can unscrew it immediately and remove the hub, wheel and drum together, but in this case there will be a high risk of damaging the brake pads.
- The hub tightens. If one of the bearing races remains on the axis, you need to move it out of place using a puller or sharpened chisels.
- The axle is inspected for the presence of marks from bearing rotation; if such marks are present, the assembled hub will need to be replaced.
- The brake cylinder is assessed for leakage, and the pads are assessed for wear.
- The retaining ring is removed from the hub using pliers or screwdrivers.
- The edge must be cleaned of rust, after which it must be moistened with WD-40 or a similar liquid that is at hand.
- There are three ways to press out a bearing: using a special press, a puller or a heavy hammer (sledgehammer). The third method may seem aggressive, but it is preferred by most service station technicians, so let’s look at it in more detail.
- The hub is securely installed on a hard surface, and the bearing is dislodged from its place through the mandrel with several blows of a hammer or sledgehammer. After this, the hub is installed on a vice.
Preparing to remove the hub
To dismantle the rear hub on a VAZ-2108 or any other car with front-wheel drive, it is necessary to perform the following preparatory work:
- Place the machine on a level surface. An inspection hole is not needed - all work is performed without it.
- Place shoes under the front wheels, turn on first gear or reverse - this will ensure maximum fixation of the machine. You cannot squeeze the handbrake - because you will be removing the rear drum.
- Remove the protective cap to access the hub nut.
- Now you need to straighten the shoulders on the nut using a drift and a hammer.
- Set the wrench to 30 and remove the nut. Be sure to use a nozzle - a long pipe.
- Only then can the wheel bolts be loosened.
Now you need to lift the side of the car that is being repaired and begin dismantling the hub.
How to change a bearing yourself
Malfunctions and repairs of the car air conditioning compressor
Before starting work, you should carefully study all its stages:
- We jack up the car from the side of the faulty bearing, remove the wheel and, having access to the lock nut of the outer CV joint, unscrew it using a 30 mm socket. It is worth considering that when subjected to high loads, the nut can be heavily tightened; in this case, the wheel is put in place, the car is released from the jack, after which we engage first or second gear in the gearbox and with great force and an elongated wrench, it can be torn off.
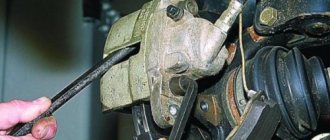
- Next, we proceed to dismantling the brake cylinder, for which we need to unscrew the two bolts that secure it from the inside of the hub with a 17 mm wrench, and using a flat-head screwdriver, carefully pressing the pads away from the disc, we remove this unit to the side.
- We unscrew the nut securing the steering tip from the steering knuckle, and using a specialized puller, squeeze it out of its seat, then we perform a similar operation with the tip of the ball joint located at the bottom of the hub
- The upper part of the steering knuckle is attached to the suspension shock absorber strut with two bolts, the lower of which regulates the vehicle's wheel alignment, mark its position and, after unscrewing these bolts, remove the entire hub assembly. We also remove the brake disc secured with two screws.
- Using a specialized puller, we press the front hub out of the inner race of the bearing, then remove the retaining rings on both sides, and with the same puller, we squeeze the old bearing out of its seat.
- Before installing a new wheel bearing, we clean its seat from old contaminants, carefully inspect it for possible damage, small chips and cracks, and if they are found, the steering knuckle must be changed, otherwise there is a possibility of its rapid breakdown.
- We lubricate the bearing seat in the steering knuckle, which will greatly facilitate its pressing, install one retaining ring and mount the new part using a specialized puller until a characteristic click is heard, after which the second retaining ring is inserted.
- We clean, inspect for damage and, if there is none, lubricate the seat of the front hub. Then, using a puller, we carefully press it into the inside of the new bearing and mount the entire assembly into its seat. After that, we carefully insert the splined flange of the drive, install the brake disc, caliper, ball joint and steering end, after which we tighten the new nut securing the outer CV joint, which comes in the repair kit for new parts, roll its edges into the locking grooves and put the wheel in place.
This completes all work on replacing the front wheel bearing. Also watch the video for a detailed analysis of replacing the front wheel bearing on VAZ 2113, 2114, 2115 cars:
As practice shows, the most common cause of wheel bearing failure is the too long service life of this part. Like other spare parts, bearings have a limited service life, and therefore there comes a time when they require replacement. The wear of this part is indicated by a characteristic sound resembling a hum. If such a symptom is detected, the best solution would be to replace the wheel bearing in a VAZ-2114 car.
First make sure that it is the bearing that needs to be replaced. After you have driven your car for a long time, touch the area of the wheel that is making the humming noise with your hand. If this area is much hotter than the other side of the wheel, then the bearing does need to be replaced.
Another way to check is as follows. Using a jack, you need to lift the car and unscrew the wheel bolts. You only need to lift the side where the sound is coming from.
The raised wheel must be rocked with great effort. If you hear a dull sound, you need to ask someone to press the brake and rock the wheel again. If the noise disappears, then the problem is in the bearing and it needs to be replaced.
External manifestations of a malfunction and its initial diagnosis
You can draw a conclusion about a malfunction based on extraneous noise, knocking, dry crunching sounds that appear in the rear of the car, vibration felt in the cabin while driving, or the vehicle pulling to the side while driving.
This conclusion can be confirmed or refuted by performing simple diagnostic operations:
- Place the car on a flat horizontal surface;
- Try to swing the wheel from left to right and vice versa with both hands. If the ZSP is faulty, clicks will be heard and a clearly noticeable play will appear;
- Place the wheel on a jack and spin it as quickly as possible. A clearly audible crunch indicates a breakdown.
There is another option that is only suitable for front-wheel drive cars (our case). The car is hung on a lift, started, then. The transmission starts. The rear wheels accelerate. The appearance of vibration and noise confirms the need to replace the bearing.
Rear bearing replacement technology
We draw the attention of the car owner to the futility and even harmfulness of trying to eliminate such a malfunction by tightening the hub nut. The backlash, however, does not disappear. On the contrary, accelerated bearing wear is observed.
The algorithm for performing the work is as follows
- Place the car on a two-post lift. If impossible, on a viewing hole, followed by fixation against unauthorized displacement.
- Release the rear wheel brake.
- Remove the protective cap from the disk.
- Straighten the collar that secures the hub nut from unauthorized loosening.
- Loosen and remove the nut.
- Loosen the mounting bolts and remove them. Then fully lower the parking brake handle and remove the rear wheel.
- Using a chisel, remove the wheel bearing protective cap.
- The hub nuts are unscrewed.
- The brake drum is removed.
Please note that after performing this operation you must not press the brake pedal. Otherwise, the pistons from the wheel cylinder may extend completely.
- From the outside of the drum, using a special puller, the retaining ring securing the bearing to be replaced is removed.
- The faulty ZSP is pressed out (using a cup puller) from the seat located in the drum.
Another option is possible. The bearing is knocked out using a mandrel of the required diameter (for ease of work, it is recommended to first place a pair of identical blocks of wood under the drum.
Before proceeding with the installation of a new spare parts assembly, it is recommended to first clean all working and seating surfaces from dirt and old grease, and visually verify their serviceability (if defects are identified, replace the faulty elements). Then re-lubricate.
- The new bearing is inserted into the brake drum seat.
- Using a puller, it is pressed in until it stops. If necessary, the outer race of the dismantled old bearing can be used as a mandrel.
When pressing a purchased new product, it is allowed to apply force exclusively to the end part of its outer casing. Mechanical impact on the inner race is prohibited (the bearing will fail).
By resting the cup of the puller used on the opposite side of the drum, it is necessary to check (when working on a car with ABC) that the master ring of the speed sensor installed in the rear wheel is not damaged.
- A retaining ring is inserted into the groove on the drum.
- The actual condition of the axle is checked.
If damage is detected to the seating surface at the bearing installation site (optionally, threads for the nut), the hub axis must be replaced.
To do this, unscrew the 4 screws that secure it to the beam flange (rear suspension), dismantle the old part and install a new axle.
- The brake drum is mounted on a trunnion (the recommended tightening torque is 80 Nm). Use a torque wrench.
- The hub bearing nut must be tightened to a torque of 175 Nm.
After completion of the work, it is recommended to check the functionality of the assembled unit. If necessary, adjust the parking brake of the Lada Largus.
Then the wheel is installed. The brake pedal is pressed several times. Then you should check the brake fluid level (add if necessary).
Check the functionality of the brake system.
Renault Logan wheel bearing replacement
has a number of features. If we are talking about the rear wheel bearing of Renault Logan, then you have come to the right place. In this article we will consider replacing the rear bearing.
You can determine that it is time to change the wheel bearing of the Renault Logan rear wheel by the hum, noise and vibrations when driving. It is quite easy to make sure that it is he. It is enough to lift the rear wheel and rotate it with your hands (the handbrake is lowered), the hum should alert you. It is also recommended to take the hanging wheel with your hands and move it back and forth. If there is play, then the bearing is completely broken.
Due to the design features, the wheel bearing on Renault Logan is installed directly into the brake drum. More precisely, the brake drum and hub are one unit. In order to remove the hub, also known as the drum, it is enough to unscrew the hub nut with a 30 mm socket. The nut is hidden under a cap that will need to be removed.
Once the drum is in your hands, you need to remove the bearing from there. Under no circumstances should you press the brake pedal with the drum removed. The wheel bearing is pulled out, but first you need to remove the retaining ring, see the photo below.
Now we take the drum and place it on a couple of pieces of wood, take a hammer and carefully (through a suitable spacer) knock out the old bearing of your Renault Logan. See the photo below for clarity.
If you are an advanced car enthusiast, then you probably have a puller that can be an excellent alternative to a hammer. In any case, removing the old bearing is usually not difficult. But to install a new one, it is advisable to have a press-in puller, or better yet, a press. In any case, the new bearing must be pressed in carefully; it is advisable to use the outer race of the old bearing as a spacer.
Once the bearing is in place, do not forget to install the retaining ring that was removed at the beginning.
Sometimes it happens that the rear wheel bearing is so broken that it damages the axle (the axle on which the inner race sits). To replace the bearing journal, you will need to unscrew 4 bolts with a 16mm wrench on the back of the brake shield on which the pads are mounted. Here is a photo for clarity.
Structurally, Renault Logan and Renault Sandero are quite similar, so this instruction will also be useful for Sandero owners. Do not forget to tighten the new wheel bearing with a tightening torque of 175 Nm or 17.5 kgf m. The hub nut is disposable, so you will have to buy a new one.
An article with photos and video materials for everyone who is faced with the need to replace the rear wheel bearing on cars of the LADA Samara family.
To perform the work you will need the following equipment:
Internal retaining ring remover;
two- or three-jaw puller.
Step-by-step method for replacing the rear wheel bearing on a VAZ 2109, 2110
Replacing the front wheel bearing of a VAZ 2107
- stop the car from the front;
- tear off the wheel bolts;
- tear off the central nut (7) of the hub, having first removed the cap (9);
- jack up the side and set the trestles;
- remove the wheel;
- fill the brake drum mounting area with WD-40 or other special liquids (you can use diesel fuel or brake fluid);
- unscrew the guide bolts (it is advisable to lightly tap with a hammer);
- we try to carefully remove the brake drum (if it doesn’t work, we screw the appropriate bolts into a special thread on the brake drum, apply tension and very lightly try to knock it out with a hammer. In most cases, the result will be positive. There are special drum pullers on sale, just for that case , if all else fails);
- unscrew the central nut completely (of course, it is possible to unscrew it immediately, and even remove the hub along with the wheel and drum, but then there is a high probability of damage to the brake pads);
- we tighten the hub (if one of the inner races of the bearing remains on the axle, you need to use a puller or just a sharpened chisel to try to move it from its place);
- inspect the axle for signs of bearing rotation (if there are any, we replace it, it is advisable to replace the hub assembly);
- inspect the brake cylinder for leaks and pads for wear;
- remove the retaining ring from the hub using pliers and/or screwdrivers.
Be sure to clean the edge from rust, moisten it with WD-40 or whatever you have on hand.
There are three options for pressing out the bearing:
- A special press (not everyone has one).
- A puller (not expensive, can be purchased, will be useful for the future).
- Using a heavy hammer (at least 2 kg) or a sledgehammer. AT first glance, the method may seem a little aggressive, but it is practiced by an overwhelming number of masters and service stations, and we will consider it.
The hub must be firmly installed on a hard surface, and with several sharp blows through the mandrel, the bearing must be moved from its place. When this happens, you need to install the hub, for example, on a yew tree (so that there is a stop for the hub and free space for the bearing to exit)
- a few more blows and the bearing will come out (don’t rush to throw it away);
- We inspect the seating plane under the bearing, clean off the rust with sandpaper, lubricate it with regular engine oil (you can polish it off);
- the new bearing must be screwed with any suitable bolt through washers (washers must be selected according to the inner races, the bearing is double-row and during installation there is a high probability of its disassembly);
- install the hub on a hard surface.
— we place a twisted bearing on top, and lightly lubricate its mounting plane with oil (a new good bearing usually does not need to be lubricated inside, but if you have doubts and a little experience in assembling and disassembling, you can use Litol -24 lubricant)
- using an ordinary 500-gram hammer, very lightly, we try to align the bearing in the plane;
— we take a suitable mandrel (for example, a pry bar), and try to press the bearing in with gentle blows.
- the basic rule is no strong blows, if it doesn’t work, it means it’s crooked
- after the bearing has passed halfway, you can no longer apply much force, since it can no longer warp.
-when we reach the cut of the hub, it is necessary to use the old clip as a mandrel (no strong impacts, the metal is high-carbon, and with a strong impact it can burst and cause very serious injury)
— we push it all the way and install the stopper (if there are problems with installing the stopper, then most likely you did not finish it all the way) the stopper should easily spring into the groove;
— that’s it, we begin the process of assembling the rear hub bearing on the VAZ 2109, 2110. To do this, we put the hub on the axle (by removing the bolt with which we tightened the cages);
— tighten and tighten the central nut (be sure to install a new one), not forgetting to put the thrust washer;
— put on and screw on the brake drum and wheel;
— check the rotation (there should be no extraneous noise);
— if all is well, lower the car from the jack;
— tighten the wheel and the central nut (the tightening torque of the hub is about 20 kgm, this is quite a strong tightening, if you don’t have a torque wrench, you need to use a lever of at least a meter to tighten the nut with a force twice the tightening force of the wheels);
— tighten the hub nut, tighten the wheels.
Design Features
The rear hub 2108 is very different from the similar mechanism used in cars of the “classic” series - VAZ 2101-2107. The design of the rear suspension on front-wheel drive cars is quite simple. The axle shaft is mounted on the beam; it is somewhat similar to that installed on the front axle. But there is one difference - this element can move in a vertical plane, but rotation will not work - the fasteners are rigid.
The hub itself is a small metal cylinder, hollow inside. A roller is pressed into it - a special bearing, with the help of which the wheel rotates on the axle shaft. Moreover, the outer diameter of this bearing is the same as the inner diameter of the hub. And the diameter of the inner race is the same as the outer one of the axle shaft. Consequently, the fit of the hub on the axle shaft is as tight as possible, there are no gaps. This can be understood by disassembling the element just once.
Best rear wheel bearings
How to determine whether the VAZ 2110 backstage is faulty, is repair or replacement necessary?
Finding good wheel bearings for the rear axle is a little easier, since they take on less load. Because of this, there were many contenders for the leading position. But only three products from Bavarian manufacturers passed the selection based on price/quality ratio.
NK 763924
Bavarian manufacturer of spare parts for cars in the budget segment. This brand produces: ball joints, levers, silent blocks, stabilizers and hub rollers. The last element is divided into 2,000 models that are suitable for all brands of passenger vehicles.
NK 763924 – universal rear hub roller for cars: Nissan, Dacia, Opel and Renault. Its dimensions are: 25x55x43 mm (inner diameter/outer diameter/width).
Advantages:
- Low cost;
- Availability of a technical passport;
- Maximum dynamic load up to 3.5 tons;
- Always available in almost any car store.
Flaws:
- Unstable quality;
- The warranty is only 3 months.
In its price segment, the NK 763924 model demonstrates excellent results. When operating a machine in difficult conditions, such a bearing can operate for at least 6 months. For 1000 rubles this is an excellent indicator.
Fag 2108-2112 545312a
A highly specialized manufacturer FAG, specializing in the production of bearings for passenger cars and SUVs, weighing up to 4 tons. In total, there are 63 factories in the world that produce products under the FAG brand. And it is sold in European countries, Ukraine, Russia and the USA.
Of the entire range of spare parts produced by the Bavarian company FAG, car enthusiasts highlight the part Fag 2108-2112 545312a. This is a rear hub roller used on cars: VAZ (2108-2112), Lada (Kalina, Priora), Volvo (340/360 sedan and hatchback). Its size is 30x60x37 mm (inner diameter/outer diameter/width) and the maximum dynamic load capacity is up to 3.5 tons.
Advantages:
- Inexpensive;
- High quality material;
- Availability of a 12 month warranty;
- There is ABS.
Flaws:
- A small list of cars on which it is used;
- Difficult to find on sale.
The Fag 2108-2112 545312a model took pride of place in the ranking of the best bearings for the rear hub thanks to many positive reviews. Car enthusiasts have repeatedly said that the unit lasts twice as long as stated by the manufacturer.
SWAG 30850008
The SWAG company specializes in the manufacture of spare parts for cars and trucks. The company's product range includes more than 10 thousand models of hub rollers for rear wheels.
Model SWAG 30850008 is worthy of special attention. This is a rear wheel bearing, which is used on cars of the following brands: AUDI, Volkswagen and Seat. Its size is 45x19x15 mm (external diameter/internal diameter/width). According to reviews from car enthusiasts, this model is the highest quality in its price segment.
Advantages:
- Use of light alloy materials;
- Low cost;
- Availability of ABS;
Flaws:
Suitable only for vehicles weighing up to 3 tons.
Replacing a bearing using the example of a VAZ-2110
Rear hub with bearing VAZ-2110
First, let's consider replacing this element on the “Ten”. The tools that will be needed are not so many, but specific ones will also be required. In total you will need to have:
- Jack;
- Car supports;
- Balloon wrench;
- Socket wrench “30” or a socket with a wrench of the same size;
- Pliers for removing retaining rings;
- Key for 12;
- Special puller for pressing out the bearing;
- Hammer;
- Chisel;
- Mount;
Having all this, you can start replacing. The car is placed on a flat surface, the gearbox is engaged in 1st gear. While the car is on its wheels, it is better to immediately loosen the hub nut. Often this nut is too tight, so it may be necessary to extend the wrench with a pipe.
Then the wheel bolts are loosened, the wheel is jacked up, and the car itself is placed on supports. Next, the wheel is removed from the car.
Before removing the hub, the brake drum will need to be removed. To do this, you first need to unscrew the guide pins. After this, the drum is removed from the hub. Sometimes it can only be removed by knocking down the drum with a hammer and a wooden handle.
Next, the hub nut is completely unscrewed to allow the hub to be removed from the axle. Since the bearing sits tightly on the axis, you cannot do without a hammer and a wooden adapter. You need to knock it down carefully, constantly turning the hub so that it comes off the axis evenly.
Then everything depends on how the hub came off the axle. The fact is that with severe wear, the inner race of the bearing may remain on the axle, and the outer race, together with the balls, may remain in the hub.
In this situation, you will have to additionally remove the brake pads in order to “rip” the inner race out of place, and then pull it off with a puller or using a chisel and hammer. The method of tightening the inner race is not important, the main thing is to remove it without damaging the surface of the axle. If the bearing comes off the axle completely assembled, you can begin further work.
The bearing needs to be pressed out from the removed hub. To do this, the retaining rings are first removed. Then using a special puller. If there is none, you can simply knock it out.
But putting a new element in place by hammering it in is strictly prohibited. It should be pressed in either with the same puller, or using a powerful vice, using the outer race of the worn bearing as a straightener.
After the new element is seated, its retaining rings are installed, and the replacement of the rear wheel bearing is completed and you can begin assembly, which is performed in reverse order.
SIGNS OF BEARING WEAR
Signs of wear on the rear wheel bearings are very easy to recognize. When driving, a hum appears in the cabin at the rear of the car. At low speeds, a creaking noise can be clearly heard.
In cases where the bearing has begun to fail, a crunching sound may occur when the wheel rotates, indicating that broken pieces of the bearing have begun to fall between the rollers.
Checking the condition of this element is also not difficult. It is enough to jack up the rear wheel and check for axial play by rocking the wheel.
Then the wheel should be rotated, listening for the presence of squeaks. If the bearing begins to deteriorate, the wheel will most likely bite when rotating.
Further actions depend on the element used. The design of the bearing may differ on different cars. For example, on the VAZ-2110, an angular contact double-row ball bearing of a closed type is used on the rear hub; in appearance it is similar to the front hub bearing. But Daewoo Lanos uses a tapered roller bearing consisting of two halves. Further we will consider everything using the example of these two cars.
So, if the VAZ-2110 wheel bearing shows signs of wear, it is simply replaced.
In Lanos, you can try to eliminate the hum, squeaks and play by tightening the hub nut. Often it is enough to carry out this operation to eliminate play and hum.
But if a crunching sound is heard when the wheel rotates or tightening the hub nut does not produce results, the rear hub bearing is replaced.
Replacing the front wheel bearing of a VAZ 2109
The VAZ 2108, 2109 series is the first Russian front-wheel drive car. Replacing the VAZ 2109 wheel bearing is necessary if, while driving, you hear an increasing hum in the wheel area, sensitive vibration appears during braking, and the hub overheats greatly. Wear of the wheel bearing threatens to increase wheel play and wear out the hub. In the most advanced cases, this can lead to bearing destruction and wheel jamming, so do not delay replacement.
Preparing to replace the wheel bearing
Before you replace a worn wheel bearing, you need to select a replacement. AvtoVAZ recommends installing only original factory bearings. But the experience of many car owners has shown that the most “unkillable” and long-lasting are the wheel bearings from the Vologda Bearing Plant.
To replace a wheel bearing on a VAZ 2109, you will need: a jack, supports for the housing, a bearing puller, a vice, a 30mm socket with a knob, 12mm, 17mm and 19mm spanners, a torque wrench, a small chisel, a hammer, Litol-24 lubricant ", a flat-head screwdriver and pliers.
1. Place wheel chocks under the rear wheels of the vehicle. Then remove the protective cap from the hub nut. Use a chisel to unscrew the nut and use a 30mm head to tear it off and loosen it, but do not unscrew it completely. 2. Loosen the wheel bolts a little. Raise the front of the car with a jack, placing a reliable support under the body.
3.Unscrew the wheel bolts and remove the wheel. Using a 17mm wrench, unscrew the bolts securing the caliper guide and remove it. Use a screwdriver to release the brake pads and lift the caliper so that it does not interfere with further dismantling.
4.Using a 12mm wrench, unscrew the two guides and lightly tap the brake disc through the soft stop with a hammer.5.Using a 30mm socket, completely unscrew the hub nut and remove the thrust washer.6.Pass two M12x 1.25 bolts through two perpendicularly located holes in the brake disc and screw in them into the threaded holes on the hub. Lightly tap the brake disc on the bolt heads to press it out.
7.Unscrew the two 17mm bolts securing the ball joint. Guide the outer joint through the hole in the hub. Using a softer metal socket, lightly tap the hub with a hammer to knock the hub out of the steering knuckle.
8.Use pliers to remove the retaining ring and press out the bearing using a puller. To do this, press the puller bolt against the inner ring of the bearing from inside the knuckle. As a result, the bearing will end up on the puller.
9.Clean the inside of the steering knuckle. Apply grease to the outer race of the bearing. Using a puller (or, as in this case, pressing takes place in a vice), press the new bearing into the fist and install the new retaining ring in place.
10. Press the fist into the hub (using the socket from a set of keys)
11.Assemble all parts of the car assembly in the reverse order. Tighten the wheel nut with a torque wrench after putting the car on the wheels. Set the moment of force on the key - no more than 25 kgf/m.
What brand should the bearing be?
In order for the replacement of rear wheel bearings on the VAZ 2109 to be as durable as possible, it is necessary to choose the right part.
So, the design features of the part are as follows: the bearings have a closed shape (double-sided seal). Type - angular contact, ball, double row.
You can also find a roller version on sale - 537906. Its features include a lower rotation speed and a higher load capacity.
Bearings are produced at four factories - at the Saratov Bearing Plant (SPZ), in Vologda (23 gas processing plants), Samara (SPZ-4), Kursk (20 gas processing plants). By the way, bearings are no longer produced in Kursk.
As for quality, the best are the first two options. As for Samara, bearings are produced there for those who like to save money (that is, you should not expect high quality).
What indicates the need for replacement?
If you notice a constant buzzing sound, then you should pay special attention to this
You should contact a service station as soon as possible. There they will check the performance of the bearing. Most often, it runs about one hundred thousand kilometers. If the time comes, it should be replaced.
To replace you need:
- It will be necessary to flood the wheels located on one of the two sides, depending on the location of the problem.
- After this, the wheels are spun to the limit by hand until a characteristic sound appears.
Then the price for replacing the broken wheel bearing is announced.
Types of bearing assembly designs
Based on the design features, the following types of single- and double-row bearings are distinguished:
- angular contact balls;
- conical roller.
As technology improves, Hub Unit Bearings (abbreviated as HUB) come in generation zero and from generation one to generation five.
Class 0 parts are no longer found in foreign cars, since they need to be adjusted and lubricated. Some domestic manufacturers continue to produce cars with such bearings.
HUB-1 consists of two rows of ball or roller units. Its main elements are 1 outer ring, 2 inner rings, balls or rollers with gaps. Sensors are installed on vehicles with ABS. Contact angles are optimized for loads depending on the vehicle model. HUB-1 is equipped with seals and filled with lubricant for the entire period of operation. It can be changed separately from the hub.
HUB-2 is developed on the basis of the first generation and is characterized by equipping the outer ring with flanges with fasteners for fixing with a suspension. Used on non-driving axes.
HUB-3 plated units have flanged inner and outer rings. In order to distribute the load, the inner ring is connected to the axle shaft using a spline, and the outer ring is mounted on the hub. This design effectively reduces vibration during braking due to low radial runout.
HUB-4 are combined with constant velocity joints, and generation 5 are combined with brake discs. But so far these designs have not found wide application and are operated in a pilot-industrial mode.
Front wheel bearing is noisy
Good afternoon! The front right wheel bearing is humming. It started humming a week ago, I won’t be able to get to the service center this weekend. What are the consequences of driving with a humming bearing? The question is... how much longer can you drive on a humming one, how strong should the hum be for it to fall apart, and what are the dangers of driving on such a bearing. Is it possible to get there on such a bearing? The knock is caused by excessive play. The hub bearing hums uniformly as a result of wear on the separator raceway. This will allow you to more accurately determine which bearing is humming. It is better to purchase and install a new part as soon as the buzzing appears.
The man still doesn’t really know whether the bearing is humming or not, and he hasn’t even written down which hub – front or rear, but we’ve already intimidated him. If it is the front hub bearing, then the easiest way to check is this: while driving, make gentle turns of the steering wheel and listen. If the humming increases, for example, when turning right, then the left wheel bearing is faulty and vice versa. The front wheel bearings of the Renault19 are maintenance-free and non-adjustable. The design is double-row, with separate internal cages and separators.
Is it possible to drive if the hub bearing is humming? Opinions vary, even among drivers with considerable experience. So, let's look at what to do if a wheel bearing hums, what kind of device it has, and the dangers of driving with such a faulty element. What to do and how dangerous is it to drive with such a malfunction? Ignoring bearing noise will reduce driving safety.
If you recognize in time that the hub bearing is humming, you will be able to calmly change the spare part without critical consequences. Regardless of the main features of your car, breakdowns are repaired either by replacing the bearing, or the entire assembly, together with the existing hub. A brake system that is damaged will release excess heat into the bearing. Incorrect wheel alignment angles can lead to load redistribution.
Now you know how to determine which wheel bearing is humming. These tips should help novice motorists who have just gotten behind the wheel of a vehicle. Otherwise, the wheel may jam, and then it would be better for the driver to drive at low speed. Therefore, it is better to replace bearings at the stage when they begin to hum. The drive is only 70 km. By the way, what kind of bearing is it? Front?
Originally written by AlexKa: Actually, the left front wheel bearing is humming on a freshly purchased jack, the hum starts at speeds of 90 km/h, and is uniform. The hub does not heat up, there is no significant play. Is it possible to travel with the buzzer until Tuesday or not? On the way out you will have to travel around the area, mountain transport is not an option... How can I check which wheel bearing is humming? Here's what experienced auto mechanics advise. There is no definite answer, since it all depends on the degree of wear of the part.
The disk is held by the top and bottom with your hands and swings: you push with one hand, and pull with the other. If the wheel is freely affected, the bearing is no longer suitable for service. Even at first glance, insignificant play indicates that the bearing has begun to crumble; if the slope is simply dangling, then measures need to be taken urgently. And by the way, today I changed the bearing myself. The hub is also due for replacement.
Good afternoon Please tell me, I have a very loud buzz in my car, like on an airplane. I went to the service station, the right wheel bearing on my car, the bearing does not change, but the whole unit, the play on the lift was quite significant.
Hmm, tough... It turns out that the right moment to replace a wheel bearing is as soon as it starts to hum? Is it possible to determine the degree of wear by ear? The vibration arising from it begins to be transmitted through the body or to the legs to the driver or passenger (depending on where exactly the above-mentioned malfunction occurred).
It is important to detect the first signs of wear on the elements in time - this will give you a small margin of mileage before replacement. It’s quite easy to determine how a bearing hums: remember the sound of an accelerating electric train or subway train and compare it with the noise of a car’s chassis
When to replace
The rear wheel bearing should be changed no later than every 100 thousand kilometers. But the realities of our roads and the quality of products are such that in fact the service life of the element is noticeably less than the specified period.
Practice shows that it is necessary to change the spare parts every 50-60 thousand kilometers, and in some cases even more often. It is best to focus not on mileage, but on signs of wear.
Symptoms of a problem
The car itself will tell you that it’s time to change the air conditioner by displaying the following signs:
- There is a noise, a strong hum or knocking sound in the rear of the car when driving;
- Play is detected in the bearing.
Checking status
If one of the symptoms appears on your VAZ 2109, you must lift the rear wheels one by one and make sure whether the problem is really in the bearings. For this:
- Lift the wheels and spin each one by hand;
- Listen to whether any extraneous sounds appear when the wheel spins;
- If you hear a characteristic hum, this indicates wear on the wheel bearing;
- Check the assembly for play. The wheels must be hung;
- Firmly grasp the top of the wheel and pull away from you and towards you;
- If the bearing is in good condition, the wheel will not move, that is, play;
- If there is a build-up, then you will have to replace the spare parts.
How to determine when an element is time to change?
The main signs of a wheel bearing malfunction are a metallic hum and/or wheel play while driving. The last criterion is difficult to notice on your own. A video taken from a car behind you may help.
In order for the driver to determine where the fault is located, it is necessary to turn sharply at speeds of up to 15 km/h. If the noise disappears, the element on the opposite side has broken. To check, it is recommended to make a similar turn in the other direction.
When grinding and crunching noises are heard, the driver is advised to stop. This is a sign of complete failure of the bearing, which may result in the wheel flying off.
In stationary conditions, the malfunction is determined after the vehicle is placed on a lift. Deviations on the drive axles are checked by accelerating to 70 km/h and listening to the hum near each of the wheels. If the wheel is not driving, it is turned by hand and rocked. The play will be felt.
Detailed instructions for replacing the rear wheel bearing
Replacing the rear wheel bearings of a VAZ 2110
- The car stops at the front.
- Wheel bolts break off.
- The nut in the center of the hub breaks off, and you must first remove the cap.
- The required side is jacked up and the trestles are positioned.
- The wheel is removed.
- The area for installing the disc brake is filled with WD-40 or other special liquids.
Note! In this situation, you can use diesel fuel or any brake fluid.
The guide bolts are unscrewed, which it is recommended to first tap with a hammer.
Replacing the rear wheel bearing of a VAZ 2110
Carefully remove the brake drum. If removal is difficult, you need to screw special bolts into the threads on this drum, tighten it and lightly tap it with a hammer. Usually such measures produce positive results.
Note! You can buy specialized drum pullers, but this is the last option when you can’t do anything on your own.
The central nut is completely unscrewed. Of course, you can unscrew it immediately and remove the hub, wheel and drum together, but in this case there will be a high risk of damaging the brake pads.
Rear wheel bearing VAZ 2110
- The hub tightens. If one of the bearing races remains on the axis, you need to move it out of place using a puller or sharpened chisels.
- The axle is inspected for the presence of marks from bearing rotation; if such marks are present, the assembled hub will need to be replaced.
- The brake cylinder is assessed for leakage, and the pads are assessed for wear.
- The retaining ring is removed from the hub using pliers or screwdrivers.
- The edge must be cleaned of rust, after which it must be moistened with WD-40 or a similar liquid that is at hand.
VAZ 2110 rear wheel bearing
- There are three ways to press out a bearing: using a special press, a puller or a heavy hammer (sledgehammer). The third method may seem aggressive, but it is preferred by most service station technicians, so let’s look at it in more detail.
- The hub is securely installed on a hard surface, and the bearing is dislodged from its place through the mandrel with several blows of a hammer or sledgehammer. After this, the hub is installed on a vice.
Note! There must be a stop for the part and a place for the bearing to bounce off.
A couple more blows are made, after which the bearing comes out.
VAZ 2110 rear wheel bearing
- The bearing seating surface must be carefully inspected, any existing rust should be sanded off and lubricated with plain motor oil.
- The purchased bearing must be screwed using a selected bolt through a washer, which must be selected in accordance with the internal races. Since the bearings are double row, they will have to be disassembled during installation.
- The hub is installed on a hard surface.
- A twisted bearing is installed on top, but first you need to lubricate its installed plane with oil.
- Use a one-kilogram hammer to slightly level the element in a plane.
- Take a suitable mandrel, for example, a pry bar, which is used to hit the part to press the bearing.
Brand rear wheel bearing VAZ 2110
Note! The main thing is not to apply strong blows, since the pressing will be uneven.
- When the bearing is about halfway through, you can hit harder.
- When reaching the cut part of the hub, you need to use the old clip as a mandrel.
Easy to replace rear wheel bearing
Note! Do not apply strong blows, as this is a high-carbon metal that can burst.
You need to push it all the way, after which the stopper is installed; if it is not possible to install the last element normally, then most likely the bearing was not finished completely.
Note! The stopper should spring back into the groove without difficulty.
Bearing assembly procedure
Now it's time for assembly, the hub is put on the axle, and you need to remove the bolt used to tighten the cage.
Wheel bearing rear
- The central nut is tightened and tightened as much as possible. In this case, it means installing a new nut. We also install a thrust washer.
- The previously removed brake drum and wheel are put on and screwed on.
- The rotation is evaluated, if there is no noise, then all actions were performed correctly. The car is removed from the jack.
- The wheel with the central nut is tightened.
- The hub nuts are closed and the wheels are tightened securely.
What tools will you need?
Before you replace the rear hub or its bearing, be sure to have all the necessary tools. It is unlikely that it will be possible to dismantle the bearing without special pullers. If you plan to install a new hub assembly, then there will be no problems - it already has a new bearing, which is installed according to all the rules.
But if you buy all the elements separately, having a puller is highly desirable. You need to have the following tools on hand:
- Jack - preferably a rolling type. And definitely reliable supports. If there are none, then you can use wooden blocks.
- Balloon wrench for wheel bolts - usually a 19, 17 or hex head.
- Pliers.
- 30mm socket or socket wrench.
- A piece of durable pipe.
- Hammer, chisel, drift.
- Wooden beam or bronze hammer.
- Mounting blade.
- A puller of any design for pressing out a wheel bearing.
- A two-legged puller is required.
That's it, you'll also need a new bearing and wheel nut. It is not recommended to reuse the old one.
How to check the rear wheel hub
Let's first find out what signs can be used to determine that a part is living its last days:
- If the hub part has become unusable, a characteristic grinding sound will be heard from under the tire while driving. This “symptom” is the main one, and with its help you can determine the presence of a malfunction with almost 100% probability.
- When turning, the tire slows down and/or becomes hotter than normal. In some cases, a clicking clicking sound may also be heard when turning.
If you suspect a breakdown, you need to check it. To do this, place the flywheel on the jack and turn it - if a metallic grinding sound appears during rotation, then you must make a replacement, since otherwise such a breakdown could damage the car while driving.