How to remove a brake caliper, work in stages
It is advisable to remove the brake caliper on a lift. To remove it correctly, you must adhere to a number of specific actions. We will give an example of removing a caliper on domestic car models.
1.Before carrying out such work, it is necessary to raise the vehicle using a lift. If for various reasons it is not possible to lift the car completely, you can use a jack.
2. Then, you need to take a wrench and unscrew the bolt on which the brake hose bracket with the brake device is attached. After completing this process, it is advisable to remove the bracket to make it more convenient to work.
3. When the bracket is removed, you will see the bolt that holds the brake hose. This bolt should be unscrewed and the hose removed.
4. Immediately after removing the brake hose, fluid will begin to flow out of the recess. You can prevent leakage by closing the hole with a bolt that is suitable in diameter and size.
5. Next, it is necessary to remove the brake pads so that they do not interfere and it is convenient to work.
6. Now, you need to unscrew the bolts in the brake device mount. After that, we bend the locking plates.
7. Do not forget that these same bolts are very different from each other and they must be screwed into exactly the hole from which they were removed.
8. And finally, we remove the brake caliper itself.
What to do if the rear brakes are stuck: 4 working methods
1. A screwdriver will help.
We can say that a vehicle owner is lucky if the car is equipped with disc brakes. Then there will be no difficulties with unlocking when the rear brakes jam:
- The wheel is dismantled, and the frozen brake pads are separated from the working disc of the brake system using a flat screwdriver.
- Next, the disk rotates, which should rotate easily after release.
- If the disc spins, the wheel is put back, the car is removed from the jack, you can move on.
2. Wedging the rear drum brakes using a hammer.
If drum mechanisms are installed on the rear axle (they can be seen even on modern cars), you need to act differently. The difficulty with this method is that the rear drum pads are not as easy to reach as is the case with discs. But there is a way out:
- The immobilized wheel is removed using a hammer.
- The drum is tapped along its entire circumference.
- Then the drum is rotated, it should be released. If this happens, the wheel is put in place and you can drive.
The effectiveness of the hammer method is approximately 70%. But what if the hammer didn't help?
3. Load on the rear axle plus a sharp start.
To solve the problem in this case, you need to load the rear of the car. It would be best to fit three adults in the back seat. If those interested are found, they are seated in the cabin, the power unit is started, it is spun to high speeds and a sharp start is made.
If it didn’t work the first time, don’t be upset: sooner or later the rear brake pads will come off the brake disc. This can be determined by the characteristic knock of the pads coming off. Helping passengers leave the back seat of the car, and the driver sets off.
This outcome is possible for 20% of successful wedgings, but what to do with the remaining ten percent?
4. Using a blowtorch.
The rear wheel is dismantled, the brake drum is thoroughly warmed up using a blowtorch. The main thing now is to distribute the heating as evenly as possible over the entire area of the drum. Otherwise, the brake cuffs will fail. You should work with a soldering iron until a characteristic click is heard, which means that due to heating, the drum has expanded and the brake pads have “come unstuck” from it. The wheel is put in place, after which you need to try to spin it. If everything went well, the car can continue moving.
What actions need to be taken so as not to be puzzled in the future by the question of why the rear brakes are sticking?
There are two rules:
- Do not put the car on the handbrake when parking for a long time.
- If the vehicle has driven into a puddle and the brake pads are wet, you need to dry them so that the rear brakes do not jam in the future. To do this, you need to press the brake pedal several times while driving and only then drive the vehicle into the parking lot.
Final operations
The assembled assembly must be checked for acceptable runout. To do this, a micrometer is mounted on the stationary part, and the disk is rotated. Each car model has an acceptable runout value. The indicator can usually be found in the car manual.
For high-quality brake discs, the runout should not be more than 0.05 mm.
Having installed the wheel in place, we lower the raised car with a jack. We press the brake several times from inside the car. At this time, the pads are in contact with the disc. If necessary, the brakes are bled or the parking brake is adjusted.
Source ktonaavto.ru
Replacing a brake caliper is a simple procedure that does not require special skills or tools. Sooner or later, regardless of the car model, every driver has to replace the caliper. Of course, you can go to a master and leave this work to him, but in this case you will need to pay for the work of a specialist. If you decide to do the replacement yourself, then you will need instructions and recommendations for completing the process. More details on how to replace a brake caliper will be discussed in this article.
Why do brake discs get hot?
Heating is not a malfunction if it occurs evenly on both sides and the temperature value does not exceed acceptable limits. In this article, by the word “heat” we mean overheating.
Most discs are made from cast iron. This metal is suitable for daily use - it is inexpensive and has good frictional properties. But it also has its drawbacks: due to frequent braking, the cast iron gets very hot, even to the point of smoke. The pads begin to melt and warp.
To reduce heating, or rather, speed up cooling, discs are produced with voids inside (ventilated). This has almost no effect on the characteristics.
To improve performance, perforations and alloys began to be used. If you replace standard brakes with drilled ones, they will cool down faster.
Why do brake discs get hot? The cause is almost always friction. In 99% of cases
And it doesn’t matter whether the front ones are heated or the rear ones, left or right. Having discovered a problem, car enthusiasts usually check the free play of the wheel:
- remove the car from the handbrake or gear;
- jack up the car;
- spin the wheel.
If you hear a rustling sound or the wheel rotates with force, the problem is most likely in the brake caliper, which does not release the pad (or pads) even when the pedal is released.
Often, rust covers the cylinder bore or the outer walls of the brake piston, which prevents it from moving freely. It can also cover the guides. Restoring a caliper at a service station is called development. It is necessary to change the rubber seals - this can only be done if you have a repair kit. Sometimes you have to change the piston too.
Another reason why the wheel rotates slowly and the brakes heat up is wear of the wheel bearing (when the brake disc heats up on one side). Actively heating up, it transfers heat to the disc brakes. True, in this case the movement will be accompanied by a howl or hum at certain speeds.
Well, what if the wheel rotates freely in a suspended state, but after the ride it burns your fingers badly? This can happen for a number of reasons:
- Severe wear or deformation of discs. As their thickness decreases, heating occurs faster.
- Installation of new low-quality pads.
- Replacement of brake fluid with inappropriate one.
- Large production of pads.
- The front brake discs heat up on cars with rear drum brakes - because the front axle bears a large load when braking.
- Excessively aggressive driving. With constant acceleration and sudden stops, the brakes do not have time to cool down.
- Delamination of the inner surface of the brake hose. This is an obstacle to the circulation of brake fluid - the pads will not be able to diverge normally.
- Air in the brake system circuit.
Front brake discs
Causes:
- wear;
- wedging caliper;
- low quality pads;
- aggressive driving with rear drum brakes;
- The pads were installed incorrectly.
On the one side
Typical problems are a stuck caliper or a worn wheel bearing. A crooked block may also be the cause.
After replacing the pads
If you did not have such a problem, but it appeared after replacing the pads, the problem is most likely due to the poor quality of the latter or the fact that you selected them incorrectly.
The cause may be improper pumping. Let the pads get used to it (which will happen over several hundred kilometers) - then the problem will disappear.
Preparatory operations
You can dismantle the old disk and install a new one yourself, even in a garage. You will first need to buy wheels suitable for your specific car model. This must be done carefully, since sometimes even the year of manufacture of the same car affects the parts being installed.
It is worth choosing a specific manufacturer of these spare parts based on your driving style. The required characteristics for a driver who uses an active style with frequent use of the brake pedal or for a driver who spends most of his time on a country road will be different.
It is customary to divide TDs into classic (standard) and sports (reinforced):
- The classic design uses malleable cast iron, machined to the desired dimensions. Non-ventilated and ventilated specimens are available. In the first case, the basis is a single disc, next to which a caliper with brake pads is installed. In the second case, a dual system of disks separated by ribs is used. Due to the entry of air between them, the unit is ventilated. Popular brands that manufacture these parts are ATE, Zimmerman, Bosh.
- In the production of reinforced discs, more durable grades of cast iron or high-alloy stainless steel are used. These elements provide longer service life under increased loads while driving. Well-known brands in this area offer more expensive products. Most often in auto stores you can find brands such as Brembo, DBA, EBC.
Brake discs must be replaced in pairs on both sides of the axle.
This will ensure proper operation of the entire braking system. Even if one of the sides is in satisfactory condition after visual inspection, and the other is significantly worn, it is recommended to replace both disks. If dismantling work is carried out on one side, then the discrepancy will lead to loss of directional stability. The rule applies to both the front and rear axles.
To carry out installation and dismantling work you will need the following tools:
- car jack (mechanical, hydraulic, pneumatic);
- clamp;
- a hammer with a wooden handle (a rubber or wooden mallet is allowed), in some cases a reverse hammer is used;
- a set of wrenches and screwdrivers;
- rust treatment fluids (WD-40 or analogues);
- brake fluid, if bleeding of the brakes is required;
- clean rags and personal protective equipment (work gloves, safety glasses, etc.);
- metal brush or power tool with a special attachment;
- torque wrench.
If the operation is carried out on all wheels, then it is customary to change the disks one by one on each axle.
Bulkhead
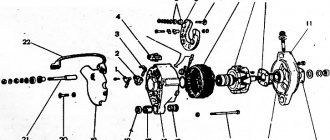
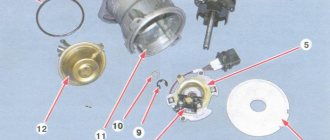
Before replacing the brake piston, the caliper must be removed from the vehicle. This can only be done by following the following instructions.
- First, you need to pinch the hose through which the brake fluid flows. This is considered a prerequisite after repair; for this reason, you do not need to fill in new brake fluid, which may not be available.
- After this, you will need to clean the hose mount, as most often it is dirty. Sometimes for complete cleaning you have to use special tools to help unscrew the nut. After unscrewing the nut, you need to plug the hole with an ordinary bolt, this will help prevent fluid from leaking out of the caliper.
- After complete disassembly, you should thoroughly clean the piston shrinkage area and the cuff groove. It is necessary to do this, because the new piston can wear off on old chips and scratches.
- Having eliminated all the shortcomings, you can install the new cuff in place, after lubricating it with new brake fluid. After this, lubricate the piston with liquid and begin to insert it into the shrink spot. This can be done by rocking it from side to side.
At the moment when the piston is already in the middle of the cylinder, you need to put a special cover on it. Having put on the cover, you can completely immerse the piston in the cylinder, and then squeeze it out with air and make sure that the boot sits evenly and is not twisted or lifted up anywhere
Then we completely recess the piston into the cylinder and begin assembling the caliper. During assembly, pay attention to the threads of the guides. We perform the remaining procedures in reverse order.
At the end of the work, you need to tighten the nut of the hose through which the brake fluid flows into the system. If there is not enough fluid, it should be topped up or replaced with a new one. You can check the amount of fluid by pressing the brake pedal. If it fails, then there is not enough fluid and there is air in the system. Don’t forget to bleed the brakes; this is done by unscrewing the special fitting on the caliper body. After unscrewing the fitting, wait until the liquid flows in an even stream without air bubbles. Then you can tighten the fitting.
Procedure for replacing the front brake cylinder on a VAZ 2110-2112
Video instruction
The video was made using the example of a VAZ 2110 car and is equally suitable for both 2111 and 2112. The only way the car parts may differ externally is the brake discs: ventilated or not, as well as their sizes.
Photo report
First of all, we will need to remove the front wheel of the car, after first lifting the car with a jack. After this, using a hexagon, you need to unscrew the two bolts securing the caliper bracket.
Now you can remove the bracket and remove the pads:
Then you can rip off the brake hose with a wrench, but you don’t have to unscrew it completely.
Next, we unscrew two more bolts securing the cylinder to the caliper, having previously bent the two locking plates under them using a screwdriver.
And we move the cylinder to the side, since nothing else holds it.
The hose can now be unscrewed completely by turning the brake cylinder itself several times counterclockwise.
To avoid excessive losses of brake fluid, it is advisable to fix the hose as high as possible, and always with the fitting facing up. You can also substitute a container if liquid suddenly leaks out.
A new front one costs about 500 rubles, so this price is quite acceptable. But the assembled caliper already costs about 2,000 rubles, which is already significant if you suddenly have to change the entire assembly. Installation of this part occurs in the reverse order.
Tips and tricks
Beginners when replacing a brake caliper often encounter common mistakes that lengthen the process. First of all, this applies to instruments, the preparation of which must begin immediately before the replacement, and not during its process.
Replacing the brake caliper
When you begin to remove the brake caliper on the rear wheel, be sure to disengage the parking brake. Before installing the wheel, always clean the surface of the newly installed brake disc with a special cleaner. This will remove any remaining oil or other liquid that has accumulated on the disc.
When working on any vehicle, there is always the possibility that the vehicle will suddenly roll and the jack supporting it will lose pressure or slip out from under the vehicle. When working with a car, always follow safety precautions, because your health is much more important than the integrity of the car. Neither a nail nor a rod, dear motorists!
Video - Repair and maintenance of calipers
Hi all! I apologize to subscribers for my long absence from the drive. Unfortunately, I haven’t gone on rides for a very long time (since winter, somewhere), so I’ll post sad posts about car repairs on my own)
So here it is. I was driving home one day, and already at the turn into the yard there was a grinding sound from the right front wheel and the car refused to go. I get up on the emergency lights and get out of the car. The wheel seems to be in place, the brake disc is noticeably hotter than its counterpart on the left. Well, since I was almost home, the decision was made to crawl to the yard as is, and deal with the problem in the morning.
Morning. I'm going to pick the threads. Below is a little female logic and my version of a way out of this situation.
So, step one: if the problem was with the wheel, obviously, first you need to remove this very wheel. We take a tire carrier, a jack and, with the help of a lever and our weight (or with the help of a passing man, it’s up to you), remove the wheel. If the repair is carried out in the field, I recommend placing the removed wheel under the car in case it falls off the jack.
Step two: inspect what remains in place of the wheel.
We are interested in the three caliper pressure cylinders and whether they can be pushed back into the block. We take a screwdriver (preferably one that you don’t mind) or a mounting tool and try to press the cylinders back into the caliper. Two of my three cylinders were pressed in - the central one was jammed tightly.
Step three: remove the caliper. First, remove the plate with the brake fluid supply pipes. It is located on the inside of the cylinder block. To do this, we need to unscrew two bolts with a 14mm wrench (I couldn’t find a better way to use a socket or open-end wrench). Don't lose the copper sealing washers! They seal the bolted connections on both sides (respectively, only four washers), but it is better to replace them with new ones later. We're getting ready for the brakes to start pouring in. For this, it is better to either clamp the hose supplying it to the cylinder block, or quickly fix it so that the brake fluid does not leak. Next is actually removing the caliper. To do this, turn your attention to the upper clamping bracket. Use pliers to remove the retaining pin of the bracket axis, remove the axis (a hammer may be required), remove the bracket and take out the two springs so as not to lose them by accident. We carefully store it all in a place where it won’t get lost). Remove the caliper and bracket assembly.
Replacement procedure
You cannot put off repairing the brake system until later, as your safety on the road depends on it. To get to the brake caliper (front or rear), you must remove the wheel. The replacement process is simple if you strictly follow the instructions.
Preparing tools
To replace the caliper or at least remove it for further repairs, you need to prepare the following tools:
- flat screwdriver;
- set of wrenches;
- pliers;
- a small bolt, the diameter of which should correspond to the diameter of the brake hose tip;
- jack with wheel chocks;
- work gloves;
- new caliper.
Caliper replacement tools
Replacing the caliper step by step
After preparing everything necessary, it's time to change the caliper. Below are step-by-step instructions for replacing the brake caliper.
Step 1: Park the car on a level surface. Turn it off and set the parking brake (this will lock the rear wheels, which means you'll start with the front wheels). If you have an automatic transmission, then put the car in “Parking” mode. For a manual transmission, the vehicle must be in 1st gear in combination with the parking brake applied.
Step 2. Install wheel chocks or wheel chocks (if you have them, of course). Place the jack under the front of the car on the side you will be working on first.
Install wheel chocks
Step 3: Raise the jack until it makes contact with the vehicle body. Make sure the jack's support point is positioned in a place where it will not slip and cause damage to the vehicle.
Jack up the car
Step 4: Once the jack is in contact with the vehicle, loosen the bolts holding the wheel. Don't remove them, just loosen them.
Loosen the wheel bolts
Step 5. Continue lifting the car until the wheel is 5-7 cm off the ground. Remove the bolts holding the wheel and then remove it.
Remove the wheel completely
Step 6. You now have the brake caliper, rotor and pads in front of you. The task is to remove the caliper, which is held in place by two bolts. Bolt sizes vary depending on the vehicle model. Unscrew these bolts. The caliper can now be removed. Depending on the age of the vehicle you are dealing with, it may take a little effort to remove the caliper.
Unscrew the caliper mounting bolts
Step 7: After removing the caliper, you must also remove the caliper bracket. It is usually held in place by two retaining bolts. Remove these bolts and the bracket can be easily removed.
Preparing to replace the AP
Having determined that the TD is faulty, you need to prepare to change them yourself. To do this, you first need to buy a new spare part from a car store.
When choosing brake discs for his car, the car owner must take into account his driving style. Does he like to accelerate sharply and actively maneuver? How often does he use the brakes? He drives a lot around the city or mostly intercity trips on the highway.
The spare part from which manufacturer you need to buy depends on these factors. Discs can be standard or sports.
- Standard TD - made of cast iron, the casting is processed on a milling machine. They are ventilated and non-ventilated. Without ventilation, it is a single disc that is pressed on both sides by brake pads. A disk with ventilation is easy to distinguish - it is two disks connected by bulkheads. Ventilation occurs during movement due to air entering between these pancakes. Some of the respected manufacturers of these products are Bosh, Zimmerman, ATE.
- Sports TD - made of durable and ultra-strong gray cast iron, as well as austenitic stainless steel. These are considered to be more durable products that can last much longer and with more aggressive driving. Such discs are produced by EBC, DBA, Brembo.
The driver must remember that when the front brake discs are replaced, they must be changed in pairs, even if one of them is suitable for further use in all respects. The same rule applies to rear brakes.
This rule is explained by the fact that unequal weight of the same type of spare part on the wheels of the same axle will lead to loss of directional stability.
Thus, for repairs, two or four TDs are purchased, but in no case one or three.
In the garage or at a special technical site, the tools and materials needed for repairs are prepared in advance.
- Jack and wheel wrench.
- Keys to "13" and "17".
- Ratchet wrench.
- Large flathead screwdriver.
- Thin flathead screwdriver.
- Clamp.
- A piece of wire to fix the stupor.
- Hammer.
- WD fluid to unscrew stuck fasteners.
- Brake fluid, in case of bleeding the brakes.
- Rags.
Place the machine in a hole or on a prepared level area. Decide in advance whether the rear brake discs need to be replaced or only the front ones need to be replaced. This determines how to jack up the car. Raise the entire side or just the front wheels.
After raising the car with a jack, remove the wheel using a balloon. Clean the released brake mechanism and the surface of the hub from dirt and oil using a brush and rag.
Repair
Having figured out the main reasons why the car may not slow down, you can begin repairs. Specifically, in this article we will look at repairing car calipers with our own hands. If everything is clear with the first case, for repairs you just need to clean the calipers from dirt, and everything will be operational again, then in the second case you will have to work.
You can solve the problem with the second breakdown only after searching for information specifically for your car, because there is no universal way to fix this problem.
Unfortunately, these are not the only problems that may cause your car to fail to slow down. Another reason why the wheel may not brake or, on the contrary, may not release, is considered to be a faulty cuff. The cuff is installed as a spring, which returns the brake piston to its place. Over time, the cuff loses its elastic properties and ceases to return the piston, which presses the pads to the brake disc. In this case, the disc will begin to overheat, which will lead to dire consequences on the road. You can check that the cuff does not return the piston only after raising the car.
On a fully functional car, the wheel spins without difficulty, even if you rotate it by hand
Particular attention will need to be paid to ensure that the wheel rotates completely immediately after the brake pedal is released. Fortunately, this problem can and even needs to be fixed with your own hands.
The main advantage of fixing all problems yourself is budget savings and personal experience in car repairs. So, if something happens on your car that the cuff does not return the piston to its place, then you need to look for the reason. Most often it is hidden in the boot of the brake piston. The first thing you need to look at is the brake disc and pads. The brake disc should not show signs of overheating or signs of severe rubbing. If the disc is heavily worn, it will need to be replaced immediately with a new one. After inspecting the disc, you can begin to inspect the pads.
After the discs and pads have been inspected, we proceed to inspect the caliper piston. This can be done by just looking under the boot. There should be no marks, scratches, or even rust on the piston body; if any of these are present, then you need to disassemble the caliper. In stores that sell car parts, you can find a repair kit for car calipers. Most often, it only includes elastic bands and gaskets. In fact, a piston for a caliper is not so easy to find, so it is best to use an analogue from other cars, which will be similar in diameter and other parameters.
Signs of a faulty caliper
Signs of a faulty brake caliper:
- increased braking distance;
- difficulty rolling;
- the car pulls to the side when braking;
- pedal vibration when braking;
- grinding noise in the caliper area when driving: it is worth noting that the reasons can be different, from a trapped stone to banal wear of the pads, but wear of the pads can be caused by a faulty caliper;
- characteristic signs of overheating on the brake disc;
- uneven wear of pads from one caliper;
- excessive heating of the disk.
Brake caliper malfunctions
The following types of rear caliper malfunctions occur:
- souring of the cylinder piston, as a result of which the fluid pressure when pressing the brake is not enough to move the piston;
- leakage of the piston seals, as a result of which the pads are pressed weaker than necessary and a loss of brake fluid occurs. If the brake fluid leaks completely and air enters the brake system, the braking efficiency of all wheels will sharply decrease;
- Damage to the brake cylinder piston boot. As a result, dirt gets between the piston and cylinder, which damages the mirror of the cylinder walls and leads to a decrease in braking efficiency and loss of brake fluid;
- damage to the guide anthers, due to which the dirt that gets on them increases the resistance to the movement of the caliper and the pressure between the pads is distributed unevenly. This leads to reduced braking efficiency, as well as uneven and rapid wear of the brake disc;
- loose caliper bracket or crack in the caliper bracket. These are the most dangerous malfunctions, because, firstly, the pads are pressed unevenly against the disc, and secondly, with strong braking, the bracket can break or unscrew from the fist. If this happens, the pads will fall out, the piston will come out of the cylinder and the fluid will pour out, instantly reducing the braking efficiency of the remaining wheels.
About the reasons for caliper failure
This brake system component can break down due to improper maintenance or due to insufficient quality. The main reasons why caliper repair may be required are as follows:
- improper operation, which is associated with filling the guides with poor-quality lubricant - because of this, the boot swells and later “sours”;
- in the future, repair of the brake calipers may be necessary due to moisture getting on the guide, which leads to a breakthrough of the boot;
- Another reason is the piston itself, the body of which is also vulnerable to moisture getting inside;
- low-quality working fluid (brake) can corrode the piston from the inside if the concentration of water in it exceeds the norm.
Video tip for DIY caliper repair:
Piston repair
Here the task is more difficult, because they are located inside the caliper body and the repair is not so simple. I would like to note right away that there are times when the piston gets stuck in the housing and it does not move at all! There can be two actions here:
1) Try to revive this caliper, put it to “soak”, say, in gasoline or silicone grease. Then carefully try to pull the piston out of the housing.
2) Buy a corny new caliper. Sometimes it jams very firmly, breaking the body; repair will not help here.
If the pistons are still moving, the first difficulty concerns pulling them out of the housing. To do this, the service station uses compressed air, which is supplied to the hole for the brake fluid. Thus, the piston simply flies out, if you are doing repairs in the garage, then you need to “squeeze it out” using brake fluid, simply without disconnecting them from the general system. Don’t worry about the brake fluid leaking; change it after repair anyway.
Now let's inspect the body. If there are traces of bending, rust, or mechanical damage, then it definitely needs to be changed; repairs will not be justified.
To do this, we purchase a repair kit, with rubber seals and new pistons; it is important to replace it; it must contain a special lubricant, usually for both the guides and the pistons! IT IS IMPORTANT!
Without it, there will be no point in repairing, because the new seals can be torn.
Now I’ll list it point by point:
1) Take out the old rubber bands and seals.
2) Remove the old pistons.
3) Clean the body, both outside and inside.
4) Then, using new lubricant, we treat all fastening points.
5) Install rubber seals
6) Install the pistons, also pre-lubricating them.
After these manipulations, we assemble the caliper. The repair is complete and you can install it on your car. Don't forget to change the brake fluid and then bleed the system.
Now I want to provide you with a detailed video on the repair, everything is described in more detail.
That's all, I think my article was useful to you, let's like it on social media. networks!
(10 votes, average: 4.50 out of 5)
Much has been said about the importance of uninterrupted operation of all elements responsible for applying the brake. This article will talk about repairing the components of the caliper: the piston (cylinder), guides and replacing their boot - with your own hands, you can also learn about this clearly from the attached video.. To fully understand how to repair and replace these parts without any problems, it’s worth understanding in the design of the front and rear calipers and the reasons for their failure, what repair kit may be required for this
To fully understand how to easily repair and replace these parts, it is worth understanding the structure of the front and rear calipers and the reasons for their failure, and what repair kit may be required for this.
Caliper repair and maintenance
In any caliper, with or without a bracket, the performance of the piston is first checked - it should move normally. If so, the next step should be the aforementioned caliper removal, removing the brake pads and disconnecting the brake fluid line. Since the entire structure of this unit is movable due to a guide bolt that moves along a sleeve with a rubber gasket, the gasket should be checked for elasticity and tightness
The condition of the bolt and sleeve is no less important. If it is in doubt, there are traces of acidification, increased mechanical wear, etc.
– these parts are replaced with new ones.
Often the hole where the rubber gasket is inserted has a build-up of hardened dust. This causes the gasket to be compressed and prevent the caliper from moving along the guide bolts. In such cases, a mandatory procedure is to clean the hole from deposits. However, the use of a round file for these purposes is contraindicated for two reasons: firstly, this tool is ineffective; secondly, its use often leads to the appearance of potholes in which even more dirt accumulates. The best option is a drill with an attachment of the required diameter.
The next step is to apply a special lubricant to the inner surface of the caliper housing bore. In addition, the cylindrical rubber gasket, bushing and guide bolt also need lubrication. And you don’t need to be afraid to apply too much, because anyway, the excess lubricant will later be forced out by the parts.
The piston is subject to mandatory lubrication, including preventive lubrication. To do this, first remove the gasket-boot ring using a simple flat-head screwdriver. Next, the piston is pressed in, and the resulting cavity is cleaned and filled with lubricant. The boot also needs to be cleaned, but it is more advisable to replace it, put on the piston and secure it with a ring. Thanks to this, the piston is less susceptible to corrosion and runs more smoothly, and the boot will not harden when high temperatures occur.
To provide increased protection of the caliper surface from oxidation, it is painted with anti-corrosion paint from cans. However, before this procedure, the metal is thoroughly cleaned of dirt and rust - in the latter case, you will need a metal brush. As practice shows, one can of paint is enough for three passes for each of the four calipers.
If there is a squeaking sound when braking a car, this means that some points of the caliper are poorly lubricated or the lubricant has completely burned out. To avoid discomfort, each time you replace the pads, apply lubricant to the following points - the non-working surface of the caliper, the two guide bolts and the piston. And there is no need to be afraid of doing something wrong: even a novice car driver, with minimal instruction, is quite capable of carrying out preventive and repair work on this mechanism.
Guide faulty
The main problem if the brake does not work can be jamming and souring of the caliper guides.
Repairing this malfunction with your own hands will not be difficult. By the way, in this case there is no difference when disassembling both the front and rear calipers. To do this, you need to unscrew and pull out both guides. Clean them from dirt or poor-quality lubricant, remove and replace the torn boots with new ones, after filling them with special grease for calipers.
Then put them in place, insert and screw the guides back. Then you should try how freely the pressure bar moves along them. This can be seen visually in the attached video at the end of the article.
We should not forget about the housing of this brake element. If significant rust, dents, sagging or other mechanical damage is found on it, it should be replaced completely.
If the repair had to be done on a removed caliper, then after installing it in place, the brake system should be bled.
Published on August 28, 2016
Front caliper repair. DIY caliper repair
Please tell me, the piston is seated very well and is not squeezed out or pressed in. car ford orion 1991 how to get it from there? Thank you in advance
How to completely change the brake fluid in an Audi A4 2007? with a manual transmission, because the clutch is also connected to the brake, I just can’t find information
Lubricate the piston with VD? Did I miss anything? But what about special heat-resistant lubricants?
Well, you are a master! Pop the vd. There is a special mounting lubricant for calipers. You're killing people with brake repairs like this.
the anther is as old as mammoth shit. I would throw this caliper at the owner. cutter
Won't wd40 cause rubber bands to swell?
I wonder why there are colored marks on the cuff?
I'm giving a minus - I didn't see how they cleaned the working surfaces of the piston and caliper?
Absolutely the same, you can get the repair kit here - support-tuareg.rf
This is all crap, I was the only one who did this and regretted it because I had to remove the caliper. And accordingly, then you will have to bleed the system. On the second caliper, I took a wrench from a grinder to tighten the disk; it fits perfectly into the rims of the piston and pressed it in place.
man you're great, don't pay attention to some negative comments
Friends, please answer how to lubricate the piston under the boot, what is the name of the lubricant. thanks for the answer..