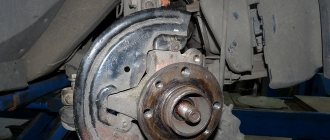
Front hub design on Niva Chevrolet
Structurally, the hub connects the wheel and the drive shaft.
It consists of two bearings, the main purpose of which is to make rotation smooth. The main advantage of this design is that the backlash gap can be adjusted in this mechanism. But during the operation of the car, the production of parts occurs. The gap increases and the wheel begins to vibrate violently. In simple words, it is misaligned relative to the axis, which leads to wear of the rubber. In this case, no adjustment will help; all that remains is to replace the faulty parts with new ones.
The hub on a car is the element that connects the wheel and the drive shaft. It has two bearings, which reduce the friction force when rotating on the shaft.
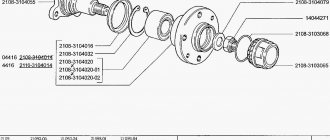
Diagram of hub assembly.
This gap may increase over time and due to wear and tear of parts. In this case, the wheels begin to vibrate on the axles, which is the cause of premature tire wear. To correct the situation, the wheel bearings should be changed in a timely manner.
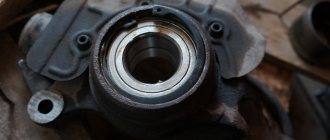
Hub assembly on steering knuckle
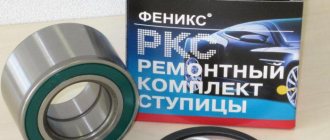
How to choose a replacement part and bearing number
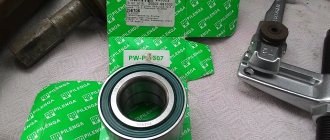
Once you are convinced that the bearings need to be repaired, you should select a hub bearing in the retail chain based on three main criteria (by default, single-row tapered roller bearings are installed - the new kit must have a nut):
- Chevrolet Niva front hub part number: 2007108 (catalog number - 2121-3103020-10, bearing according to GOST - 2007108, foreign equivalent according to ISO - 32008).
- You need to buy two roller bearings in the kit.
- Dimensions of the Chevrolet Niva front hub bearings: height – 19 mm, internal diameter – 40 mm, external diameter – 68 mm.
- The cost of a new set of parts for the hub, including double-row bearings, as well as suitable manufacturers, are presented in the table below.
Table - Recommended manufacturers, numbers and articles of hub bearings
| N p/p | Manufacturer | Catalog number | Price for 2021, rub. | Additional Information | |
| Dimensions (mm) and parameters | Applicability | ||||
| Standard sets of two bearings | |||||
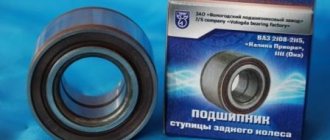
| 1 | Volzhsky standard, Russia | 2007108 | 200 | Inner diameter - 40 mm; Outer diameter - 68 mm; Width -19 mm; Weight - 0.278 kg; Number of rollers in the bearing - 21 pcs.; Roller dimensions - 7/11x19 mm; Dynamic load capacity - 40 kN; Static load capacity - 52 kN; The maximum rated speed is 7000 rpm. | Chevrolet NIVA trim levels L, LC, LE, GL, GLC. In that case Restyling 2021. |
| 2 | VPZ, Russia | 32008 | 200 | ||
| 3 | SKF, Sweden | 32008X/QSKF | 770 | ||
| 4 | KOYO, Japan | 32008JR | 880 | ||
| Double row bearings (for reinforcement) | |||||
| 1 | OPTIMAL, Germany | 681 923 | 2200 | Inner diameter - 40 mm; Outer diameter - 73 mm; Width - 55 mm; Number of raceways - 2 pcs.; Seal - Yes. | Likewise |
| 2 | RUVILLE, Germany | 4013 | 2480 | ||
| 3 | SKF, Sweden | BTH-1024 C VKBA 3551 | 2300 | ||
What you need to know about signs of bearing wear
A broken car hub is usually a serious problem and should not be ignored.
Among other things, a worn hub heats up more when the car is braking, which negatively affects the performance of the car’s brakes. It happens that damage to the hub occurs gradually and, as a rule, this is indicated by an unpleasant sound, accompanied by vibration of the body or weak shocks.
The main reasons for hub failure are:
- careless driving on roads;
- multiple overloading of cars;
- driving on sandy soil or “mud baths”;
- frequent car slipping;
- aggressive driving style with sharp acceleration and braking.
These reasons can have a significant negative impact on the hub housing, outer or inner bearing ring. They are also sources of dirt, moisture and sand getting inside the bearing mechanism, which causes the journal to fail.
The following list of signs may indicate a failure of the wheel bearing on a Niva-Chevrolet car:
- the appearance of vibrations during movement, clearly felt on the steering wheel or the body as a whole (it is necessary to take measures to replace the bearing, since there is a possible risk of it jamming);
- spontaneous change in trajectory while driving (also possible due to incorrect wheel alignment adjustment);
- a specific sound penetrating inside the cabin (sometimes accompanied by a crunching sound caused by the displacement of the bearing rollers);
- uneven and intense wear of tires due to misalignment of the wheels due to a failed bearing.
- the appearance of extraneous sounds - a crunching sound that can be heard while moving from the passenger compartment. This sound is produced by balls that move in the broken walls of the bearing.
- vibration is a harbinger of bearing seizure. This is a very important sign, it is quite difficult not to notice it, since it is felt throughout the body and radiates into the steering wheel.
- The car pulls a little to the side. This may be caused by the need to perform a wheel alignment. But also the deviation from the course may be due to the fact that the bearing jams a little and it stops the wheel.
The appearance of even one of these signs requires immediate inspection and, if necessary, replacement of the Niva Chevrolet wheel bearing. This work is quite simple, so even a novice car enthusiast can do it.
There are two main signs that indicate replacement is necessary:
- There was a knock and play in the hub area
- There was a strong hum and grinding noise in the hub area
But in order to accurately understand the reason for the appearance of extraneous noise, you need to disassemble this mechanism and inspect it.
To make a replacement, carefully do the following:
- If this is the front wheel, then the Niva Chevrolet front hub is removed. To do this, the car must be placed on a level surface and jacked up on the replacement side. Then disconnect the pads from the caliper. Unscrew the nut on the axle. We remove all spare parts from the wheel. Take a skein and disconnect the hub from the brake disc.
- We remove the bearing. To do this, remove the plate and oil seal from the inside. Take a cleat and a hammer and remove the inner bearing
- We install a new one. Replacing bearings must be changed on both sides at once, and it does not matter whether it is the rear or front wheels. In order not to damage the body, pressing must be carried out using a wooden plate and a pipe.
- Putting the unit back together. Reassembly must be done in reverse order.
Bearing wear manifests itself as the following symptoms:
- Vibration of the front wheels, which can be reflected in the steering wheel or felt in the cabin.
- Knocking or crackling sounds in the front of the car when driving;
- Heating of the front wheels in the axle area.
If such manifestations occur, you need to check the condition of the wheel bearings. To do this, jack up the car and rock the wheel in different directions. Play and knocking in the bearing area indicates the need for replacement and adjustment. The malfunction may also manifest itself in the form of noise when the wheel rotates.
1. The hubs get hot. It is important to understand that when braking, the kinetic energy of the car is converted into thermal energy. As a result, the brake discs and the hubs on which they are attached become very hot. Heating of the part during movement, and not during braking, indicates wear of the bearing or its incorrect adjustment.
The second option is typical for adjustable hubs. The adjusting nut must be tightened with a force of 2 kgf*m. If you tighten it further, the tapered bearings will be too tight.
Their rotation will be difficult. Prolonged operation of the machine in this condition leads to bearing failure and wheel jamming.
2. The adjusting nut is unscrewed while moving. Sometimes this happens literally after 20-50 kilometers. The phenomenon is observed in three cases: the master forgot to tighten the nut, there was a misalignment between the bearing races, or play appeared in the coupling of the CV joint with the hub.
Wheel Bearing Maintenance
The front wheel bearings of the Chevrolet Niva experience constant loads during operation, even when driving on a flat road. In addition, the aggressive effects of moisture and dirt should be taken into account. All maintenance comes down to constant monitoring of the operation of moving parts. It is necessary to check as often as possible that there is no play in the wheel or extraneous noise when it rotates.
When pressing the outer race, you should use mandrels that prevent distortion. During the assembly process, grease is generously applied between the rings and the separator. It not only reduces friction, but also protects the rollers from dirt. There are two types of hubs available for the Chevrolet Niva. A conventional hub is installed with tapered bearings that need to be adjusted periodically
, and, if necessary, disassemble to replace the lubricant. The reinforced hub is installed with a double-row ball bearing.
The service life of such a bearing is significantly higher than that of a tapered one, however, the likelihood of the transfer case breaking under overload increases, while the standard hub is a kind of “fuse”.
Is it possible to replace the front wheel bearing of a Niva Chevrolet with your own hands?
It is recommended to entrust installation to professionals. However, if you have a set of tools and free time, it is quite possible to perform the replacement yourself. Before starting repairs, you need to visit a car wash and wash the front suspension especially thoroughly. The second important step is the correct dismantling of the part. To do this, you need to block the wheel and remove the bolts that secure the wheels. Further:
- first, use a jack to suspend and secure the front part of the car;
- then remove the wheel along with the brake pads;
- unscrew the piston pin of the swing arm;
- we take out the bolts that secure the ball joints;
- screw the hub together with the hinges.
The fact that the wheels on a Chevrolet Niva rotate smoothly is determined by the presence of bearings in the hubs. They can stand on both the front and rear wheels. Bearings are designed to reduce friction.
If such bearings fail, the wheel warps and the rubber begins to wear unevenly and quickly. If the bearing is damaged while the car is moving, the wheel will simply lock and stop rotating. For this reason, it is important to pay timely attention to bearings, especially on the Chevrolet Niva, since the car is an SUV and therefore experiences heavy loads on the chassis.
(as well as the rear) Chevrolet Niva has exactly the same design as old cars, and their repair and replacement are carried out according to the same scheme. Initially, you should go to any car wash, where you should thoroughly wash the entire front suspension under high pressure. For crossovers, this advice is especially important.
- The front of the car is raised using a jack;
- The corresponding wheels, brake pads and calipers are dismantled;
- The hinge pin is untwisted and pressed out using a special tool;
- The bolts from the hinges and nuts are removed.
- After this, you have the opportunity to examine the part for damage and make appropriate repairs. Regardless of whether you plan to replace the bearings, you should change the seals.
And it’s also interesting: the injection field does not pull.
The inner race along with the rollers must be thoroughly washed with kerosene after removal. After this, you will be able to visually assess the bearing damage. It is worth remembering that these parts are replaced only in pairs.
- There is no possibility of adjusting the backlash using a nut (tightening does not help);
- The rollers and clips are heavily scratched;
- Overheating is detected and a hum is observed.
If you observe one of these signs, you need to get new bearings for your Chevrolet Niva. Otherwise, only the lubricant and oil seal need to be changed. Pressing occurs using special nozzles. Do not throw away the old clip, as you will need it to install the new part. If difficulties arise, you can always find one of the many videos on the Internet that demonstrate this process.
For repairs you will need:
- Powerful socket wrench 30.
- Puller for steering rod pin.
- A mandrel for pressing out a bearing or a piece of pipe of suitable diameter.
- A set of spanners or ratchet sockets.
- Balloon wrench.
- Hammer.
- Round nose pliers.
- Jack.
- Wheel chocks.
- Vise.
- Mount.
- Torque wrench.
- Boards or wooden block.
The replacement process is divided into five stages:
- Disconnecting the assembly (brake disc, hub and steering knuckle) from the CV joint strut.
- Pressing out old bearings.
- Installation of new parts.
- Assembling the unit and installing it in place.
- Tightening the adjusting nut.
Work is carried out on a level area. The presence of an inspection hole is not necessary.
To change bearings, you must perform the following steps:
- Place the car on the site and place wheel chocks under the rear wheels.
- Jack up the wheel.
- Unscrew the wheel rim mounting bolts.
- Build an improvised support under the side member from a wheel with boards or timber laid on it and lower the jack so that the car rests on it.
- Jack up the lower arm, compressing the suspension spring.
- Turn the steering wheel to the right or left (depending on the side from which the replacement is performed).
- Unscrew and remove the caliper, caliper and brake pads.
- Hang the caliper so that it does not put any weight on the brake hose.
- Turn the steering wheel in the opposite direction.
- Remove the ABS sensor.
- Unscrew and unscrew the tie rod nut.
- Remove the pin using a puller.
- Unscrew the hub nut.
- Remove the ball joint mounting bolts.
- Carefully remove the hub along with the steering knuckle, ball joints and brake disc.
- Remove the caliper protective screen.
- Remove the brake disc.
- Unscrew the steering arm.
- Clamp the steering knuckle in a vice.
- Remove the seals with a pry bar or a powerful screwdriver.
- Substituting the mandrel, knock out the outer races of the bearings.
- Wipe and clean the seat.
- Disassemble new bearings.
- Press the outer races into the hub using a mandrel or old parts.
- Apply lubricant, filling ⅔ of the space in the cage.
- Install the bearing race and inner race.
- Carefully press in the new oil seal.
- Repeat the installation operation for the bearing on the second side of the hub.
- Place the assembly on the CV joint splines.
- Tighten the hub nut.
- Screw on the ball joints and steering bipod.
- Install the protective cover and caliper bracket.
- Tighten the bolts securing the protective screen and lock.
- Put the caliper and brake pads in place.
- Jack up the car.
- Place and secure the wheel.
- Tighten the hub nut by tapping the wheel in the 6 and 12 o'clock directions.
Detailed video about replacing wheel bearings
https://www.youtube.com/watch?v=RdXcXbHjaRI
Detailed video about replacing wheel bearings
Causes and signs of failure of the Chevrolet Niva hub
A broken car hub is usually a serious problem and should not be ignored.
Among other things, a worn hub heats up more when the car is braking, which negatively affects the performance of the car’s brakes. It happens that damage to the hub occurs gradually and, as a rule, this is indicated by an unpleasant sound, accompanied by vibration of the body or weak shocks.
The main reasons for hub failure are :
- careless driving on roads;
- multiple overloading of cars;
- driving on sandy soil or “mud baths”;
- frequent car slipping;
- aggressive driving style with sharp acceleration and braking.
These reasons can have a significant negative impact on the hub housing, outer or inner bearing ring. They are also sources of dirt, moisture and sand getting inside the bearing mechanism, which causes the journal to fail.
Tips for replacing the Niva Chevrolet hub
When disassembling the front suspension, special attention should be paid to damage to the lever mechanism (deformation of parts, breaks and tears in the metal).
Inspect the landing channels of the inner and outer rings, the condition of the working surface of the bearing rollers. Metal corrosion in the form of grooves or “ulcers” on the metal of rollers or rings is unacceptable.
Damaged and unusable bearings must be replaced along with the outer rings.
After installation, it is necessary to adjust the clearance in the bearing and lock the hub nut.
Replacing the Chevrolet Niva hub can be done more conveniently on a lift. However, the work can be carried out using a jack, with all the required safety measures being taken.
To change the hub you will need:
- keys “10”, “13”, “17”, “22”, “30”;
- vice;
- wheel wrench;
- screwdriver;
- puller for steering tip;
- hammer and chisel;
- pliers;
- Litol 24 lubricant;
- new hub.
A new original Chevrolet Niva hub with article number 21230310301400 costs 1,460 rubles. The analogue from Pilenga has catalog number HBP2123, and its price is about 1110 rubles.
Prices are indicated for Moscow and the region for the summer of 2021.
We jack up the car. Unscrew the five wheel nuts.
We remove the wheel. Remove the decorative cap and loosen the hub nut.
Use a 30mm wrench to remove the hub nut.
We remove the rubber holder along with the hose from the bracket.
Using a 17mm socket wrench, unscrew the two caliper mounting bolts, first at the bottom.
At the same time, remove the casing.
Take a flathead screwdriver and pry apart the brake pads. We remove the caliper.
Carefully hang the caliper on a wire or move it to the side so that it does not interfere with work and does not dangle on the brake hose.
Unscrew the pin nut of the outer joint of the side link and turn it out.
We take a hammer and try to knock out the hinge pin.
If it doesn't work with a hammer, use a puller.
We install it and...
... we press the hinge pin out of the swivel arm boss.
Using a 22mm wrench, unscrew the hinge pin nut, first at the top.
Replacing the front wheel bearing on a Niva Chevrolet
Tools:
- Straight box spanner 13 mm
- Straight box spanner 17 mm
- Straight box spanner 19 mm
- Straight box spanner 27 mm
- Small hammer
- Chisel
- Beard
- Driver for 3/4 socket bit
- Knob attachment 13 mm
- Knob attachment 17 mm
- Knob attachment 19 mm
- Knob attachment 27 mm
- Rolling jack
Parts and consumables:
- Front wheel hub bearings 4pcs
- Litol-24 lubricant
- Kerosene
- Container for washing parts
External signs of the need to remove bearings for troubleshooting are: - increased noise when the wheel rotates; — the impossibility of adjusting to achieve the nominal clearance in the bearings.
We carry out the work on an inspection ditch or overpass.
1. Raise the front of the car and remove the wheel.
It is more convenient to work on a lift. It is permissible to work on a vehicle raised by a jack on supports, taking the necessary precautions.
2. Disconnect the caliper from the pad guide, as described here, and tie them with wire to the upper arm.
3. Unscrew the adjusting nut of the hub bearings, as described here.
4. Take out the conical bushing.
5. Using a chisel, unbend the edge of the locking plate of the nut for the front attachment of the lever to the steering knuckle.
6. Similarly, loosen the rear fastening nut.
7. Using a 19mm spanner, unscrew the nut for the rear mounting of the lever to the steering knuckle.
8. Unscrew the front fastening nut in the same way.
9. Remove the locking plate.
10. Having removed the lever from the bolts, move it away from the steering knuckle.
11. Disconnect the brake hose from the steering knuckle as described here.
12. Disconnect the fastening of the upper and lower ball joints from the arms.
13. From the splines of the front wheel drive outer joint housing, remove the steering knuckle assembly with ball joints, hub assembly and brake disc.
14. Disconnect the steering knuckle and the hub with the brake disc.
15. If it is difficult to separate the parts, clamp the steering knuckle in a vice and use a soft metal drift to knock out the hub.
16. Now you can remove the bolts securing the lever to the steering knuckle.
17. To separate the hub and brake disc, screw the nut onto the stud and knock out the stud.
18. Unscrew the nut and remove the stud.
19. Similarly, dismantle the other four studs.
20. Disconnect the hub and brake disc.
21. Use a chisel to knock down the dirt ring.
22. Using a 10mm wrench, unscrew the bolt securing the protective casing.
23. Remove the casing.
24. To dismantle the seals and hub bearings, clamp the steering knuckle in a vice. Use a screwdriver to pry off the seal.
25. Remove the oil seal.
26. Remove the ring.
27. Remove the inner ring of the outer bearing with the cage and rollers.
28. Similarly, remove the oil seal, ring and inner ring of the other (inner) bearing with a cage and rollers.
29. Using a punch, knock out the outer ring of the outer bearing.
30. Take out the ring.
40. Similarly, we knock out the outer ring of the inner bearing.
Inspect the raceways of the inner and outer rings of the bearings, as well as the running surfaces of the rollers. Pitting, visible wear of cages, rollers and rings, as well as cavities and chips on rollers and rings are not allowed.
Be sure to replace defective bearings together with the outer rings.
Replace the outer and inner bearings at the same time.
41. We carry out the assembly in the reverse order.
42. Before installing the bearings, clean the inner cavity of the steering knuckle from old grease.
43. Using a tool head of a suitable size or a piece of pipe, press in the outer rings of the bearings.
Use the outer rings of the corresponding replaced (old) bearings as mandrels. It is more convenient to press in the rings using a press.
Insufficient pressing or distortion of the ring is not allowed. Check that the rings are securely seated in the hub body. The rings should not turn by hand.
44. Place 40 g of Litol-24 lubricant into the cavity of the steering knuckle and into the bearing separators.
45. Using a tool head of a suitable size or a piece of pipe, press in the seals.
46. Having installed the mud ring, use a chisel to press the metal of the ring into the groove of the steering knuckle in several places.
47. Having connected the brake disc to the hub, press in the studs with a soft metal drift.
48. The milled surface of the stud heads must face the cylindrical surface of the brake disc.
The Chevrolet Niva deservedly enjoys great popularity both among city residents and among off-road enthusiasts. It is one of the few that allows you to drive over the most rugged terrain.
In this case, from time to time there is a need to replace some parts, including wheel bearings. This part performs an important function: it ensures smooth running of the wheels, minimizes friction, and ensures free rotation of the wheel relative to the axis. Bearings are installed on each wheel.
When this part wears out, the wheel becomes misaligned. As a result, severe wear of the rubber appears on one side. If the defect is not corrected in time, this can lead to wheel jamming as a result of bearing scattering. At high speed, this means loss of steering control - the car can fly off the road or into oncoming traffic.
Replacing the front wheel bearings of a Niva Chevrolet is done a little more often, as on other SUVs, which is explained by the operating conditions of such vehicles. Severe road conditions lead to excessive load on the car suspension, so it is necessary to periodically diagnose the condition of the car and, if problems arise, make a timely replacement, without waiting for the period recommended by the manufacturer.
Raise the front of the car with a jack so that the front wheels do not touch the ground. If the right or left side is not raised completely, the stabilizer will put pressure on the machine and this can become a serious obstacle.
- Place chocks under the rear wheels.
- remove the hub nut cap using a screwdriver.
- put the wheel back in place
- it is necessary to loosen the hub nut. First you need to loosen it a little; for this you can use a piece of pipe to apply sufficient force.
- Remove the wheel and use a screwdriver to release the pads.
- After this, the mounting bolts on the caliper are removed. Before this, you need to straighten the locking tendrils. The caliper rises up. To ensure that the brake hose does not interfere with operation, you can attach it to the spring.
- The brake disc is selected using a hammer. To do this, you need to tap a little around the perimeter.
- In order to remove the finger you need a special puller. The location of the adjusting bolt is marked on the steering rod. When the finger is pressed out, the rod is retracted to the side.
- The fasteners are removed from the steering knuckle.
Also interesting: Do-it-yourself Niva 2121 elevator: drawings, dimensions
In order to connect the wheel to the shaft, a hub is installed in the vehicle structure. While driving, this wheel assembly is most subject to loads and wear. Over time, the backlash increases and axial vibration of the wheel appears. The reason for this may be the Niva Chevrolet wheel bearing and this problem can be solved simply by tightening the wheel nut. But any part does not last forever, so over time, tightening may not help and the wheel will stop rotating and a complete replacement will be required.
To work, you will need an indicator and a torque wrench.
To prepare for adjusting the wheel bearing, you must perform the following operations:
- Secure the indicator by resting its leg on the hub near the adjusting nut.
- Place spanners on the studs and secure them with nuts.
- Rotate the hub and move it axially. (Screwed spanners are used as handles).
- Measure the amount of axial movement (clearance) of the hub, guided by the indicator readings.
- If the stroke exceeds 0.15 mm, adjust the play.
The adjustment is carried out as follows:
- Straighten the collar of the nut.
- Unscrew it with a spanner.
- Install a new nut and tighten with a force of 2 kgf*m.
- Loosen the nut and tighten again with a torque of 0.7 kgf*m.
- Loosen the tension by turning the key 20-25 degrees counterclockwise.
- Check hub play.
- Make sure that the indicator readings correspond to the norm (0.02-0.08 mm).
- Lock the nut by pressing its edge into the groove of the outer CV joint.
You can adjust the hub play without using a torque wrench. To do this you need:
- Tighten the nut tightly.
- Rotate the wheel a few turns.
- Check the play.
- If necessary, loosen or tighten the nut slightly.
- Continue until the free play of the hub is within 0.02-0.08 mm.
- Lock the nut collar.
Video instructions for adjusting the wheel bearing You can install non-adjustable IVECO bearings on the Chevy Niva. To do this, you need to buy the appropriate hubs or remake the old ones. For the rework you will need a jig boring machine. In addition to boring the mounting hole, you will have to make spacer rings. Drawings of parts are provided at the link.
The design of the rear wheel mounting of the Chevrolet Niva is very different. However, they also use bearings that need periodic replacement. They are replaced either together with the axle shafts or separately. The second option is much cheaper, but requires good metalworking skills and a torch to heat the metal.
To work you will need:
- Jack, wheel wrench, chisel, hammer.
- Standard set of screwdrivers and wrenches.
- Axle puller.
- Gas (gasoline) burner or muffle furnace.
- Repair kit including bearing, oil seal and retaining ring.
- A pipe with a diameter of 40-45 mm, the length of which exceeds the size of the axle shaft.
Niva Chevrolet wheel bearings are subject to heavy loads during operation. Therefore, it is necessary to monitor their condition and change parts in a timely manner. Otherwise, the risk of a collision due to a seized bearing increases.
Replacement of bearings is carried out as follows:
- Place the machine on a level surface.
- Place wheel chocks or bricks under the front wheels.
- Jack up the car.
- Remove the wheel.
- Place a support under the rear axle.
- Unscrew the brake drum mount.
- Dismantle the part.
- Unscrew the nuts holding the bearing.
- Load the rear axle by lowering it onto the stand.
- Pull out the axle shaft using a puller.
- Hang the brake mechanism on a wire.
- Knock down the retaining ring using a chisel, hammer and grinder.
- Crack the bearing races using a chisel.
- Remove rust and dirt from the seating surface.
- Put the new bearing in place.
- Heat the locking ring to 200-250 degrees (dark red color) and hammer it into the seat with a pipe
- Replace the oil seal.
Hub repair: popular mistakes and misconceptions
Connoisseurs of tuned cars are often able to make radical changes to their cars. And few restrictions exist for them. Owners of Niva Chevrolet are no exception. Tuning fans also took a look at the design of the front hub assembly. Often on online forums in discussions you can find advice (and even corresponding training videos) about replacing the bearing using a hub mechanism that has a steering knuckle from a VAZ 2121 car, since it is believed that this design is better in terms of reliability.
However, this is a misconception. Yes, tightening will occur without any difficulties, but this will make it impossible to adjust the camber of the front wheel of the car. The fact is that each fist has distinct differences in size and axial angles. But much more stupid are the tips that require turning the hub and shaft on a lathe.
Repairs such as replacing a wheel bearing in a field can be done independently without much difficulty. Wheel bearings on the VAZ 2121 and Chevrolet Niva have a very short resource due to the suspension design, compared to other all-wheel drive vehicles, therefore, these parts need to be given increased attention in order to identify the fault in time.
Replacing a wheel bearing in the field does not involve anything complicated if you follow the instructions strictly. Anyone, even a novice car owner, can cope with such repairs. Not all vases have wheel bearings changed the same way. The design of the Niva car hub differs from the design of other VAZ models, so the process of replacing the bearing will also have its differences.
Symptoms and identification of a worn wheel bearing
When the life of the hub bearing is running out, a hum is clearly audible when driving, this is the main sign. If you listen, you can understand which direction this hum is coming from. When driving at low speeds, it is not too noticeable, and it can easily be confused with noise from rubber, but as speed increases, the hum increases, which is reminiscent of flying in an airplane. You can’t drive with a humming bearing, because soon it may simply break into pieces, and this implies a lot of other problems.
And also interesting: Off-road wheels for the Niva: review, photos -
If there is an assumption that the bearing has exhausted its service life, then you can check this with the car parked. To do this, you need to jack up the wheel whose bearing is suspected and pull the wheel vertically with your hands. If there is play, then the bearing is most likely to blame.
Necessary tools for work
- Jack and supports. To replace the front bearing, you need to lift both wheels, otherwise the stabilizer will interfere, pinching the suspension elements;
- Wrench for unscrewing wheel nuts;
- Flathead screwdriver. To remove the protective cap;
- Head 27;
- Locksmith's beard. To straighten the collar of the hub nut;
- Hammer;
- Wrenches for 10, 17, 19 and 22;
- Chisel and wooden spacer. To avoid damaging other parts when knocking out;
- Vise;
- A piece of pipe for pressing in bearing retaining rings.
Bearing replacement process
- Loosen the nuts on the wheel where replacement is planned and jack up both wheels of the axle. Remove the desired wheel;
- We dismantle the caliper and guide. To avoid damaging the brake hose, we tie the caliper to the upper arm with wire;
- Having removed the protective cap, use a 27mm head to unscrew the hub bearing nut and remove the conical bushing;
- Using a chisel, unbend the locking plate of the front and rear lever mounting nuts. Using a 19mm wrench, unscrew the front and rear nuts securing the lever. After this, remove the locking plate;
- When the lever is released, it must be moved away from the steering knuckle, freeing the brake hose;
- Disconnect the ball joints (upper and lower) from the lever;
- Now you can remove the entire steering knuckle assembly, along with the ball joints and the brake disc, by removing it from the CV joint splines;
- Separate the steering knuckle from the hub with the brake disc. If the parts do not separate freely, then we clamp the fist in a vice and, using a soft metal drift or chisel, through a spacer from wood, knock out the hub with the brake disc;
- Next, pull out the bolts securing the lever and knock down the protective ring with a chisel;
- Using a 10mm wrench, unscrew the bolt that secures the casing and remove the casing itself;
- We hold the fist in a vice and, using a flat-head screwdriver, pry up and remove the wheel bearing seal. There is a metal ring behind the oil seal, we also remove it;
- The next step is to remove the inner ring of the outer bearing assembly from the well. Next, we also remove the oil seal, metal ring and inner bearing ring assembly;
- Using a punch and a hammer, we knock out the metal rings of the outer and inner bearings. At this point, dismantling is considered complete.
After cleaning the well from old grease, you can proceed to installing a new bearing. Replacing a wheel bearing in a field occurs in the reverse order; it is only important not to forget to fill it with fresh Litol 24 grease and, after installing the steering knuckle on the car, adjust the clearance in the bearings.
Thematic materials:
What happens if you pour gasoline into a diesel engine? Car engine cooling system What malfunctions prohibit the use of a car Orion on-board computers Pressure reduction valves, selection and operation issues Installation of additional headlights Reviews: Chrysler engine on a Gazelle Electronic speedometers for a car
103583
If you notice an error, select a piece of text and press Ctrl Enter
Unregulated
As a rule, the Niva has a standard adjustable hub, which requires periodic adjustment. But in order to get rid of this inconvenience, non-adjustable hubs for the Chevrolet Niva were developed, which have such positive qualities as:
- No maintenance required. They don't need to be adjusted
- The bearing in the device does not rotate
- It is filled with special lubricant from the factory, so there is no need to lubricate it.
- Due to the fact that the work occurs thanks to the ball bearing in the unit, friction is reduced
- There is no wear on the seat in the rotary cam
- Not adjustable as it is tightened from the factory
- No need to change the bearing
- Long service life which is equal to 100-120 thousand kilometers
Therefore, thanks to all the positive characteristics listed above, many car owners change the standard part to a non-adjustable one.
It is also worth noting that the non-adjustable part can be produced as a reinforced Niva Chevrolet hub, which solves the problem of wear of the oil seals on the steering knuckle. It is best to choose companies such as VolgaAvtoprom, IVECO, OmegaInterAuto.
The main disadvantage of this unit is its high price, but by installing this part you can forget about the problems that appear in the standard element. By installing a reinforced version of your SUV, the cross-country ability will increase and reliability will increase, and having a standard set of tools, you can make an independent replacement without any problems.
Possible improvements
The Chevrolet Niva hub does not require any maintenance work during operation. In this case, the car owner is obliged to constantly monitor the condition of the wheel bearings. By replacing them, improvements are possible. First of all, this is the installation of non-adjustable, reinforced bearings. Instead of two single-row ones, one double-row bearing is installed, and the landing part of the steering knuckle is bored. The landing part of the hub is also bored. Today you can already buy a non-adjustable hub along with a steering knuckle.
You just need to pay attention to the number of splines for the drive. Such bearings are more reliable. In addition, there is no need for constant adjustment.
The hub ensures free rotation of the wheel and its reliable attachment to the car suspension. It acts as a supporting structure and allows you not to change the entire hub assembly as a whole, but to separately repair parts (bearing, drum, disc).
The hub plays a key role in the operation of the drive, brakes and steering and is subject to severe stress while driving. Therefore, the comfort and safety of driving depend on the strength and condition of this unit.
Replacing the axle bearing
First of all, you should pay attention that when replacing a bearing, you need to install not only it, but also new axle shaft seals and new retaining rings. For cars with and without ABS, the locking rings are different - on cars without an anti-lock braking system, the axle locking ring has a smooth surface, and on cars with ABS, the locking ring is splined. It is impossible to confuse them. We assemble tools and accessories:
- Bulgarian.
- Standard set of tools and screwdrivers.
- Inertia axle puller.
Inertia axle puller.
New set - oil seal, retaining ring and bearing.
The tool has been selected and the axle shaft can now be removed. This is done in the following sequence:
- We place the car on a flat surface and install wheel chocks under the front wheels.
- We tear off the wheel mount, jack up the car, and install a stand under the rear axle.
- Remove the wheel and unscrew the brake drum mounting screws.
We unscrew the bolts securing the brake drum to the axle shaft.
We knock down the brake drum using a wooden block.
We unscrew the four nuts of the axle bearing mounting plate bolts.
We remove the axle shaft using an inertial puller.
When removing the axle shaft, you need to try not to damage the oil seal if there is no desire or need to change it. After this, the entire brake mechanism is suspended from the spring using a wire.
Another element that experiences heavy loads while driving is the Niva Chevrolet axle bearing. Which are recommended to be changed along with the axle.
A symptom that this part needs to be replaced is the appearance of loud noise at any speed, as well as the appearance of axial and radial play. This part is not in short supply and can be purchased at any auto store, its factory part number is 2121-2403080, the analogue has part number 62208-2RS, and the industrial part is 180508.
To make the replacement, first of all you need to remove the axle itself and do the following:
- To remove the retaining ring with the bearing, take a vice and clamp the axle shaft in it
- We take a grinder and cut the stopper and bearing in several places, this must be done carefully so as not to touch the axle shaft
- Take a chisel and split the retaining ring and bearing
- We remove rust and dirt from the ring and bearing seats
- We take the pipe and use it to press the new bearing into place; during these actions, we must not allow the cage to rotate
- We take a blowtorch and use it to heat the locking ring until red and use pliers to install it in its place
- We wait until the axle shaft cools down, while it cools down in the brake flap we replace the oil seal
Also interesting: Chevrolet Niva front suspension diagram
After everything has been changed, you need to check the transmission oil level in the rear axle. At this point, all replacement work can be considered completed. As you can see, all the work can be done independently without the participation of a specialist; it is enough to have a little knowledge and a standard set of tools.
- To remove the retaining ring with the bearing, take a vice and clamp the axle shaft in it
- We take a grinder and cut the stopper and bearing in several places, this must be done carefully so as not to touch the axle shaft
- Take a chisel and split the retaining ring and bearing
- We remove rust and dirt from the ring and bearing seats
- We take the pipe and use it to press the new bearing into place; during these actions, we must not allow the cage to rotate
- We take a blowtorch and use it to heat the locking ring until red and use pliers to install it in its place
- We wait until the axle shaft cools down, while it cools down in the brake flap we replace the oil seal
Pressing out and dismantling old bearings
The removed assembly and steering knuckle do not require further disassembly. The only thing you need to do is remove the old oil seal using a regular flathead screwdriver, holding the hub assembly in a vice. It is not recommended to use them in the future; new ones are installed, just like the bearing.
Inside the fist, there are two tapered angular contact roller bearings. They are installed at random and form a hub unit.
- To begin dismantling, it is enough to separate the brake disc mounts from the wheel turning mechanism.
- Don't forget to remove the seals.
- The small race of the inner bearing can be removed without any problems by hand.
- Next, at the same time, using the adapter, you need to knock out the outer roller bearing race from the pipe, as shown in the photo below.
- After separation, one ring with a separator remains on the hub, and the second remains inside the knuckle. The old clip is pulled off with a special puller equipped with grips.
- The second part of the part is knocked out of the trunnion through a spacer made of soft metal in the form of a rod or carefully with a screwdriver.
- The attachment is placed against the clip and light blows are applied, moving it in a circle.
- After this, the old grease should be carefully removed from the cavity.
egoST
I drive a Ford Focus ST in Moscow
The engineers did a great job - 15 devices in 1 case.
An entire car on-board computer with FULL HD footage. We are pleased with the clear rear view camera and GPS navigator with 32 satellites.
I've been using it for 6 months and already forgot about the fines
.
I am sharing a link to the official website of this miracle recorder: MORE
Choosing a new bearing.
A new part is selected based on the conditions in which the car will be used. For most situations, Niva 2121 bearings manufactured at the VAZ plant are suitable. If the car is used mainly for off-road driving, it is better to use more durable elements. Parts produced by Triali have very good performance.
During production, this vehicle is equipped with double-row bearings. They have a longer service life and do not require additional lubrication.
Experienced car mechanics know that it is better to choose a bearing that is completely identical to what was before. It would be good if it was an item with the original box and logo. Such parts often correspond to their counterparts that were originally supplied to the assembly line. The price of the bearing is not always affordable, because they are produced in a limited batch for a batch of cars.
But there are other bearing models whose characteristics are in no way inferior to the original ones. And the cost of non-original bearings is lower only due to the use of a different brand. Here are just a few bearing suppliers that have become popular in today's automotive market.
- SNR – French company;
- SKF is one of the largest manufacturers in the world;
- FAG is a German manufacturer, one of the largest companies;
- NSK - from Japan;
- NTN is another representative of the Land of the Rising Sun.
Manufacturers from Japan often deliver their parts directly to the assembly line. Therefore, practically nothing is known about them on the regular spare parts market. You can ignore the country of origin in the case of the companies mentioned above. It often lists one of many offices and branches around the world.
If a bearing manufacturer is allowed onto the assembly line, this is already confirmation that a strict selection process has been passed in the first stages. This means that the quality system meets the stringent requirements for manufacturers and their parts.
Generator bearing: replacement recommendations
The following recommendations are given for replacing the Niva Chevrolet generator bearing:
- The first step is to remove the generator itself. First, the generator mounts are loosened, then the adjustment bolt is released. The next steps are to remove the belt and disconnect the ground from the battery. We are talking about the negative terminal. It is also necessary to disconnect the wires from the generator itself. The structure is removed through the lower part. Why does the mount itself unscrew?
- After this, the master begins to disassemble the generator. The first step is to remove the pulley. The owner will need a screwdriver to lock the rotor. The main thing is a careful approach to work. The pulley is unscrewed with the appropriate key. You will need to pull back the latches to remove the cover. The part is pulled towards itself. All connections with bolts are additionally processed. Then it will be easier to unscrew them.
- The next steps are to unscrew the screws and remove the voltage regulator unit. You also need to get rid of brushes for a while. The generator cover is disconnected from the starter, otherwise it will not be possible to gain access to the bearings themselves. The main thing is not to damage the winding during such work.
- After complete disassembly of the generator, access to the bearings becomes available. It remains to check the parts for any defects that have appeared, including cracks and chips. Do the parts rotate easily? Is there any play between them? The seats may suffer from wear, so they also need to be inspected.
- Next, you need to knock the bearing out of its seat. To do this, tap the surface with a small hammer. The blows must be strong, but careful, otherwise the result will not be achieved. A piece of pipe of the appropriate size will make an excellent stand. Removing the rear bearings is impossible unless a special puller is used.
- The properties of old and new parts must remain similar. The same attachment is used when pressing into the body. The anchor is where the rear bearing is installed.
- When reassembling, proceed in reverse order.
Below watch a video on how to disassemble and repair a Niva generator.
Removing the gearbox is a mandatory step for those who are interested in replacing a Chevrolet Niva release bearing that has failed. The work is labor-intensive, because you have to remove the drive shaft. It's good to have an assistant.
The following procedure is relevant when replacing the clutch mechanism:
- Installing the car on the inspection hole and removing parts;
- Removing the gearbox;
- If it is necessary to replace the bearing, the part is pulled out. Its base must be disengaged from the fork. The plug is removed from the structure, then the part is easy to remove.
The main difficulties are associated with removing the gearbox. Replacing a bearing is an operation that takes no more than 10 minutes. Before installing a new part, it is recommended to lubricate it thoroughly. The quality of the material used determines how durable the structure will be in the future.
Shevik hub design
In order to understand the purpose of a wheel bearing, you need to find out what a hub is. So, this is a structural element of the car that connects the shaft to the wheel. Two tapered bearings are responsible for the operation of the hub, that is, its rotation on the shaft. The main feature of the hub is the ability to adjust the gap or the so-called backlash. But over time, when the car is used, the sliding mechanisms are susceptible to abrasion and this gap increases. Subsequently, this is reflected in the wheels; they begin to vibrate on the axle , which leads to their distortion and abrasion of the rubber. To fix the problem, it is necessary to replace the front wheel bearing.
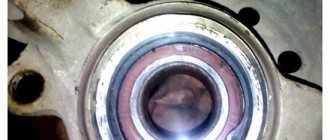
Bearing design
The front wheel bearing consists of two roller cages (internal and external), which are installed in pairs.
The rollers play an important role in the design of this product. They cause “soft” friction between the wheel and the axle. During friction, the rollers are exposed to mechanical force and a large amount of thermal energy is released (the rollers are heated to extremely high temperatures of over 200 degrees). Not every metal can withstand such temperatures, so the hub rollers are made of special, ultra-strong alloy steel. More detailed information about the manufacturing process can be found on the Internet. If a separator with rollers is used in a dry state, they heat up to extreme temperatures and soon collapse (disintegrate). To reduce the effect of friction and remove the generated thermal energy, special lubricants are used.
Use only special lubricants for sliding mechanisms that are designed for normal operation at high temperatures.
The most common lubricant is Litol-24, which can withstand temperatures above 180 degrees. You cannot lubricate the product with Solidol lubricant, as it can withstand temperatures no higher than 100 degrees.
When to replace?
There are two reasons indicating that the sliding mechanism of the front structure of a Chevrolet Niva car needs to be replaced:
- knocking and increased play of the front wheel manifested in the form of rubber abrasion;
- hum or grinding noise from the front end.
To diagnose faults in more detail, it is necessary to disassemble the mechanism and check the serviceability of all parts. We will replace the front wheel separators with our own hands.
Replacing bearings
Replacement is carried out in stages:
- Removing the front hub mechanism;
- Removing the sliding mechanism;
- Installation of new parts.
- Assembly.
Therefore, we will perform all the actions in order on one front wheel of the SUV; on the second, the actions are similar.
- The Niva Chevrolet car is placed on a flat surface and the front part is raised using a jack. The wheel is removed, and we begin to remove the hub.
- The caliper with pads is disconnected. The process of removing it is described in other sections.
- The adjusting nut of the mechanism is unscrewed from the axle.
- All elements of the front wheel mechanism are removed. The hub is separated from the brake disc by knocking it out. (Detailed description of mechanism extraction will be provided in other articles).
- Now let's move on to extracting the sliding mechanisms. Extract:
- The outer bearing is removed from the brake disc using a puller.
- The oil seal and ring plate are removed from the inside.
- Let's move on to removing the inner bearing. To do this, we clamp the hub structure in a vice and knock out the separator structure from the back of the hole with a chisel.
Use the chisel carefully so as not to damage the hub groove. It is necessary to knock out with successive movements along the separator body.
Before installation, the seat must be cleaned and thoroughly lubricated.
Although wheel bearings have a long service life, like many parts, they are not designed to withstand strong mechanical impacts on the mechanism shaft. And this happens when you get into even a small hole or pothole. The part may not be damaged immediately, but a microcrack may appear on it, which will ultimately lead to a sad outcome. Therefore, control the movement of the car and always monitor its mechanisms.