Hi all! For the second year now, the heater motor on my Kalina has been beeping frequently. If before this happened quite rarely, now for the second day in a row the fan practically does not stop. I decided that there was nowhere to delay and this morning I stopped by BB with a new engine, the price of which is 1,400 rubles. I took the Luzar company, since it was the one that was praised by the majority of potassium growers.
So, the first thing I did was remove the front passenger seat by unscrewing the 4 bolts that secure them, which resulted in much more free space.
Then we open the glove compartment, take out all the things from there, and unsnap the “curtain” mounting plate, then unscrew all the screws that are visible in the photo below:
Then unscrew one screw on the left side:
And another one on the right side. After this, you need to unscrew three more screws in the upper part of the glove box lid:
In general, next we remove the side trim of the passenger compartment pillar, as shown in the photo below:
After this, unscrew the screws from below using a short screwdriver or a bit and a ratchet:
Now we lift the upper black cover and unscrew the two nuts under it using an extension, a socket and a ratchet, as well as two self-tapping screws (shown by arrows):
Next, slightly lift the side air duct and unscrew the bolt:
So, we still have to deal with the lower bolts, two on the left and one on the right:
After performing all these manipulations, it seems that nothing will interfere anymore and now you can move the right side of the instrument panel to the side, and then put something under it to fix it in this position:
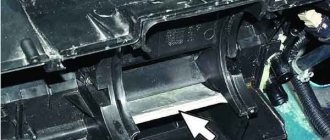
The photo above does not show an ideal option, and in my case I had to move it back a little more so that I could pull out the stove fan. Then you can crawl up from below with your hands and disconnect the power plug from the heater motor, after first bending the block clamp:
Next, unscrew the three screws that secure the heater fan to the housing:
And after that we try to pull the motor out, if you manage to do this. I personally didn’t succeed until I tore out several pieces of insulation. As a result, after an hour of effort, we finally managed to pull the motor out, resulting in the following picture:
Then we put the new fan in its place without any problems! In fact, this is true - installation compared to removal is just idleness! In total, the whole job took me 3 hours.
Signs and causes of furnace fan failure
The owner of the Lada Kalina will immediately know that the stove fan has broken down. Here are the characteristic signs of failure of this part:
- the pressure of hot air blown out of the deflectors is greatly weakened and practically does not depend on the position of the stove regulator;
- The operation of the heater is accompanied by a loud creaking noise, which turns into a grinding noise when the fan speed increases.
All this happens for the following reasons:
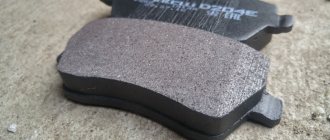
- One or more fan blades are damaged. The fact is that the fan on the Lada Kalina is made of plastic, and this plastic is far from being of the best quality. This is especially true in severe frost. If there is a small crack on the blade, then at low temperatures it is guaranteed to increase and the blade will completely collapse. This, in turn, will reduce the pressure of air pumped into the cabin, which will immediately become noticeable to the driver and passengers by the lack of pressure in the deflectors;
- Fan squeaking occurs due to wear of the bushing on which the fan is mounted. This bushing lasts an average of five to six years, after which it will inevitably have to be replaced, since during this time it wears out almost completely (and it is advisable to install a ball bearing in place of the bushing, since its service life is twice as long).
Here we should make one digression and tell a real-life incident. As mentioned above, when replacing a furnace fan, drivers try to install them not on bushings, but on ball bearings. Until recently, there were no problems with this: you had to go to the nearest auto parts store and buy a Luzar fan. But for some time now it has become difficult to find products from this company. I don’t know what this is connected with, but the fact remains: “original” VAZ fans with hubs are on sale everywhere, but devices with ball bearings cannot be found during the day. One driver I know solved the problem in a very original way: instead of rushing around car stores, he simply ordered the required part from the Chinese online auction “Aliexpress”. The ball bearing fan arrived in the mail about a month and a half later. According to him, it cost only a third more than Luzarov's. This is probably a markup for shipping.
The ball bearing heater from Luzar is currently in short supply
About lubrication of the Lada Kalina stove fan
Lubricating a squeaky bushing on a Lada Kalina fan is a pointless task. Yes, lubricant will remove the annoying squeak for a while. But if the bushing is worn out badly, then even the thickest lubricant will very soon be used up and the bushing will begin to creak with redoubled force. Therefore, car owners prefer not to lubricate worn bushings, but to replace them along with the fans. And this is the only rational option.
Major breakdowns
Noise and whistling are already a breakdown; it is worth noting that the stove either works or it doesn’t. If there is no airflow from it at all, then most likely the motor is jammed or the brushes are worn out. And if there was noise and then at one point it disappeared and the heater stopped working altogether, this means that the motor has stopped and the bearing or bushings need to be checked.
By the way, the appearance of a noise or whistle is not always a signal that the engine is failing; it may also be that a large amount of dirt has accumulated in it and just needs to be cleaned.
Therefore, first of all, when noise appears, disassemble the heater and try to clean and lubricate it, in most cases this helps.
Replacing the heater motor without removing the panel
Purpose of the VAZ 2108/09 stove fan, problems and their elimination
Hello everyone! For the second year now, the heater motor on my Kalina has been beeping frequently. If before this happened quite rarely, now for the second day in a row the fan practically does not stop. I decided that there was nowhere to delay and this morning I stopped by BB with a new engine, the price of which is 1,400 rubles. I took the Luzar company, since it was the one that was praised by the majority of potassium growers.
So, the first thing I did was remove the front passenger seat by unscrewing the 4 bolts that secure them, which resulted in much more free space.
Then we open the glove compartment, take out all the things from there, and unsnap the “curtain” mounting plate, then unscrew all the screws that are visible in the photo below:
Then unscrew one screw on the left side:
And another one on the right side. After this, you need to unscrew three more screws in the upper part of the glove box lid:
In general, next we remove the side trim of the passenger compartment pillar, as shown in the photo below:
After this, unscrew the screws from below using a short screwdriver or a bit and a ratchet:
Now we lift the upper black cover and unscrew the two nuts under it using an extension, a socket and a ratchet, as well as two self-tapping screws (shown by arrows):
Next, slightly lift the side air duct and unscrew the bolt:
So, we still have to deal with the lower bolts, two on the left and one on the right:
After performing all these manipulations, it seems that nothing will interfere anymore and now you can move the right side of the instrument panel to the side, and then put something under it to fix it in this position:
The photo above does not show an ideal option, and in my case I had to move it back a little more so that I could pull out the stove fan. Then you can crawl up from below with your hands and disconnect the power plug from the heater motor, after first bending the block clamp:
Next, unscrew the three screws that secure the heater fan to the housing:
And after that we try to pull the motor out, if you manage to do this. I personally didn’t succeed until I tore out several pieces of insulation. As a result, after an hour of effort, we finally managed to pull the motor out, resulting in the following picture:
Then we put the new fan in its place without any problems! In fact, this is true - installation compared to removal is just idleness! In total, the whole job took me 3 hours.
Lada Kalina hatchback White cloud › Logbook › Reanimation of the heater motor
— We unscrew one screw at the bottom of the panel, to the right of the shelf under the glove compartment — We unscrew two screws at the beard — We remove the front pillar trim, prying it up with a screwdriver, it is attached to 3 pistons. — We unscrew the screw securing the trim (jabot) under the windshield and slightly pulling it up a little, we gain access to the screw holding the ventilation nozzles. We turn it away. — Open the glove compartment and unscrew the bottom screw of the ventilation nozzles and the two screws on the left. To pull out the ventilation nozzles, the upper pipes on the right are screwed together with a self-tapping screw, unscrew and remove the nozzles.
Place the L-shaped plate under the plate securing the dermantine and pull it towards you, unclick the latches. Each plate has 5 latches - After removing the dermantine, unscrew 3 screws on top and 4 on the bottom. Although the top 3 can’t be unscrewed.
We pull back the dashboard. We unscrew the three screws of the heater motor after first removing the connection connector and pulling off the cooling hose.
I read here that in order to pull out the heater motor, some people cut the insulation, which makes it difficult to pull out the motor. No need to suffer, unscrew the threshold at the door,
five self-tapping screws and bend the carpet with insulation to the left, freeing everything behind the motor, then bending the dashboard, pull it out.
Now let's start resuscitating the heater motor.
When I removed the motor, it hardly rotated by hand.
I was surprised how it started at all, if it barely turns by hand.
Remove the impeller lock, having first marked the position of the impeller relative to the shaft, remove the impeller.
Having gained access to two bolts (at the bottom of the nut, at the top under the cross), unscrew them, pull them out and open the motor. Unfasten the anchor clamp from above and set the washers aside. Pull out the anchor. You now have access to the bushings. It looks like these bushings weren't lubricated at all at the factory.
. The lower bushing was clean, there seemed to be some kind of oil on the upper one, but it was high and rolled onto the armature shaft and the shaft became jammed in the bushing. Clean and lubricate with graphite grease. At anchor, wipe the contact plates and clean them with the finest sandpaper. We also wipe and clean the contact pads with sandpaper. Do not try to lubricate the contact surfaces! Everything there should shine and be sterilely clean.
We lubricate only the bushings with graphite lubricant for highly rubbing surfaces. Under no circumstances should you use oil or salidol, which will then leak, but moderately with graphite lubricant. I read that some people drill holes, pour oil on the shafts, and spray them with a VD after removing the cooling hose. You can’t do this, you’ll immediately kill the motor. The oil will flow, get on the contact group and it will all burn out. We assemble everything in reverse order. The motor now rotates freely.
We install the motor in place, tightening everything that was unscrewed in the reverse order. The motor began to rotate more quietly, without creaking or rustling.
It takes about two hours to put everything back together on my knees, with smoke breaks, because it’s not cool to squirm around like that near the car. But from the outside it all looks funny.
There is nothing you can do about the airdynamics of the heater pipes; the air flowing into them hums a little. I would like it to work completely silently at all 4 speeds, like on foreign cars. Apparently the designers didn’t bother themselves much with aerodynamics.
Disassemble and clean the fan
Replacing the heater fan of a Chevrolet Niva car with your own hands
The main thing is that before starting work, do not forget to disconnect the terminals from the car’s battery so that a short circuit does not occur.
There are two options for developing actions:
- Just clean it: to understand what the problem is, you will need to spin the already removed engine; if it turns over with difficulty, sometimes even familiar noisy sounds appear, then in this case you will need to vacuum the engine and lubricate the bearings and other rotating parts. You can lubricate with any silicone grease or WD-40. Also be sure to clean all dirt from the shaft. In 65% of cases, these actions are enough to get rid of extraneous sounds from the stove and will last for a long time.
- Repair or replace shaft bearings: To determine whether any work needs to be done on the shaft bearings, you first need to look at their condition. If they don't turn at all, then you will have to disassemble the motor. Bearings may fall apart or become jammed from prolonged operation. Of course, you can just buy a new motor and not have to worry about repairs, but a new part costs a lot and if you try really hard, you can still fix the old one yourself.
Diagnosis and elimination of alternator belt whistling
Is the alternator belt whistling in your car? - Don't panic. The first thing you need to do is do a little diagnostics. Inspect the belt for obvious damage.
Check that it is well tensioned and that there is no obvious shift in the pulley line. Pay special attention to the surface of the belt - there should be no liquids on it.
After the inspection, you will be able to draw preliminary conclusions and make a decision on further repairs:
If the belt is visually damaged, there are serious cracks on the surface, and the edges are frayed, then you cannot do without replacing the belt. At the same time, buy only original parts for your VAZ model.
Otherwise, after a couple of thousand kilometers you will encounter this problem again. By the way, low-quality Chinese fakes often “whistle” immediately after installation.
Is there obvious contamination on the belt (oil, antifreeze)? – Carefully clean the belt of excess dirt (if possible). If dirt has become embedded in the product and cleaning does not produce visible results, then it is better to replace the alternator belt.
If no external problems are found, move on to the mechanical part. Check tension. To do this, press the belt at the midpoint between the crankshaft and generator pulleys.
The optimal level of deflection is about 6-8 mm. If this parameter turns out to be larger or smaller, adjustment is necessary.
Let us immediately note that for each VAZ model the setup process may be slightly different. We will consider the general case.
Prepare a ratchet handle, a spanner set to “19”, a deep socket set to “17”, and also reserve 15-20 minutes of personal time.
Fan replacement
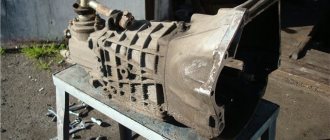
Procedure for removing the transmission on a Chevrolet Niva
The most convenient way to get to the unit is from the passenger seat, which will have to be dismantled so that you don’t have to do acrobatics inside the cabin. The chair runners are held in place by 4 13 mm nuts; unscrewing them is not difficult. Further work on replacing the fan is carried out in the following sequence:
- Remove the cabin filter and remove dirt and dust from the opening.
- Unscrew 4 screws located on the back wall of the glove compartment, and another one under the right heater grille.
- Remove the plastic cover from the stand and unscrew the 2 screws that secure the panel and the blower unit.
- Remove the blower unit, lift the plastic panel and loosen the 2 fan mounting nuts underneath it.
- Move the dashboard as far back as possible and secure it. The turbine must be removed from below, from a lying position.
You should not rush to change the fan when it only works at speed 1 and the heater switch is at maximum. This is a sure sign that the resistor located below the glove compartment has failed. The part is a small green plastic panel with a connection connector. Replacing the heater resistor is carried out without any disassembly; you just need to disconnect the connector and unscrew the 2 screws that secure it to the body.
Replacing a stove fan in Kalina
Today we will look at the algorithm for independently replacing the heating circuit fan of the Lada Kalina interior, and we will tell you how to remove it, as well as how to change a non-working device. The main advantage of the method we have outlined is that there is no need to dismantle the front panel. The owner will spend no more than one hour on the entire process. As your “helpers” you should take a pair of ordinary keys and a small screwdriver.
- First, we de-energize the network by simply removing the terminals from the battery.
- Next you will need to remove the glove compartment lid. This can be done by pressing on a pair of internal stops. Then the cover is hinged and removed by pulling upward.
- Now you need to unscrew two screws in order, the first of which is located in the glove compartment cavity, and the second on the side panel of the tunnel.
- We find another screw under the compartment cover and unscrew it.
- We move on to the three fastening components, which should also be unscrewed. They are located on top of the glove compartment.
- There is a screw “hidden” next to the deflector on the right side, which we can safely “defeat” with a screwdriver.
- The plastic decorative trim of the body pillar must also be removed. After this, remove the screw holding the deflector itself and remove the ventilation system component.
- We unscrew the remaining fasteners one by one.
- At the right end of the panel we see a small cover, which we dismantle. A couple of bolts at “13” should not be unscrewed.
- Now, by pulling, we move the corresponding side of the panel in the direction of the seat and find the fan located behind it.
- To remove the part we are considering, you will need to cut out a section of the felt soundproofing panel.
- The fan is held in place by three screws and you will have to unscrew them to remove it.
- After removing the faulty component, we install a new or repair fan in this place.
Kalina heater diagram
The Lada Kalina heater device is designed for heating and cooling the car interior. If the car does not heat up, the windows fog up, or you feel discomfort, then you need to test the performance of the heating system. Understand the functioning of the stove on Kalina.
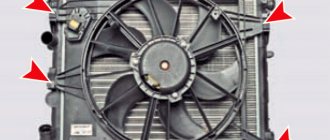
General layout of the Kalina stove
The location of the stove was designed for easy installation of an air conditioner. The system is simple, but at the same time quite reliable.
- Left side flow outlet.
- Left air duct.
- Heated side window.
- Air flow splitter.
- Stove.
- Right ventilation duct.
- Right side flow exit.
- Bottom heating duct.
- Interior heating duct.
- Central outlet of ventilation flows.
The supply and exhaust principle is used. The air masses inside the car are heated using a special liquid, which simultaneously cools the engine. The operating principle of the Kalina stove is based on the fact that the liquid warms up the radiator, where heat exchange occurs, and the heated air passes into the cabin through the air ducts.
If we analyze Kalina’s heater, the operating principle and the heater circuit will differ in configuration. The first option has a simple and reliable design. And in the other - full electronic control. The air passes through the filter into the air intake, and then the fan blows further through the system. The engine is running and warmed up. Antifreeze moves through the system in which the heater radiator is involved.
The amount of air that is heated by the stove radiator is regulated by a damper. Controls the operation of the fan and dampers by a unit located on the central panel.
Heating device control unit
- Temperature regulator. We change the heating of the air flow by turning the knob. The blue zone produces cold air, the red zone produces warm air.
- Fan speed switch. By turning the knob clockwise, the intensity of the air flow is adjusted. Choose one of 4 fan speeds.
- Air flow separation selector. Distributed in specific areas:
The flows pass through the upper part of the cabin.
The air is directed downwards.
Air flows are directed onto the windshield and down.
Air flows are concentrated in the area of the windshield, as well as the side ones.
- The handle that controls the recirculation of cabin air. We turn on the mode when driving off-road or in a traffic jam. Used for a short time, the glass fogs up.
- Rear window heating mode switch.
We regulate the direction and saturation of air flows through aerodynamic devices. We turn the guide blades and change the position of the dampers to achieve the desired air direction.
Interior ventilation of Lada Kalina
The outlet pipes are located in the car body under the trunk. The heater is located under the dashboard. The air flow enters the car interior through an intake, which is designed in front of the windshield in the engine compartment. The air enters through the filter and is accelerated throughout the cabin under pressure created by the fan.
1.Pipes for supplying air to the rear of the cabin.
2.Side ventilation nozzles.
3.Blowing the side windows.
- Windshield blower nozzle.
5-6-7. Central deflectors for flows entering the car interior.
We direct the supply air through the deflectors by turning the handwheel. If we turn it up, the flap opens and vice versa. You already understand how the stove on Kalina works.
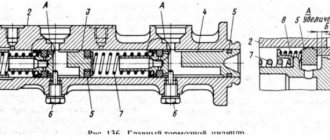
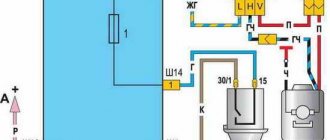
Electrical diagram of the Kalina stove
- Relay with fuse assembly.
- Mode switch.
- Resistor.
- Electric stove motor.
- Egnition lock.
A. To the power source.
DIY heating system repair
To change this or that part of the heating system, it is not at all necessary to seek help from specialists. This will help save time, but not money. If you follow the recommendations, you can replace some system components yourself.
Heater fan
Even beginners can replace the Kalina stove fan. The main problem is its location. For this reason, most of the time is spent not replacing the part, but dismantling it.
Fan replacement with panel removal
The method is recommended by AvtoVAZ engineers, but it is not the simplest. Not everyone decides to use it in a regular garage. When performing work, you must follow the instructions:
- First, turn off the power to the on-board network by disconnecting the battery terminals.
- Drain all coolant and remove the cabin filter.
- After unscrewing the fastening nuts, lower the steering column to its lowest position.
- Release the brake light switch from the wires, unclip the clips, and remove the upholstery from the pillars.
- Unscrew the screws and remove the front panel (cladding), then remove the dashboard along with the deflectors.
- Now you can begin dismantling the fan. To do this, you need to disconnect the terminal with wires from it, remove the ventilation hose, and unscrew the fastening nuts.
After installing the new fan, all further actions are carried out in the reverse order of dismantling. The procedure requires attention and accuracy and takes a lot of time. At some points, the help of a second person will be required.
Replacing a fan without removing the panel
It is not practical to remove the entire dashboard just because of the heater fan. You can replace the device without removing the dashboard - you just need to lift its right side. Next, you should “arm yourself” with a knife and a flashlight and crawl under the panel. The noise insulation is cut off, the fasteners are unscrewed, and replacing the Kalina stove motor becomes much easier. This method will significantly save time and nerves, although it will create some inconvenience.
Replacing the temperature controller
To dismantle the part and replace it, it is necessary to remove the control unit assembly. The procedure looks like this:
- the on-board network is de-energized by removing the “negative” terminal from the battery;
- the radio tape recorder (if any) is removed, and the terminal block of wires is unhooked from it;
- the damper control lever is removed;
- Next, the handle for controlling the temperature and direction of air flow is dismantled;
- there are plugs located at the bottom of the control unit - they need to be removed and the fastening screws underneath must be unscrewed;
- the center console should be carefully pulled towards you;
- After removing the console, disconnect the terminal blocks from the switches.
After replacement, everything is assembled in the reverse order. This operation is simple and only requires a couple of different screwdrivers to get the job done.
Replacing the heater core without removing the panel
Changing the heater radiator on a Lada Kalina, as on all front-wheel drive VAZ cars, is not an easy task. You will have to remove most of the front panel. To work, you will need a new heater radiator, hoses, clamps, an angle grinder and a standard set of tools. First you need to carry out some manipulations in the engine compartment:
- drain antifreeze from the cooling system;
- remove the battery and air filter housing, ensuring unhindered access to the heater pipes;
- you need to disconnect all the rubber pipes from the stove in the engine compartment, unscrew the nut securing the metal shield that covers the hoses going to the stove into the cabin.
Now you need to go to the salon and perform the following steps:
- unscrew the three fastening nuts and remove the gas pedal;
- move the brake pedal as far as possible to the side;
- Having made a cut on the metal shield, cut off the radiator pipes with a knife;
- Unscrew the fastening screws and pull out the heater radiator towards the pedals.
A hose with a thicker end is attached to the upper radiator outlet, and a narrower end to the lower outlet. The other ends, without being confused, need to be installed instead of the old ones. It is advisable to treat the place where the hoses from the passenger compartment enter the engine compartment with soundproofing material.
Replacing the stove radiator will help solve the problem of insufficient heating. Due to the labor-intensive nature of most work on troubleshooting a heating system, prices for such services at specialized service stations may seem quite high. It is not surprising that many “folk” repair methods have appeared.
Heating system modifications
Every owner of a Lada Kalina is faced with the need to modify the stove. The upgrade usually involves installing a new 6-hole thermostat, a coolant filter element, and a different heater valve. Many, given the mediocre performance of the pump, install an additional water pump. There are many ways of minor tuning that can be used to achieve improvements for greater comfort.
Increase in operating temperature
This method is suitable for Lada Kalina with an electronic gas pedal. Previously, the throttle valve, which was heated by a common cooling system, was controlled by a cable drive. After installing the electronics, the hose that went for heating was looped into the cooling system.
To upgrade, you will need a tee, an additional hose and clamps. The second air duct is mounted as close as possible to the thermostat - the tee is installed in the coolant supply pipe to the radiator. The other end of the air duct is connected to the outlet of excess steam near the expansion tank fitting. Thanks to such a simple modernization, it is possible to increase the operating temperature to 92-95 ° C when the stove warms up from 50 ° C and above.
Installation of a hydraulic fence for drainage
A regular medical dropper is inserted into the channel of the steam outlet tube, which is immersed in antifreeze to the bottom of the expansion tank. As the liquid cools, obeying the law of physics about communicating vessels, it will begin to be drawn into the steam outlet, preventing the possible formation of air plugs - airing. Thanks to this simple method, the stove will begin to heat much more efficiently, which means the interior will be warmer.
You can also change the clamps to more reliable ones - self-tightening ones, and ordinary rubber hoses - to silicone ones. To reduce heat losses, it is worth taping all the joints of the air ducts, but to do this you will have to dismantle the panel again. The most convenient way to do this is when troubleshooting a problem.
Regular removal and installation of the dashboard will lead to its loosening, squeaks, knocks and other extraneous sounds will appear coming from under the panel while driving.
Adjusting the heater damper
To get to the heater damper, you will have to disassemble part of the front panel - unscrew the center console. This is where the stove control unit is located. You will need to remove the ashtray and two plugs under the hazard warning button. There are two self-tapping screws that need to be unscrewed. All knobs and switches are removed from the control unit. When releasing the latches, the console must be pulled out towards you, and then all the wires behind it must be disconnected.
Often the cause of damper malfunction is wear and breakage of the mounting of its drive. If it is not possible to replace the part, use epoxy glue and seal the broken mount. It may be broken due to the drive cable being too tight. In this case, you will have to develop it manually - usually this is enough to avoid similar problems in the future.
It is better to start adjusting the damper position by adjusting the stove tap. The bracket holding the cable sheath should be removed from its body. After this, you can remove the cable from the crane. Turn the tap lever to the maximum open position and remove the old cable. In fact, the heater tap may not be closed at all in the future.
If this method does not suit you, use another, more time-consuming method:
- The length of the cable sheath must be adjusted so that in the extreme right position of the switch on the control unit the valve is opened to the “maximum”.
- Using a latch bracket, the cable is fixed in this position, after which you can begin adjusting the damper.
- Remove the bracket that secures the cable sheath to the stove body and feel for the yellow lever, which is located on the right. You need to pull it all the way towards you.
- The cable sheath should be adjusted so that the lever on the control unit in the extreme right position fully opens the damper.
- After this, the cable can be secured with a bracket.
The same cable controls the position of both the damper and the heater valve lever. Damper malfunction is the most common problem in the heating system not only of the Lada Kalina, but also of other VAZ models. Therefore, it is recommended that this part be adjusted before the onset of cold weather.
If you monitor the condition of the heating system and periodically carry out maintenance, the stove will work for a long time without any serious problems.
The stove does not work on the Lada Priora (reasons and repairs)
With the onset of cold weather, the first malfunctions of the Lada Priora heater begin to appear. Situations may be different; in one case there may be problems with the fan, in another with the dampers, etc. Today we will tell you how to properly repair a stove on a Priora with your own hands.
Engine cooling system problems?
As practice shows, most problems with the Priora stove occur due to the ESD (engine cooling system).
In this case, the procedure is as follows:
1.
We check the coolant level in the expansion tank so that it is between o and “MAX”. If coolant has to be added all the time, then the cooling system is leaking somewhere. You should carefully inspect all pipes for leaks, and also tighten the clamps. By the way, in order for warm air to enter the cabin faster, many car enthusiasts in winter specially add coolant only to the “MIN” mark. After all, the less liquid there is in the system, the faster it will heat up.
2
We check the coolant circulation in the SOD, paying attention to the expansion tank
If there is no antifreeze circulation, or it is not sufficient, then the pump may be faulty (it should be replaced) or the cooling system may be clogged.
3.
Checking the thermostat. We warm up the engine to 75 degrees and feel the upper radiator pipe (in diagram No. 13), if it is cold, then the coolant circulates only in a small circle, the thermostat should be replaced with a new one.
If the stove blows cold air, then the reason may be airing of the SOD.
Problems with the heater elements of Lada Priora?
The stove on a Priora does not heat up when the cooling system is working? Then you should first understand the principle of its operation:
The heater control unit (HCU) receives a signal from the interior temperature sensor (installed in the interior lamp) and compares it with the temperature set by the driver. If the difference is greater than a certain value (for example, more than 2 degrees), then the ACS unit sends a control signal to the heater damper motor (MMR), which controls the heater dampers (opens or closes the air supply from the heater radiator).
If the heater only blows cold or hot air, regardless of the regulator (knobs) on the heater unit, this means the heater dampers are not working and there may be several reasons for this. Start by checking the overhead interior temperature sensor.
After this, pay attention to the MMR; it happens that its resistor layer or gear teeth are erased. If the stove on a Priora does not blow or blows but very badly, then start by checking the cabin filter
If there is no flow at all, then check the heater fuse (F9 at 25A). If this is not the reason, then the heater fan may not be working and should be replaced. It is also changed when the stove whistles or hums.
If the stove on a Priora does not blow or blows very badly, then start by checking the cabin filter. If there is no flow at all, then check the heater fuse (F9 at 25A). If this is not the reason, then the heater fan may not be working and should be replaced. It is also changed when the stove whistles or hums.
Let us recall that in the previous article we provided reviews from owners about the liftback grant. This car is a worthy replacement for the slightly outdated Lada Granta.
Don’t forget about the heater resistor, which affects the speed of the heater fan (for example, the 4th speed of the heater does not work).
If the heater is blowing cold air instead of hot air and you have made sure that the damper opens completely, allowing air to flow through the radiator, then the problem is most likely in the heater core.
Another reason for the malfunction of the stove may be the Priora heater control unit itself, but do not rush to buy a replacement without making sure that the actions are correct (this applies not only to the ACS unit, but also to other elements of the stove).
The easiest way to find out why the stove is not working properly is to replace the part with a working one and check its functionality. It is not necessary to buy a new part; you can ask a friend for a known working part, or negotiate with the seller, leaving a deposit.
Note that if you decide to make your car more comfortable and warmer, you can install heated seats or make your own heated steering wheel on a Prior. We talked in detail about this tuning, so you shouldn’t have any problems.
Thus, we examined all the elements of the Lada Priora stove. Proceed in the order of the article, moving from simple to complex, and then you will certainly be able to repair the Priora heater yourself.
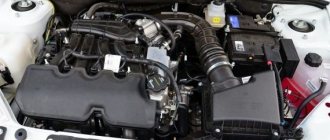
Engine whistling when starting and running
It's always nice to know that your car is in full working order and will not cause inconvenience at the most inopportune moment. However, this does not always happen and many car owners are faced with a number of manifestations of failure of some car parts. This makes people doubt their “iron horse”, and such a car will clearly not add positive emotions. The most common signal of a breakdown is a whistle when starting the engine. Moreover, it is faced not only by owners of old cars, but also by almost new ones that have recently driven out.
The reason why a whistle is heard when the engine is running can be a number of different malfunctions in the car engine. Usually this is not so much a dangerous sign as it is annoying. Although, if the engine begins to make such extraneous sounds and the engine whistles more and more, then it is clearly impossible to delay the elimination of this problem. Some ignored faults can lead to expensive repairs and a host of problems.
Belts
One of the main reasons for whistling when starting the engine is the belts of various drives in the engine compartment of the car. Poor tension and wear lead to the appearance of that same annoying whistle, which can intensify with increasing engine speed. Or, on the contrary, it may disappear when you press the gas pedal. In any case, the sound made by the belts is very audible and impossible not to notice.
When a whistle occurs, the first thing you need to do is check the tension of the drive belts.
The first step is to check the tension of all drive belts. If any of them is weakened, then it may slip, which leads to a whistle when the engine is running. In this case, you need to tighten the belt to the permissible limits in order to leave it with normal free play. Another reason for belt slippage can be dirt and oil that gets on them. In this case, it must be thoroughly cleaned, and it is best to replace it with a new one.
Most often, troubles in terms of noise emitted are caused by the alternator belt. A whistle appears when the engine starts and disappears when the engine speed increases, since the belt enters the same amplitude as the rollers and pulleys. This can lead to insufficient battery charge and all the ensuing problems. It also happens that the engine whistles, and then suddenly stops making this sound. However, no changes are immediately observed. This could be caused by a broken alternator belt. After it breaks, charging the battery while the engine is running stops. This is usually signaled by a special light on the instrument panel, but not all drivers notice it and attach some importance to it. Such inattentive car owners risk being left somewhere in a deserted place with a dead battery.
Another most common cause of a whistle from the engine compartment of a car is. Here the consequences of ignoring the problem can be much more serious than in the previous case. The problem here is not so much in the belt as in the bearing, but you should definitely pay attention to this. A broken timing belt may result in a major engine overhaul due to bent valves, costing a lot of money. Therefore, you need to respond to any kind of whistles during engine operation in a timely manner and not take the situation to extremes. This does not affect all types of motors, but the real problem is widespread.
In most cases, engine whistling when cold is caused by the same belts. If it disappears when the engine warms up, then the reason is definitely in them. In the cold season, there is a chance that the grease in the generator belt bearing may become very thick and the belt will not be able to turn the generator pulley, simply slipping. The solution to this problem can be replacing this lubricant and tensioning the generator belt. But before that, you need to make sure that the generator pulley generally rotates on its own and is not jammed. Therefore, as you can see, whistling on a cold engine can be eliminated quite easily.
If you hear some kind of whistle when starting the engine and subsequently when it is running, then first of all pay attention to the tension of all the belts in the car engine and check their condition. It is possible that some of them need tensioning or replacement.
Rollers and bearings
Another element of a car engine that can make unpleasant noises is all kinds of bearings and rollers, which are present in many engine components. Often, when malfunctioning, they produce sounds slightly different from the usual whistle - a low-pitched howl. This sound appears when the engine is running at idle speed, but intensifies with increasing speed and immediately disappears or becomes much quieter. If you determine that the engine whistles precisely because of these elements, then you can “cure” it by replacing the failed parts.
Intake system malfunctions
If you hear a whistle when the engine is running, and you are already convinced that the reason does not lie in something else, then most likely there is some kind of malfunction in the engine intake system. This could be either the throttle valve, which periodically jams and creates specific air turbulence, or the PCV intake valve, which is responsible for recirculating crankcase gases.
In the first case, whistling when the engine is running is eliminated by thorough washing. But in order to thoroughly clean it from dirt, it is necessary to completely remove this unit, which should not be forgotten.
In the second case, the problem is a clogged PCV valve of the intake system. Because of this, hot air from the crankcase cannot circulate normally, which leads to oil being squeezed out through the seals due to excessively high pressure and the appearance of that same whistle when the engine is running. The real problem can be “cured” by simply cleaning this valve. To do this, you need to remove the valve, which is located either on the valve cover or next to the air filter on the crankcase ventilation tube. If the valve is metal, then any cleaning products that will not scratch the surface will work perfectly. If it is plastic, then overly aggressive aerosols and liquids should be avoided. After this, simply put the valve back in place and the whistling will stop.
Turbine malfunctions
Many modern cars are equipped with turbochargers, which significantly increase their power and driving performance. But this is another component in the engine that can signal its malfunction with a characteristic and loud whistle. The reason for this may be an air leak at the junction of the engine and the turbocharger. Usually such sounds indicate the imminent “death” of this important part. This malfunction most often occurs on machines that consume diesel fuel. Therefore, the owners of such cars know that the whistling of a diesel engine turbine does not lead to anything good.
Kalina stove damper drive
Back in December, the mode switch (where the air blows) on the center of the console began to work very poorly. Namely, it is very difficult to switch from the “blow into the face” position to the “blow into the windshield” position. And at one time, something actually crunched inside. I didn’t disassemble everything in the winter, but I assume that the structure that is responsible for regulating the temperature and regulating where the air blows has broken down. I bought this mechanism. I read on the Internet that it is better to lubricate this mechanism with graphic lubricant, namely all moving parts. Which is exactly what I did. I disassembled this mechanism, lubricated all the parts and put it back together.
Spring has arrived and it’s already quite warm outside, so we can start replacing this unit. Removing the console was not a big problem. Well, since I climbed into the center console, why don’t I wrap all the wires (which I can reach) with bitoplast. No sooner said than done.
But then I remembered that I still had STP vibration insulating material. Namely: STP Gold (one third of a sheet) a whole sheet of STP Silver. Wherever the hand could get into it, STP Gold glued it. I already removed the control console once and I remember how difficult it was to put it back in its place. This time I fiddled around for an hour and a half to put it in place. But unfortunately nothing worked out that way. The reason was that I wrapped the wires with bitoplast, and it, in turn, slid very poorly and the wires did not want to climb into their technological holes. I am very lucky that I still have maden (anti-script material). And only after I again wound the madeline onto the bitoplast, the wires were able to go into their technological holes (namely, a large bundle of wires for switching fan speeds and for lighting). In the end, it took me about two and a half hours to install the center console. I can only advise one thing: in order to quickly install the center console, lay out the wires so that they freely enter and exit their technological holes.
As for the heater control unit. It turned out that it wasn’t about him at all; he was intact and undetectable. The problem was that the cables were tight in the padding. We take a syringe, fill it with regular motor oil, and try to spill the cable. I spent about an hour trying to lubricate all the cables so that they would move easily and without constraint.
Replacing the Lada Kalina fan at home - step-by-step instructions
1. First of all, disconnect the negative terminal from the battery.
2. Next, open the glove compartment and, pressing the two stops, open the glove compartment lid. Remove the cover by pulling it up.
3. Next, unscrew the fastening screws one by one. The fastening screw is inside the glove compartment, as well as the screw on the side of the tunnel.
4. Next, unscrew the top screw, which is located under the glove compartment lid.
5. Unscrew the three screws at the top of the glove compartment, shown in the photo.
6. Next, you need to unscrew the fastening screw located in the area of the right passenger air vent.
7. Remove the decorative plastic trim from the windshield pillar, under which there are two fastening screws. Unscrew them and remove the deflector.
8. Unscrew the remaining fastening screws.
9. From the right end of the panel you only need to remove the cover; you do not need to unscrew the two bolts at “13”. Afterwards, we pull the panel towards the seat and find the fan. It is quite difficult to get the fan, and in order to do this you need to cut out a piece of felt sound insulation.
10. Now unscrew the three screws and take out the stove fan.
After the fan of the Lada Kaliina stove is dismantled, it can be replaced or repaired if possible. Assembly is carried out in reverse order.
Climate control Lada Kalina Lux
The system design is similar to that described above, with the exception of some details. To maintain a given temperature in the cabin, two new elements are used in the design: a temperature sensor in the cabin (built into the ceiling light) and a damper micromotor reducer. Also, the mechanical control unit has been replaced with an electronic one, with degrees of air temperature in the cabin marked on it.
The operation scheme is as follows: the control unit periodically receives a signal from the temperature sensor in the cabin and compares it with the temperature set on the unit. If the difference is too large, the control unit sends a signal to the micromotor gearbox, which already controls the heater dampers (opens or closes hot air from the heater).
Checking heating system elements
If the heater on the Lada Kalina does not work - it blows cold air - it is better to look for the reason, starting with the simplest thing. You should not immediately disassemble complex components. Typically, most problems arise from minor problems.
temperature sensor
If only hot or, conversely, only cold air blows from the air duct nozzles, regardless of the position of the damper, the cause of the malfunction is the interior temperature sensor. It is located in the ceiling, in the lampshade. The problem is solved by replacing the sensor.
Cold air from the stove: Causes
Insufficiently warm or completely cold air blows from the stove quite often and the following reasons may be the culprits.
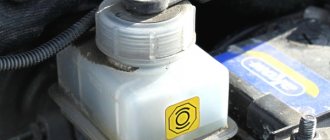
Expansion tank cap
This part seems to be quite simple, although it is, its task is not only to close the filler hole of the expansion tank, but also to relieve excess pressure or prevent the formation of a vacuum in the engine cooling system.
A special valve is built into the lid, which operates in two directions. When there is excess pressure in the tank, which occurs in hot weather, when the coolant heats up to high temperatures, the liquid begins to expand and, therefore, the air that is in the tank needs to come out to prevent an explosion. The valve opens and releases air, and vice versa, when it is cold, the air is compressed, creating a vacuum, making it difficult for the coolant to circulate. All these vacuums can affect the temperature of the air coming from the stove.
Not enough antifreeze
A small amount of liquid can air up the ODS, which will lead to a lack of coolant for proper circulation, thereby making it impossible to heat the radiator. If your furnace is blowing cold air, the first thing to do is make sure there is enough coolant in the reservoir. The coolant level should be between the MIN and MAX marks.
Heater radiator clogged
This problem may appear if the antifreeze is not replaced for a long time. A large number of various oxides accumulate in the cooling system, which, together with the liquid, circulate through the system, getting stuck in narrow, difficult-to-pass places, which is precisely the radiator of the stove. This problem can be easily resolved by flushing the radiator or replacing it with a new one.
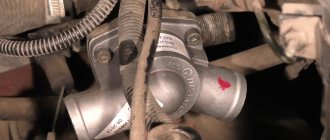
It is quite simple to check this possible cause; you need to start the car and, as it warms up, touch the pipes going to the heater radiator; both pipes should be hot. If the inlet pipe is hot and the outlet pipe is cold, then this is a clear sign of a clogged radiator.
Damper gearmotor
To control the air flow and change it to cold or hot, a damper is used to block the heater radiator. This damper is driven by a special gear motor, which is mounted on the stove body. Quite often this part fails, thereby preventing the damper from being moved from a cold position to a warm one.
You can check this by listening to the operation of the gearmotor; when switching between hot and cold air, you can hear the characteristic sound of the gears and the DC motor operating; if such a sound is absent, then most likely the gearmotor is not working.
Thermostat
Engine temperature directly affects the heat inside the car. If the engine does not warm up to operating temperature, the air from the heater ducts will blow cold
It is necessary to pay attention to the coolant temperature readings on the dashboard; the temperature arrow or display on the screen should be approximately 85-90 degrees. If these readings do not meet the standards, then you need to check the thermostat
The thermostat is checked by starting a cold engine and as it warms up, the lower radiator hose should remain cold until the temperature reaches 85 degrees. If the lower pipe warms up immediately, then this is a clear sign of a faulty thermostat.