14.10. Steering mechanism repair
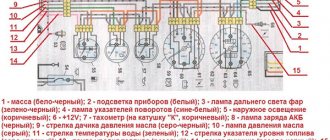
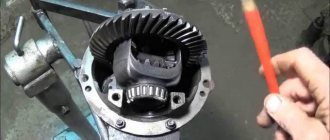
Section of the steering gear housing
1 – plate of the bipod shaft adjusting screw; 2 – bipod shaft adjusting screw; 3 – adjusting screw nut; 4 – oil filler plug; 5 – steering gear housing cover; 6 – worm; 7 – steering gear housing; 8 – bipod; 9 – nut securing the bipod to the shaft; 10 – spring washer for the bipod fastening nut; 11 – bipod shaft cuff;
12 – bronze bipod shaft bushing; 13 – bipod shaft; 14 – bipod shaft roller; 15 – worm shaft; 16 – upper ball bearing; 17 – lower ball bearing; 18 – adjusting shims; 19 – lower worm bearing cover; 20 – roller axis; 21 – needle bearing; 22 – worm shaft cuff.
Drain the oil from the gearbox housing, unscrew the adjusting nut and remove the lock washer.
Using a 10mm wrench, unscrew the four bolts securing the top cover of the gearbox.
We remove the head of the adjusting screw from the groove on the bipod shaft and remove the cover.
When replacing the bipod shaft, the axial gap between the screw head and the shaft groove is eliminated by selecting the thickness of the adjusting plate. The gap size is allowed no more than 0.05 mm. The plates have a thickness of 1.95 to 2.20 mm in increments of 0.025 mm.
We remove the bipod shaft with the roller from the crankcase.
Using a 10mm wrench, unscrew the four bolts securing the worm shaft cover and...
. remove it along with the ball bearing adjustment gaskets.
Gaskets are available in thicknesses of 0.1 and 0.15 mm.
With light blows of a soft metal hammer, knock out the worm shaft from the gearbox housing along with the bearing.
On the end surfaces of the worm there are raceways for the bearing balls.
Using a screwdriver, we remove the cuff of the worm shaft.
Similarly, remove the cuff of the bipod shaft.
We use a punch to knock out the outer ring of the second bearing.
We wash all parts in kerosene or diesel fuel. We carefully check that there are no signs of wear, scuffing or damage on the working surfaces of the roller and worm. The gap between the bipod shaft and the bronze bushings should not exceed 0.1 mm. Ball bearings must rotate freely, without jamming, and there must be no damage or signs of wear on the surfaces of the rings, cages and balls. Cracks of any length are not allowed on the crankcase itself. We replace worn and damaged parts with serviceable ones. We replace the cuffs with new ones in any case. Before assembly, lubricate all internal parts with transmission oil.
Using light blows of a hammer on a piece of pipe of suitable diameter, press the inner bearing ring into the crankcase.
You can press in the bearing ring using a tool for replacing rubber-to-metal hinges on the front suspension (see Appendices).
We install a separator with balls into the bearing ring and insert the worm shaft. We put the outer bearing separator on it and press the outer ring into place with light blows of a hammer. We put the cover with gaskets and...
. We press in the cuffs of the worm shaft and bipod, lubricating the working edges with Litol-24 lubricant.
We install a worm in the crankcase. Using a set of adjusting shims, we set the turning torque from 2 to 5 kgf.cm. We install the bipod shaft and adjust the engagement gap according to the moment the shaft rotates. It should be 7–9 kgf.cm when the worm shaft is turned 30° to the left and right and smoothly decrease to 5 kgf.cm with further rotation until it stops. Fill the crankcase with transmission oil to the level of the lower edge of the filler hole (0.215 l).
Dimensions of the main mating parts and limits of permissible wear
Dimensions of mating parts, mm
Permissible gap in mating, mm
Steering bipod shaft bushing – steering bipod shaft
Steering housing - upper worm bearing
Free movement is not allowed
Steering gear housing - lower worm bearing
Swingarm Bracket - Swingarm Axle Bushing
↑ Adjusting the gearbox engagement
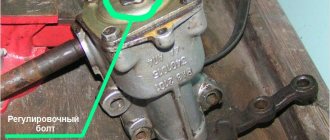
- Remove the protective cap from the adjusting screw. Using a 17mm wrench, loosen the nut so that you can lift the lock washer.
- We quickly turn the steering wheel left and right several times at an angle of about 10° and at the same time use a slotted screwdriver to tighten (unscrew) the adjusting screw until the free play and forces on the steering wheel are within acceptable limits. It is not recommended to over-tighten the screw.
After adjustment, tighten the nut, holding the adjusting screw with a screwdriver from turning.
↑ How to remove steering play on a VAZ 2106
If axial play of the pendulum arm axis is detected, then tighten the nut on the top of the axle. To do this, in the engine compartment, remove the cotter pin from the castle nut, use a 19-point socket wrench to turn it 60° (one edge) and check the play again.
If the play does not disappear, then tighten the nut again and install the cotter pin. If, after tightening the nut, the force required to turn the steering wheel increases significantly, then we repair the pendulum arm.
Steering column VAZ 2106
Steering was present in all cars: from the very first to the latest models, which not everyone can afford to buy. This part of the machine should not be changed, as safety depends on it. It is prohibited to make any changes to the control design. VAZ classics are popular - these are rear-wheel drive cars with a worm-type gearbox.
Repair
1. Remove the steering column (see Section Removing and installing the steering column). Insert the key into the ignition and turn it to position 0.
2. Use paint or a marker to mark the position of the column shaft relative to the upper universal joint of the intermediate shaft.
3. Remove the pinch bolt and separate the intermediate shaft from the column.
4. Remembering the installation position of the components, remove the spring from the base of the column, then the spacer and ring bushings. Remove the column shaft upwards from the guide pipe. Remove the lower support sleeve.
5. If equipped accordingly, a puller will be required to remove the steering wheel adapter from the upper end of the column shaft.
6. Remove the snap ring from the top end of the column shaft, then remove the spacer ring and upper support sleeve.
7. Check the condition of the components, replace defective ones.
8. When assembling, install the ring and support bushings on the upper end of the shaft, and immediately secure them with a locking ring. Make sure the ring fits correctly in its groove. If equipped accordingly, place the steering wheel adapter on the shaft.
9. Install the upper support sleeve into the guide tube, then carefully thread the shaft assembly into it. Place the ring and spacer bushings and spring onto the lower end of the shaft.
10. Ensure that the marks made during dismantling align, then connect the intermediate shaft to the assembly. Make sure the shaft is seated correctly in the column splines, then tighten the pinch bolt to the required torque.
Do-it-yourself VAZ 2106 steering wheel repair
Hello everyone, having returned the gearbox I bought from disassembly, so as not to buy a new one, I decided to repair mine using a repair kit.
I removed the electric heating so as not to interfere, and there’s no point in it, so I won’t put it back.
First, I unscrewed the casing and the steering shaft mounts in the cabin, nothing complicated, just 4 bolts of 12mm and 13mm. One of the bolts turned out to be broken, but the grinder figured it out without any problems)
Then I unscrewed the bolt that secures the shaft to the gearbox, which turned out to be very inconvenient. The steering wheel should be secured or simply locked, and in such a way that the key has maximum free play; how long you will unscrew it depends on this. then grab the steering wheel and pull it towards you, the main thing is to disconnect the steering shaft from the gearbox.
Then you need to disconnect the steering rods from the steering knuckle lever (bipod), remove the wheel, unscrew the pin nut (it doesn’t sound particularly difficult, but in reality you will have to tinker a bit)
We take a 22mm wrench and unscrew the nuts themselves, then knock out the fingers, hit the bipod until the finger comes out. Then we unscrew the 3 through bolts that secure the gearbox and that’s it, remove the gearbox, disassemble it completely, clean the body, and insert a new pair, then we assemble it in the same way in the reverse order, I won’t describe the whole process, my hands are constantly covered in fuel oil and taking photographs is not an option, but without them it won’t be particularly clear, and in principle there is nothing complicated there, the main thing to remember is: the bipod is always installed in one position, on the shaft where it is installed there will be a blind spline, the wide groove should fall on it. Also, do not forget to use the adjusting screw to set the correct gap; if adjusted correctly, the worm shaft should not have any play and should turn easily.
The vehicle's steering must always be in good condition. The safety of driving a vehicle directly depends on its functioning. At the slightest sign of malfunction, diagnostics are necessary, and then repair or replacement of the unit, which you can do yourself.
Removal and installation of the VAZ 2106 steering shaft
Disconnect the negative terminal of the battery. We remove the steering wheel (see Removing and installing the steering wheel), the casings of the steering shaft mounting bracket, the steering column switches, and disconnect the ignition switch connector (see Replacing the steering column switches).
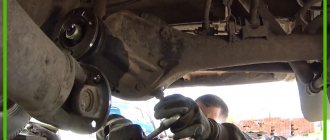
From the bottom of the car, use a 13mm socket wrench to unscrew the turnbuckle bolt at the lower end of the steering shaft. For clarity, the vacuum brake booster has been removed.
In the cabin, under the pedal assembly, we fold back the carpet and thermal insulation.
. Using a Phillips screwdriver, unscrew the three self-tapping screws securing the steering shaft seal.
. and move it up the shaft.
Using a 10mm socket wrench, unscrew the two shear bolts securing the steering shaft bracket.
If the bolts have broken heads, use a chisel to loosen the remaining round heads and finally unscrew them with pliers.
Using a 10mm socket wrench, unscrew the two nuts securing the steering wheel bracket.
. and remove it together with the steering shaft.
Using the “10” key, loosen the tightening of the clutch and, turning the ignition key to position “0” or “I” (to disable the shaft locking), remove the shaft from the bracket.
A groove is milled on the shaft for the locking rod of the anti-theft device.
The design of the bracket allows you to compensate for the misalignment of the worm shaft and the steering shaft in the vertical plane.
We install the steering wheel and turn it several times in both directions to self-install the shaft, after which we tighten the nuts on the steering shaft bracket.
ATTENTION! The steering shaft is mounted on the worm shaft in only one position.
The spline connection of the steering shaft has double depressions, a.
. There are double projections on the worm shaft.
The steering wheel is connected to the steering shaft in the same way.
Video about “Removing and installing the steering shaft” for VAZ 2106
Replacing the steering shaft of a VAZ 2106 Replacing the steering column of a VAZ 2106
Replacing the steering gear and shaft on a Zhiguli VAZ 2104 “classic”. Part 1
Steering - how to repair the steering column on a VAZ 2106, 2107 with your own hands
Hello, dear car enthusiasts! Without a doubt, one of the most important attributes for safe driving is the steering. Attempts to find another way to give the machine the required direction of movement do not stop.
But in the coming decades, automakers are not going to change their traditions of putting steering wheels in cars. The steering is very reliable, durable, and informative. The steering system does not have many parts, and it is not difficult to understand.
As a rule, almost no attention is paid to such a part of the steering system as the steering column, mistakenly believing that a piece of metal rod cannot create problems.
How to replace the steering column of a VAZ-2106
When owning a personal car, car owners must carefully monitor the operation of all systems and components and, of course, promptly replace an element that has become unusable.
In the “classic” VAZ-2106 models, however, as in other cars, all systems are important, but special attention should be paid to the steering wheel, since it is she who is responsible for the safe movement of the car. If any, even the most minor, problem is detected in the control system, it must be eliminated as quickly as possible. One of the most common malfunctions in this system is a broken steering column. It is worth noting that this element cannot be repaired, so it will simply need to be replaced. Replacing a faulty VAZ-2106 steering column, of course, is a long process, but if the work is carried out step by step and taking into account the recommendations provided by professionals, then every car enthusiast can easily cope with this work.
Step-by-step replacement of the steering column
Having decided to replace the steering column on a VAZ-2106 yourself, you need to stock up on free time and patience, and experts recommend performing this step in stages:
- The steering shaft, which is clamped in the column, should be carefully removed.
- Using a size 30 wrench and a long wrench, you should try to rip off the connecting nut that secures the steering column. It is not always possible to remove the fasteners the first time, but since this stage is mandatory, you have to return to it several times.
- The three fasteners that connect the column to the car body are unscrewed. It is most convenient to use a so-called ratchet for this process, since the bolts are not so easy to get to with a regular wrench.
- After unscrewing all the fasteners, you need to free the column from the tie rod splines, which continue to hold the assembly. To do this, you should pry the structure with a pry bar and try to knock it down with sharp jerks.
- After dismantling the unit, it is necessary to check the condition of the boot and oil seal; if even minor damage is detected during a visual inspection, these components must be replaced. By installing a new boot, the life of the bearing and shaft will be extended, and the new oil seal will not allow automotive lubricant to leak out of the steering column.
If all components are installed correctly, the car owner will replace the failed elements with high-quality and reliable ones, and the steering column will have a long service life.
Replacing the steering gearbox on a VAZ 2101, VAZ 2102, VAZ 2103, VAZ 2106
Welcome! The steering gearbox is an integral part of any car, because only thanks to this thing the forces from turning the steering wheel are transmitted to the wheels. But like any other unit, the steering gear wears out over time, which makes it necessary to replace it. You can find detailed instructions for replacing the steering gearbox below.
Note! To replace the gearbox, you definitely need to take a set of tools for its removal and installation, the set of tools should include: A basic set of wrenches, as well as pliers, and you will have to buy a special puller for pressing out the pins of the ball joints, otherwise removing the steering gearbox will be difficult without it!
Summary:
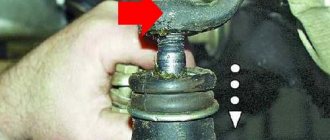
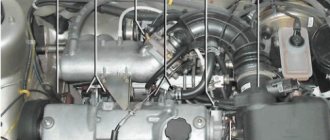
Where is the steering gear located? It is located in the engine compartment of the car, so after opening the hood you can immediately see it, but to get an approximate orientation, the brake master cylinder is located just above the gearbox, and the gearbox itself is indicated by an arrow in the photo.
When should the steering gear be replaced? When it breaks down, control over the car is immediately lost; in other words, the control simply fails. But how can you understand an impending gearbox failure? We will answer this question!
The first signs of gearbox wear include:
- The appearance of various kinds of sounds or so-called squeaks in the steering gear, which are especially audible when turning the steering wheel.
- And also more serious defects of the gearbox include the appearance of large play when turning the steering wheel in the right direction.
Note! But the backlash can also be caused by a loose adjustment screw, which can be treated simply by tightening this screw to the required point. (For information on how to tighten the adjusting screw, see the article: “Adjusting the steering wheel play”) If adjusting the screw does not produce results, then most likely you will have to replace the entire steering gear!