Hub classification
For driving steered and unsteered wheels. For non-drivers: the part is installed on the drive axles of cars/trucks, including special equipment, but only with rear wheel drive. For driven vehicles: the hub is located on the front axle of vehicles with front-wheel drive, and is also optimal for all-wheel drive vehicles. For driven steered and unsteered wheels. For steered wheels: mounted on the front wheels, but for vehicles with rear wheel drive. For non-drivers: hub installation is provided for rear wheels, but with front wheel drive.
Signs of breakdown
To avoid premature damage, it is worth learning more about the types of people who are most likely to encounter this situation:
- racing driving enthusiasts should be the first to get ready;
- those who like to load their car beyond the permissible cargo limit;
- inexperienced amateurs who do not calculate the power of their car and get stuck in mud or snow.
A seized bearing or a cracked hub housing is guaranteed with these driving habits. Wheel play will be an alarm bell for replacement, and a ringing hum will already be a critical situation.
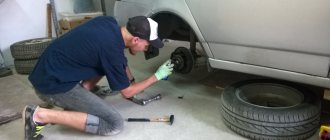
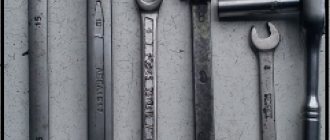
At the auto mechanic I saw the following tools:
- pliers;
- spanner;
- hammer;
- chisel;
- mount;
- block of wood;
- socket heads.
You should watch the thread, it can easily break off while tightening. The wheel bearings are immediately checked and replaced with a screwdriver and chisel. First, the first one is removed, then the oil seal, then the washer under the oil seal, then another bearing. The outer wheels are removed with a hammer and chisel. It is done!
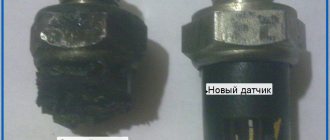
However, there are other types of damage, such as wheel studs. To replace it, hammer it in and pull it out. Or they cut it with a grinder at the bend, since the pin is often bent.
Before installing the hub in place, you need to insert a new stud into the hole, screw on two nuts (the second wheel nut) and remove the car from the parking brake. For reliable fixation, it is worth checking the bolt for tightening force.
Functions and tasks of hubs
The hub, as part of the bearing, provides the car wheels with full rotation. All hubs transmit torque to the wheel, hold the car's braking system, attach the wheel to the suspension, and rotate it around an axis. Due to this, the car performs its main function - driving. In the front and rear wheels, the bearing parts perform slightly different functions. The main tasks of the front wheel hubs are to connect the disc with the turning mechanism, braking and the movement of the car as a whole, if it is front-wheel drive. The fact is that in this case it is through this spare part that the wheel rotates. In rear-wheel drive cars, not only the front but also the rear hubs are important. They provide torque, responsible for the braking distance of the car, and are equipped with motion and speed sensors (in modern foreign cars).
Replacing the rear wheel bearing
There are also several repair methods:
- With the removal of the rack;
- Without removing the stand;
- Using a puller/press;
- No puller/press.
The first steps in the instructions are similar for almost all passenger cars:
- We choose a flat area.
- Loosen the wheel nuts.
- We jack up the rear wheel.
- We place a support under the rear of the car, and place a wheel chock under the front wheel.
- We lower the car onto a support using a jack.
REPLACEMENT INSTRUCTIONS BY VEHICLE BRAND:
On our website you can see detailed instructions with photos and videos for all types of designs and techniques for the following car models:
- Chevrolet:
- Lanos
- Aveo
- Lacetti
- Fusion
- Nexia
- Logan
- 206
- Gazelle
- Accent
- Sportage
Note:
If your car is not on the list, choose by brand, in 90% of cases the instructions will be suitable for you!
Step-by-step instructions: replacing the rear axle bearing
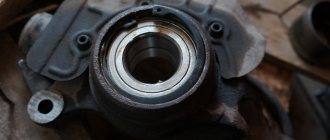
At the beginning of the article, diagrams of the main components of the rear axle shaft of the KIA Sportage are shown. This car in 2WD and 4WD versions has a different design of the rear hub assembly, so we took this car as an example of repair.
Differences in the hub assembly: On the left, the HUB-3 is a non-separable unit. On the right, HUB-1 is a dismountable unit: HUB-1 is sequentially pressed into the hole of the fist 1, then the hub axle 2.
- Removing the wheel.
- Unscrew the 2 diametrically located screws securing the brake disc.
- Unscrew the 2 caliper mounting bolts.
- We dismantle the caliper and check whether the pads need to be changed.
- Removing the brake drum (disc).
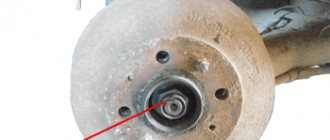
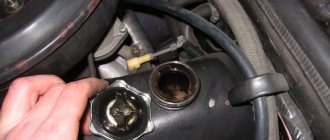
- Unscrew the central nut and remove the pressure washer.
- Trying to knock out the axle shaft with a hammer is sometimes unsuccessful.
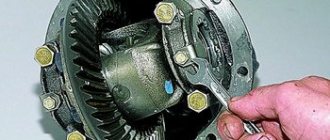
- We squeeze out the axle shaft with a puller, unscrew the fastenings of the levers and supports, and free the fist.
Photo report:
Replacing the rear wheel bearing using a special puller without removing the assembly
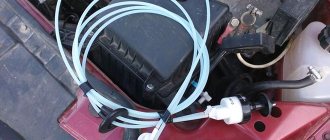
- We install a device called an impact hammer on the hub studs.
- It will take a few hard hits and the hub will come off, but often there will be clips left on it and inside the knuckle.
- We remove the axle shaft from the hole in the fist.
- We take out the retaining ring from the fist socket.
- We charge a screw puller - a set of a long rod (bolt) and a set of washers and round plates (pancakes) for the diameters of the outer and inner races, wide rings.
- We rest the round plate against the hole in the fist, and pass the rod (long bolt) into the hole in the plate. On the other end of the rod we put a plate along the diameter of the outer race and press it with a nut. We begin to tighten the bolt and place the key on the back side.
- Use a powerful wrench or a hand tool with an extension as a wrench. The bearing housing will move forward so that it comes out further, add a wide ring.
It is important to know:
Pay attention to the selection of the puller plates: they must match the diameters of the cages.
Photo report:
Instructions for replacing the wheel bearing with removing the unit
Points up to 7 are the same as in the step-by-step instructions.
- We unscrew the bolt securing the ABS sensor, pull it out of the socket, and put it aside.
- We unscrew the bolts of the rods and levers attached to the knuckle axles.
- We disassemble the handbrake mechanisms: pay attention to the guide pins of the springs; if you are doing this for the first time, take a photograph of the position of the parts.
- We release the handbrake cable, take out the fixing bracket on the reverse side, and pull out the cable.
- Unscrew the 2 bolts securing the shock absorber strut from the knuckle axle.
- Remove the assembly completely.
Photo report
Replacing the rear wheel bearing on a pressing machine
- We take out the retaining ring.
- After dismantling the hub, install a clamp or puller.
- First we press out the hub, then the bearing.
Assembly of the unit
- After purchasing a new part, press it into the hub
- See if the retaining ring should be replaced with a new one.
- Press the hub into the assembly.
- Next, we carry out the installation in reverse order.
Photo report
Replacing the rear wheel hub flange assembly
A non-separable unit, when the bearing is combined with the hub, is easier to replace: disconnect the rear axle flange, just unscrew a few bolts, but this depends on the design of the flange.
- We remove the caliper and brake disc - operations as in the previous instructions.
- If the disk is clamped, turn the adjusting wheel with a screwdriver through the special hole. Depending on which side you remove the disc from, rotate the wheel teeth down or up.
- The HUB-3 flange mounting bolts can be accessed after removing the shock absorber. First place a stand under the rack arm.
- Unscrew the 4 flange mounting bolts, disconnect the ABS connector, and remove the wheel bearing.
- Check the numbers of the old and new rear wheel bearings.
- Clean the flange seat. Installation in reverse order.
Photo report
Video instructions
Replacing the rear wheel bearing on a Kia Sportage
Kia Sportage - rear wheel bearing replacement
Standard Features and Dimensions
Bearing parts for fastening wheels are made in different sizes. We are talking about the diameter of the hub. The dimensional characteristics of the spare part will always depend on the make of the car and the size of the rims. Manufacturers adhere to the rule: the cylinder of a metal product must always match the size of the car wheel. A special system, DLA, is responsible for determining these parameters. The fact is that large wheels on hubs of small diameter will dangle. Sometimes, for large-diameter wheels that a standard hub does not fit, an additional adapter ring is installed.
How to Identify a Bad Wheel Bearing
The original VAZ-214 rear wheel bearings last quite a long time and can withstand up to 70-100 thousand kilometers. And even if one or two of them malfunction, they immediately continue to work. This does not mean at all that you can continue to drive on obviously faulty bearings, but if problems are discovered with them, you will always have a chance to make it to a service station or your own garage.
Signs of a faulty rear wheel bearing include:
- hum, howl, rustling in the area of the corresponding wheel while driving;
- crunching noise when driving over small bumps;
- hub heating;
- wheel play (detected by loosening the jacked wheel).
Causes of failure and replacement of the hub
A broken hub can cause the brake system to malfunction. If a part breakdown is detected and repaired in time, you can avoid serious accidents and costs for more complex repairs. The reasons for the failure of a bearing part can be: aggressive and careless driving, “drifting”, rubbing the belly of the car with gravel, sand or mud slurry on the roads, regularly getting wheels into holes and bumps, overload. In some cases, a spare part may fail due to an initial defect during assembly at the factory. Among the main signs of failure of a spare part are weak shocks, an unpleasant sound, a feeling of body vibration, and motion sickness.
Knocking and hearing will help determine if the hub is broken.
— The first way is to knock on the wheel with your foot. Tires should neither wobble nor play from light impacts. If you feel wobbly or notice a gap between the parts when tapping, then this is a signal of a breakdown.
— Another option is to listen while driving. If an unpleasant cutting sound or any other extraneous rustle is heard from under the wheels, the wheel part should be replaced immediately.
On the front and rear wheels, a spare part malfunction is determined differently. This is easier to do on the front tires. You need to accelerate the car to a speed of 60 km/h or higher and swerve along the road in different directions. If the left bearing is broken, the sound will increase when turning left, and if the right one - accordingly, when turning right. Faulty hubs on the rear wheels behave differently. It is difficult to determine which one is broken. It happens that an unpleasant sound comes from the right, but the left part is broken. Experienced motorists advise lifting the rear of the car and then turning the wheel in different directions. One and the other. Where you hear a crunching sound, an extraneous sound, or find play, repair or replacement of the part is needed.
Tips for maintenance and operation of bearings
- How to lubricate a wheel bearing.
- Keep dust away from grease and bearings. Lubrication of external surfaces prevents corrosion. For external lubrication, perform the following operations:
- First, you need to cleanly rinse the seat of the clip with kerosene, wipe it dry, then lubricate the seating surface with a thin layer of lubricant. Put on a clean rubber glove, apply lubricant to your palm and rub it into the bearing, then insert the part inside and additionally wipe the surface with a rag moistened with lubricant.
- You can use any anti-corrosion lubricant; specialized lubricants for bearing units are sold on the market. When applying, observe the amount of lubricant - there should be no leaks from the unit.
- Lubrication of the bearing inside is possible if it is open or has rubber seals. Add lubricant inside, but here you also need to follow an important rule - there should be no excess lubricant (turn the races repeatedly, excess lubricant will come out, it should be removed).
Recommended lubricant is presented in the table:
| Lubricant brands | Manufacturers | Thickener | Base oil |
| RareMax AF-1 | Kyodo Yushi Co., Ltd. | Urea | Mineral oil |
| 6459 Grease N | Showa Shell Sekiyu, KK | Urea | Mineral oil |
| Pyronoc Universal N-6C | Nisseki Mitsubishi Oil Corporation | Urea | Mineral oil |
| HB-1 | Kyodo Yushi Co., Ltd. | Urea | Mineral oil |
| Ronex MP | Exxon/Mobil | Lithium | Mineral oil |
- How to extend service life.
Tighten the axle nut to the recommended torque. Excessive tension will cause excess friction, the lubricant will heat up, dry out, and the rubbing parts will become deformed. Insufficient fastening torque will cause more play than is permissible, which will lead to premature wear. Use original spare parts (nut, cotter pin, retaining ring, etc.) to repair bearings.
Calculate service life "Wheel Bearing Life Calculator"
Read the article “Tightening torque of wheel bearings”
- Which wheel bearing to choose based on manufacturer, and what to look for when purchasing.
The original number is indicated on the case; the manufacturer recommends installing it. If it is not possible to get the original, there are replacement brands. The main thing is that the dimensions and technical characteristics match. On the packaging, look at the inscriptions, barcode, stamped number on the case, and the package contents.
Read the article “Rating of the best wheel bearing manufacturers”
- Wheel bearing kit - what it includes.
The repair kit includes consumable parts: wheel nuts 1 or 2 pcs., wheel bolts - set, lock ring 2 pcs. cotter pin Possible oil seals, outer races and even lubricant.
- What to use a press or puller.
For high-quality work, use a press, remove the assembly, take it to a service station, and for a small fee they will replace the assembly parts in 1-1.5 hours. The puller is used when replacing independently, purchased or rented. An assistant's hand will be useful for holding the key.
Important point:
Do not put pressure on the inner race of the bearing, as this may damage the elements of the bearing assembly.
- ABS bearings.
The presence of an impulse ring can be easily checked by placing a metal object on one side of the seals. The magnetized side is placed inside the hole of the fist to the connector of the reading sensor.
Rear suspension and chassis design
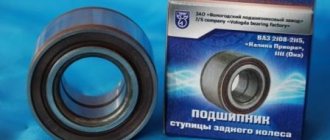
Bearing produced by AvtoVAZ
Before proceeding directly to the replacement process, it is worth considering the rear suspension structure in order to understand the location of the part, as well as determine what needs to be removed in order to change the rear wheel bearing.
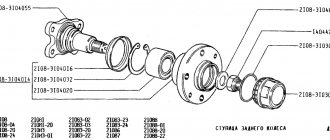
Sectional view of the rear chassis
1. Rear wheel hub; 2. Rear suspension arm; 3. Suspension arm mounting bracket; 4. Rubber bushing for the lever hinge; 5. Lever joint spacer; 6. Rear suspension arm mounting bolt; 7. Body bracket; 8. Support washer for fastening the shock absorber rod; 9. Upper suspension spring support; 10. Spacer sleeve; 11. Suspension spring insulating gasket; 12. Rear suspension spring; 13. Shock absorber rod mounting pads; 14. Compression stroke buffer; 15. Shock absorber rod; 16. Shock absorber protective cover; 17. Lower support cup of the suspension spring; 18. Shock absorber; 19. Lever connector; 20. Hub axle: 21. Cap; 22. Wheel hub nut; 23. O-ring; 24. Bearing washer; 25. Wheel bearing; 26. Brake shield; 27. Retaining ring; 28. Mud deflector; 29. Suspension arm flange; 30. Shock absorber bushing; 31. Lever bracket with eye for mounting the shock absorber; 32. Rubber-metal hinge of the suspension arm;
Important points
- The wheel nut on the VAZ 2109 is tightened very tightly, and in addition, it is often covered with rust. It may take a huge amount of effort to move it. In such a situation, WD-40 liquid can help. If you don’t have this liquid on hand, you can generously pour oil on the nut and wait 10 minutes.
- Not every car owner has a wheel bearing puller at hand. In this case, to remove the bearing, you can use a hammer and a piece of steel pipe of suitable diameter (about 4.5 cm). The main thing is not to damage the inner surface of the hub with the pipe. If scratches and gouges remain there after pressing out, the new bearing will quickly fail.
- When reassembling the hub, special attention should be paid to tightening the hub nut. If it is loosely tightened, play will occur, which will again lead to bearing wear. Therefore, with a 30 socket head, you should use the longest wrench so that the force when tightening the hub nut is maximum.
Replacing wheel bearings is a procedure that every owner of a “nine” will sooner or later encounter. The only question is whether he will be ready for this. If the driver prefers to repair his car himself, then it makes sense to purchase a puller for hubs and bearings in the store. This simple tool will greatly facilitate the work and also save the car owner a lot of time and nerves.
Replacing the rear wheel bearing on a VAZ-2114 is quite difficult, but you can do it yourself. So, a motorist needs to know the design features of the car, as well as have some experience in suspension repair, but even a novice car enthusiast will be able to understand the process by reading this material. The article will tell you about all the features of the operation, and also show step by step how the procedure is done.