Lada Priora error codes with decoding
Like any modern car, the Lada Priora is equipped with dozens of various sensors, the functioning of which determines the condition of the main vehicle systems. Diagnostics of the machine for errors allows you to detect all sensor faults in order to eliminate breakdowns. Now you will learn how Priora error codes are deciphered and how to independently diagnose the on-board computer (hereinafter referred to as BC).
Description and meaning of error P0506
This p0506 code is one that is sometimes triggered on vehicles that have electronic throttle control. That is, they don't have a conventional throttle cable from the accelerator pedal to the engine. They rely on sensors and electronics to control the throttle. In this case, the p0506 DTC (diagnostic trouble code) is triggered when the PCM (powertrain control module) detects the engine idle speed exceeding the desired (programmed) RPM.
Do-it-yourself diagnostics
Various breakdowns of sensors and other devices can cause increased gasoline consumption, incorrect engine operation, and increased wear of car system components. Despite the presence of errors, the VAZ Priora will drive until the driver has to make expensive repairs because of them.
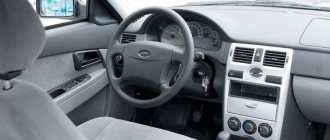
VAZ Priora car
So that the motorist does not suddenly have to face the need for repairs, a special controller is installed on the VAZ Priora, with the help of which the driver can diagnose breakdowns. This can be done either using special additional equipment or an on-board computer installed in the car.
In fact, to carry out diagnostics, the car owner will only need to press a few buttons and count combinations of faults.
For example, you do not have a special tester, so we will look at diagnosing the vehicle for errors using the on-board computer. The BC is built into the dashboard and can be used to read combinations of faults. To do this, you need to activate the auto test mode.
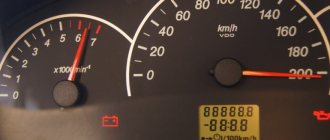
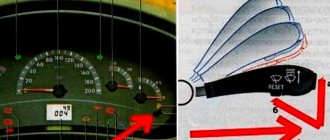
The arrows on the dashboard move to maximum values when performing self-diagnosis of the vehicle
- First, turn off the ignition. After this, hold down the daily mileage reset button and turn on the ignition. Please note: the button must be held down.
- There is an LCD indicator on the vehicle's dashboard, keep an eye on it. When you turn on the ignition, all icons will begin to light up, and all arrows (speedometer, tachometer, antifreeze temperature sensor, gasoline level status) will begin to move to the maximum values and back. That is, if all the arrows behave as described here, this means that the sensors and indicators are functioning correctly.
- Now you need to find the button for switching BC functions - it is located on the right steering column switch. By clicking on it, the software version (1.0 and higher) will be displayed on the screen.
- Click on this button again. Combinations of faults will begin to appear on the screen. If necessary, you can reset error data here. To do this, press and hold the daily mileage reset button for about three seconds.
The appearance of a fault combination on the LCD screen during self-diagnosis
Decoding codes
Well, if you succeed in checking your car for faults, then you need to decipher the combinations of errors, otherwise why do you need diagnostics at all?
Self-diagnosis
Let's look at the decoding of combinations of faults that you can read when checking the Lada Priora yourself.
| Number | Malfunction |
| 2 | When independently checked, this code indicates an increased voltage level in the on-board network. It is recommended to check the main electrical circuits. |
| 3 | Errors have been reported in the operation of the gasoline level control sensor in the fuel tank. |
| 4 | This code indicates a malfunction in the refrigerant temperature level control sensor. |
| 5 | Malfunction of the ambient temperature sensor. The information sent to your device may not be accurate. |
| 6 | The engine is reported to be overheating, and antifreeze may boil. |
| 7 | The BC informs the car owner about the emergency lubricant pressure. |
| 8 | Malfunctions in the brake system were detected. This may indicate defects that may subsequently affect the safety of the driver and passengers. |
| 9 | Low battery reported. |
| E (EEPROM) | Faults have been detected in the data packet. |
The arrows on the dashboard move to maximum values when performing self-diagnosis of the vehicle, and all icons on the panel are lit.
Please note: if the button for switching functions of the on-board computer is not pressed for more than 10 seconds, the dashboard will return to the operating state.
Failures in the ignition system
If you were unable to check your VAZ Priora yourself, you can do this using a special tester. In this case, the error code will be a combination of a letter and four numbers:
- P - means a breakdown in the operation of the electronic systems of the internal combustion engine;
- C - malfunction of the chassis;
- B - breakdown in the electronics of the car interior;
- U - indicates an error in the joint operation of different systems;
- the number 0 indicates the OBD-2 code;
- 1 and 2 - enterprise code;
- 3 - reserve code.
| Combination | Description of the breakdown |
| P0300 | The control unit transmits a signal that there is no spark in all cylinders of the 16-valve car engine. |
| P0326 | Incorrect signal received by the control unit from the knock sensor. It is recommended to perform a more thorough check of the device. |
| P0327 | There is an open or short circuit in the knock sensor circuit. The circuit should be checked. |
| P0335, P0336 | There are errors in the operation of the crankshaft sensor. In addition, such combinations may indicate an incorrect signal coming from the device to the on-board computer. |
| P0337 | The crankshaft position monitoring device shorts to ground. |
| P0338 | There is a short circuit or open circuit in the crankshaft sensor circuit. |
| P0342 | The signal in the headlight sensor circuit is too low |
| P0343 | A too high signal has been detected in the circuit of the same device. |
| P0422 | The neutralizer has broken down; it is recommended to replace the device. |
| P0444 | The Lada Priora control unit detected a break in the wiring of the canister valve. |
| P0445 | The canister valve has shorted to ground. |
| P0480 | There is a break in the wiring of the fan relay; the relay should be checked and, if necessary, replaced. |
| P0481 | There is a short circuit in the cooling fan wiring. |
Connector for self-diagnosis of a VAZ Priora car
Fuel and air system error codes
| Codes | Description |
| P0030 | The control unit detected an open circuit from the oxygen sensor heating device to the exhaust gas converter. |
| P0031 | A short to ground is reported in the oxygen sensor circuit. |
| P0102 | An incorrect signal level was detected in the electrical circuit of the mass air flow control device. |
| P0116 | An incorrect signal is received from the coolant temperature monitoring device. You should check the electrical circuit and the condition of the device itself. |
| P0122 | The on-board computer receives an incorrect signal from the TPS. |
| P0130 | The oxygen level control sensor has failed. |
| P0171 | The control unit has detected an excessive amount of air in the fuel mixture. |
| P0172 | The on-board computer detected an excessive amount of gasoline in the fuel mixture. |
| P0201 - P0204 | The Lada Priora control unit detected a break in the wire of one of the four injectors. |
| P0217 | This fault code means the motor is overheating. |
| P0230 | A malfunction has been detected in the electrical circuit of the electric fuel pump relay. It is necessary to carry out a complete diagnosis of the electrical circuit to identify breaks and short circuits. |
| P0261 | There is a short circuit in the wiring of the injector of the first cylinder. |
| P0263 | The driver of the first injector has failed. |
| P0266 | There was a breakdown in the operation of the second injector driver. |
| P0269 | The control unit has registered errors in the functioning of the third injector driver. |
| P0272 | The fourth injector driver has failed. |
| P0264, P0267, P0270 | One of these combinations indicates a short circuit in the second, third or fourth injector circuit. |
How to view the error code using the odometer
In the interior of the VAZ 2114 dashboard, the speedometer scale is combined with the odometer scale in one instrument. The error code will appear on the display if you perform the following actions:
- At the bottom of the speedometer there is an odometer button, which should be pressed and not released, and simultaneously turn the ignition key to the first position.
- Return the button to its initial state, then briefly press it again, the firmware version will appear in the window.
- If there is a malfunction, the error code numbers will be displayed on the display after pressing the device button for a short moment.
The error codes that the odometer shows differ from those displayed by the on-board computer; they have numbers ranging from 1 to 9, as well as two-digit numbers. The numbers do not say anything; to identify the problem, you need to look at the printout of the digital values in the verbal description.
Failures identified using the odometer
| Error code | Decoding code numbers |
| 1 | The malfunction is related to the microprocessor, a failure or a serious malfunction that requires flashing |
| 2 | The float sensor that determines the fuel level inside the gas tank has stopped transmitting readings |
| 4 | The voltage in the electrical network is higher than normal, there is a possibility of a short circuit |
| 8 | The voltage in the power supply has dropped to a minimum value, one of the reasons is the battery, it needs to be recharged |
| 12 | The indicator lamp on the instrument panel does not work correctly, the wiring is faulty |
| 13 | There is no connection with the oxygen sensor, possibly a wire break or short circuit |
| 14 | Engine overheating, high signal level of the coolant temperature sensor |
| 15 | Antifreeze temperature controller is faulty, wiring problem |
| 16 | There is increased voltage in the car electrical network |
| 17 | Low voltage, battery may be low |
| 19 | Malfunction in the crankshaft position sensor circuit |
| 21-22 | There is a malfunction in the throttle position sensor circuit, the cause may be a break or short circuit in the wiring |
| 23/25 | High or low signal level of the temperature sensor of the air entering from outside, possibly a short circuit of the TPS |
| 24 | The speed sensor circuit is faulty, there is no speedometer reading |
| 27-28 | Exhaust gas sensor signal is incorrect |
| 33-34 | The air flow meter does not work, there is a fault in the circuit |
| 35 | The idle air control has a deviation |
| 41 | The signal from the phase control sensor does not work correctly |
| 42 | Malfunction in the electrical circuit of the ignition unit |
| 43 | The signal from the mixture knock sensor is questionable |
| 44-45 | Fuel mixture is too lean or rich |
| 51 | Malfunction of the starter-charger |
| 52 | Malfunction of the memory module of the electronic control unit - RAM |
| 53 | CO potentiometer failure |
| 54 | Indicates that there is no signal from the octane corrector regulator |
| 55 | Lean air-fuel mixture (sudden throttle opening) at low load |
| 61 | Malfunction in the electrical circuit of the oxygen sensor (lambda probe) |
Video “Control unit error 1602”
In this video, the author talks about the power failure error on the ECU of a VAZ Priora car.
Error codes - malfunctions of the electric power steering ESD on the Lada Priora VAZ 2170 2171 2172 (Lada Priora)
The first character means the following:
- B – code is intended for body systems, i.e. AIRbags, central locking, electric windows
- C - code is intended for the chassis system, namely the Priora chassis
- P - code is intended for the engine and its operation and / or automatic gearbox (automatic transmission);
- U - code is intended for interaction between electronic units of Lada Priora
Second character:
- 0 – common code for OBD-II
- 1 – manufacturer code
- 2 – manufacturer code
- 3 – reserve
The third character of the code is the type of malfunction:
- 1 – fuel system or air supply
- 2 – fuel system or air supply
- 3 – ignition system
- 4 – auxiliary control
- 5 – idle
- 6 – ECU or its circuits
- 7 and 8 – transmission
In order to better understand the operation of car systems, as well as promptly eliminate any problems that may arise during the operation of the Lada Priora, this information may be useful to you. After all, by understanding the basic car error codes, you can make your car life much easier.
To test panel error codes on a car, you need to press the “reset daily mileage” button, without releasing it, you need to turn on the ignition. After which, all familiar positions will be displayed on the indicator, and the speedometer, tachometer, fuel level indicator and other instruments will show values on their scale from minimum to maximum and back. This is an independent test, as well as a visual check of the instruments and indicator.
Decoding errors
Each error code consists of five characters. The last two characters indicate the serial number of the specific error.
The first character changes based on the fault system in the car:
- P – malfunctions in the operation of the power plant or defects in the operation of the gearbox.
- U – disruption of interaction between system units.
- B – electric lifts, airbag and other defects in body systems.
- C – faults associated with the EUR.
Next character:
- 3 – reserve;
- 1 and 2 – manufacturer codes;
- 0 – general code for on-board diagnostics.
The third character indicates the nature of the malfunction:
- 1 and 2 – inform about the appearance of defects in the operation of the fuel system or malfunctions during the air supply;
- 3 – breakdown in the ignition system;
- 4 – additional control;
- 5 – incorrectly operating components in idle mode;
- 6 – electronic unit, as well as its circuits;
- 7, 8 – gearbox malfunction.
Error codes Lada Priora decoding table
To check the error codes of the Lada Priore, you need to press any button that controls the on-board computer, after which the available version of the program will be displayed on the indicator. After such actions, you need to press any of the buttons again and see what error the indicator gave. When any code is displayed on the first or second line, it means that this error is present in the car.
To decipher the error code on the Lada Priora 2014, you only need to know the designation of the numbers and letters displayed on the indicator.
Source
Prior error codes on the dashboard
Using the built-in controller, drivers can identify the main error codes for Priors 8 and 16 valves on their own.
The procedure is carried out using a built-in computer or a connected device. Almost all modern cars are equipped with a system of various sensors that monitor the condition of automotive components. The bottom line is that the functionality of many working units directly depends on the correct functioning of the existing sensors. On the other hand, turning off some indicators may not affect the operation and movement of the car, and malfunctions are detected much later, when the negative consequences of deactivating the sensors appear. Symptoms of the indicators turning off include unstable engine operation, excessive fuel consumption, and excessive wear of parts.
How does a mechanic diagnose a P0506 trouble code?
When diagnosing this error code, a mechanic will do the following:
- Reads all error codes stored in the PCM using an OBD-II scanner.
- Reviews all stored data to determine engine operating conditions when error code P occurs
- Clear the error codes and test drive the vehicle to see if the P0506 code appears again.
- Monitor the engine's idle speed and compare the current engine idle speed with the values specified in the manufacturer's specifications.
- Determines the number of engine revolutions per minute at idle by turning on the air conditioner and warm air fan. At this point in the diagnostic process, the mechanic will subject the engine to various loads to determine if the PCM is able to maintain normal engine speed at idle.
- Check the throttle body for vacuum leaks as well as large amounts of carbon buildup, in which case the throttle body will need to be cleaned.
- Check the operation of the idle speed control system and PCM.
Self-diagnosis using BC
The owner can identify the main error codes of Priora 8 and 16 valves using the built-in controller and on-board computer (BC), without resorting to the services of car service diagnosticians. To do this, you must activate the vehicle testing option. The arrows on the instrument panel move to the maximum possible position. Further manipulations are performed in the following sequence:
- The ignition is turned off and the daily mileage reset button is activated. Then the ignition is turned on again with the button held down;
- After this, all the icons on the instrument panel should light up, and the arrows of the control devices should begin to move from zero to maximum values. This behavior indicates the normal functioning of all sensors;
- On the right steering wheel switch there is a key for selecting BC functions. After pressing it, information about the software category will appear on the display;
- You should press this button again, combinations of problems will be displayed on the monitor. If necessary, error information is also reset here. To do this, hold down the mileage reset button for a few seconds.
Code meanings for self-diagnosis
Using the on-board computer, the driver can determine the following faults:
- Code “ 2
” – excessive voltage in the on-board network. To eliminate it, you need to check the main electrical circuits; - The number “ 3
” indicates a malfunction of the fuel control indicator; - «4
» – problems with the refrigerant temperature sensor; - The number “ 5
” means incorrect operation of the environmental indicator; - Code “ 6
” means engine overheating; - «7
» – critical lubricant pressure; - The number “ 8
” indicates a malfunction in the brake system; - «9
» – signals that the battery is low; - The " E
" symbol indicates a problem with the packet data.
It is worth noting that if the BC options switch key is inactive for more than 10 seconds, the instrument panel will return to normal operation.
Causes of error P0346
The most common cause of P0346 is an engine oil or transmission fluid leak that has damaged the camshaft position sensor or electrical components in the system.
Other reasons are:
- Camshaft position sensor malfunction
- Malfunction of the crankshaft position sensor
- Short circuit or broken camshaft position sensor wires
- Poor electrical connection in the camshaft position sensor circuit
- Starter motor malfunction
- There is a malfunction in the engine starting system
- Low or completely discharged battery
- In rare cases, PCM malfunction
Checking with a plug-in tester
More accurate and comprehensive diagnostics can be performed using a connected computer or a special tester. However, the data displayed on the screen is alphanumeric. The letters have the following meaning:
- P
– errors in the operation of the electronic systems of the power unit; - C
– problems with the functioning of the chassis; - B
– electronic malfunctions in the cabin; - U
– joint system errors.
In addition, the number 0 means OBD code 2, numbers 1 and 2 indicate the enterprise code, and 3 is the backup password.
Basic ignition system
(the letter P precedes the digital designation):
- 0300
– no spark in the cylinders of 16 valves; - 0326
– defect or short circuit in the knock indicator circuit; - 0337
– difference of the crankshaft controller to ground; - 0343
– high level in the headlight sensor circuit 0342 – a similar low indicator; - 0422
– signaling device malfunction; - 0444, 0445
– failure of the adsorber valve; - 0480, 0481
– problems with the fan assembly.
Fuel-air system
(the letter P is located before the numbers):
- 0030
– open circuit between the oxygen indicator and the exhaust gas converter; - 0116
– problems with thermal control of the cooling fluid; - 0102
– error in the air flow control circuit; - 0201, 0202, 0203, 0204
– break in the injector wiring; - 0217
– overheating of the power unit; - 0172
– excess amount of air,
0171
– gasoline, in the fuel mixture; - 0230
– malfunction of the electric fuel pump; - 0266 0269, 0270, 0272, 0274
– problems with injector drivers.
In principle, diagnostics using BC makes it possible to identify the main faults. Basic error codes for Priora 8 and 16 valves using a plug-in tester provide significantly more information. To understand it, you should study the decoding of indicators, which is not so difficult.
Diagnosis and problem solving
Check for battery voltage (12 V) at the injector connector wire. If there is no voltage, check the continuity of the circuit to ground using a test lamp. Connected to the battery positive. If it lights up, it means there is a short circuit to ground in the voltage supply circuit.
Repair the short circuit in the voltage supply and restore proper battery voltage. Don't forget to check the fuse and replace it if necessary.
One injector can short-circuit the voltage supply from the battery to all injectors.
If battery voltage is being supplied to the injector wiring harness, the next step is to turn on the indicator light to check the injector driver is working. Install an indicator light in the injector harness instead of the fuel injector. Which will flash quickly when the injector drive is operating.
Check the resistance on the fuel injector if you have the resistance specifications. If the resistance is higher or lower than the nominal value, replace the fuel injector. If the injector passes the test, the problem is most likely loose wiring.
Remember that a fuel injector may work fine when cold but malfunction when hot, or vice versa.
Checking the wiring harness
Check the wiring harness for chafing and the connector for loose connections or a broken lock. Repair as necessary and check if P0203 returns.
Disconnect the PCM connector and connect to the fuel injector driver circuit. Any resistance means there is a problem. Infinite resistance indicates an open circuit. Find and repair, then try again.
If you cannot find any problems with the harness but the fuel injector driver is not working, check the PCM power and ground. If they are OK, the PCM itself may be faulty.
Diagnostics using the built-in BC
To view the error codes, you need to find the daily mileage reset button on the dashboard, press it and, holding it, turn the ignition key. The self-diagnosis mode will turn on. All arrows on the instruments should move from minimum to maximum values and back, and all positions on the LCD display should light up. You need to look: if any position does not light up or the arrow on any device does not move, then you should check the corresponding sensors, their networks or display for malfunctions.
Priora on-board computer
In the same mode, press any button for switching modes of the built-in BC 2 times, after which digital codes may appear on the liquid crystal display:
- 2 - very strong voltage in the BS;
- 3 - errors in the fuel level sensor system in the gas tank;
- 4 - error in the coolant temperature sensor system;
- 5 - error in the air temperature sensor system outside the car;
- 6 — motor overheating;
- 7 — emergency low oil pressure;
- 8 - malfunctions in the brake system;
- 9 - battery is low;
- E - error in the data packet stored in the EEPROM.
Many drivers ask how to reset error codes on a Lada Priora. Perhaps their built-in BC is faulty, since a working on-board computer automatically exits the diagnostic mode after 30 seconds if you do not press any control buttons.
What repairs can fix the P0506 code?
- Replacing the idle air control
- Repairing Vacuum Leaks
- Cleaning the Throttle Body
- Replacing a damaged throttle body
- Clearing a clogged air inlet or outlet
- Replacing a faulty positive crankcase ventilation valve
- Replacing the Power Steering Oil Pressure Switch
- Eliminating other errors that appeared along with error P0506
- Replacing or reprogramming the PCM
Checking using a connected computer or tester
Driver Information Panel
Checking system malfunctions using connected devices gives more accurate results, but at the same time requires deciphering special codes. For example, the monitor displays code p0441 or p0130 or error p0422. Oh, these car manufacturers, in human language they could write “replace the oxygen sensor” instead of P0130 or “check the canister valve” instead of P0441. But nothing can be done, the Lada Priora is also intended for export, so it is easier to write p0441 in the program than to give explanations in Russian, Kazakh, Arabic, Armenian and 10 other languages. And then attach special tables that indicate the meaning of certain codes. Just look at them and everything will become clear. But these tables are not included with the operating instructions. Either way, you can check them out below.
All fault codes for Lada Priora car systems consist of 5 characters. Here is a breakdown of Prior's errors.
The Latin letter comes first:
- P - error in the electronic systems of the motor;
- C - error in the electronic systems of the chassis;
- B - error in interior electronics;
- U is an error in the joint operation of different systems.
Next comes the number:
- 0 - OBD-2 code;
- 1 - enterprise code;
- 2 - enterprise code;
- 3 - reserve code.
The system indicates an error
The next digit indicates the system in which the malfunction was found:
- 0 — exhaust;
- 1, 2 — fuel and air supply system;
- 3 - ignition;
- 4 - additional control;
- 5 — idle system;
- 6 - ESC;
- 7, 8 - transmission.
The last 2 digits indicate the serial number of the fault.
Symptoms of malfunction
The main driver symptom of P0203 is the MIL (Malfunction Indicator Light) illumination. It is also called Check engine or simply “check light”.
They can also appear as:
- The “Check engine” warning light on the control panel will light up (the code will be stored in the ECM memory as a malfunction).
- Floating speed, the car engine may operate unstably.
- Increased fuel consumption.
- The engine stalls or has trouble starting.
- Jerking/misfire at idle or under load.
- Poor speed gain.
- Black smoke from the exhaust pipe.
P0203 is above average in severity and should be used with caution. Because the vehicle may experience serious problems, potentially affecting safety.
Deciphering faults in the fuel and air systems
- P0030 - the oxygen sensor heater wire to the exhaust gas converter has broken;
- P0031 - the same electrical wire has shorted to ground;
- P0032 - the same wire has shorted to the on-board network (BS);
- P0036 - the wiring of the oxygen sensor heater is broken, after the converter;
- P0037 - the same wiring has shorted to ground;
- P0038 - it has shorted to BS;
- P0102 - weak signal in the mass air flow sensor network;
- P0103 - very strong signal in the network of this device;
- P0112 - weak signal in the air temperature sensor network;
- P0113 - very strong signal in the network of the same device;
- P0116 - antifreeze temperature sensor signal is out of operating range;
- P0117 - poor signal from the antifreeze temperature sensor network;
- P0118 - very strong signal from the antifreeze temperature sensor;
P0122 - poor signal in the throttle position sensor circuit;
- P0123 - very strong signal in the same circuit;
- P0130 - the oxygen sensor before the converter does not work;
- P0131 - weak outgoing signal on the network of this device;
- P0132 - signal too strong on the same network;
- P0133 - slow response to changes in mixture quality in the network of the same device;
- P0134 - oxygen sensor circuit inactive;
- P0136 - the oxygen sensor after the converter is broken;
- P0137 - poor signal in the circuit of this device;
- P0138 - signal too strong in the same circuit;
- P0140 - the same sensor circuit is inactive;
- P0141 - the oxygen sensor heater after the converter is broken;
- P0171 - there is a lot of air in the fuel mixture;
- P0172 - there is a lot of gasoline in the fuel mixture;
- P0201 - injector wire No. 1 is broken;
- P0202 - injector wire No. 2 is broken;
- P0203 - injector wire No. 3 is broken;
- P0204 - injector wire No. 4 is broken;
- P0217 - engine overheated;
- P0230 - failure in the electric fuel pump relay network;
Here we are looking for an electrical problem that has arisen.P0261 - the injector circuit of cylinder No. 1 has shorted to ground;
- P0263 - injector driver No. 1 does not work;
- P0264 - the injector circuit of cylinder No. 2 has shorted to ground;
- P0266 - injector driver No. 2 does not work;
- P0267 - injector circuit No. 3 has shorted to ground;
- P0269 - injector driver No. 3 does not work;
- P0270 - injector circuit No. 4 has shorted to ground;
- P0262 - the injector circuit of cylinder No. 1 is shorted to the BS;
- P0265 - injector circuit No. 2 is shorted to BS;
- P0268 - injector circuit No. 3 is shorted to BS;
- P0271 - injector circuit No. 4 is shorted to BS;
- P0272 - injector driver No. 4 does not work.
Return to contents
Malfunctions of auxiliary systems and ignition
P0301 - no spark in cylinder No. 1;
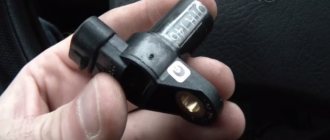
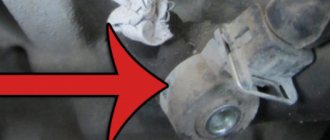
Camshaft sensor location
P0337 - crankshaft sensor shorted to ground;
Return to contents