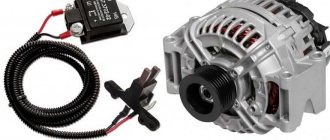
Advantages of installing a three-level regulator
The three-level voltage regulator on the VAZ 2107 is capable of maintaining a constant voltage supplied by the generator to the vehicle network.
With this product it is possible to save and increase the battery life. In addition to regulating voltage, three-position regulators are capable of maintaining current within a certain range. Some of the main advantages of the device in question include:
- The main board of the device is located not in the generator itself, but away from it, which contributes to less heating of the product, as well as extending its service life.
- Possibility to regulate the voltage level manually thanks to a special switch. The device operates from a switch.
- The charge level is significantly higher, in contrast to standard products.
Problems with starting the engine, especially on frosty days when it is very difficult for the starter to start the engine, can be avoided by replacing the standard device with a three-position one. Large loads on the electrical circuit in a car, such as headlights, heater, heated glass, can contribute to battery discharge, even if the engine is running and the standard product is in good working order.
Types of regulator relays are simple, three-level and with temperature compensation. In the brush section of a standard seven generator, in most cases, a temperature-compensated option is installed. But, as practice shows, in terms of thermal regulation, these regulators are mostly ineffective. Recently, among drivers of the VAZ 2107 and other Lada models, the three-level type is gaining more and more popularity. Car owners who have installed such a regulator overwhelmingly recognize it as more effective than the standard one.
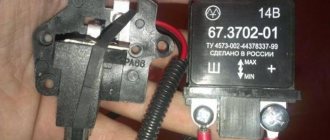
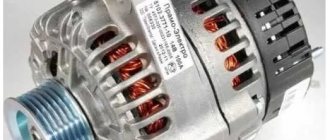
Characteristics of the Energomash device for VAZ 2107
The Energomash voltage regulator for the VAZ 2107 is equipped with three “25C” type diodes and a mode switch. With their help, a three-stage voltage change is carried out. A three-level balancer is also called a current injector, since the device is capable of maintaining it at a level of up to 6A. The main functionality of the three-level voltage regulator for the VAZ 2107 model "Energomash" is based on changing the current from the generator, thereby increasing the voltage of the on-board circuit to 13.6-14.7 V.
The first operating mode provides for maintaining the voltage at the generator output at 13.6 Volts. The switch should be installed in a position where the ambient temperature is +20 degrees and above. The switch in the neutral position should be set at temperature values from 0 to +20 degrees. And in the third position, the generator will produce a voltage of 14.7 V when the air temperature is from 0 to -20 degrees.
Changing the brush assembly
Replacing a standard product with a VAZ-2107
Connecting a three-position regulator, or rather, changing a standard product, does not present any difficulties. After purchasing the product, you must complete the following steps:
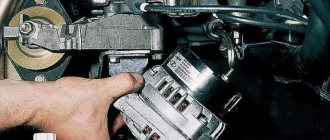
- Initially, you need to remove the protective cover of the generator. Don't forget to disconnect the negative terminal from the battery.
- The standard part is removed by unscrewing two bolts using a screwdriver or a “6” key, which depends on which VAZ generator is installed on the car. It is also necessary to remove the terminal.
- After this, we compare the standard device with the three-level one. The brushes and fasteners must be identical in design, otherwise the product will need to be replaced.
- A new product is installed in place of the standard “tablet”, after which it is fixed with fasteners (bolts).
- The body of the product should be secured to the ground of the car in any convenient place (pictured below). This is not difficult to do, since the wire is long enough.
After installing such a product, the owner of a VAZ-2107 car will be able to forever forget about constant problems with a dead battery, since the new regulator will recharge it more stably under certain temperature conditions.
How to remove a generator on a VAZ 2107 Everything is as simple as shelling pears
Diagnostics of the relay voltage regulator of the generator VAZ 2109Post navigation
- Keys 10, 17, 19;
- Set of heads;
- Ratchet;
- Mount;
- Hammer and punch.
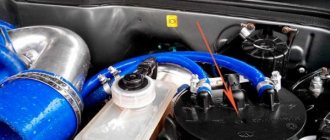
First, remove the chips from the generator. The wire to terminal “30” is secured with a nut; unscrew it using a 10-mm open-end wrench; Using a 17 key, loosen the adjustment bar and press the “gene” to the cylinder block. Usually this can be done by hand, if it doesn’t work, use a pry bar. Remove the belt; We remove the adjusting bar; to do this, unscrew a pair of 17 nuts. In extreme cases, it is enough to dismantle only the nut that is on the generator itself; Unscrew the nut 19 from the generator mounting screw. It is most convenient to use a ratchet for this; Gently tap the end of the screw to move it out of place. Next, hit the head of the screw to knock it out. In the end, you will have to support the generator, otherwise it will warp and the screw will jam; We remove the generator. It is pulled down, between the bracket and the cross beam. Installation is carried out in reverse order
At the same time, pay attention to the installation and tension of the belt: Install the adjusting bar, the fastening screw should not be tightened; Place the belt on the pulleys; Using a pry bar, press the generator away from the engine until the belt is fully tensioned. Holding the part in this position, tighten the fastening nut.
- The wire tip is removed from the relay output;
- A pair of mounting screws are unscrewed; for this you will need a Phillips screwdriver;
- The relay is removed along with the brush holder. At the same time, inspect the condition of the brushes. If they are shorter than 10 mm, or one is noticeably smaller, then the relay should be replaced. The brushes cannot be changed separately;
- To check, terminal “B” is supplied with power from the positive of the battery, and negative is supplied to ground. After that, we check the voltage on the brushes, it should remain within 13-13.5 V without twitching.
AutoFlit.ru
Generator brushes - why are they needed?
Quite often (especially in older models) there are cases when, with a sharp increase in driving speed, various seemingly inexplicable things happen: the light of the dashboard or headlights dims, the cigarette lighter and (or) radio work intermittently. Drivers who have not been hardened by many years of experience in the cold lake may mistakenly think about burnt fuses, wiring, or shorted devices. It can take a whole day or more to work through all these versions. But what will be the driver’s surprise when the true cause of the malfunction becomes clear, that the whole essence of the problem is due to some small pieces of black metal called generator brushes.
Based on 9th or 8th grade physics lessons, everyone knows that any generator must include two main parts, one of which is movable (rotor), and the second, correspondingly, stationary (stator). Each part has a copper (in most cases) winding. Under the influence of magnetic force, the rotor begins to rotate, powered by electricity through the armature and two other metal parts. And they are called generator brushes. Due to the constant impact of friction, all parts gradually wear out due to the constant rotation of the rotor. This happens in any case, regardless of the quality of the material of the parts (and it is really strong).
How to determine the malfunction?
If, while warming up the car, you begin to notice strange actions on the dashboard (the voltmeter readings change greatly with minimal engine load or the battery charging light comes on), then this can only mean one thing - the alternator brushes are worn out and need to be replaced.
In some cases, a good warm-up of the engine allows you to “extinguish” the indicator. At the same time, the car drives on the autobahn quite calmly and normally, without any signs of malfunction. But you shouldn’t be such an optimist, because your car may break down at the most inopportune time. Don't forget to check the condition of the alternator winding and belt, although the absence of sparks and smoke suggests that the brushes are the cause of the breakdown.
When is it time to change generator brushes?
The main signs of brush failure on a generator:
- spontaneous shutdown of electrical appliances while the engine is running;
- decrease in brightness or blinking of control lamps and standard lighting equipment;
- voltage drop in the on-board network during operation of the power unit;
- the appearance of extraneous sounds (rustling or squeaking) when the generator is operating;
- turning on the control indicator for lack of charging (the lamp is located in the instrument cluster);
- rapid battery discharge when the car is moving.
Methods for replacing brushes
Unit repair is carried out using 2 methods:
- with equipment removal;
- without dismantling.
The method for restoring the unit depends on the layout of the units in the engine compartment and the condition of the threaded connections. If there is a coating of rust and oxides on the steel elements, it is recommended to remove the electrical machine.
The parts are treated with a special liquid, otherwise the edges of the nuts will be licked off or the body of the bolt will break.
Before replacing the brushes on the generator, you need to prepare:
- wrenches or sockets (size and type depend on the car model);
- screwdrivers with flat and Phillips blades;
- a set of new parts (selected from the catalog depending on the modification of the electric machine);
- a bottle of WD-40 liquid, which allows you to unscrew dirty or rusted threaded connections.
This is interesting: Self-replacement of low beam lamps in Hyundai Accent headlights
On a removed generator
Algorithm for servicing a unit using the example of a VAZ-2113 car with an 8-valve power unit:
- Stop the engine, engage 1st gear and tighten the parking brake lever.
- Open the hood and disconnect the negative cable from the battery housing (it goes to the car body).
- Loosen the bolt in the lower support.
- Disconnect the patch cables.
- Unscrew the drive belt tension adjuster nut, and then use a mounting spudger to carefully move the generator towards the engine block.
- Remove the drive belt, unscrew the bolt securing the tension bracket to the cylinder block.
- Unscrew the bottom bolt holding the electrical machine to the motor.
- Place the equipment on the workbench and remove the plastic cover, which is held in place by latches.
- Remove the voltage regulator housing, which is secured with Phillips head screws. The unit is attached to the windings using a quick-release block.
- Remove the brushes; parts must be replaced if the remaining length of the graphite elements is less than 5 mm.
- Install new parts and reassemble in reverse order. Adjust the belt tension, and then start the power unit and check the operation of electrical devices. If an on-board computer is installed on the car, the device shows the voltage in the on-board network.
Removing the alternator on other vehicles may require removing the air filter housing or air ducts.
On some foreign-made machines, automatic tensioning devices are used; the body of the electrical device is rigidly bolted to the cylinder block. The owner needs to loosen the belt tension and then remove it from the pulley. On Toyota vehicles, the electrical components are covered by a metal casing secured with nuts.
Under the cover there is a brush block, a diode bridge and a charging control unit (equipped with an aluminum radiator). After removing the brushes, the collector rings are inspected; if there is wear on the parts, you will need to remove the rotor to correct the defect. After assembly and installation, the voltage in the on-board network is checked with the engine turned off and running.
Replacing the voltage regulator on the generator from an old model to a new one
| Old-style voltage regulators do not see the real voltage in the vehicle's on-board network, but only try to guess it from the voltage on the additional diodes of the bridge, which does not work very well. Since April 2004, generators began to use voltage regulators of a new type, which see the real voltage in the on-board network thanks to feedback and adjust it in real time, which avoids voltage sag when consumers are turned on. |
About the compatibility of voltage regulators and VAZ generators
- — 372.3701 installation RN 1702.3702-01 — VTN.
- - 9402.3701/3202.3771 installation RN 9111.3702 - VTN, 9111.3702I2 - VTN, or 9333.3702-02 - VTN.
- — 5102.3771 installation RN 846.3702 — Orbit.
Reasons for VAZ 2110 battery discharge
— 9402.3701/3202.3771 with installation of LV 93.3702 — Astro, 941.3702 — Autoelectronics, 844.3702 — Orbit, 845.3702 — Orbit, 611.3702-05 — Energomash, 611.3702-07 — Energomash, 793 1.3702 I4 - Electric module, 7931.3702-01 - VTN, 9444.3702 - VTN, 9333.3702-04 - VTN.
Replacing the old-style voltage regulator with a new generator model
- without consumption: 13.75-13.8V.
- with consumers: 13.6V.
- without consumption: 14.4V.
- with consumers 14.3V and freezes at this figure.
xn--2111-43da1a8c.xn--p1ai
Types of existing relay regulators
A century has passed since the advent of automobiles. During this time, the regulators changed their filling and appearance more than once. Let us first consider modern stabilizers, and then outdated ones.
There are two types of regulators today:
built-in - these are attached directly to the generator housing and are produced combined with the brush assembly;
Read also: How to measure amperes with a tester
Both types have non-separable housings and cannot be repaired. If the output voltage on the generator deviates from normal, and there is confidence that the stabilizer is to blame, then in this case we simply replace it with a new one.
How to remove a generator on a VAZ 2114 and 2115 Available methods
Lada 2107 Arkano-mobile Samara Logbook Replacing the heater tap in a VAZ 2107 with a tap from a VAZ 2108 with its removal from the passenger compartment under the hood
- The terminal is removed from the battery; this should be done for all work on the car’s electronic systems;
- The car is jacked up, the right wheel is removed;
- The mudguard is unscrewed;
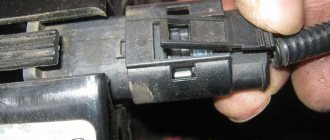
- Remove connector block D from the generator;
- After that, using a 10mm wrench, unscrew the wire from terminal B++. The wires are removed;
- The generator adjusting screw is loosened. The belt is removed. The screw should be completely unscrewed. Remove the tension bar;
- Using a 17 socket, unscrew the 3 screws securing the generator bracket to the cylinder block;
- The generator is removed;
- Remove the bracket, to do this the nut is unscrewed, this is done with a 13 key. The screw is removed.
- Unlock the cover fastening latches and remove it;
- Use a Phillips screwdriver to unscrew the 2 screws securing the voltage regulator;
- The block of wires from the regulator is disconnected, and it is finally removed from the generator;
- Using a 10mm wrench, tighten the nut securing the capacitor wire. Next, unscrew the screw securing the capacitor itself;
- We remove the diode bridge. To do this, unscrew the screw securing the block with a Phillips screwdriver. Next, unscrew several screws securing the winding terminals. There are insulating washers on the screws;
- We remove the winding leads and remove the diode block;
- While holding the head from turning with a gas wrench, use a hexagon to unscrew the pulley;
- Using a Phillips screwdriver, unscrew the 4 screws holding the covers together;
- We mark the position of the covers relative to each other. Separate both halves;
- We remove the stator;
- We clamp the cover with the rotor in a vice. We knock it out with a punch;
- All that remains is to remove the bearing using a puller.
AutoFlit.ru