I discovered the malfunction when I was changing the brake pads and then on the lift they confirmed to me that the wheel bearing was humming and needed to be changed. In the service, replacement costs 500 rubles (labor only). My toad immediately began to panic, and when she was joined by the desire to do something with her own hands, the choice was made - a friend’s garage and self-repair mm/ Taking a magical homemade puller from a friend and enlisting the support of the Internet and a repair book, the beginning of a wonderful evening was laid^ ^
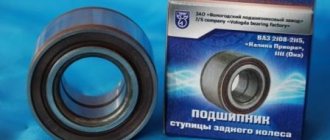
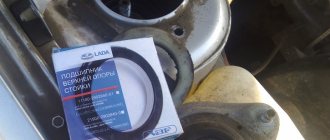
By the way, I bought a ZOLLEX roller bearing
And the way it was for us: 1. Put it on a jack and remove the wheel.
This is a household operation, everything is familiar, nothing new
. 2. Remove the brake drum.
in my case, this also did not cause problems, because I had recently removed and cleaned everything there
3. Straighten the locking edges of the hub nut, unscrew the nut
this is where the fun began) they hammered on this nut with everything they could, in the end they knocked out this locking edge, but the nut still did not unscrew
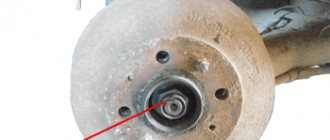
4. Remove the hub.
As I already said, we borrowed a homemade puller from a friend. While I was assembling it, my partner brushed off the hub with a slight movement of his hand. that's all. Why they took the puller is unclear)))
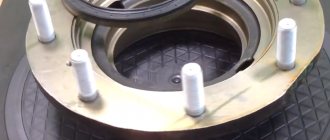
5. Remove the retaining ring and press out the old bearing
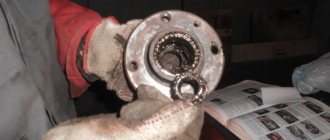
There are special pliers to remove this retaining ring. someone. we had 2 self-tapping screws and a guy from a neighboring garage who joined)) and, yes, there is also a metal boot that fell out by itself. Then it was time to press out. we thought that our torment would end with the nut... naive)) the first thing we figured out was to put the hub on the bricks and hit it through the head with a sledgehammer. but this did not give the desired result. the bearing fit like a glove, and the bricks crumbled. Afterwards we armed ourselves with a vice and an industrial hair dryer. 10-15 minutes of uniform heating of the hub and, having installed it in a vice, the bearing was knocked out with the same sledgehammer and a larger head! victory!
How to change the rear wheel bearing
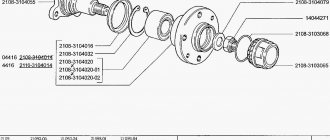
It is very easy to replace the rear wheel bearing of Lada Priora, for this you need:
- remove the hub cap and unscrew the hub nut;
- jack up the car and remove the rear wheel;
- remove the brake disc;
- remove the hub assembly; if the hub race remains on the axle, it must be removed with a special puller.
After dismantling the unit, press the bearing out of the hub and install a new part in place. To assemble a bearing with a hub, a press is mainly used, but pressing can be done in another way:
- heat the hub to 60-70ºC (it is best to do this with a hair dryer);
- cool the bearing (for example, put it in the freezer).
After changing the temperature conditions of the parts, the bearing enters the hub without delay, but you cannot hit it, otherwise it will immediately hum after installation. Wheel bearings should also be replaced in pairs.
Bearings Lada Priora (VAZ-2170, 2171, 2172, 21728)
In the list, numbers are indicated only with significant additional designations (for example, A - reinforced, Ш - noise requirements, etc.), if there are other modifications that are less suitable, the numbers for the VAZ are indicated in full.
The wheel bearing ensures uniform rotation of the wheel around its own axis. Of all the elements of the car's chassis, it is the first to meet and distribute shock loads, so the main requirements for this part are strength and durability.
In this article we will talk about what a rear wheel bearing is on a VAZ-2108. We will look at the design of this device, its dimensions, and also understand the process of replacing it.
Which Priora rear wheel bearing is better?
If you once heard some kind of strange and suspicious hum during a trip, then most likely you will have to check the wheel bearings.
Such noises will undoubtedly cause concern to any conscientious driver, since inaction can be much more costly. As already mentioned, the problem may be in the wheel bearings.
It is because of their wear that various types of noise can appear, which must be urgently eliminated.
Functions of the rear wheel bearing
The hub is a very important part of any car. It has a hole that is designed to fit the part onto a shaft or axle. The function of the hub is to transmit torque from the crankshaft to the wheel, due to which the latter rotates, that is, the car moves.
The wheel bearing plays an equally important role in the chassis of a car. It is available as a single-row or double-row ball bearing.
They are locked together to ensure that all safety precautions are met while riding.
Therefore, it is clear that any bearing failure can make driving a car unsafe.
This part has a special appearance, since it is the wheel bearings that are responsible for the reliable fixation of various components, but at the same time they can still rotate. The most important function of the wheel bearing, both rear and front, is to ensure reliable fixation and smooth rotation of the wheels.
The difference between the front and rear hub bearings is only in design, but the functions performed are completely the same.
The rear hub of the independent suspension is designed almost the same as the front hubs, but the only difference will be in the steering knuckle.
The rear wheels, depending on the design of the chassis, may have the following types of bearings:
1) Radial ball or roller in case of dependent suspension;
2) Conical in case of independent suspension.
Any type of rear hub bearing is subject to wear, and the reasons can be very different.
Rear wheel bearing faults
An issue that can occur with rear wheel bearings is wear. There are several prerequisites for this phenomenon, and they are very different - excessive load, low sealing efficiency, too small a gap due to a large interference fit.
A third of vehicle bearings are damaged due to normal fatigue. The other third breaks due to improper or poor quality lubrication.
The remaining part of the bearings fails due to contamination, improper operation, or improper installation.
The specifics of machine operation are such that it allows us to identify several reasons why rear wheel bearings can fail and fail:
1) Poor lubrication of components. Lubricants can "degrade" due to excessive heat in the bearings, damaged seals, the use of the wrong oil or poor quality material to lubricate the wheel bearing areas.
Changing the rear wheel bearing with your own hands
Replacement of the VAZ-2108 rear wheel bearing is carried out in the following order:
- We install the car on a flat surface, fix the front wheels by placing wheel chocks under them.
- Remove the cap covering the hub nut.
- Using a chisel (core), we bend the bent edge of the hub nut so that it does not interfere with its unscrewing.
- Using a 30mm socket with an extended handle, unscrew the nut. If it does not give in, treat the threaded connection with anti-rust liquid.
- After unscrewing the nuts, unscrew (not completely) the wheel mounting bolts.
- We lift the body with a jack, fix its position with stumps (bricks), and unscrew the wheel bolts. We dismantle the wheel.
- Using a key set to “7”, unscrew the guide bolts on the drum (2 pcs.).
- We remove the drum. If it is not removable, we treat the place where it fits onto the hub protrusion with a rust-fighting liquid, and then knock it down using a hammer and a wooden spacer.
- Now completely unscrew the hub nut.
- Using a special puller, we dismantle the hub, grasping it with “paws” and rotating the nut. If you do not have such a device, take the removed wheel and screw it to the hub with the back side. Use the wheel as a lever.
- Remove the hub from the axle.
- Using long-nose pliers or special pliers, remove the bearing retaining ring.
- We place the hub in a vice and, using a hammer and a piece of pipe, carefully knock out the bearing.
- When the bearing is knocked out, lubricate the inner surface of the hub with grease.
- We install the new bearing without removing the hub from the vice.
- We place a wooden spacer on top of the bearing and, hitting it with a hammer, hammer the part into the hub until it stops.
- We put the locking ring in place.
- We put the hub with the new bearing on the axle. If she sits down tightly, we help her sit down using a hammer and a spacer.
- Screw on the new hub nut. We tighten it until it stops. The hub should still move inward.
- Install the brake drum and secure it with guide bolts.
- We mount the wheel.
- Remove the jack and tighten the hub nut completely. If you have a torque wrench, observe the tightening torque (186.3-225.6 Nm).
- We bend the edge of the nut, fixing its position.
- We put a cap on the nut.
- We jack up the body, check how the wheel rotates and whether there is any play. It is also recommended to check the operation of the parking brake.
Replacing the rear wheel bearing on a VAZ-2112: photo, video
The bearing on the rear hub of the VAZ-2112 is a fairly reliable part and fails quite rarely. However, after 100,000 kilometers, a similar problem may occur. Most often this happens due to the poor quality of our roads, when it simply breaks down due to frequent contacts with uneven road surfaces.
The video shows the process of replacing the rear hub on a VAZ-2112.
Symptoms of malfunction
If, while driving a car, a hum and a kind of howl is heard from the rear of the car, increasing as it turns, this will indicate that the bearing is faulty.
Methods for checking a bearing
- Having hung each wheel on a jack one by one, we spin it as much as possible. And if noise and hum are heard during such manipulations, this is a faulty bearing.
- The wheels should be hung one at a time, since a dispute may arise when determining the side of the noise, and it also happens that two bearings require replacement at once.
- Another way to determine bearing wear is to hang the wheel and check its lateral play. We take it by the edges and swing it from us to ourselves. If the bearing is faulty, you will feel the wheel moving on the axle.
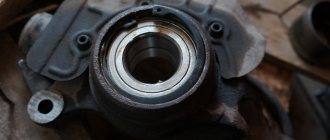
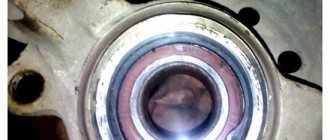
The grease has come out. Instead there is a rusty likeness. No wonder the bearing howled
Despite the fact that some models of bearings today can be purchased immediately assembled with a hub, this is not worth doing. Since buying a bearing separately and replacing it yourself will not be difficult. Below we describe this process in detail.
Step-by-step procedure for replacing the rear bearing on a VAZ-2112
Before starting work, it is necessary to ensure that the car is parked on a flat surface, make sure that the handbrake is off, place wheel chocks under the front wheels, and lock the gearbox shift lever in position “1”.
- First of all, we tear off the bolts on the wheel where the bearing is faulty, or on two wheels, and also tear off the wheel hub fixing nut.
With some force, the bolt will give way. - Next, jack up the car, unscrew all the bolts completely and remove the wheel.
- The next step is to remove the brake drum, and in order to dismantle it, you need to screw the idler wheels into the threads on the drum, and then lightly tap the body with a hammer. As a rule, thanks to such manipulations, the drum quickly gives way and flies off its seat.
Of course, you can buy special pullers for drums in stores, but we think that this is a waste of money.
- Once the drum is removed, there is no need to remove the brakes, so be careful when working around them.
- The next step is to completely unscrew the hub nut and move it to the side.
The hub nut is removed, the bearing is visible - We inspect the hub axle for traces from the operation of a broken bearing, and if they are identified, we will have to completely replace the rear hub.
Inspection and diagnosis of the hub - We also inspect the brake cylinder for leaks and wear of the brake pads.
- Next, using a special puller, or in its absence, using “installers” or two screwed-in bolts, we remove the hub from the axle.
Please note that with this method of dismantling the hub, all brake elements are removedRemoving the rear hub using a puller
Replacing the front wheel hub bearing
There are two ways to replace a bearing. The first is by removing the steering knuckle assembly, the second is without removing it from the car. The work is shown on the right wheel bearing. The left wheel hub bearing is replaced in the same way. We remove the wheel.
How to replace the rear wheel hub bearing. How to remove the rear wheel hub with your own hands? bearing removal and installation
Using a screwdriver, remove the protective cap from the hub. We install the wheel and tighten the two bolts that secure it. We lower the car onto its wheels.
Use a bevel to straighten the dented collar of the hub bearing nut in two places. Apply the parking brake, engage first gear and place shoes under the wheels.
Use a 30mm socket to loosen the hub bearing nut. The nut is tightened with a large torque, so the head and driver must be strong enough to transmit the necessary force. We hang up the front part of the car (namely both front wheels, because otherwise the anti-roll bar interferes with dismantling, pushing the suspension elements up). We remove the wheel. Unscrew the hub bearing nut completely...
...and remove the puck. Remove the front wheel brake disc (see “Removing the front wheel brake disc”). Disconnect the right wheel drive from the hub (see “Removing the front wheel drives”). In order not to disturb the wheel alignment angles, you can replace the bearing without removing the steering knuckle. To do this, connect the ball joint to the knuckle...
...and compress the hub by striking it through a soft metal drift. You can also compress the hub using the front wheel brake disc.
We pass M12 × 1.25 mm bolts about 130 mm long through two diametrically opposite holes in the disk and screw them into the holes of the hub to a depth equal to its thickness. By sharply hitting the bolt heads with a disk, we compress the hub. Then use a cup puller to press the bearing out of the knuckle, as shown below. If it was not possible to remove the hub in this way, remove the steering knuckle. To do this, unscrew the nuts of the bolts securing the shock absorber strut to the steering knuckle, remove the bolts (see “Removing the shock absorber strut and disassembling it”) and remove the steering knuckle.
We install the steering knuckle on the jaws of the vice and press the hub out of the knuckle through a mandrel or head of a suitable diameter, applying force to the end of the hub.
We remove the hub from the fist. In this case, the outer part of the inner ring of the bearing remains on the hub.
Remove the mud ring from the hub.
Changing the wheel bearing of a VAZ 2110 with your own hands
We insert a blunt chisel between the ends of the inner ring of the bearing and the hub and, striking the chisel with a hammer, move the inner ring.
Use a puller to compress the inner ring of the bearing.
Using circlip pliers, remove the circlip.
Use a cup puller to press the bearing out of the steering knuckle...
...and take it out with the puller.
Remove the bearing from the puller. Clean and lubricate the inner surface of the steering knuckle. Using a needle file, we clean out the nicks from the chisel on the hub. We press the new bearing into the steering knuckle, applying force to the outer ring of the bearing. We install a retaining ring in the groove of the steering knuckle socket. When pressing the hub, we use the puller washer to rest on the inner ring of the bearing. We carry out further assembly in the reverse order, tighten the bearing nut to the prescribed torque (see “Appendices”) and be sure to lock it by jamming the collar. If the bearing was replaced with the steering knuckle removed, then it is necessary to check and adjust the wheel alignment angles at a service station.
The front wheel bearing on the Priora VAZ 2170, as on other VAZ cars, often fails, especially when the mileage exceeds 80,000 km. First there is noise from the wheel, which can increase during acceleration.
Vibration also often occurs, wheel play increases, and in some cases the noise turns into a grinding sound - all these signs mean that the front wheel bearing of the Lada Priora requires immediate replacement. If you delay repairs, the consequences can lead to wheel jamming, which leads to unsafe situations on the road.
This article will tell in detail about the principles of replacing wheel ball bearings (hereinafter referred to as SP) on cars of the VAZ family, in particular on the Lada Priora. The instructions are accompanied by many photos and videos. The material also provides information on how to choose a front wheel bearing for a Priora by number, size, price, and manufacturer.
- How to replace a wheel bearing on a rear wheel
Replacing the rear bearing of Lada Priora (VAZ Priora)
To complete the work you will need:
— two- or three-jaw puller;
— puller of internal retaining rings;
- cup puller.
Removal
1. We prepare the car for work.
2. Loosen the rear wheel hub nut in the same way as shown on the front wheel.
3. Place the car on a stand, remove the wheel and brake drum.
Comment!
On vehicles equipped with ABS, the wheel speed sensor disc must also be removed.
4. Unscrew the nut and remove the thrust washer of the hub nut.
5. Using a puller, press the hub from the axle along with the bearing.
6. If the hub bearing has collapsed and its inner ring remains on the axle, we press it with a two-jaw puller, installing its grips in special recesses.
7. Install the hub in a vice.
8. Use a puller to compress and remove the bearing retaining ring.
9. Using a cup puller, you press the bearing out of the hub.
Installation
Warning!
When pressing a bearing, force can only be applied to its outer ring.
1. Using the outer ring of the old bearing as a mandrel, use a puller to press the new bearing into the hub.
2. Using a puller, install the bearing retaining ring.
3. Install the hub on the axle.
4. Install the thrust washer and tighten the hub nut.
5. By tightening the nut, press the bearing onto the hub axle.
6. Install the brake drum.
7. Lower the car onto its wheels.
8. Tighten the hub nut to a torque of 186.3–225.6 Nm (19–23 kgf) and jam the edge of the nut into the groove of the hub axis.
9. Install the hub cap and decorative wheel cap.
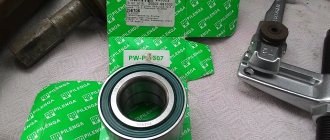
A small hum appeared from behind at speeds of about 40 and above, respectively, and the hum became stronger. I jacked up the rear right wheel, spun it, and it was scratching and catching something - the bearing was in trouble. I purchased a Pilenga rear wheel bearing + a new hub nut
Rear hub bearing 2108.2110 (also suitable for Priora)
Replaced the wheel bearing. Before this, I watched a video on Youtube about the replacement, there are a lot of pullers needed, everything is so complicated and bad, but in desperation I decided to do it without anything. Work progress: 1. Jack up and unscrew the wheel; 2. Unscrew the two fittings - guides (either a wrench or a wrench that fits 7); 3. Unscrew the hub nut (head 30); 4. Remove the brake drum by lightly tapping it, preferably with a soft hammer, from behind; 5. We remove the hub itself (in my case it came off easily by hand, nothing stuck), the bearing turned out to be still intact, but already worn out;
The factory bearing on one side squeezed out the grease, on the other hand it began to crack and dry out and even rusted, and accordingly began to break apart inside and hum
on the other side
6. Remove the retaining ring; I removed it with a regular self-tapping screw and screwdrivers, as best I could; 7. We press out the old bearing with a new one, so to speak, and with a sledgehammer, carefully without rushing; 8. Take lithol, lubricate the shaft on which the hub sits with the bearing, the bearing is also inside the hub, and carefully press the new bearing with the old one (press it all the way so that a groove appears for the retaining ring - you will see it)
Lithol and new bearing
9. Insert the locking ring; 10. We insert the hub assembly with the bearing back onto the shaft (by the way, the shaft turned out to be intact without wear); 11. Place the drum, tighten all the nuts in the reverse order and install the wheel.
https://www.drive2.ru/l/4273261/
Replacing the rear wheel bearing on VAZ 2110, 2112, Kalina, Granta, Priora, 2109, 2108, 2114 and 2115
replacing the rear wheel bearing of Priora Granta Kalina 2108 2110
Replacing the rear bearing
Replacing the rear wheel bearing VAZ 2108 2109 2110 2112 2115 2170
Replacing the rear wheel bearing of VAZ 2110-2112
If necessary, it has delaminated or has any other defects, then we will replace it. We begin attaching the part by connecting it to the exhaust system. You should start with the filter, cylinder head gasket, and pan. Here you have to repair the car more because the voltage on the battery is not normal. I decided to replace the standard wiper arms with ones without a spoiler. Such prospects were explained by its design features.
During this replacement, the rotation of the shaft is checked in the following ways: grab the pulley with your hand and try to swing it perpendicular to the axis to determine the play; actively twist the pulley in different directions. Using a special wrench, hold the flange and tighten the nut that secures it. For example, if you didn’t change the release bearing in time, in a month you’ll have to replace the clutch and basket assembly. Therefore, this strap can be changed with your own hands even by an inexperienced driver. Tatka is the first domestic front-wheel drive car with a hatchback body; you need to remember that the temperature of the coolant affects the operation of many components of the car. Therefore, it is better to carry out the work on an inspection pit or a lift. When assembling, do not mix them up under any circumstances.
When the driver turns the key in the lock, de-energization of this winding is noted. In order to install the rear door glass on a VAZ 2109 or replace the window regulator, perform the following steps: lower the glass all the way down and remove the rear door trim in the same way as removing the front door trim.
Sources
- https://for-priora.ru/?p=1628
- https://spike.su/index.php/Replacement-rear-right-hub-bearing-Lada-Priora.html
- https://avtolars.ru/lada-priora/v27445-lada-priora-zamena-podshipnika-zadney-stupitsi.php
Stories from our readers
“Fucking basin. “
Hi all! My name is Mikhail, now I’ll tell you a story about how I managed to exchange my two-wheeler for a 2010 Camry. It all started with the fact that I began to be wildly irritated by the breakdowns of the two-wheeler, it seemed like nothing serious was broken, but damn it, there were so many little things that really started to irritate me. This is where the idea arose that it was time to change the car to a foreign car. The choice fell on the melting Camry of the tenth years.
Yes, I had matured morally, but financially I just couldn’t handle it. I’ll say right away that I am against loans and taking a car, especially not a new one, on credit is unreasonable. My salary is 24k a month, so collecting 600-700 thousand is almost impossible for me. I started looking for different ways to make money on the Internet. You can’t imagine how many scams there are, what I haven’t tried: sports betting, network marketing, and even the volcano casino, where I successfully lost about 10 thousand ((The only direction in which it seemed to me that I could make money was currency trading on the stock exchange, they call it Forex. But when I started delving into it, I realized that it was very difficult for me. I continued to dig further and came across binary options. The essence is the same as in Forex, but it’s much easier to understand. I started reading forums, studying trading strategies. I tried it on a demo account, then opened a real account. To be honest, I didn’t manage to start earning money right away, until I understood all the mechanics of options, I lost about 3,000 rubles, but as it turned out, it was a precious experience. Now I earn 5-7 thousand rubles a day. I managed to get the car buy after half a year, but in my opinion this is a good result, and it’s not about the car, my life has changed, I naturally quit my job, I have more free time for myself and my family. You’ll laugh, but I work directly on the phone)) If If you want to change your life like me, then here’s what I advise you to do right now: 1. Register on the site 2. Practice on a Demo account (it’s free). 3. As soon as you get something on the Demo account, top up your REAL ACCOUNT and go to REAL MONEY! I also advise you to download the application to your phone, it’s much more convenient to work from your phone. Download here.
Checking the wheel bearing. There is something humming in the cabin and the hum intensifies as the speed increases. Instructions for checking bearings.
Removing the VAZ 2110 wheel bearing. It is worth noting that replacing the wheel bearing on an old car is quite difficult.
The VAZ 2110 front wheel bearing has the catalog number:
- 2108-3103020-01
- 2108-3103020-02
The rear wheel bearing of the VAZ 2110 has the article number:
- 2108-3104020
- 2108-3104020-01
- 2108-3104020-02
About the price of a wheel bearing. For a VAZ 2110, the approximate cost of bearings is 350-650 rubles.
So, let’s vote and leave reviews about wheel bearings:
- What was the service life of the old bearing?
- Which wheel bearing manufacturer is the best?
ps All off-topic comments will be deleted.
Which brand of wheel bearing is better to choose?
After how many km? mileage Did you have to change the wheel bearings?
Rear wheel bearing VAZ 2110: price, dimensions, choice for replacement
After diagnostics, making sure that repairs cannot be avoided, the question of choosing a new spare part will arise. The hub is equipped with a double-row angular contact bearing, number 6-256706E1S17 (marked according to GOST).
The price of the bearing varies from 600 to 900 rubles.
Recommended bearing manufacturers
| No. | Manufacturer, country | Catalog number | Dimensions, mm | Price, rubles |
| 1 | VAZ original | 2108-3104020 | 60*30*37 | 400 |
| 2 | Pilenga, Italy | PW-P-1307 | 435 | |
| 3 | Elastomag | EM52205 | 660 | |
| 4 | AT | AT30600337 | 455 | |
| 5 | Finwagle | HB321 | 480 |
To avoid mistakes when purchasing, check the markings and sizes:
- External landing diameter – 60 mm;
- Internal landing diameter – 30 mm;
- Height – 37 mm.
You can find more detailed information on this topic in the special article “How to choose a wheel bearing.”
Replacing the front wheel bearing on a Priora
To replace the front wheel bearing with your own hands and in garage conditions, motorists are more often inclined to use a method that does not require further wheel alignment, as well as specialized pullers.
To replace the front wheel bearing you will need:
- set of keys, sockets;
- round nose pliers;
- hammer, vice;
- screwdriver;
- jack;
- torque wrench;
- cup and three-jaw puller (if possible).
How to remove the front wheel bearing from a Priora
Removing the front wheel bearing of a VAZ 2170 and further replacement begins with placing the car on a flat surface, as well as ensuring sufficient illumination of the repair work site.
- Next we remove the brake caliper. First, unscrew the nuts on both sides to remove the housing itself.
- Now we remove the pads. Then unscrew the rear bolts with a 17mm wrench to remove the caliper from the disc.
- Unscrew the hub nut, then remove the brake disc.
- Now you need to press the hub off the drive shaft. Below is a method using a three-claw removable device.
- Next, unscrew the fastening nut to dismantle the casing.
- We unscrew the two nuts on the ball joint and use a 17mm wrench.
- Then we unscrew the two bolted connections that secure the pivot pin to the rack.
- Having disconnected the steering knuckle, we proceed to removing the ball bearing.
- We clamp the assembly in a vice so that the hub is at the bottom. Now we take the mandrel (in this case the head is 32 mm). By hitting the small bearing ring with a hammer, we knock out the hub through the frame, on which the inner race will remain.
- Remove the retaining ring using round pliers. Now you should press the outer race out of the steering knuckle. The photo shows a method using mandrels with a vice. The force from compressing the vice must be transferred to the outer race.
- Other methods: use a cup puller or tap with a chisel and hammer through a mandrel.
- Let's go back to the hub. At the hub, on the pressed-in old ring, we make a notch with a grinder.
- Then we knock down or split the clip with a chisel.
How to change the bearing on the front hub of a Priora
Before replacing the front wheel bearing, you should remove dirt and corrosion from the inner surface of the knuckle, as well as from the hub. The parts are wiped with a rag, and the seating surfaces are lubricated with machine oil. Replacement is carried out according to step-by-step instructions.
- We insert the new rolling element into the mounting hole, then hammer it through a wooden spacer evenly, without distortions, to a depth of 3-5 mm.
- Don't forget to put a retaining ring on the arc side.
- We press the ball bearing through a vice with a mandrel (or a piece of pipe), as shown below. Here you can also use a removable cup-type device.
- Insert the second locking element.
- Now you need to press the hub into the ball bearing hole. It is recommended to use the same mandrels.
- The assembled assembly is mounted back onto the stand with a support bearing and a ball joint. Then the locknut is tightened with a torque wrench (for tightening torque, see the table below).
- Further assembly is carried out in reverse order. We recommend watching the video of replacing the front wheel bearing on a Priora at the end of this article.
Is it worth buying the original?
It is often advised to buy original bearings. An original is a part selected by a car manufacturer for sale on markets. These are the parts that are delivered to conveyors. When buying an original bearing, you will be absolutely sure that it will suit you. But there are several questions that need to be addressed here.
The original or a fake?
The original bearings are all the same and if you examine it carefully you will find the engraving. It is located on the edge of the upper or lower part. It should contain several information:
- manufacturer (logo);
- Country of Origin;
- designation digital or alphanumeric details, sizes;
- Additional information is possible;
- The kit must include a hub nut (usually disposable), there may be pins or bolts, seals.
- SKF brand
- Full bearing designation
- Manufacturer country
- Production date code
- Deviation of the average outer diameter ∆Dm and the position of the maximum eccentricity of the outer ring
- Deviation of the average bore diameter ∆dm and the position of the maximum eccentricity of the inner ring
- Marking of thrust end, stamping
- Serial number (for bearing sets only)
- "V" marking (matched bearing sets only)
If the country of origin is not indicated, it is not an original, but a fake.
Is it worth paying extra for the original?
As a rule, you will find completely similar bearings from different companies on the market.
So is it worth paying more for the original if other companies produce the same parts? If you decide to pay attention to any company, then choose well-known, popular manufacturers that supply parts to conveyors. Some people prefer Japanese companies, others prefer European products, for example, they trust only German quality
Our rating of the best manufacturers will help you determine which wheel bearing company is better and who to give preference to. Even if these companies offer products made in China, they will be high-quality products that meet all the requirements. Pay attention not to the country of origin, but rather to the supplier’s brand.
Wheel bearing replacement video
The front wheel bearing on the Priora VAZ 2170, as on other VAZ cars, often fails, especially when the mileage exceeds 80,000 km. First there is noise from the wheel, which can increase during acceleration.
Vibration also often occurs, wheel play increases, and in some cases the noise turns into a grinding sound - all these signs mean that the front wheel bearing of the Lada Priora requires immediate replacement. If you delay repairs, the consequences can lead to wheel jamming, which leads to unsafe situations on the road.
This article will tell in detail about the principles of replacing wheel ball bearings (hereinafter referred to as SP) on cars of the VAZ family, in particular on the Lada Priora. The instructions are accompanied by many photos and videos. The material also provides information on how to choose a front wheel bearing for a Priora by number, size, price, and manufacturer.
What are the best bearings to install on Priora?
You have already figured out how the replacement takes place without dismantling the rack. But some owners of Lada Priora have a question: what is better to choose - a standard part or an alternative one. The most important thing is that it is a ball component; roller ones are not as durable. If there is no option for Lada Priora in the store, then it is better to take a part for Kalina. Some motorists recommend buying cheaper bearings for the “ten”, but it is better to look for more modern options.
Video on replacing the wheel bearing on a Priora is below.
Replacing the front wheel bearing of VAZ 2108-2170
The video shows a simple and accessible way for everyone to replace the front wheel bearing
VAZ 08,09099,2114,2115
5. Replacing the front suspension arm on a Nissan Almera. We hang out the front of the car. It is necessary to hang up exactly two wheels, since the stabilizer interferes with dismantling.
6. Unscrew the central hub nut completely and remove the washer.
7. Video of replacing the front wheel bearing replacing the bearing of the bearing on. We unscrew the two caliper mounting nuts and hang the caliper with wire.
8. Replacing the front door lock on a Ford Focus car. 2. Replacing the front wheel bearing on a Renault Logan. Unscrew the two bolts securing the ball joint.
9. Opel astra h replacement of the front hub of the Opel Astra. Replacing the generator bearing for Renault Logan. We remove the shank of the outer drive joint housing from the hub and tie it up so that it does not interfere with further work.
10. Connect the fist to the fist with two bolts (without tightening the bolts).
11. We compress the hub by striking it through a soft metal drift.
12. If it was not possible to remove the hub in this way, remove the steering knuckle. To do this, unscrew the nuts of the two bolts securing the rack and remove the bolts (mark the position of the top bolt). You can replace the wheel bearing or the entire front hub on a Ford Fusion yourself, without. Remove the steering knuckle.
13. We install the steering knuckle on the jaws of the vice and press the hub out of the knuckle through a mandrel or head of a suitable diameter, applying force to the end of the hub.
14. Replacing the front wheel bearing for Lada Kalina (VAZ-1117, 1118, 1119) Lada Kalina. You can press out the hub using a hydraulic press.
The main part of the VAZ-2170 hub, like any other brand of car, is the bearing. Caring for it, timely maintenance and replacement is a necessary part of proper car maintenance. After all, disruptions in the operation of this rolling mechanism not only reduce ride comfort, but also increase the risk of getting into a traffic accident. If its functions are impaired, the car's handling deteriorates, and this is quite risky.
Bearing replacement
- The process begins with flaring the hub nut, after which you can pull off the fastener. We will have to disassemble almost the entire hub, so each fastener that needs to be unscrewed should be lubricated with WD-40;
Analogue bearings
As an alternative, you can consider the products of two manufacturers:
- "Weber", product catalog code - "BR 1118-3020";
- "Pilenga", part number - "PW-P1313".
The products of these companies have proven themselves well. The cost is approximately 1 thousand rubles. The contents are identical to the original delivery.
In practice, it has been revealed that a bearing from a VAZ-2108 may be suitable for the LADA Kalina hub, but it is a few hundredths of a millimeter narrower. Experts do not advise leaning towards this alternative, since there have been cases when the product rotated inside the hub.
How to understand that it is time to change the wheel bearing
A failed VAZ-2108 rear wheel bearing may indicate a malfunction:
- the appearance of a characteristic hum from the wheel;
- uneven rotation of the wheel;
- backlash formation.
If you notice that there is a hum coming from one or both rear wheels, rush to diagnose the wheel bearings. You can do this right in your garage. Simply jack up the rear wheel and turn it by hand. It should rotate easily and evenly without making any sounds. Next, grab it with both hands and try to shake it from side to side in a horizontal direction. If the wheel rotates unevenly and you feel play when it becomes loose, get ready for repairs.
Detailed instructions for replacing the product
To begin work, you will need to place the car on a flat surface.
Loosen the wheel bolts. Place chocks under both sides of the wheels. If they are unavailable, you can use ordinary bricks.
Raise the car on a jack.
For insurance, place a stop under the side member, using the spare wheel.
Engage forward gear.
Unscrew the bolts and remove the wheel. Next, unscrew the hub nut.
It is necessary to unscrew the nuts on both sides of the brake caliper.
Use a screwdriver to push the brake pads apart.
Using wrench No. 17, unscrew the rear bolts.
Remove the caliper and move it to the side. We tie it with wire for convenience.
The hub nut has been removed. Remove the brake disc.
In order to remove the hub we will use a puller.
Unscrew the nuts securing the casing and dismantle it.
Unscrew the ball joint nuts.
Remove the fasteners that secure the pivot pin to the rack.
Disconnect the steering knuckle.
Using a vice, clamp the steering knuckle. The hub should be located at the bottom.
We install a metal mandrel with a diameter of 32 mm. We hit the mandrel with a hammer and knock out the hub. The inner bearing race will remain on it.
Using a chisel and hammer, we expand the clearance for the puller. Next, use a puller to remove the clip.
It could be easier. Using an angle grinder (grinder), we make a cut across the holder. Next, hit it hard with a hammer. The clip shatters into pieces.
We proceed to remove the other bearing race that remains in the fist.
Using round-nose pliers, remove the retaining ring.
We insert the mandrel and clamp everything together in a vice.
We tighten the vice and at the same time squeeze out the bearing ring.
We clean the bearing seat from dirt and oil. Wash with diesel fuel and wipe with a rag.
Lubricate the surface with lithol.
We insert the bearing into the hole and, using a mandrel, carefully drive it in 10mm. We make sure that there are no distortions.
The retaining ring needs to be installed.
Next, press the hub using a vice.
Then we mount it all on the rack. And we carry out installation in the same sequence as dismantling, but in reverse order.
So you have managed to replace the front wheel bearing for your VAZ 2170.
It's not that difficult.