An external sign of wear on the oil seals (valve seals) is the short-term appearance of blue smoke from the exhaust pipe when starting the engine after a long period of parking or when braking the engine after a long period of driving under load. Moreover, constant smoking is usually not observed.
Also, indirect signs are increased oil consumption, oily spark plug electrodes, and oil leaks on the valves.
Similar signs are observed when the caps jump off the seats of the valve guides.
The caps can be replaced without removing the cylinder head. It is more expedient to carry out this operation in conjunction with the replacement of timing parts or during a planned adjustment of the thermal clearances of the valves.
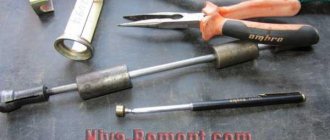
For this we need: - A set of valve stem seals Ø8 mm - A pair of crackers (optional) - An installation sleeve (if available) or a heat shrink tube Ø8-10 mm - A rod of tin solder Ø7-8 mm or other soft metal - A piece of cord or wire - Torque wrench - Wrenches and socket wrenches for 7,8,10,13,17 - Valve depressurizer - Collet puller-mandrel (preferably) or narrow-nose pliers for removing caps - Mandrel for pressing in caps - 0.15 mm feeler gauge or rack for adjusting the thermal gap valves - Tweezers or magnetic screwdriver - Screwdriver, hammer
So, turn off the engine and let it cool. Remove the cylinder head cover and align the timing marks at the top dead center (TDC) of the 4th cylinder.
In this position, the pistons of the 1st and 4th cylinders will be installed in the TDC position, which will prevent the valve from falling into the cylinder during “drying” and will make it easier to fix it with a tin rod.
Loosen the chain tensioner, unscrew the fastening nut and remove the camshaft sprocket along with the chain. Without allowing the chains to jump, we tie them together and secure them from falling into the engine crankcase so that the valve timing does not go astray.
We remove the bed with the camshaft.
We unscrew the spark plugs and use a flashlight to make sure that the piston of the 1st cylinder is in the upper position. Having overcome the force of the spring, remove the rocker (lever) of the valve, and then the spring itself.
Using a suitable socket, we apply a light blow with a hammer to the upper plate of the valve tension springs to facilitate the process of “de-drying” in the future.
We insert a tin rod into the candle hole under the valve, put on the desiccant and, pressing the plate, remove the released crackers with tweezers or a magnetic screwdriver. Then remove the desiccant, the upper plate with springs, and the support washer of the small spring.
Using a collet inertial puller, with light blows of the striker, remove the cap from the valve guide. If this device is not available, as a last resort, you can use narrow-nose pliers.
However, you should work very carefully, since they can easily damage the guide bushing made of fragile metal-ceramic, which threatens unscheduled repair of the head.
We wipe the seat, put an installation sleeve on the valve stem (usually included with the caps) or a heat-shrinkable one of suitable diameter, so as not to damage the working edge of the cap on the groove for the crackers.
If there is significant play and wear on the working surfaces of the guide bushings and valve stem, it is desirable and necessary to thoroughly degrease the seats to prevent the caps from slipping off the guides.
We put the cap on and move it to the guide, having previously lubricated its working edge with engine oil. We remove the installation sleeve, remove the spring from the cap, put on the mandrel and lightly press the cap until it stops, put the spring back on.
We install the springs, plates and “dry” the valve back, remove the desiccant.
After this, while the piston is still at TDC, remove the rod and apply several gentle blows with a hammer to the valve stem to make sure that the crackers are securely in place.
We install the spring and rocker in place.
Similarly, we change the caps on the second valve and on the valves of the 4th cylinder. Then, holding the sprocket with the chain, rotate the crankshaft 180°, and the camshaft, respectively, 90° and replace the caps of the 2nd and 3rd cylinders. To do this, it is very convenient to use the rear wheel in 4th gear.
We set the crankshaft again to the TDC position of the 4th cylinder and install the camshaft with sprocket in place. We tighten it with a torque wrench with a force of 2.2 kgf m according to the tightening diagram.
After installing the camshaft and tensioning the chain, be sure to adjust the thermal clearances in the valves.
Process video:
Good luck on the roads!
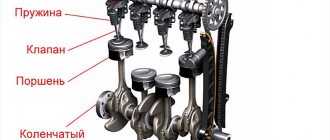
WHY ARE SEALS NEEDED AND HOW THEY ARE STRUCTURED
Engine cylinders need protection from foreign substances entering the combustion chamber. It is the oil seals (or valve stem seals) that play the role of a kind of protector. Their task is to prevent oil from penetrating while the valve stems are operating. If the caps have lost their function, they must be replaced. Otherwise, carbon deposits will begin to appear on the walls of the engine, which will lead to increased oil consumption.
A running engine causes all elements of the gas distribution mechanism to constantly move. They rub against each other, which inevitably leads to wear. To reduce the wear rate, oil gets onto the surface of each element. In this case, you need to ensure that the oil does not end up in the working area of the valves. Otherwise, the motor will begin to malfunction. To ensure that not a drop of oil penetrates into the combustion chamber, oil seals are installed.
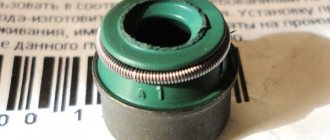
Valve seals have a very simple structure. They consist of only three elements:
- Base. This is the oil seal frame, which is made in the form of a steel bushing. This element ensures the strength of the spare part.
- Spring. It ensures the tightness of the mechanism by pressing the rubber tightly against the valve stem.
- Cap. This is the main element of the device, made of rubber. With its help, excess oil on the rod is eliminated.
SIGNS OF BREAKAGE
To prevent serious problems in engine operation, it is necessary to promptly diagnose and correct oil seal failure.
You can judge the wear of valve stem seals on a VAZ 2107 by the following signs:
- There is an increased release of white or blue exhaust gases.
- Engine oil consumption increases significantly.
- The candles become covered with black soot.
If you find these signs of failure, you need to make sure that the entire gas distribution mechanism is working properly, and not just the caps. Pay special attention to valve diagnostics. If necessary, replace the valve stem seals on the VAZ.
If the problem is not diagnosed and corrected in time, the following consequences may occur:
- the motor will lose dynamics;
- it will begin to work unstably and will often stall at idle;
- the pressure in the cylinders will decrease;
- carbon deposits form not only on the valves, but also on the walls of the cylinders and pistons;
- the tightness of the system will be compromised.
When carbon deposits appear on the engine walls, its service life decreases sharply. If the problem is not corrected in time, the situation will lead to an expensive overhaul of the engine. But these difficulties can be avoided by simply replacing the oil seals on the VAZ 2107.
Removing the caps
To prevent the crankshaft from turning, it is necessary to install a tin rod in the holes for the spark plug of the first cylinder. After this, install the desiccant so that its bracket rests against the valve plate. Press the plate to compress the spring. Take out the crackers located on the groove.
After this, it is necessary to dismantle the plate, spring, and support washer. Be sure to remove the desiccant. The oil seal is pryed off with a flat screwdriver and removed. If the valves are being replaced, you will need to completely remove the cylinder head. But there is no need to remove the cylinder head if you are only replacing the valve stem seals of the VAZ-2107. Just check the dimensions with those that were installed earlier. New elements must fit tightly into the seats.
WHEN IS IT TIME TO REPLACE
Over time, the sealing material of the valve stem seals becomes hard. As a result, it loses its elasticity, which leads to oil leakage into the cylinder. The same problem occurs when the piston rings are faulty.
The caps are changed in cases where oil leaks occur without visible places. Watch how the exhaust behaves while driving. Brake the car sharply with the engine, and then also sharply press the gas pedal. If this leads to the appearance of thick smoke from the muffler, then it is time to replace the seals.
Thick, bluish-colored smoke may appear on the car even after a long period of parking.
It's easy to explain. If the caps are worn out, this leads to oil entering the engine cylinder. If the piston rings are worn out or coked, the engine behaves a little differently. Smoke will remain behind the car only when driving uphill or during rapid acceleration.
If, in addition to smoke, you observe an increase in fuel consumption, a decrease in engine dynamics and problems during startup, this may all be evidence of wear and tear on the mechanisms.
Replacement process
- Completely dismantle the air filter housing. Immediately remove the cover and pull out the filter, then unscrew the fastening nuts from the carburetor and remove the entire housing.
- We remove the gas pedal linkage, as well as the choke cable on the carburetor.
- We unscrew all the valve cover fastening nuts around the perimeter and remove all the spark plug wires for convenience. You can also remove the distributor cover.
- We dismantle the clamping washers under the nuts and remove the valve cover.
- We install the first cylinder at TDC, aligning the marks. We turn the engine by the crankshaft pulley bolt clockwise.
- Loosen the chain tensioner and unscrew the camshaft sprocket mounting bolt. After unscrewing the bolt, remove the star from the camshaft. The chain must be left directly on the sprocket; you can wrap it with wire so that it does not come off.
- Unscrew the camshaft mounting nuts and remove it.
- We dismantle the rocker with springs. The main thing is not to confuse them during assembly; each rocker must be put in its place.
- Unscrew the spark plugs.
- We have TDC installed, which means the oil seals can be changed on the first and fourth cylinders. The valves on the first and fourth cylinders will not fall into the cylinder after desiccation, because they are supported by the pistons.
- We dry out the valve, for example, you can start with the first cylinder. We squeeze the valve spring, remove the “cracker” with tweezers and the valve is free.
- We remove the valve springs and gain access to the oil seal.
- We put on the puller and remove the cap.
- We put the cap on the valve stem by hand and then use the device to put it in place. You need a device that rests on the inside of the cap so that with a light blow of a hammer you can put it in place.
- We put on the springs and “dry” the valve.
- Using the technology described above, we change the valve caps on the first and fourth cylinders.
- We crank the engine and support the valve pistons on the second and third cylinders. Make sure that the chain does not fly off the sprocket when turning.
- We change the caps on the valves of the second and third cylinders.
- We install the springs and rocker in their places.
- We install the camshaft and align the TDC marks. There are duplicate marks near the crankshaft pulley, make sure that they also line up.
- Install the RV star and tighten the fastening bolt.
- We tighten and tighten the camshaft mounting nuts with a torque of 2.2 kg, according to the diagram below.
To see the process of replacing valve stem seals on a VAZ 2107, see this video:
HOW TO REPLACE CAPS ON A VAZ 2107
- Drain approximately two liters of coolant.
- Remove the air filter housing and throttle linkage if you have a carburetor.
- Remove the valve cover.
- Place the first cylinder in top dead center mode.
- Loosen the chain tension nut.
- Remove the camshaft gear mounting bolt.
- Remove the sprocket and chain and secure them with wire to prevent a possible fall.
- Remove the bearing housing and rockers.
- Remove the candles. To prevent the valve from falling into the cylinder, be sure to plug the spark plug hole with a tin rod.
- Using a valve remover, remove the "crackers".
- Using a screwdriver, carefully pry and remove the oil seal.
- Before installing the new one, do not forget to lubricate the surface of the rod with oil.
- Replace the springs and other parts.
- Repeat all the described operations with each cylinder, installing them at TDC.
After completing all the work, return the crankshaft to its original state, install the bearing housing, camshaft gear and chain. The remaining elements are installed in reverse order.
Preparing for work
Before you start, it is recommended that you watch the video on replacing valve stem seals on your car. From the very beginning, you should thoroughly wipe the upper part of the timing belt, as well as the mechanism cover.
To make it more convenient, you need to unscrew the air filter housing, wrap the carburetor with film or cloth to prevent foreign objects, moisture and dirt from getting into it during operation. Unscrew the spark plugs and remove the cover with the gasket.
The 4th cylinder must be moved to TDC (top dead center) on the compression stroke. For this purpose, the crankshaft should be rotated to a position in which the intake and exhaust valves of the 4th cylinder remain in the closed position before and after TDC. This location of the piston should be determined by the distance between the valves and rocker arms.
You can find out what position the piston is in using any rod by measuring the distance in the spark plug hole. You should also check whether the marks on the sprocket and the housing match.
How to replace valve stem seals on a VAZ-2107
Fortunately, a process such as replacing valve stem seals on a VAZ-2107 is far from the most difficult thing you may encounter when repairing your car. The main thing in this matter is to be as careful as possible, and then replacing the valve stem seals will be quick and successful. The entire procedure is no different depending on what is under your hood, an injector or a carburetor, except that the carburetor will need to be removed before starting work. It is important to make the replacement without removing the head - this is an easy and simple method that most car enthusiasts can handle.
Replacement of VAZ 2107 engine valves
The need to replace VAZ 2107 valves arises in the following cases:
- the valves are bent due to a skipped timing chain or as a result of severe wear on the rod;
- the plate cracked;
- The valve itself burned out.
For repairs, you will need to purchase new valves and prepare the tools used when replacing valve stem seals. In addition, the cylinder head must be removed from the engine. This is done as follows:
- Use a 10mm socket to unscrew the cylinder head fasteners.
Replacing valve guides
Valve bushings (valve guides) are designed to guide the movement of the valve stem. Thanks to the precise fit of the head on the seat, the combustion chamber is sealed. The correct operation of the valves largely depends on the serviceability of the seats and guides, which wear out over time and begin to negatively affect the operation of the engine. In this case, the bushings and seats must be replaced.
If the bushings are heavily worn, oil consumption increases, valve stem seals fail, and lubricant gets into the cylinders. As a result, the temperature regime of the engine is disrupted, and carbon deposits form on its individual parts. The main signs of guide wear:
- increased oil consumption;
- the appearance of noise in the cylinder head area.
To make sure that it is the bushings that are faulty, you need to open the hood and listen to the engine. If uncharacteristic sounds and noises are heard, then it will be necessary to diagnose the valves and their guides.
For repairs you will need:
- hammer;
- sweeps at 8.022 and 8.028;
- mandrel for pressing out and pressing in bushings.
Replacement of valve bushings is carried out on the removed engine head in the following sequence:
- We hit the mandrel with a hammer and knock out the valve guide.
Replacing the valve seat
The operation of valves with seats, like the entire engine, is associated with exposure to high temperatures. This can lead to the formation of various defects on parts, such as holes, cracks, and burns. If the cylinder head overheats, misalignment may occur between the valve sleeve and the seat. As a result, the tightness of the connection will be broken. In addition, the seat wears out faster along the cam axis than in other places.
To replace the seat, you will need to remove it from its seat. The required set of tools and equipment may vary depending on the capabilities of the car owner:
- machine;
- electric drill;
- hammer;
- metal attachment;
- old valve.
The saddle can be dismantled in the following ways:
- Using a machine. The saddle is bored and becomes thin and less durable. During the process, the remaining part of the seat is rotated and removed with pliers.
- Using an electric drill. A small abrasive wheel is clamped into the drill chuck, the tool is turned on, and it is cut into the saddle. At a certain point, the part can be removed due to loose tension.
- By welding. The old valve is welded to the seat in several places. The valve together with the seat is knocked out with hammer blows.
Installation of a new seat is carried out in the following order:
- To ensure the required tension of 0.1–0.15 mm, the cylinder head is heated on a gas stove to 100 °C and the seats are cooled in the freezer compartment of the refrigerator for two days.
- Press the seat into the engine head with gentle hammer blows through the adapter.
- After the heads have cooled, they begin to countersink the seats.
It is best to cut the chamfer on a machine. Rigid fastening of the part and centering of the cutter will ensure high accuracy, which cannot be obtained using hand tools. If this is not possible, you can use cutters and a drill.
Three edges are cut on the saddle with cutters with different angles:
The last edge is the narrowest. It is with this that the valve will come into contact. After this, all that remains is to grind the valves.
Video: replacing the valve seat
Grinding in VAZ 2107 valves
Grinding in the valves is necessary to ensure the tightness of the combustion chamber. It is performed not only after replacing the seat, but also when compression in the cylinders decreases. Grinding can be done in the following ways:
- on a special machine;
- hand cutter;
- mechanically.
Since special equipment can only be found in car repair shops or machine shops, in garage conditions the latter option is the most common. For manual grinding you will need:
Grind the valves in the following sequence:
- We put a spring on the valve and insert its stem into the bushing.
When is it time to change caps?
Experienced car drivers can easily understand when a replacement is necessary. Moreover, this is easy to do with your own hands, without resorting to the help of specialists from the workshop. If you see the following signs, it means it's time to change the caps.
- Black carbon deposits appeared on the spark plugs. It is important to understand that we are not talking about soot, but about soot. Soot may indicate other problems.
- Presence of blue smoke. The reason for this is a strong oil coating.
- Very high oil consumption. It is difficult to bring an engine to this state and is considered a serious problem. When the oil seal in the engine is too worn out, it will “drink” oil with such thirst that it will simply fly out through the exhaust. Therefore, you should not be surprised when, after driving just a couple of hundred kilometers, you find that you have no oil left at all, even though it was recently filled in.
Signs for repairing valve stem seals
However, this is not a panacea; there are several signs that it is time to change the valve stem seals:
- Increased oil consumption. Of course, you shouldn’t bring the engine to this state, but this situation can still arise. So, with severe wear, the oil seal becomes a filler neck, which only leads to even greater consumption. If this situation occurs, then goodbye oil after a couple of hundred kilometers. It's hard to believe, but it comes straight out of the exhaust pipe;
- Blue smoke from the exhaust pipe. It is accompanied by an oil deposit at the end of the pipe;
- Black carbon deposits on spark plugs. Moreover, it should be carbon deposits, not soot.
Replacing caps
Before you start working on the carburetor, it must be removed. Before that, you need to disconnect the negative terminal of the battery.
Don't forget to also remove the air filter, then follow the following diagram:
- Remove the valve covers and carefully place all the nuts and washers in a separate container.
- Then you need to start cranking the crankshaft. It is very important to obtain a position where the pistons of the fourth and first cylinders are both at top dead center. Only in this case are both valves completely free.
- Then remove the chain tensioner by unscrewing the nuts that secure it.
- Now you can begin to unscrew the housing mounting nuts. After the nuts have been unscrewed, it must be removed directly from the camshaft.
- It is important to insert a tin rod into the spark plug hole, and then use it to support the bottom of the valve.
- Then you need to take the desiccation tool and secure it to a pin. We will dry out the first and fourth valves, and the main thing is to do it sharply.
- At the next stage you should be extremely careful, because it’s time to get out the plates, crackers and springs.
- Once we got all this out, it is important to put on the puller and remove the caps. Then insert a new cap.
- Then we return the plates, crackers and springs.
- After the operation with the first and fourth cylinders is completed, rotate the crankshaft 180 degrees and do the same with the remaining cylinders.
- Then we put everything back together in reverse order.
At this stage, we have successfully replaced the valve stem seals. Now you don't have to worry about your car losing oil faster than it gets it. Always monitor the condition of your engine and oil level, because this will have a positive effect on the life of the car.
Removing oil seals
Replacing valve stem seals on a VAZ 2107 begins with disassembling part of the gas distribution mechanism and removing the old caps. To do this, you must perform the following operations:
- Unscrew the spark plugs using a special wrench;
Note: after removing the spark plugs, check their condition and replace if necessary.
- Unscrew the timing cover bolts;
- remove the cover;
- set the camshaft position according to the marks;
- bend the petals of the lock washer that prevents the camshaft sprocket mounting bolt from unscrewing;
- unscrew the bolt;
Tip: to prevent the camshaft from turning, you must engage the first gearbox speed.
- unscrew the chain tensioner fastening;
- remove the tensioner;
- remove the sprocket;
Advice: so as not to have to re-adjust the position of the chain on the sprocket teeth, you need to tie the chain to the sprocket with wire and place it on the cylinder block.
- unscrew the nuts securing the camshaft bearing housing;
- remove the housing with the camshaft;
- remove the rocker (rocker arms) of the valves.
To remove the valve stem seals, perform the following operations on each of the intake and exhaust valves:
- insert a tin rod (8 mm in diameter) into the spark plug hole to prevent the valves from lowering;
- fasten the puller (depressurizer) to the studs so that the bracket rests against the valve spring plate;
- press the puller onto the plate, compress the valve spring and pull out the crackers from the valve groove;
- remove the desiccant;
- dismantle the springs with the plate and support washer;
- pry it up with a screwdriver and remove the oil seal.
Note: replacement of VAZ 2107 valves is also carried out using a desiccant. But before the operation, it is necessary to remove the engine head to ensure that the valves can be removed and installed.