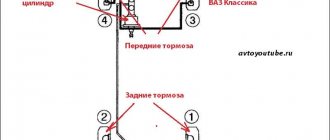
checking and adjusting brakes on VAZ 2110 VAZ 2111 VAZ 2112 cars
Checking pipelines and connections To prevent sudden failure of the brake system of the VAZ 2110, VAZ 2111, VAZ 2112, carefully check the condition of all pipelines and connections, paying attention to the following: metal pipelines should not have nicks, scratches, burrs, active foci of corrosion and should be located away from from sharp edges that can damage them;
brake hoses must not have any cracks on the outer shell or signs of chafing visible to the naked eye; they should not be exposed to mineral oils and lubricants that dissolve rubber; by pressing the brake pedal firmly, check to see if any swelling appears on the hoses, indicating their destruction; all pipeline fastening brackets must be intact and well secured; loosening or destruction of brackets leads to vibration of pipelines, causing their breakdowns; Do not allow fluid to leak from the connections of the master cylinder with the tank and pipelines; if necessary, replace the tank bushings and tighten the nuts without subjecting the pipelines to deformation. When tightening the pipeline nuts, use the wrench 67.7812.9525. Eliminate any detected faults by replacing damaged parts with new ones. Flexible hoses, regardless of their condition, should be replaced with new ones after 125 thousand kilometers or after five years of operation of a VAZ 2110, VAZ 2111, VAZ 2112 to prevent sudden ruptures due to aging.
Checking the functionality of the vacuum booster VAZ 2110, VAZ 2111, VAZ 2112
Press the brake pedal 5-6 times with the engine off to create equal pressure close to atmospheric in cavities A and B (see Fig. 6-2). At the same time, by the force applied to the pedal, make sure that the valve body is not jammed. Keep the brake pedal depressed and start the engine. If the vacuum booster of the VAZ 2110, VAZ 2111, VAZ 2112 is in good working order, the brake pedal should “move forward” after starting the engine. If the brake pedal does not “go forward”, check the fastening of the hose tip, the condition and fastening of the tip flange in the booster, the hose to the tip and the fitting of the engine intake pipe, since loosening the fastening or their damage sharply reduces the vacuum in cavity A and the efficiency of the booster.
rice.
6-2. Vacuum booster: 1 - vacuum booster housing; 2 — amplifier housing cup; 3 - rod; 4 — adjusting bolt; 5 — rod seal; 6 — sealing ring of the main cylinder flange 7 — diaphragm return spring; 8 — amplifier pin; 9 — tip mounting flange; 10 - valve; 11 — hose tip; 12 - diaphragm; 13 — amplifier housing cover; 14 — sealing cover; 15 - piston; 16 — protective cover of the valve body; 17 — air filter; 18 — pusher; 19 — pusher return spring; 20 — valve spring; 21 - valve; 22 — valve body bushing; 23 — rod buffer; 24 — valve body; A - vacuum chamber; B - atmospheric chamber; C, D - channels Adjusting the brake drive of VAZ 2110, VAZ 2111, VAZ 2112
The free play of the brake pedal when the engine is not running should be 3-5 mm. The adjustment is carried out by moving the brake light switch 7 (Fig. 6-11) with nut 6 released. Install the switch so that its buffer rests against the pedal stop, and the free play of the pedal is 3-5 mm. In this position of the switch, tighten nut 6.
rice.
6-11. Brake drive: 1 — master cylinder; 2 - tank; 3 - vacuum booster; 4 — brake pedal bracket; 5 — brake light switch buffer; 6 — brake light mounting nut; 7 — brake light switch; 8 - brake pedal WARNING Adjust the free play of the brake pedal when the engine of the VAZ 2110, VAZ 2111, VAZ 2112 is not running. If the brake light switch is too close to the pedal, it does not return to its original position.
In this case, valve 21 (see Fig. 6-2), pressing against body 24, separates cavities A and B, which opens air access to chamber B, and the wheels are incompletely released when the pedal is released. If moving the brake light switch cannot eliminate the incomplete release of the brake mechanisms, then disconnect the brake master cylinder from the vacuum booster and check the protrusion of the adjusting bolt 4 relative to the mounting plane of the master cylinder flange (size 1.25-0.2 mm). This size can be set by holding the end of the rod with a special wrench, and with another wrench, tightening or unscrewing bolt 4.
The purpose of the sorcerer
Where is the oil pressure sensor on the Kamaz
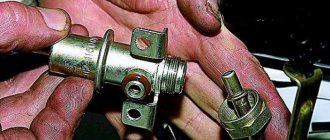
? The so-called sorcerer on the VAZ-2109 is necessary to automatically change the fluid pressure in the rear brake cylinders depending on the load acting on the car when the speed decreases. This element is used in both hydraulic and pneumatic drive systems.
The main purpose of changing the pressure is to prevent possible wheel locking and skidding of the rear axle of the car.
In some car models, in order to maintain their controllability and stability, a regulator is additionally installed in the brake drive of the front wheels.
In addition, on the VAZ-2109 the sorcerer is used to increase the braking efficiency of an empty car. The traction force of a loaded car and an empty one is different, so the force on different axles must be adjusted. In the case of a loaded and empty machine, static type regulators are used. Automatic solutions are installed in trucks.
In sports cars, manufacturers often install a screw adjuster. It is located inside the car and adjusts the balance of the brake system directly during the race. It is adjusted based on weather conditions, road conditions, and tire quality.
Basic faults and brake repair options
KamAZ GTK for cab
The best fix is prevention. When operating the VAZ 2108, it is necessary to strictly adhere to the scheduled maintenance periods for the brake system. This applies to the friction linings of the front disc and rear drum brakes. Complete wear of the friction linings threatens unexpected brake failure in an extreme situation. Periodically check the condition of the linings, monitor their level of wear, and replace if necessary.
Carefully monitor the brakes of the VAZ 2108 in terms of fluid leakage through worn gaskets and seals. Excessive wear of the sealing elements is fraught with the risk of insufficient force in the brake cylinders, failure of the pedal when driving the VAZ 2108, and an increase in the braking distance. All this creates very serious risks. Brakes are a critical safety system for drivers, passengers and other road users.
How to check and adjust
Brake cleaner
If during the braking process the car slows down ineffectively, the car is pulled in one direction, the car often skids, then this is a signal that you need to check the unit and adjust the sorcerer on the VAZ-2109.
To check, the car is driven into a pit or overpass. Defects will be detected visually. Most often, the inspection shows that repair is not possible.
If we talk about adjustment, it is better to do it on an overpass. The adjustment greatly depends on the position of the body. Adjustments must be made after each maintenance. Adjustment is also necessary if something from the suspension has been changed. If there has been repair work on the rear beam or it has been changed, this also requires adjustment.
To adjust the device, use a wrench to slightly loosen the bolt securing the sorcerer to the lever. Then use a screwdriver to move the bracket until the gap allows you to insert a drill into it two millimeters. Next, the bolt needs to be tightened.
The regulator on the “ten” and previous models becomes very sour during the operation of the car. The bracket cannot be moved. In this situation, you can douse it with WD-40, and then use a hammer to move the part to the side.
Adjusting the sorcerer
After the regulator has been replaced, all that remains is to figure out how to adjust the sorcerer on the VAZ 2114.
This should be done as follows:
- Rock the car from side to side several times.
- Use a screwdriver to press the sorcerer pin with such force that the gap between it and the spring is 2 mm (you can check this using a feeler gauge or, more conveniently, the shank of a drill of the appropriate diameter).
- Tighten the first adjusting bolt.
- Check the size of the gap again.
- If it remains unchanged, then tighten the second adjusting bolt.
At this point, the configuration of the sorcerer can also be considered complete.
As you can see, replacing and adjusting the sorcerer will not be difficult for a motorist even with little experience. The only thing worth remembering once again when finishing this article is that you should check the condition of the brake pressure regulator periodically, and if obvious signs of malfunction appear, replace it immediately.
VAZ 2115 Checking and adjusting brakes
6.3.1 Checking and adjusting the brakes
Checking pipelines and connections Checking the functionality of the vacuum booster Adjusting the brake drive Adjusting the parking brake system Checking the functionality of the pressure regulator on the car Removing air from the hydraulic drive Replacing brake fluid
6.3.2 Checking piping and connections
To prevent sudden failure of the brake system, carefully check the condition of all pipelines and connections, paying attention to the following: – metal pipelines should not have nicks, scratches, rubs, or active foci of corrosion and should be located away from sharp edges that could damage them; – brake hoses must not have any cracks visible to the naked eye..
6.3.8 Replacing brake fluid
To ensure that no air gets into the hydraulic drive system when replacing the brake fluid and that a minimum amount of time is spent on this operation, adhere to the following rules: - proceed in the same order as when bleeding the brakes, but use a hose with a glass tube at the end, which you lower into a container with brake fluid; – while pressing the brake pedal, pump out the old brake...
Examination
Symptoms of a sorcerer malfunction on a VAZ 2110 appear when braking:
- Pulling the car to the side;
- Skidding;
- Insufficient brake performance.
The VAZ 2110 has a sorcerer on a bracket under the bottom, slightly to the left, in the area of the rear wheels. It is better to work with it on a lift, overpass or inspection hole. The main defects are easily detected during external inspection. Brake fluid leaks indicate wear or damage to the seals.
Sorcerer (RDT) installed on the bottom
If the sorcerer's piston has turned sour and does not move, then this is also determined visually when the assistant smoothly presses the brake pedal several times. In both cases, repair is impractical and replacement is necessary.
Everything is in order if the regulator is clean, the gap between the drive lever and the plate is 2 mm, the rod moves when the pedal is pressed.
A good sorcerer must provide:
- Uniformity of braking forces on the rear wheels;
- Rear brakes engage later than front brakes;
- Adjustment of this delay, depending on the vehicle load.
Without a sorcerer
Knowing what the sorcerer's job is on the VAZ-2109, it is not difficult to guess what will happen if it is absent from the brake system. And the following will happen. The car will brake with all four wheels together. The wheels are blocked sequentially - first a pair of wheels on the rear axle, and then the front ones. The risk of an accident increases, since the driver moving behind is unlikely to react in time to a sudden maneuver. A collision will be inevitable.
A sorcerer in the car is very necessary. A VAZ-2109 car without a sorcerer can be very dangerous not only for others on the road, but also for the driver himself. This car is practically uncontrollable in a skid.
Only those who know exactly and understand well what they will get in the end remove the sorcerer. This is mostly done by professional racing drivers.
But some car owners still remove the sorcerer. At the same time, there are even claims that the car began to brake faster and better. Experts say it only seems so. In fact, everything is a little different. The problem here is that in the event of sudden braking, both pairs of wheels will jam in succession.
Checking the brake pressure regulator of VAZ 2114, VAZ 2115, VAZ 2113
/ / / / / We bleed the brakes of the Lada 2113 ourselves, check the brakes of the Lada 2115, the hydraulic brakes of the VAZ 2113, VAZ 2115, VAZ 2114.
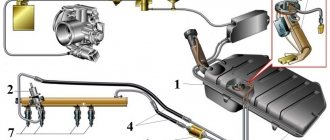
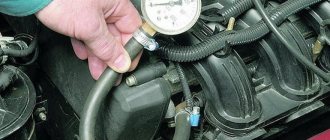
Place the Lada Samara 2 car on a lift or inspection ditch, clean the pressure regulator and its drive parts from dirt.
Pressure regulator VAZ 2114: 1 – pressure regulator body; 2 – piston; 3 – protective cap; 4, 8 – retaining rings; 5 – piston sleeve; 6 – piston spring; 7 – body bushing; 9, 22 – support washers; 10 – sealing rings of the pusher; 11 – support plate; 12 – pusher bushing spring; 13 – valve seat sealing ring; 14 – valve seat; 15 – sealing gasket; 16 – plug; 17 – valve spring; 18 – valve; 19 – pusher bushing; 20 – pusher; 21 – piston head seal; 23 – piston rod seal; 24 – plug; A, D - chambers connected to the main cylinder; B, C - chambers connected to the wheel cylinders of the rear brakes; K, M, N - gaps
Pressure regulator drive VAZ 2115: 1 – pressure regulator; 2, 16 – pressure regulator mounting bolts; 3 – bracket for the pressure regulator drive lever; 4 – pin; 5 – pressure regulator drive lever; 6 – axis of the pressure regulator drive lever; 7 – lever spring; 8 – body bracket; 9 – pressure regulator mounting bracket; 10 – elastic lever of the pressure regulator drive; 11 – earring; 12 – earring bracket; 13 – washer; 14 – retaining ring; 15 – bracket pin; A, B, C - holes
By external inspection, make sure that the pressure regulator of the Lada Samara 2 and its drive parts are not damaged, there is no leakage of brake fluid, plug 24 is recessed into the housing hole by 1–2 mm, there is no play in the connection of the earring 11 with the elastic lever 10 and the pin 15 of the bracket. Ask an assistant to press the brake pedal of the VAZ 2114, VAZ 2115, VAZ 2113. At the same time, piston 2 should move out of the body by 1.6–2.4 mm, compressing the leaf spring 7 until it stops against lever 5. Lever 5, overcoming the force with side of the elastic lever 10, will rotate relative to pin 4. Non-compliance with the listed requirements, lack of piston stroke, as well as its insufficient or excessive stroke indicate a malfunction of the regulator or its drive. In this case, repair or replace the pressure regulator, and after installing it, adjust its drive (see subsection “Adjusting the VAZ 2113 pressure regulator drive”).
- —
Checking pipelines and connections of the brake system of VAZ 2114, VAZ 2115, VAZ 2113
—
—
—
—
—
—
Replacing brake fluid
Replacing brake fluid VAZ 2114, VAZ 2115, VAZ 2113
Operation and repair of the brake system of the Lada 2113. Checking the regulator, cylinder, brake booster of the Lada 2114. Maintenance of the front and rear brake mechanisms of the Lada 2115.
Adjusting the braking forces of Lada Vesta
The operating principle of the system that regulates and distributes brake fluid pressure on Lada Vesta cars is fundamentally different from previous models, and there is no “witchcraft” in it. The Lada Vesta brake pressure regulator is directly connected to the ABS system and is electronically regulated depending on the speed of each wheel.
The ABS control unit transmits signals from speed sensors and analyzes the situation. The system “understands” any skidding and allows you to distribute the braking force with maximum efficiency. The pressure is controlled by the valves in the ABS hydraulic block, and there is no need for any magic. In addition, the electronics itself detects all malfunctions and reports them to the driver using a special lamp on the dashboard.
One of the reasons for the car skidding or pulling to the side when braking may be a malfunction of the pressure regulator. It is recommended to replace a faulty pressure regulator as an assembly.
You will need: a flat-blade screwdriver, a 8- or 13-size wrench, a 13-size socket wrench (head), a special 10-size wrench for loosening the brake pipe nuts.
1. Using a screwdriver, remove the lock washer of the elastic arm of the regulator drive and the flat washer installed under it.
2. Disconnect the elastic lever with the shackle from the rear suspension beam.
3. To avoid having to adjust the pressure regulator drive during installation, mark the position of the drive lever relative to the bracket.
Place a container under the junction of the pipes with the regulator, since liquid will flow out from there, and use a special “10” wrench to unscrew the four nuts securing the brake pipes.
Disconnect the tubes from the regulator. Plug the pipe openings, for example, with protective caps for the wheel cylinder bleeder valves.
Label the tubes so as not to mix them up when installing the regulator later.
6. Using a 13mm wrench, remove the front bolt securing the regulator to the bracket
7. Using a 13mm wrench, remove the rear regulator mounting bolt
8. Remove the regulator with drive from the vehicle.
This is what the pressure regulator and its drive look like when removed from the car
9. If it is necessary to replace drive parts, use a screwdriver to pry the earring bracket away from the elastic lever
Brake force regulator device
It is mounted on a body bracket and connected on passenger cars to the rear axle beam via a rod and torsion bar. The second end of the last element acts on the regulator piston. The regulator input is connected to and the output is connected to the rear. The device is controlled by a drive connected to the rear beam. As for the design, the brake force regulator consists of a housing divided into several cavities (usually two). One of them is connected to the main cylinder, the other to the rear system. There are also pistons and valves that block access
When work starts, the pressure in the two chambers is the same. However, in the first, the liquid acts on a smaller area of the piston, while in the second, on a larger area. The piston strives to move, but cannot do this due to the centering spring. If the pressure in the master cylinder begins to increase, then the piston can easily overcome the force of the spring, causing the valve to block the flow of fluid. This is the classic principle of operation of the brake force regulator. Today there are hydraulic elements, pneumatic, and electronically controlled.
Typical faults
There are very few malfunctions that occur in this part. These include stuck valves, misalignment, and leaks.
If the sorcerer is upset, he can be adjusted. And they determine whether adjustment is needed by the behavior of the car. If the setting is off, then when braking the car will throw from side to side. If the valves are stuck or the brake fluid is leaking, the part needs to be replaced. Theoretically, repairs are possible, but the complexity and cost make it unprofitable.
The regulator may fail to operate only in two cases - at the maximum possible load and at a speed limit above 80 kilometers per hour. In this situation, the speed does not drop quickly, so the rear axle is not unloaded.
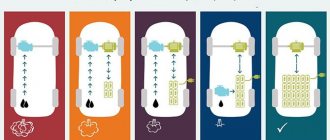
How does the brake force regulator work during braking?
When the driver sharply presses the pedal, the rear part of the body will rise, and the front, on the contrary, will lower. And at this moment the brake force regulator begins its work. Once the device is running, it will immediately allow the rear wheels to begin to reduce speed immediately after pressing the pedal. The fact is that if the wheels on the rear axle of the car begin braking at the same moment as the front axle, then there is a high probability of skidding.
If the wheels on the rear axle begin to slow down later than the front ones, then the risk of skidding is reduced to almost zero. When the car slows down, the distance between the bottom and the rear beam increases at the rear. While this gap grows, the lever releases the regulator piston and, thanks to this, the fluid line that goes to the rear wheels is blocked. As a result, they will not lock, but will continue to rotate.
How to bleed the brake system on a VAZ 2113-VAZ 2115?
Note! Bleeding the brakes is carried out on a car with an assistant, although it is possible without one, but it will be more difficult, and the article itself is written on bleeding the system only with an assistant!
On cars of the Samara 2 family, the bleeding system must be replaced in sequence, namely first the rear right wheel, then the front left, then the rear left and only after that the front right, generally diagonally starting from the rear wheel first!
1) At the very beginning of the operation, open the hood of the car and then unscrew the cap of the reservoir containing the brake fluid by hand. (The location of this cover is indicated by an arrow in the photo below, but only it is turned out)
2) Then, if possible, take brake fluid of the same brand, and add it to the MAX mark in the same tank, and if you bought new fluid and decided to replace it, then for more detailed information on replacing brake fluid, see article: “Replacing brake fluid on a VAZ.” (By the way, in this article to which a link is given, at the very bottom there will be a section “Important!”, be sure to read it, a lot of interesting things are said there)
3) Next on the rear right wheel, find a small cap that covers the bleeder fitting, and after you find this cap, remove it and clean it of dirt.
4) After this cap is removed from the fitting, take the pre-prepared hose in your hands and put one end of it on the fitting, and lower the other end into a transparent plastic bottle, preferably. (If you don’t understand about the hose and the bottle, then for an example with a hose and this very bottle, see the photo below in paragraph “6”)
Note! The bottle into which you will lower the hose must be filled with brake fluid and the tip of the hose must be in this very fluid!
5) Then, when everything is done, tell your assistant to get behind the wheel of your car and then let him smoothly press the brake pedal 7-8 times and at the very end, that is, when he presses the last eighth time, let him press this pedal will remain pressed all the way.
6) And at this time, start using a wrench to carefully unscrew the bleeder fitting, but in no case do you need to unscrew it completely, you just need to loosen it a little by 2-3 turns and after which you should see how the brake fluid goes into the bottle liquid.
Note! Wait and watch carefully how the brake fluid drains, by the way, you will see in it those same air bubbles that should not be present in the system under any circumstances, so continue to drain the fluid from the system until the release of bubbles into the bottles stops, and when the release of bubbles will stop, then screw the fitting all the way and only after that let your assistant take his foot off the pedal!
Be sure to keep an eye on the level in the tank while the fluid is draining; under no circumstances allow this level to drop to zero, otherwise air will get into the system and you will have to start pumping the brakes all over again, so always keep an eye on the fluid and top it up if possible !
7) After your rear right wheel has been bled, do exactly the same operation with the left front one, the same fitting on the front wheels is located slightly differently, see the photo below for more details:
Note! When this circuit is pumped, proceed to bleeding the next circuit, that is, the rear left wheel and then the front right!
Additional video clip: To make it more clear to you about how to bleed the brakes, we have prepared a video clip for you just below, it contains a bunch of excellent tips that will be useful to you in life, but this video, as you have already seen from the title, is aimed only at cars of the ninth family, but it also applies to cars of the Samara 2 family since the braking system of these two cars is almost identical!
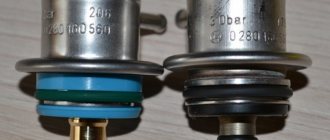
One of the most mysterious, but no less important parts of the car is the brake force regulator (sorcerer VAZ 2114).
The importance of this part is that it regulates the behavior of the car under different braking conditions. When the regulator operates correctly, the braking distance is reduced and skidding and skidding are prevented.
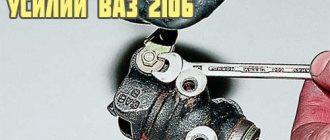
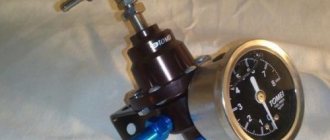
Replacing the sorcerer with a VAZ 2114 tee
Among some car enthusiasts, such a technical procedure as replacing the standard brake force regulator with a so-called tee is popular. The reasons for this replacement are constant complaints from car owners about problems with the sorcerer, for example: - Initially incorrect operation of the new product; - For souring of the element. As a result, failure or improper operation of the braking system; - Other problems.
In other words, driving with a faulty sorcerer is fraught with consequences in the form of skidding, which at high speeds can lead to serious accidents and overturning of the car. Conversely, driving without a brake force regulator is safer (compared to a faulty regulator) due to the fact that only two front wheels are involved in braking, the rear wheels are not blocked at all.
Some car owners simply get rid of the sorcerer. In this case, only the front wheels are used for braking. Other car enthusiasts install a tee instead of the sorcerer VAZ 2114. The tee ensures simultaneous blocking and, accordingly, uniform distribution of braking forces between four wheels. This approach has its pros and cons.
Here's the diagram
Disadvantages of using a tee: — Uncomfortable and dangerous braking in winter conditions (icy conditions); — Possibility of skidding (in cases where the rear wheels lock faster than the front wheels).
Pros: — Sharper and more responsive brakes; — Lower cost of the part; — Increased service life.
Both cars and trucks consist of many components. One important component is the brake force regulator. Not all motorists know how this element works and works. But if it is faulty, an unpleasant surprise may occur for the driver during emergency braking. Car owners call this component of the braking system the “sorcerer”. This node received this name because its work was very mysterious and unpredictable. Let's try to understand the structure, operating principle and adjustment of this regulator.
Sorcerer VAZ 2114 operating principle
The sorcerer comes into operation in situations of sharp braking, when the car “nods off”, and the rear part, on the contrary, rises. In this situation, the device temporarily stops the supply of brake fluid to the rear wheels, thereby preventing them from blocking at the same time as the front ones. As a result, the car does not skid. In other words, the device redistributes the braking forces at the required moment. If the sorcerer malfunctions, there is a risk of sending the car into a skid or even overturning during an emergency stop.
The feasibility of installing a vacuum brake booster
The vacuum booster dramatically improves the driving comfort of the VAZ 2108. It reduces the pedal effort required to stop the car. All modern cars are equipped with a vacuum booster. Domestic and imported. Nowadays, it is impossible to imagine a car without a vacuum brake booster.
The amplifier is aggregated with the master brake cylinder and is mounted on a shield separating the engine compartment from the interior of the VAZ 2108. It is connected to the engine crankcase with a flexible hose to supply rarefied air necessary for the operation of the amplifier. A malfunction of the amplifier is clearly indicated by a noticeable increase in the force on the brake pedal. Braking acceleration decreases.
Continuing your trip with a broken amplifier is very risky.
You can drive to the nearest car service center with caution. A cracked hose can be wrapped with several layers of electrical tape.
If replacing the cracked hose and check valve does not produce results, the unit must be replaced.
Work on removing the amplifier is carried out in this order.
- Disconnect the negative battery terminal. De-energize the electrical system.
- Disconnect the wiring block from the hydraulic reservoir cap located on the brake master cylinder body.
- From the passenger compartment, remove the amplifier pusher pin using pliers. Disconnect the pusher.
- Disconnect the hose going to the engine crankcase.
- Unscrew the two nuts securing the brake master cylinder.
- Move the cylinder away from the amplifier housing. Leave it hanging from the metal hydraulic pipes.
- Unscrew the four nuts securing the amplifier bracket to the engine shield and carefully remove the amplifier.
- Unscrew the two nuts securing the amplifier to the bracket. Disconnect the bracket and amplifier.
Install the new VAZ 2108 vacuum booster in the reverse order.
Replacing the sorcerer on a VAZ 2114
Dismantling and reinstalling a non-working device does not cause significant problems and is accessible to almost anyone. The automaker recommends replacing the faulty regulator assembly. To carry out the work you will need:
- flat screwdriver;
- key to 13;
- 10mm socket for removing brake pipes.
The replacement sequence is as follows:
- We provide convenient access to the rear of the car's underbody (we use a lift, pit, or overpass).
- We find the regulator drive lever. We lift the bracket up and release it. If difficulties arise, use a screwdriver to slightly release the bracket.
- Remove the earring bracket.
- Now we disconnect the four tubes from the body of the product. To do this, you need to loosen and unscrew the fastening nuts. To prevent brake fluid from leaking, plug (seal) the holes of all pipes. In the future, in order not to confuse the connections to the regulator, we mark the 4 pipes with different colors or numbers.
- We unscrew the front bolt of the sorcerer (with which it is attached to the bracket).
- From the side of the bracket, unscrew another bolt.
- Remove the complete device (together with the drive).
- After replacing the product, installation is carried out in the reverse order.
Please note that after reinstallation, the earring fastening bracket must be crimped with pliers. In addition, it is necessary to bleed the brake system and adjust the device for proper operation.
How to change the sorcerer
In order to replace a damaged sorcerer, you will first need to purchase a new one. One of the best of this kind is considered to be the brake regulator from. In addition to this, you will also need to purchase a canister of brake fluid, since during the repair process a significant leakage from the system may occur.
To perform the replacement you will need an appropriate set of tools, which includes:
- wrenches “10” (it is highly recommended to use special ones designed for unscrewing brake pipe fittings);
- wrenches “13” (socket and socket);
- a screwdriver with a large blade or a steel spatula;
- feeler gauge (a drill or a 2 mm thick steel plate will also work).
The replacement and adjustment of the VAZ 2114 sorcerer itself should be carried out in the following order:
- Place the vehicle on an overpass or inspection hole.
- Clean the pipe fittings and other threaded connections with a wire brush, then fill them with kerosene or WD-40 and leave it like that for a while.
- Using a screwdriver or a spatula, use a screwdriver or a spatula to pry the clamp-retainer of the regulator drive lever and remove it.
- Disconnect and dismantle the sorcerer lever.
- Unscrew the fittings using a special “10” wrench and immediately plug them with rubber plugs (if you are unable to move the fittings out of place, you should once again flush the threads with “Vedeshka” or kerosene and wait some more time, then try again).
- Unscrew the two sorcerer fastening nuts from the body using a “13” wrench.
- Remove the sorcerer along with its bracket.
- Disconnect the brake pressure regulator from the bracket.
- Attach the new sorcerer to the bracket (there is no need to tighten the bolts all the way).
- Place the bracket with the regulator in its original place, connect the tubes to it and tighten the fittings.
- Connect the lever from the rear beam to the sorcerer and secure it with a clamping bracket (it is important to ensure that the bracket securely grips the lever).
At this point, the installation of the sorcerer can be considered complete, all that remains is to bleed the brake system.
When dismantling the brake pipes when replacing the sorcerer, it is recommended to immediately mark them so as not to confuse them during reassembly.
Replacing the brake pressure regulator on VAZ 2108, VAZ 2109, VAZ 21099
Welcome! Today you will read detailed instructions on how to replace the sorcerer on cars of the Samara family. The first question you ask yourself will sound like this: “What kind of sorcerer, I was looking for instructions for replacing the pressure regulator?” We will explain everything to you in order. The so-called name “Sorcerer” came from the people, and “Brake Pressure Regulator” is its real name.
Note! To replace the pressure regulator, you will need the following tools: First, be sure to stock up on a screwdriver and a small set of basic wrenches. And also for the convenience of unscrewing some nuts, you can stock up on an extension cord with a union head!
- Replacing the brake pressure regulator
- To remove the regulator together with the bracket
- To remove the regulator without bracket
- Disassembling the brake pressure regulator
- Additional video clip
Where is the brake pressure regulator located? The pressure regulator is located on the left side of the body compartment, closer to the rear wheel. But to find it you will need to know what it looks like, if you still don’t understand what it looks like, then look at the very first photo at the top of the article. If you already know what it looks like, then look at the bottom photo where the red arrow indicates its location.
When should you change your brake pressure regulator? The regulator must be replaced if:
Its breakdowns can be very easily identified. Usually, with a faulty regulator, when braking sharply, the car skids, which can be very life-threatening if you are driving on the highway.
Note! With a working regulator, when braking sharply, the car does not go anywhere, that is, it brakes strictly in a straight line, but there is one “But!” The pressure regulator only works when, when braking, the nose of the car goes down and its rear part rises. Otherwise, the sorcerer will not work!
Replacing the brake pressure regulator:
Note! It is recommended to replace a faulty sorcerer with a new assembled one!
Removal: 1) First you will need to drive your car into the inspection hole.
2) Next, use a screwdriver to slightly lift up the bracket of the lever earring; for clarity, it is indicated by a red arrow.
3) Then remove the lever from the hole in the shackle and, as a result, remove the shackle bracket from the lever.
4) Then, using a wrench, unscrew the fittings of all pipes connected to the pressure regulator.
Note! Before unscrewing them, be sure to mark which tube goes where. If you have not done this, then when installing a new sorcerer, watch the video at the very bottom, which describes the correct connection of the tubes!
5) And after unscrewing the fittings, disconnect the brake hose tubes from the regulator.
Note! It is best to plug the holes in the brake pipes with something, because otherwise fluid will leak from the hydraulic drive of the system!
To remove the regulator together with the bracket: 1) Using an extension with a union head, unscrew the two nuts that secure the bracket to the body and then remove it together with the regulator.
To remove the regulator without a bracket: 1) Using a wrench, unscrew the two bolts that secure the sorcerer body to the bracket and then remove the regulator separately.
Installation: 1) Installation of a new brake pressure regulator is carried out in the reverse order of removal.
Note! To connect the tubes to the regulator, use the video located at the bottom of the article!
After final installation of the regulator, be sure to bleed the brake system! (How to bleed the brakes, see the article: “Bleeding the brakes on a VAZ”)
And finally, adjust the regulator drive! (For how to adjust the regulator, see the article “Adjusting the rear brake pressure regulator”)
Adjusting the brake pressure regulator (sorcerer)
1. Place the car on the inspection ditch and press the rear part of the car several times (with a force of about 40–50 kgf) to set the rear suspension to the middle position.
2. Loosen the front bolt securing the regulator to the bracket.
3. Using the wire as a feeler gauge, adjust the bracket so that the gap between the drive lever and the lever spring is 2.0–2.1 mm.
4. To do this, move the drive lever by the protrusion. In this position, tighten the bolt.
5. If the pressure regulator is correctly adjusted, when braking from a speed of about 40 km/h on a horizontal section of the road with a hard surface, the front wheels should lock slightly earlier than the rear (this can be determined by an observer outside the car). Otherwise, increase the gap (if the rear wheels lock earlier than the front ones) or decrease it (if the rear wheels lock much later than the front ones). After this, check the adjustment again by braking and repeat if necessary.