One of the reasons why engine oil consumption may increase is wear of valve stem seals or valve seals, as they are called differently. In this case, the only solution to the problem will be to replace these cylinder head parts with new ones.
To perform this Niva repair yourself, you will need at least the following tool:
- Valve desiccant
- Special cap remover
- Tweezers, long-nose pliers or magnetic handle
But first you will need to perform several actions before getting to the details we need:
- remove the valve cover
- set the gas distribution mechanism to TDC
- remove the camshaft along with the housing
After this, we install our desiccant so that it rests against the valve with a good margin. To ensure that the valve remains in place while the spring is recessed, it is necessary to insert a flexible tin rod or wire through the spark plug hole.
Then press on the desiccant, as shown in the photo below:
This will be shown more clearly and understandably below - you need to achieve a moment when the spring is compressed and the crackers become almost free:
And at this moment you can use a magnetic handle or tweezers to remove the crackers:
Then we remove all the cups and springs of the valve, which has been dried out, and after that, using a special puller, we remove the valve stem seal:
You first need to grab it with the help of special paws on the puller, and then pull it towards you with sufficient force:
After this, new caps (valve seals) are dipped in oil and pressed onto the valve in the reverse order. To do this, you also need to use a puller, just turn it over to the other side.
We similarly carry out all the procedures with the remaining valves and install all the removed parts in the reverse order of removal.
Replacing valve stem seals on a VAZ 2121 is a procedure that does not require specific knowledge or skills. It is quite feasible in a garage (or outdoors); you do not need either an inspection hole or an overpass. Our detailed instructions will help save your time and money.
Main stages
The next point of work is to install the rod in the spark plug hole. Thus, it is located between the piston plate and the valve.
This is followed by placing the pressure bracket of the desuction tool on the spring plate and securing the support bracket using a nut located on the mounting pin.
Now required:
- Compressing the valve spring with a depressurizer;
- Removing two crackers (using tweezers);
- Removing the desiccant;
- Removing the spring plate;
- Removing both springs, both lower and upper;
- Removing the support washer from the intravalve spring;
- Installing the collet of the removable device on the part being removed;
Using the upper striker of the puller, compress the collet (by hitting the lower striker with it) and compress the cap (impacts are applied to the nut).
To protect the replacement part from damage during pressing, a special installation sleeve must be located on the valve stem. Usually it comes with new consumables. Now, having applied lubricant to the inner surface of the cap, it is pressed down along the bushing (all the way).
After this, install the valve elements back and proceed to the next stage - removing the rod and installing the crackers in place (lightly hitting the end of the rod with a hammer). Now we need to replace the parts of the remaining valves, turn the shaft half a turn and install the pistons of the two remaining cylinders (No. 2 and 3) at TDC. In the same way, change all the caps, and then turn the shaft another one and a half turns.
Chevrolet car repair manuals and tips
Guide to replacing valve stem seals
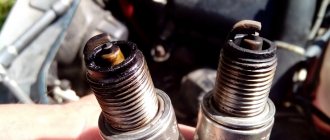
An external sign of wear on the valve stem seals is the short-term appearance of blue smoke from the exhaust pipe after starting the engine, as well as when braking the engine after a long period of driving under load. In this case, constant smoking is usually not observed. Indirect signs are increased oil consumption in the absence of external leaks and oily spark plug electrodes. You can replace the valve stem seals without removing the cylinder head from the engine.
You will need the same tools as when replacing the head gasket and reservoir, as well as pliers, a device for compressing valve springs, an oil seal remover (if possible), round pliers or tweezers for removing valve cotters, a mandrel for pressing oil seals, a hammer and a rod of tin solder with a diameter of about 8 mm (to support the valve).
1. Remove the cylinder head cover (see “Replacing the cylinder head cover gasket”).
2. While turning the crankshaft, align the mark on the camshaft sprocket with the mark (tide) on the camshaft bearing housing (see “Installing the piston of the fourth cylinder to the TDC position of the compression stroke”). In this case, the pistons of the 1st and 4th cylinders will be installed in the TDC position, which will prevent the valve from falling into the cylinder when it is “dry out”, and will also make it easier to fix the valve using a solder rod.
3. Remove the camshaft (see “Replacing the hydraulic bearings of the valve drive levers”).
4. Remove the intake system receiver (see “Replacing the receiver gasket”), as it interferes with installing the device for compressing the valve springs.
NOTE If you have a device that differs in design from the one shown (for example, a screw screwed into a hole in the block head for a hydraulic mount), the receiver may not need to be removed.
5. Remove the valve control arms and...
6. ...lay out the removed parts on the workbench in the order in which they were installed on the engine.
WARNING Do not depersonalize the valve drive parts, as they are worn in to each other.
7. Disconnect the wire from the spark plug of the 1st cylinder, unscrew the spark plug and insert a rod of tin solder (about 8 mm) into the hole for the spark plug to hold the valve in the closed position after “drying”.
NOTE It is not recommended to use a screwdriver or other heat-treated tool to support the valve. In addition to the fact that they scratch the surface of the piston bottom and combustion chamber, when “drying” the valve can break off part of the tool, which will fall into the cylinder.
8. Screw the camshaft bearing housing mounting nut onto one of the studs (most conveniently located for installing the valve spring compressor) and install the intake valve spring compressor.
9. Compress the valve springs with the tool and...
10. ...take out the crackers.
HELPFUL ADVICE If the force of movement of the device lever increases significantly, and the crackers do not come out of the valve groove, apply a light blow to the spring plate with a hammer to release the crackers.
11. Remove the spring plate, outer and inner springs,...
12. ...as well as the support washer of the inner spring.
13. Place the collet clamp of the fixture onto the cap and...
14. ...with light blows of the striker of the device, remove the cap from the valve guide.
WARNING Do not remove the cap using pliers or prying it off from both sides with screwdrivers. The guide sleeve on which the cap is placed is made of cermet, and its edge breaks off easily.
15. If the new caps come with an installation sleeve, place it on the valve stem to prevent the sharp edges of the cotter grooves on the valve stem from damaging the cap's working edge.
16. Lubricate the inside surface of the new valve stem seal with engine oil and slide the cap along the valve stem to the guide sleeve.
17. Install the mandrel for pressing the cap. Using light blows of the striker on the mandrel, press the cap until it stops.
In the absence of a special mandrel, you can use a high twelve-sided tool head of a suitable size.
18. Remove the guide sleeve from the valve stem, replace the inner spring support washer, springs and valve cotters in the reverse order of removal.
USEFUL ADVICE After installing the cotters and removing the device for compressing the valve springs, apply several gentle blows with a hammer to the end of the valve stem so that the cotters are guaranteed to be fixed in the groove of the stem. If the crackers installed skewed remain unfixed, when the engine is started, the “decayed” valve will fall into the cylinder, leading to a serious engine failure.
19. Similarly, replace the oil seals of the exhaust valve of the 1st cylinder and both valves of the 4th.
20. Holding the sprocket together with the chain, rotate the crankshaft half a turn and replace the valve stem seals of the 2nd and 3rd cylinders.
21. After replacing all the caps, turn the crankshaft another half turn and install all the previously removed timing parts.
NOTE Tighten the camshaft bearing housing nuts in the sequence shown in Fig. 4.6 in the subsection “Replacing hydraulic bearings of valve drive levers”, with the torque specified in Appendix 1: Tightening torques of threaded connections.
22. Install the cylinder head cover and all removed components and parts in the reverse order of removal.
How to identify a malfunction
Engine oil entering the engine combustion chamber causes blue smoke to appear, especially when using engine braking. There may be several reasons:
- Worn oil scraper or compression rings
- The oil seals have failed
The first reason is less common and is caused by the use of a non-standard brand of gasoline or oil, violation of engine operating conditions, or the approaching period of major repairs. The second reason, the most common, and easy to fix with your own hands, is what we will consider
Set of tools
To replace the caps you will need the following tool:
- A set of open-end wrenches or a set of heads
- Screwdriver Set
- Special desiccant
- Tin rod (8 mm)
- Inertia puller
- Hammer
- Torque wrench
- Mandrel for installing new caps
- Tweezers or fine-nosed pliers
- Rags
Reasons for replacement
On average, on domestic cars, such as the VAZ 21214 and other models, they are replaced approximately every 80,000 km. For modern imported cars, the interval approximately doubles or triples. Signs of the need to install new caps on the Niva may include:
- High oil consumption
- The appearance of blue smoke when the engine accelerates sharply or, conversely, when braking using the engine;
- Unreasonable increase in gasoline consumption (when covering the same sections of the route and similar driving conditions).
Replacing valve stem seals on a Chevrolet Niva video
Before changing the caps, I read the relevant topics, but as I later realized, everything in those topics was unclear. So, oil consumption is hinting... it's time to change it. We go to the store and buy it - I took it in a blister, "Reserve", / 85 rubles / + desiccant / 180 rubles / Subsequently, it turned out that the caps did not want to be removed and required a device for removal - which I bought turned out to be non-working - I had to edit the pliers using emery to It was convenient to grab the cap. In addition, it is very advisable to buy a solder bar - the choice was POS-60 and POS-40. The second one is three times more flexible - I didn’t appreciate it and fumbled with a piece of copper bar - but in vain that POS-40 would have been THE MOST. A solder rod is needed as a stop between the piston and the valve when you press the valve plate with a desiccant.
Next, as in the instructions, remove the valve cover, jack up the front left wheel, put it in fourth gear, turning the wheel to align the marks on the sprocket and the camshaft bed / by the way, I still don’t understand whether the pin on the sprocket is a mark or not? / we grab the sprocket to the chain with a piece wire, unscrew the sprocket nut, remove the bed, and here they are, the valves. With a short sharp blow with a small hammer through a tubular wrench 8*10, we loosen the seat of the crackers in the cup, stick a piece of solder into the spark plug hole and, pressing with a desiccant, find the position where there is a stop under the valve. Press, remove the crackers, etc. Pull off the old cap. Here I had to get creative - it is not recommended to use excessive force - the bushing where the cap is placed is metal-graphite or something similar. Therefore, it is advisable to spend money on a device for removal / 200 rubles / A new cap - for me they fit tightly - I punched it with a socket head at 12, which in turn was set with the aforementioned 8 * 10 tubular wrench. We changed cylinders 1 and 4 - turning the wheel, we turned the camshaft sprocket a quarter of a turn / don’t forget that it is fixed to the chain with a wire - the fixation point will have to be moved. And we start working with 2 and 3 cylinders. With hydraulics and assembly in the next series.
0 0 vote
Article rating
Replacing valve stem seals — Chevrolet Niva, l., year on DRIVE2
If the crackers cannot be removed, apply a light blow to the valve plate so that they move.
Remove the spring plate, inner and outer springs and the lower support washer. Install the collet clamp of the puller onto the cap and, using light blows, remove it from the valve stem.
Then we turn the crankshaft half a turn so that the pistons in the second and third cylinders rise to top dead center. For this I used a long screwdriver and caught the upper position of the piston through the spark plug hole.
Victor Reinz; Corteco; Elring. It is also recommended to pay attention to original components. Tool To complete the task without errors and unintentional defects, you will need: How to change the valve stem seals The spark plugs are successively removed, the cylinder head cover is dismantled by removing: At the same time, the fastenings of the air supply hoses are unscrewed, the valve stem seals are removed, the 8 bolts of the cover mounting studs with washers are unscrewed .
Signs of wear on valve stem seals
Oil seals are rubber seals that fit onto the necks of the valve stems and protect against oil leakage into the cylinders.
Signs of wear are:
- Engine oil consumption has increased. If the rubber seal does not hold, then the oil goes into the cylinder, therefore, the total volume of oil decreases, which after some time will be noticeable in the dipstick levels. Oil consumption is not necessarily a sign of worn rubber caps. Oil may also leak when the oil rings need to be replaced. Perhaps they have stuck to the piston, this is also called “stuck”.
- Immediately after starting the internal combustion engine, bluish exhaust smoke is observed. This effect occurs when oil accumulates on the piston. When the car was not running, oil flowed into the sump and down the piston rod through a broken oil seal.
- Sometimes the engine stalls. Triple occurs when one spark plug does not spark at the right time or does not produce a spark at all. If oil gets into the cylinder, the spark plug is splashed with oil. This can be checked by unscrewing the spark plugs. If the base of the spark plug is covered in soot and oil, then this is a sign of wear on the caps.
It is useless to use various additives in these cases. It is better to quickly replace failed parts.
Instructions for replacing valve stem seals on a VAZ 2107 (Video)
To replace the valve stem seals of a VAZ 2107 you will need:
Preparatory work
It is advisable to carry out the work in a garage - this will help to avoid dust getting on the timing parts during assembly. It is also necessary to secure the machine with the handbrake and turn on neutral speed so that you can turn the crankshaft during operation.
Replacing valve stem seals on a VAZ 2107 begins with disassembling part of the gas distribution mechanism and removing the old caps. To do this, you must perform the following operations:
Note: after removing the spark plugs, check their condition and replace if necessary.
Tip: to prevent the camshaft from turning, you must engage the first gearbox speed.
Advice: so as not to have to re-adjust the position of the chain on the sprocket teeth, you need to tie the chain to the sprocket with wire and place it on the cylinder block.
To remove the valve stem seals, perform the following operations on each of the intake and exhaust valves:
Note: replacement of VAZ 2107 valves is also carried out using a desiccant. But before the operation, it is necessary to remove the engine head to ensure that the valves can be removed and installed.
When installing new caps, it is advisable to use a special bushing that fits onto the valve stem to avoid damage to the working edge. For the same purpose, the inner surface of the valve stem seal is lubricated with engine oil before installation.
The procedure for installing the oil seals on the valve guide and springs is as follows:
Next you should assemble and adjust the engine timing belt:
Replacing valve stem seals on a VAZ 2107 is quite feasible at home. The most important operation is setting the gap between the camshaft cams and the rocker arms (rockers) of the valves. The operation requires a micrometer or probe. If the gap is too large, the camshaft will knock loudly on the rocker arm while the engine is running, and the valve will not open fully, which will impair engine performance and can lead to burnt out exhaust valves. If there is no clearance, the valve will not close completely. A slightly open valve will worsen engine compression and burn out over time. Therefore, when replacing VAZ 2107 valves or valve stem seals, after removing/installing the camshaft, it is necessary to adjust the clearances. But this is a topic for a separate article.
Replacing valve stem seals for Daewoo Lanos
An external sign of wear on the oil seals is the short-term appearance of blue smoke from the exhaust pipe after starting the engine and when braking the engine after prolonged driving under load. In this case, constant smoking is usually not observed. Indirect signs are increased oil consumption in the absence of external leaks and oily spark plug electrodes.
It is possible to replace the valve stem seals without removing the cylinder head from the engine, but this will require a complex device for compressing the valve springs without removing the camshaft, which is difficult to find commercially. You can use a universal tool for this purpose by removing the camshaft housing, but since the body and cylinder head are secured with the same bolts, you will have to replace the head gasket. Therefore, we recommend replacing the oil seals on the removed cylinder head.
You will need: all the tools necessary to remove the cylinder head (see “Replacing the cylinder head gasket”), tweezers for removing the crackers from the valve spring retainers...
...and a device for compressing valve springs.
1. Remove the cylinder head (see “Replacing the cylinder head gasket”).
2. Remove the pressure levers and lever cotters (see “Replacing hydraulic valve compensators”).
| 3. Install a valve spring compressor onto the cylinder head, securing it as shown in the photo using a hook made from a suitable metal rod. | 4. Place a support under the “breakable” valve (you can use a head of a suitable size from the tool kit), compress the spring and remove the crackers from the spring plate. |
| 5. Remove the upper valve spring retainer, spring... | 6. ...and the lower plate of the intake valve spring... |
| 7. ...or the exhaust valve rotation mechanism. | 8. Using pliers, remove the oil seal from the valve guide. |
| NOTE The valve stem seals are mounted on the guide bushings with a slight interference fit, so they can be removed with pliers without the risk of damaging the bushings. |
9. Lubricate the inner surface of the valve stem seal with engine oil, slide the cap along the valve stem to the guide bushing and, using finger pressure, push the cap onto the bushing until it stops.
| WARNING Install original valve stem seals only by hand without using a mandrel. Trying to press the cap through the mandrel with a hammer will inevitably damage it. |
10. Install the valve spring and plates (rotation mechanism) in the reverse order of removal. Install the cotters using the tool so that they fit into the grooves of the valve stem. After installing the crackers, hit the end of the valve with a hammer through the metal rod so that the crackers sit in place.
| WARNING If the crackers installed skewed remain unfixed, then when the engine starts, the “dry” valve will fall into the cylinder, which will lead to a serious engine failure. |
11. Replace the oil seals of the remaining valves in the same way.
| Rice. 5.4 . Tightening sequence for cylinder head bolts |
12. Install the cylinder head on the engine and the camshaft housing on the head and tighten the bolts securing them in the sequence shown in Fig. 5.4 (see “Replacing the cylinder head gasket”), the moment given in Appendix 1.
| WARNINGS Be sure to replace the cylinder head gasket with a new one. Before installing the camshaft housing on the cylinder head, apply a layer of sealant to the mating surface of the housing to the head. |
13. Install all previously removed parts of the gas distribution mechanism.
14. Adjust the tension of the drive belts of the generator and power steering pump Daewoo Lanos”>generator and power steering pump (see “Checking and adjusting the tension of the drive belt of the generator and power steering pump”), as well as the air conditioning compressor (see “Checking and adjusting the tension of the air conditioning compressor drive belt”).
Video about “Replacing valve stem seals” for Daewoo Lanos
Replacing valve stem seals for Daewoo Nexia
CHEVROLET LANOS cylinder head repair
Replacing valve stem seals without removing the cylinder head
How to change valve stem seals
The spark plugs are sequentially removed, the cylinder head cover is dismantled by removing: the engine screen, holders with a throttle cable and a vacuum brake booster hose.
At the same time, the fastenings of the air supply hoses are unscrewed, the receiver hoses are removed, and the 8 bolts of the studs securing the cover with washers are unscrewed.
The crankshaft rotates until the mark of the secondary drive ring gear aligns with the crankshaft position sensor (CP).
The RV asterisk is placed opposite the mark on the bearing housing.
The camshaft bearing housing is removed.
The valve rockers are removed.
The KV installation allows you to service cylinders 1 and 4, since the highest dead center of the corresponding pistons is fixed in this position. Cylinders 2 and 3 will become accessible after turning the crankshaft 180º.
A special puller is used to loosen the valves.
During the process, the device rests against the spring plate, while the hooking lever is retracted by a nut that is previously screwed onto the stud of the RV housing. At the same time, there should be a rod (preferably made of lead solder) in the spark plug wells.
Moving the lever downward compresses the springs and releases the crackers. They, in turn, should be carefully pulled out with tongs.
After this, the pressure on the spring is removed.
The inner spring and plate are removed from the outer element.
Using a collet clamp, the cap is knocked out of the guide sleeve and completely removed.
All actions are carried out carefully so as not to deform the guide sleeve.
Pressing new oil seals is done in the reverse order - first onto the valve stem, then onto the bushing. As a mandrel for installation, it is possible to use the original mandrel or a tool head with a hammer. Before doing this, it is important to remember to service the valve stem, including cleaning of deposits and lubrication with oil.
It would be a good idea to lightly hit the metal rod in the direction of the end of the valve. This event will allow you to center the crackers and prevent them from falling out.
Upon completion of installation, the HF is turned half a turn.
Replacement must be carried out at the first sign of a problem. This usually happens with a mileage of 100-120 thousand km.
Source: nivachevrole.ru
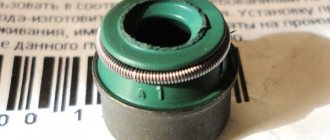
Niva valve stem seals, German manufacturer Goetze
MS caps Goetze Since 2021 I have been working with this manufacturer, the German company Goetze. The brand is currently part of the Federal Mogul concern. I switched to it because the products were complete. Each package contains 2 protective “condoms” for putting caps on the valve. And for some reason they stopped putting them in Victor Reinz boxes. This was the main reason for switching from one manufacturer to another. These valve stem seals are made for valves with an 8 mm stem, so they are suitable for a wide range of engines (VAZ, UAZ, Gazelle). Experience and statistics have accumulated on them in a very large volume. In terms of quality, everything is as it should be - they don’t tan in the cold, they bathe painlessly in gasoline and hot oil. In general, they do what MS caps are supposed to do. At the moment, only Japanese NOK caps may be cooler, but I haven’t found any of their products for these valves. Probably because the 8 mm valve in Japanese engines is from the Mesozoic era.
Buy valve seals for VAZ NIVA II (2123)
Valve seals and their role
The main purpose of the VAZ NIVA II (2123) valve seals is to prevent oil from leaking out of the engine. If oil gets on the valves, the valve will not close.
Alternative names: valve stem seals, valve stem seals.
Wear and replacement of valve seals VAZ NIVA II (2123)
Engine oil seals can become unusable over time. The material crumbles. Throughput increases. Here are the main symptoms that the valve stem seals need to be replaced:
- oiliness of the threaded part of the spark plugs
- engine smoke during cold start
If such symptoms are present in the operation of your vehicle, then immediately check the suitability of the valve stem seals. The question often arises: how to change valve seals? Replacement on your own can only be done if you have experience. If you are confident in yourself and your qualities as an auto mechanic, then you can easily find information on replacing them on the Internet.
Where to buy valve stem seals for VAZ NIVA II (2123)
The AutoTO electronic spare parts catalog offers valve seals for VAZ (LADA) NIVA II (2123) from popular manufacturers. Products of the brands that are present in this section are supplied to the conveyors of popular manufacturers as original parts.
Niva valve stem seals, replacement interval
The AvtoTAZ operating manual recommends replacement after 50 thousand km. This is about 2-3 years of average mileage. The D'Artagnans argued until they were hoarse on the motorists' forum that if these are the same caps that we put on the "Germans", then they can be changed no earlier than after 100 thousand. The answer is simple, precisely because “at the Germans”))). What the plant is doing now and calling it engines is sabotage and sabotage. On any other car, the maximum valve-guide gap should be up to 0.04. To avoid incidents associated with bad metal valves and guides, the factory makes this gap more than 0.1 mm, that is, 10 acres. With such “tolerances and fits”, valve stem seals simply do not last more than 50 thousand. Therefore, the plant carefully and gently makes a backing for itself.
Purpose and design of oil-deflecting valve seals
Rubber valve seals are an integral part of any internal combustion engine. They perform two main tasks:
Ensuring adequate lubrication of the valve stems is especially important when exposed to hot exhaust gases. Prevents excess lubricant from entering the combustion chamber.
The operational parameters of the engine largely depend on the quality and reliability of the oil seals of the timing valves. Their timely change is important and is almost the same for both Lada Samara and BMW.
Design
The current version of the oil seal is a rubber product with a reinforced bushing and a spring that presses the edge of the sealing lip to the valve stem. Motorists interested in how much it costs to replace valve stem seals should also take into account the cost of the consumables themselves, which depends on the brand. For example, over the last ten years, Goetze products have been popular, structurally consisting of the following elements:
The seals are made of elastomers, mainly FP-7510 rubber compound based on fluorine rubber. The service life of parts is on average 160-180 thousand kilometers or 5-6 years. Elring products have a similar design, which is made from a mixture of FPM-8003. But their resource is slightly less - 120-140 thousand km.
Trust the specialists: how much does it cost to replace standard valve stem seals at a service station?
Traditionally, the first step in eliminating a defect associated with increased oil consumption is to change the valve seals. Only after this, if the desired effect is not achieved, comes the turn of the oil scraper rings on the pistons and further down the list. Many car enthusiasts believe that the first stage of repair is no more difficult than installing a clutch cable on a VAZ 2110 in your own garage.
Why is it better to contact the service?
Correct implementation of all stages of work implies the presence of several factors:
- Thoroughly understand the structure of your car’s engine.
- Have some experience in performing plumbing work.
- Have the appropriate set of tools and equipment.
Take, for example, a device for compressing valve springs - it cannot always be found in the arsenal of even an experienced motorist. Therefore, the question of how much it costs to replace faulty valve stem seals is quite popular among car owners. It is especially important to take into account the moment when repairs are performed by a car mechanic with low qualifications or using a makeshift method. In this case, the seals may lose their properties even at the installation stage.
The advantages of a specialized car service with a solid reputation are as follows:
- High-quality implementation of the repair process.
- Modern equipment and tools.
- A full technological range of work performed on any type of car.
- Short deadlines that do not affect the quality of repairs.
- Providing guarantees.
In the event of unforeseen circumstances, the service center technicians are able to carry out diagnostics and implement the next stage of work. When using specialized service station equipment, the common problem of seals “slipping” from the valve guide is eliminated.
Estimated prices for replacing valve seals
The price for repair work depends on the car model and technological nuances. For example, the price for installing new seals without removing the cylinder head is slightly less than a similar operation involving dismantling the cylinder head. This is quite natural, since the labor costs for removing the cylinder head are much greater.
For a car with considerable mileage, it makes sense to remove the cylinder head and grind or change the valves. It is also recommended to troubleshoot camshafts and other elements of the power unit. Owners of expensive prestigious foreign cars should immediately take into account that the cost of replacing faulty valve stem seals on such models is much more expensive than, for example, on a Lada Vesta or Renault Logan. By car brand, the average price in car repair shops for such repairs is:
- VAZ 2101-07 – 1500 rubles.
- Niva and Niva Chevrolet - 1,750 rubles.
- Foreign cars, depending on complexity – 3500-12000 rubles.
- Motor 8 valves – 1500 rubles.
- Motor 16 valves – 4500 rubles.
The numbers presented are far from being extreme. If an old “ten” can be restored for 1,500-2,000 rubles, then the owner of an Audi TT will have to pay about 60,000. Replacing valve seals with the removal of the cylinder head on engines M54, M52, M56, M50 from BMW will cost up to 23,000 rubles. The same operation, but without dismantling the head, will cost 10,000 rubles. In any case, the price for the work of changing consumables is significantly lower than engine overhaul, which can result from a negligent attitude to the condition of the seals.
Repair and maintenance of Chevrolet Niva
The Ladya-AVTO car dealership, being an official dealer of Chevrolet NIVA, offers comprehensive maintenance and repair of Chevrolet NIVA vehicles in Ufa on the basis of our (authorized) service center.
Completion of scheduled and post-warranty service (TO):
- replacement of motor oils in internal combustion engines, gearboxes, gearboxes
- replacing filters (fuel, air, cabin, etc.)
- replacement of technical fluids (coolant, power steering, clutch, brake, etc.)
- diagnostics and replacement of spark plugs
- replacement of timing belts, alternator, power steering
- replacement of brake discs, pads, hoses, etc.
- replacement of steering racks, rods and ends
- replacing stabilizer struts and bushings
- Diagnostics and replacement of wheel bearings
- replacing suspension shock absorbers
- refilling the car air conditioner
Engine diagnostics and repair:
- engine diagnostics
- repair and replacement of cylinder head, cylinder head gaskets
- replacement of timing belts, alternator, power steering
- replacing valve stem seals
- repair and replacement of piston and piston rings
- Coolant replacement
- fuel system repair
- washing nozzles and injector systems
- firmware of electronic control units
- repair of engine cooling systems
- engine overhaul
- ignition system repair
- exhaust system repair, gasket replacement
Transmission diagnostics and repair:
- manual transmission repair
- Clutch diagnostics and replacement
- transfer case diagnostics and repair
- diagnostics and repair of gearboxes (drives)
- Changing the oil in the transmission (drive, gearbox, transfer case)
Diagnostics and repair of vehicle chassis. Chevy Niva:
- diagnostics and inspection of chassis
- diagnostics and repair of car suspension elements
- steering diagnostics and repair
- diagnostics and repair of the brake system
- computer wheel alignment adjustment 3D
Body repair:
- polishing body scratches
- repair of bumpers and plastic body elements
- restoration of body geometry on a slipway
- painting body parts in a professional booth
- auto glass repair and replacement, tinting
- selection of car enamels
Auto electrician:
- replacement of electrical wiring
- repair of generators and starters
- window repair
- car alarm installation
- car audio and multimedia installation
You can make an appointment and undergo service and repair of the Chevy NIVA at the address: Ufa, st. Peterhofskaya, 5, phone: +7 347 229 40 10
- Last changes
- Options and prices
- Accessories and tuning
- State programs
- Photos and videos
Chevrolet-NIVA from the official dealer "Ladya-Auto"
High level of service
It doesn’t matter whether you came to buy a car, carry out maintenance, warranty service, or install an alarm or audio system. Experienced and friendly managers, as well as competent specialists who will solve your problem, are always waiting for you
Buying from a reliable company
The Ladya company has been successfully operating in the Ufa market for over 20 years in the field of selling auto parts and car servicing. Stable work and an honest approach ensured the trust of car owners in the city. Whatever happens, rest assured that we will fulfill our obligations 100%.
The Ladya company is not only an official dealer of Chevrolet Niva. This is a chain of auto parts stores with a stock of more than 50,000 items. We always have both auto parts for maintenance and spare parts for any urgent repairs, body repairs, as well as tuning of your car.
OJSC "LADIA-AVTO" - the official dealer of CJSC "Super-Auto", a manufacturer of special vehicles based on assembly kits of OJSC "AVTOVAZ", offers an increase in engine volume and power on cars of the Chevrolet NIVA family with a 2123 engine
A little theory
The main task of valve stem seals is to seal the valve-guide pair. So that oil that is absolutely not needed there does not get into the combustion chamber. By the way, caps are important only on the intake valves, since it is in the intake tract that vacuum is formed. We develop excess pressure in the exhaust tract, so by and large the valve stem seals play a rather “decorative role” there. In this regard, the Americans distinguished themselves, sometimes with a full set of gaskets for the engine, NO exhaust valve caps AT ALL. In the old, ancient times, caps were made of rubber, caoutchouc and fluoroplastic. Now the materials are completely synthetic. The most popular are Acrylic (working temperature range -40C to +180C) and Viton (working temperature range -40C to +250C). The second material is more modern and lasts longer. The selection of valve stem seals for our valves is very large. Elring (Germany), Goetze (Germany), Victor Reinz (Germany), Corteco (Italy). A couple of times I was let down by the quality of the caps and cuffs made by Ajusa (Spain). After that I don't recommend them. The Kirovochepetsk brand “reserve” has a very good price-quality ratio, but unfortunately it is very difficult to find original products. Sometimes on forums you can hear the phrase, I put Audi or BMW caps on the car. This is a misconception, since automakers do not produce these items themselves, but place orders and purchase products from the above-mentioned manufacturers of rubber products.
Auto parts for foreign cars, auto repair
How to correctly remove a box on a Chevrolet Niva Every car owner knows about the value and necessity of such a product as a box. It is also clear that at some point any part or device tends to wear out or fail, which leads to malfunction of one or another type of product or valve seals of the Chevrolet Niva system
Now let's pay attention to the boxes. This is power steering. That is, hydraulic power steering
Replacing the Chevrolet Niva fuel pump Fuel pump design The Chevrolet Niva fuel pump is located in the gas tank and is combined into a common module with a fuel pressure regulator and a gasoline level sensor. The electric pump is of a submersible type and has a commutator electric motor in its design. Changing the chain tensioner on a Chevrolet Niva Hydraulic timing chain tensioner The chain tensioner is one of the valve seals of the Chevrolet Niva gas distribution mechanism, related to the engine camshaft.
Starter Niva Chevrolet. Malfunctions and replacement Basic starter malfunctions and their causes It happens that the car refuses to start normally. But everything is very Chevrolet Niva valve seals there. We remove the battery that would not interfere. Unscrew the nuts on both sides. Replacing the generator belt on Kalina The correct operation of the generator and the entire electrical system of the car depends on the generator belt.
If the belt is worn or too slack, there is a risk that the alternator will not generate current and the battery will be discharged. Starting the car will be very problematic. And it’s clean there, the Chevrolet Niva valve seals seem to have been cleaned up by someone. But then an unexpected surprise showed up. Full size I thought it was the hydraulics that were knocking at times. There was a crack on the ramp. Okay, I called my friend so that he could pick up a new Chevrolet Niva valve seal along the way.
And their modifications are SUVs. Alternative names for car parts: Let's get started. I unscrew the spark plugs.
It is clearly visible that the threads of two candles are all covered in oil.
Valve seal for CHEVROLET NIVA
I adjust the camshaft so that the mark on the camshaft sprocket is opposite the boss on the camshaft bearing housing.
To prevent the chain from jumping on the sprocket when sagging, we fix it with zip ties. I screwed them up with a large margin.
When the sprocket is removed from the camshaft, it will lower. The chain will become slack on the crankshaft sprocket and the chain may jump.
To prevent this from happening, it is necessary to tighten the chain for the entire period of repair. I tied the timing sprocket of the Chevrolet Niva valve seals to the hood lid lock. Bend back the lock washer and unscrew the bolt securing the camshaft sprocket. To loosen the chain tension and to wash the hydraulic chain tensioner, I dismantled it. Access to the camshaft chain tensioner nuts is very difficult. To make access to them easier, I unscrewed the shield of the electric fan casing, the Chevrolet Niva valve seals, and turned it.
After this, it became easier to get to the hydraulic tensioner mounting nuts.
Unscrew the nuts securing the hydraulic tensioner to the cylinder block. Unscrew the oil supply tube nut, loosen the tube clamps, and remove the tube from the hydraulic tensioner. I wrapped the Chevrolet Niva valve seals with a rag to prevent dirt from getting in there.
We take out the hydraulic tensioner. Now you can begin removing the camshaft bearing housing.
Replacing valve stem seals for Niva Chevrolet, choosing the best
To do this, unscrew the nut from the stud securing the oil rail fitting, and move the tube to the side so that it does not interfere with removing the bearing housing. Next, unscrew the remaining nuts, not forgetting the Chevrolet Niva valve seals and washers.
After unscrewing all the nuts, the bearing housing can be removed. On the cams of my camshaft there are developments from the valve levers.
Remove the valve drive levers. We lay them out strictly in the order they were in the engine. They will need to be placed strictly in the same place, since during operation the levers have already gotten used to their cams. The Chevrolet Niva valve seals are not worn. The KV installation allows you to service cylinders 1 and 4, since the highest dead center of the corresponding pistons is fixed in this position.