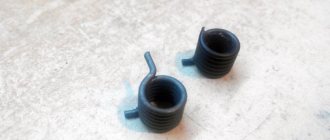
Oil seals - replacement
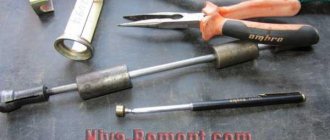
To complete the work you will need: - a compressor (developed pressure of at least 2 bar) with a hose; — adapter for a hose with a thread for a spark plug hole; - desiccant; - tweezers; — oil seal remover; — a mandrel for pressing the caps.
Removal
1. Turn the crankshaft to the TDC position of the compression stroke of the first cylinder and remove the camshafts (see “Camshafts - removal and installation”) and fix the crankshaft in this position by engaging the highest gear in the gearbox. 2. Use a medical syringe (a bulb or a clean rag) to remove any remaining oil from the niches of the cylinder head.
3. Remove the hydraulic pushers from the mounting holes in the head (see “Hydraulic pushers - removal and installation”). 4. We wrap the adapter into the spark plug hole, connect the hose from the compressor to it and supply compressed air.
5. Install the desiccant bracket on the cylinder head.
6. Place the grip of the desiccant under the head of the bolt, and place the stop on the spring plate.
7. By pressing on the desiccant handle, we compress the valve spring. 8. While holding the spring compressed, use tweezers to remove the two valve cotters.
9. Smoothly release the spring and remove the desiccant. 10. Use tweezers to remove the spring plate...
...and remove the spring.
11. Install the puller grip onto the valve stem seal. Press the cap off the valve guide.
Installation
1. Apply clean engine oil to the working edge of the new valve stem and valve stem. 2. In order not to damage the working edge of the cap, we put a plastic guide on the valve stem (as a rule, included in the kit of new caps) so that it covers the grooves on the stem.
3. Place the oil scraper cap on the valve stem and remove the guide mandrel.
4. Using light blows of a hammer through a mandrel, press the cap onto the valve guide.
5. Install the spring, spring plate and crackers in the reverse order of removal. 6. Similarly, we replace the oil scraper caps of the remaining valves of the first and fourth cylinders (their pistons are in the TDC position), after which we turn the engine crankshaft 180° and replace the valve caps of the second and third cylinders. 7. Install the parts in the reverse order of removal.
Replacing valves on Lada Kalina 8 valves: photos and videos
The majority of Lada Kalina car owners are faced with the need to replace the valves while operating the car. There can be many reasons for this, for example, a valve is burnt out or bent when the timing belt fails. The valve stem may also wear out or the plate may crack.
Replacing valves (tool)
On cars with an eight-valve engine, valve replacement can be done on your own if you have certain skills in this matter, as well as special tools. To work you will need:
- A tool with which you can remove crackers from the valve (desiccant).
- Remover for caps that remove oil. The choice of oil for the 8-valve Lada Kalina engine must be taken care of in advance.
- Head at “13” and knob.
The process of replacing valves on an 8-valve valve
The process of replacing valves on all engines with eight valves is almost identical. Subsequence:
- Remove the cover.
The cover was removed and the camshaft was visible. - The gas camshaft is removed from the head.
We got to the cylinder block - The pushers are dismantled.
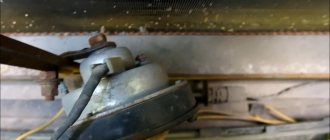
- The desiccant is fixed on a pin.
- It is used to remove crackers from the valves. The work must be carried out carefully, since when the desiccant comes off the valve, it can shoot out the cracker. In this case, it will be almost impossible to find him.
- After removing the crackers, you can also remove the spring with the plates.
The springs are quite easy to dismantle. Valves close up - After the valve is released, it is removed from its seat. It is recommended to mark the valves so that each one is in its place. You can use points made with a center punch as markings.
- Installation of a new valve and assembly is carried out in the reverse order of removal. The valve must also be dried using a special tool.
In the case when an old valve is installed, it must be thoroughly cleaned of carbon deposits. If the valve is new, then it must be ground in so that fuel or air does not escape from the combustion chamber.
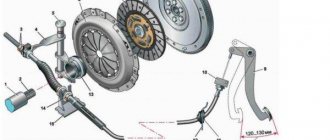
Setting the valve clearance
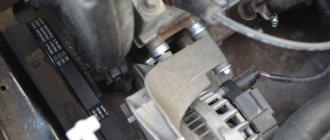
The process must be carried out on a cold engine with the valve covers removed. To do this, it must be dismantled by unscrewing the fastening bolts. Then you need to remove the cover that covers the timing belt. There is no need to touch the alternator belt.
Remove the timing cover, then remove the spark plugs for convenience
The spark plugs are turned out so that the engine can be cranked more easily. The oil is also completely removed from the head to make work easier. You can use a syringe for this. If the camshaft has worn cams, it should be completely replaced. A device that recesses the valve is screwed into the place where the cover is attached. Use a wrench to turn the crankshaft until the marks on the pulley match the marks on the belt cover. After this, you still need to turn the crankshaft three teeth. In this case, the piston will reach its dead center. There is no need to change the oil after this procedure.
This checks the valve clearance
First you need to check the clearance on the first and then on the third cam. The probe should have a size between 0.2 and 0.35 mm. If the move is large, then you need to change the washer. If all the work is done correctly and using a special tool, then there will be no difficulties in the process. All remaining valves are regulated according to this principle.
The video below describes the process of adjusting the valves; the basic principle is the same, since the Kalina and Samara engines are of the same family.
After this, the timing belt should work smoothly. This will also allow the car owner to drive about 50,000 kilometers without additional work and adjustments.
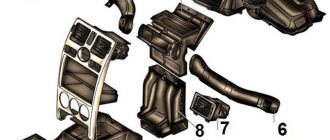
Engine oil seals 1.6i - replacement
Removal
1. Remove the camshaft (see “1.6i engine camshaft - removal and installation”). 2. Use a magnet to remove the pushers with adjusting washers from their seats in the cylinder head.
3. To install the pushers in their original places, mark them or arrange them in the order of their location in the engine. 4. We turn out the spark plug of the cylinder whose valve we are replacing the oil seal (see “Spark plugs for the 1.6i engine - replacement”). 5. Insert a tin rod into the spark plug hole so that its end is under the plate of the corresponding valve.
6. We install a device for depressurizing the valves on the cylinder head studs. 7. We rest the cup of the device against the spring plate.
8. By pressing on the desiccant handle, we compress the valve springs. 9. Keeping the springs compressed, use tweezers to remove two crackers.
10. Smoothly release the springs and remove the desiccant. 11. Use tweezers to remove the spring plate.
12. Take out the outer...
...and the inner valve spring.
13. Install the puller grip onto the valve stem seal.
14. Press the cap. 15. If necessary, remove the spring support washer.
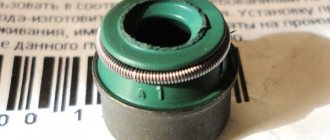
When to change caps
In a good way, these parts need to be replaced after several tens of thousands of kilometers. Experienced drivers are able to visually determine that it is time for another repair, as there are certain signs of wear on the valve stem seals.
The first sign is an increase in oil and possibly fuel consumption. After all, a worn cap will let oil into the combustion chamber with all the consequences mentioned above. The second sign is blue smoke from the exhaust pipe when accelerating. It should be noted that these signs already indicate the presence of a problem and the need for urgent repairs.
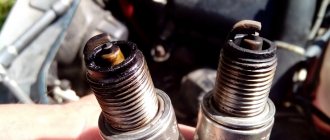
True, it’s not always a matter of seals. Sometimes the problem may be worn rings. Of course, the question arises: how to identify valve stem seals or rings, because the “symptoms” are almost the same. The answer is quite simple. It is necessary to unscrew the spark plugs and inspect them for oil and carbon deposits. The presence of both indicates a malfunction of the caps. This can also be checked by measuring the compression in the cylinder (the spark plug is unscrewed and a special device is screwed into its place). If it is normal according to the passport, then the rings do not require replacement. In addition, if the oil seals need to be replaced, the car will smoke during acceleration and during engine braking.
We also recommend reading the article on how to determine the condition of the engine by spark plugs. From this article you will learn about various signs that allow you to determine the causes of an internal combustion engine malfunction by analyzing the color and structure of deposits, soot and other defects on the spark plugs.
In general, the destruction of the oil seal occurs due to the fact that it is constantly in a chemically aggressive environment (oil). Plus is subjected to intense mechanical stress (friction). As a result, the rubber loses its elasticity, hardens and begins to collapse. Often, after removal, the caps simply fall apart in your fingers.