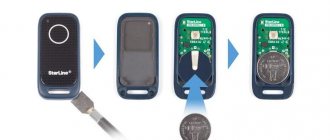
Starter performance monitoring sequence
If, when turning the ignition key to the “Start” position, the starter does not show any signs of life, you must perform the following sequence of actions:
1. Measure the voltage at the battery terminals with a multimeter. There must be at least 12 volts to start the engine. If less, you should charge the battery.
2. Next, you need to measure the quality of the vehicle's ground tire. You should check the contacts of the “minus battery” bus - the car body and the “minus battery” bus - the engine body, actually the starter. This is best done by turning on the ignition and measuring the voltage between the battery negative, the metal elements of the engine body and the stripped elements of the engine body. Voltages must be strictly 0.0 Volts. If more, the connection contacts may be broken.
3. Before carrying out further actions, it is better to perform computer diagnostics. In many cars, the engine may be blocked by the immobilizer, which may require key binding. A malfunction of the automatic gearbox components can also introduce a prohibition mode for starting the car.
4. For further diagnostics of the starter, an electrical diagram of the vehicle and a diagram of the location of relays and fuses are required. The car's starting system can be organized in one of two ways. In cars of earlier years of production, voltage was supplied to the starter solenoid relay directly from the ignition switch contact group. A malfunction of the contact group leads to a lack of voltage supplied to the solenoid relay. In this case, it is necessary to check the presence of contacts according to the ignition switch connection diagram. Modern vehicles control starter activation using a starter relay, usually located in the relay and fuse box under the hood. It is necessary to check the serviceability of the relay, the presence of +12 Volts at its input contact. You can force the starter to turn on by closing the relay contacts.
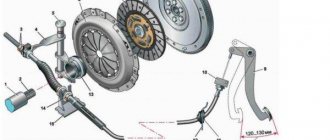
5. Next, proceed directly to work with the starter. It is usually located in the flywheel area. A more convenient location is between the engine and the radiator of the cooling system. In this case, access to it is simplified. It is worse if the starter is located behind the engine under the exhaust manifold. In any case, it is necessary to trace the path of the wires coming from the starter. Two conductors extend from it: one thick (cross-section of at least 25 sq.mm.) for starting the electric motor and a thin one for controlling the solenoid relay.
6. First of all, it is necessary to strip the thin conductor in a convenient place and connect a wire with a cross-section of at least 2 sq. mm to it. and insulate the connection point. Then move the gearbox to neutral. After this, connect the connected conductor to the positive terminal of the charged battery. If there is no action from the starter, the following options are possible:
- malfunction of the solenoid relay winding (break);
- wear of the starter motor brushes;
- failure of the collector lamellas;
- armature winding break;
- lack of contact on the connector of a thin wire (often occurs when a thin wire comes into the connector “under the chip”, sometimes it’s enough just to move it);
- lack of grounding on the car engine body (to be more sure, you can connect the engine body to the battery negative with a powerful wire).
7. If the solenoid relay works reliably, but the starter motor does not rotate, you should check the presence of + 12 Volts at the output of the thick conductor. It usually has a “nut” connection, sometimes the contacts burn and char. In this case, the contact areas should be removed and cleaned. You should also check the connection of the thick conductor in the area of the positive terminal of the battery.
8. Using a multimeter, you can check the resistance of the coil of the solenoid relay (between the connected conductor and the motor housing, it should be in the range from 3 to 20 Ohms for different types of starters).
9. If the previous actions did not lead to a positive result, it is necessary to begin diagnosing the malfunction on the starter removed from the vehicle.
Video - how to close the starter directly if it does not turn:
Connecting wires to the starter
Connecting a starter to a VAZ - instructions. Attach the relay in a convenient place (for example, a washer reservoir). Connect the wires to the starter. Then remove the red wire located on the flat terminal of the relay, and you need to make a connection with the connector of the male wire and the wire from the new relay.
Place the wire with a ring terminal for 8 mm on the positive side of the starter and tighten it with a nut. Place the wire of the new “female” type relay onto the contact that was released at the traction relay. This wire will transmit the positive to the coil. Using a clamp, tighten the new wire and the stock one together. Screw a small length of wire from the coil. Now you can turn on the new relay.
FAILURES IN THE ELECTRICAL CIRCUIT OF THE STARTER
The starter does not respond to turning the ignition key
Lada Priora Sedan Logbook Preparing for winter.
Starter The starter does not turn on due to a break in the starter power supply circuit or its windings (which happens less frequently). Need to check:
starter activation relay. Turn on the ignition and close terminal 50 (in Fig. 3) and the power wire terminal from the battery with a metal object
If the starter works (be careful, the engine may start), then the starter relay is faulty or there is an open circuit in its circuit. If it is inconvenient to use this method on your car due to the layout, then check the relay with a continuity test - a light bulb or a tester; engine "mass"
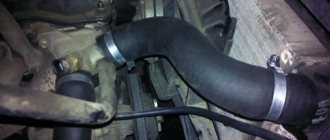
A break or burnout of the wires connecting the body and the engine leads to an open circuit. On modern cars, the negative terminal of the battery is connected directly to the motor housing. On older cars, the body was often simply connected to the gearbox housing;
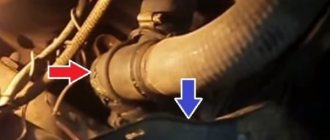
Checking the starter wires
if the power circuit is not broken externally, then the starter does not turn after turning the ignition key due to wear on the starter brushes - they do not come into contact with the armature commutator. Sometimes this can be established by sharply hitting the starter housing with a metal object. If worn brushes are “stuck” in the brush holder, sometimes the shock caused by the impact releases them and the starter operates. In general, everything here is the same as with any motor with brushes.
The brushes are replaced with the starter removed. The operation is not difficult if their wires are not soldered. You can replace the entire brush assembly - look at the condition. At the same time, clean the armature commutator from coal dust - this will prevent unnecessary contact between the lamellas of the commutator. If the starter clicks but does not start, this is most often caused by poor contact in the wiring - the battery terminals are loose. Try to compress them and also clean them from plaque. Sometimes the clicking of the starter indicates that the copper contact bolts of the retractor relay, the so-called, are burnt. “nickels” (orange in Fig. 3). They can be replaced and cleaned, but modern solenoid relays are usually non-removable.
Such repairs are simple for the starter shown in Fig. 1 – the solenoid relay housing is connected with studs.
When starter
This is caused by a malfunction of the starter solenoid relay - burnout of the holding winding or poor contact of the wire with terminal 50 in Fig. 3. Sometimes the wire leading to this terminal is unsoldered. You can check it with a continuity tester or a light bulb - the diagram is quite clear and universal. The crackling sound can also be caused by the burning of the coins. If the starter spins for a long time during starting, then look for the reason not in it, but in the systems that control the operation of the engine and the engine itself - maybe the timing belt is simply broken.
Preliminary work
We install wheel chocks
Performing a few simple steps related to preparing the VAZ 2107 for repair work will significantly save your time, improve the quality of maintenance and will guarantee the safety of your health.
- The place where the machine will be serviced must have good and uniform lighting. In some cases, this can only be achieved through the use of additional lighting.
- Due to the fact that the starter in the VAZ 2107 is located in the lower part of the engine, work on its dismantling should be carried out on an overpass or inspection hole. It is not possible to remove the starter from the top.
The machine must be securely secured using the parking brake or wheel chocks. Otherwise, there is a possibility that the vehicle will start moving spontaneously.
Verification Guide
How to change the starter
The device can be checked without removing it from the car. Removal is carried out in case of serious damage. No special knowledge is required for diagnosis. The device is checked in several stages. The most important thing is to test with thick wires; it won’t work on thin ones.
Stages
Checking the starter assembly. To do this, you need to remove the device from the car and clamp it in a vice, securely, but not too tightly, so as not to break it. Then you need to close the contact bolts located on the back side using a metal object or a piece of wire. If the starter is working, it will start spinning. In this case, the cause of the malfunction may be in the traction relay.
Checking the operation of the traction relay. To do this you need to use wires with low resistance. One wire needs to connect the positive terminal on the battery and the relay to ground, and the second wire must connect the negative terminal on the battery and the starter housing. If the relay is working properly, a characteristic click will sound and the armature will push out the gear (video author - altevaa TV)
The tester should measure the resistance between the rotor housing and the windings; it should be several million Ohms. If the insulation resistance is from 0 to 2 ohms, the armature is faulty and requires replacement. Checking the inter-turn short circuit is done using a special stand for testing generators.
Checking the device on the stand
Checking the brushes is done using a 12 V light bulb, which is connected to the brush holder and the body of the device. A glowing light indicates a brush malfunction. In this case, they need to be replaced. The winding is also checked with a light bulb, only the winding and the housing are connected.
Call the electrical network. Using a tester, you can ring an electrical circuit to find breaks. To ring the electrical network, you must turn on the ignition.
Checking the Bendix. To check, you will need a soft gasket to protect the part from damage. The Bendix sprocket must be clamped in a vice and the clutch turned in one direction and the other. If the part is working properly, the coupling will only turn in one direction. If it turns in the other direction, this indicates that it is faulty and needs to be replaced. The teeth may be worn out, then the bendix just needs to be replaced.
Gouges in Bendix teeth
A visual inspection can reveal the following faults:
- winding breaks;
- insulation violation;
- wear of the collector plates;
- surface defects of the commutator and armature in the form of burrs, scratches, grooves, etc.
Small defects can be eliminated by sanding with fine-grained sandpaper. If as a result of these actions the anchor has decreased in diameter, spacers are installed. The same applies to the collector. If the parts are very worn, it is better to replace them. Replacement is required if the interturn insulation is faulty, brushes and bearings are worn out.
By learning to check the device that starts the engine with your own hands, you can save on visiting a service station.
If you don’t know how to check the starter without removing it from the car, diagnostics can be done at service stations that are equipped with a special stand for diagnosing generators.
Sorry, there are no surveys available at this time.
How we diagnose the starter.
In order to conduct a visual inspection of each starter part and diagnose it, we completely disassemble the unit.
Before disassembling, in rare cases we put it on a stand, and only the starter that we made before. The question is that there is a network power supply on the stand where the starting current is approximately 800 Amperes, and if the starter is shorted somewhere and this can be cured, then after such a start it will simply burn out.
Inspect the starter for mechanical damage.
Initially, the unit is inspected for various mechanical damages (chips, cracks in the housing, damage to the power bolts of the solenoid relay).
Next comes complete disassembly of the unit into its component parts for diagnostics.
Checking the starter armature.
The starter armature is inspected for mechanical or electrical damage. If there is a lot of wear on the starter bushings (starter bearings), the armature wanders and can cling to the stator winding. This results in scuffing and breakdown of the insulation of the stator windings.
Also, when the brushes wear out and the tight contact between the commutator and the brush disappears, an electric arc is formed and the armature commutator burns out and melts. Also, if the starter operates for a long time, or if the ignition switch is faulty, the armature spins and gets very hot, as a result of which the insulating varnish leaks out. Visually everything is fine, but in fact there is an interturn short circuit or an insulation breakdown.
Next, if visually the condition of the armature does not raise any doubts about its serviceability, a megohmmeter is checked for the insulation resistance of the winding.
Finally, the armature is checked for interturn short circuit of the windings.
Checking the starter brush assembly.
The brush assembly is inspected for mechanical or electrical damage. When the armature commutator falls apart, the assembly can simply be broken, twisted without any obvious influence of current, or there may be an option when the driver twists to the limit, while the commutator, assembly and brushes become very hot and begin to collapse, forming carbon deposits, burnouts, and splitting of the graphite of the brushes into layers .
Next, if the node is visually normal, it is checked with a megohmmeter for insulation resistance.
Next, you need to determine the degree of wear of the brushes by visual inspection.
Checking the starter stator.
If the stator is based on permanent magnets, then it is inspected for cracks, chips, unstuck magnets, and the presence of any metal parts of the starter in the form of magnetized particles.
If the stator is based on a classic winding, then it is inspected for mechanical damage, melting, burnouts, rust, and desoldering. Next, it is checked with a megohmmeter for the insulation resistance of the windings.
In powerful, large stators, usually from trucks, part of the insulating coating must be opened to inspect and check the interturn insulation. When they use “launchers”, “tarzans”, the strength of the starting current is such that externally the winding looks great and doesn’t even penetrate the housing, but inside it’s just a mess, the wire simply melts.
Checking the starter solenoid relay.
Visual inspection for mechanical damage to the housing, damage to the power bolts, inspection of the starting terminal for breakage and souring.
Inspect the integrity of the rear insulating cover.
If all is well, the relay is started by applying operating voltage, the operation of the pull-in winding and the holding windings is checked, and the voltage loss across the contacts is measured.
In relays where it is possible to remove the insulating cover, it is removed and the contacts are inspected for carbon deposits and wear.
Checking the starter gearbox.
Inspection for mechanical damage (the Bendix guide splines break off, the gearbox shaft bursts. The planetary gears and gearbox sprockets fall apart).
Bendix check.
Inspect the gears and guide splines for chips and licking.
Checking the Bendix for failure. This operation is done when the starter is already fully assembled. The unit is placed on a stand and screwed very tightly. A special device is brought to the Bendix, which holds the gear dead and the launch is carried out. The stand measures the force of the moment with which the bendix presses, and if the bendix is weak, it simply breaks it off.
Checking the front and rear starter covers.
The bushings or bearings are checked for wear and play. Look at the seat for the bushing or bearing on the head (aka dome or front cover) of the starter.
The seats for the bushing or bearing of the starter rear cover are checked.
The mounting holes are inspected, since they are also broken due to vibration or insufficient tightening of the bolts.
Why do you need a starter and its design features?
Where is the starter located on a VAZ 2107
A starter (from the English word start - to begin) is a mandatory unit for starting the engine, which forcibly rotates the crankshaft flywheel to the speed necessary for independent operation.
It is a 4-pole DC electric motor that takes energy from a battery. The starter is necessary to start the engine of any vehicle and receives power from the battery when the key is turned in the ignition.
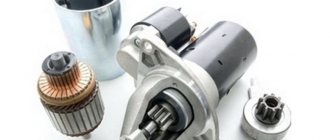
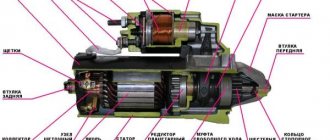
Main components of the starter:
- housing - a cylinder-shaped steel part in which the winding and cores are located;
- anchor - has the shape of an axis and is made of high-strength steel, collector plates and windings are fixed in it;
- a solenoid relay that supplies power to the starter when the key is turned in the ignition and pushes out the bendix;
- brushes and brush holders - supply the necessary voltage to the armature commutator unit, increasing the motor power when the engine spins up;
- drive gear and bendix (overrunning clutch).
Despite the huge range of electric motors, there are only two types, distinguished by the presence of a gearbox.
The most modern version of the electromagnetic motor is the gear motor, the main advantages of which include the ability to operate even with a low battery charge and the presence of permanent magnets that reduce problems with the winding.
The main disadvantages of such a unit are the low strength of the gear and the impossibility of repair, which leads to an expensive purchase in the event of a breakdown.
Starters that do not contain a gearbox in their design directly act on the rotating gear.
The main advantages of this type of starter are:
- simultaneous engagement of the flywheel with the gear, allowing you to start the internal combustion engine as quickly as possible;
- durability and long-term operation;
- the ability to independently repair breakdowns and the availability of necessary spare parts in almost any auto shop;
- practically independent of the influence of electric current, which reduces the possibility of breakdowns.
The disadvantages of gearless starters include:
- difficulty starting in extreme cold;
- significant mass of the unit;
- high energy consumption, leading in some cases (if there are faults in the starting system or other components) to a strong discharge of the battery and the impossibility of starting the internal combustion engine without recharging;
- quite high prices for spare parts.
Why do you need a VAZ 2107 starter relay?
The starter traction relay on all classic models, except the VAZ 2107, was switched on directly through the ignition switch. The problem is that when it is turned on, a current of more than 15A passes through the contacts on the ignition switch, which over time leads to their oxidation, heating and failure. To reduce the current passing through the ignition switch when the starter is turned on, the designers of the “Seven” provided an additional element - the VAZ 2107 starter relay. The small current required for its operation does not harm the contacts of the ignition switch, and the relay itself more reliably switches the power to the starter traction relay . Often, owners of older “classic” models, tired of regularly changing the contact group of the ignition switch, independently install an additional relay that allows them to increase the service life of the contacts responsible for turning on the starter.
Where is the starter relay located on the VAZ 2107
The designers provided for the installation of a starter relay on the VAZ 2107 on the right side of the engine compartment. It is attached directly to the right wing, for which a stud is installed on the wing, onto which the relay mounting nut is screwed.
How to check the starter for functionality without removing it from the car
To begin with, it would be nice to find the location of this device in the wilds of the engine compartment. Usually, access to it is somewhat limited, but you can always reach it with your hand. At the same time, there is no urgent need to crawl under a dirty car and get your clothes dirty. It is also a good idea to check whether the battery is charged. It is likely that the low beam was left on and the battery was discharged. If everything is in order with the battery, then you need to find a voltmeter in the tools. If something happens, it will be easy to buy such a device in an auto supply or electronics store, and it costs very affordable.
So, a thick braided wire from the battery goes to the large bolt on the starter. This is the positive terminal of the solenoid relay. You need to put the “crocodile” of the positive (red) wire of the voltmeter on it. We connect the black wire to the ground of the car in the same way. Now you should ask someone to turn the ignition key. In this case, the needle on the scale should show 12 V, and the starter itself should begin to make characteristic clicks. If the voltage does not reach the indicated value, the problem is either in the battery or in the ignition switch (switch). Even if the starter clicks but there are less than 12 volts, there is a clear problem worth fixing.
The most effective way to check the starter for functionality without removing it from the car will require a longer screwdriver with a good plastic (rubberized) handle. You need to disconnect the wire coming from the ignition switch from the solenoid relay. Use the metal part of the screwdriver to carefully short-circuit the positive terminal of the relay with the bolt from which the wire was just disconnected. This will allow current to be supplied directly from the battery to the relay, and the car can start from this. If it works, this means that the lock is faulty and requires replacement, or the solenoid relay is worn out.
Faulty brushes and bushings
Using brushes, current is transmitted to the rotor winding of the starter. All four stator windings are connected in series-parallel, as shown in the diagram below.
If one stator winding is damaged, the rotor will not be fully powered. And if the brushes are faulty, then power will not flow to the excitation winding. Since it is not possible to check the starter for functionality using the battery, remove the back cover and brush assembly.
If there is severe wear, install new brushes - they are sold separately and can be purchased at any store. It is advisable to replace the bushings, since as they wear out they take on the shape of an ellipse. Because of this, friction increases significantly. The current consumption also increases due to deteriorated contact. The old bushing is knocked out of the back cover with a hammer and a mandrel of a suitable size.
Checking the starter for operability on a VAZ 2101-VAZ 2107
Welcome! Starter - not everyone always has the money to buy a completely new starter for a car, and that’s not even the point, many spare parts that already exist are actually not of very high quality, unlike those years when, for example, a car like the VAZ was still produced 2106. And therefore, many people simply forcibly do not buy new spare parts, but immediately go and buy old ones, but how can you understand when buying a starter whether it will work on your car or not? This is what we will analyze with you today!
Note! This article was written about what a starter is in general and what elements are included in it, and the test of the starter itself for performance was posted as a video in which all the nuances were described in detail, so if you don’t need to know what it is starter, what elements it consists of, then watch the video at the very end, which immediately shows you how to check the starter for functionality!
Why do you need a starter anyway?
The starter is needed to spin up the car engine so that it can simply start and the starter does nothing else besides this. In general, if we delve a little deeper into this topic, the starter, firstly, begins its work only when the key is turned to the final position when the car is already starting to start, and secondly, it only works for a while while you hold the key in the extreme right position, and after releasing the key, the key itself returns automatically to a strictly vertical position in which the starter stops working.
Have you ever had this happen, you started the car and by mistake turned the key again all the way to the right and after that a clearly audible grinding noise occurs, which by the way is due to the starter, which in this case, when you turn the key with the car running, it comes into operation again work.
Article: 21030-1008090-00more, additional articles: 21030100809000, 2103-1008090hide
Order code: 000880
In stock Available for order – 9 pcs. Data updated: 05.15.2021 at 19:30
Order code
000880 Articles 21030-1008090-00, 21030100809000, 2103-1008090 Manufacturer LADA Catalog group: ..Electrical equipment Electrical equipment Width, m: 0.21 Height, m: 0.05 Length, m: 0.18 Weight, kg: 0 .208 Main color: Black Applicability by car brand: LADA Number of parts/elements: 1 Applicability by car model: 2107.2107
Reviews of the product
Where is it used?
Certificates
Reviews
There are no reviews for this product yet.
Write a review
Articles about the product
- “Crystal” vases: “Classic”. Do you remember how it all began? April 16, 2013 Today, the next article in the series “Crystal VAZs or typical breakdowns of domestic cars” is dedicated to the “classics”: VAZ-2101, 2103, 2104, 2104, 2105, 2106 and 2107. These cars have been driving along our roads for decades and, despite all the shortcomings that we will talk about, their popularity is still high.
- Protection of VAZ-2101-2107 AvtoVAZ starter Article: 21030-1008090-00, 21030100809000, 2103-1008090 Order code: 000880 260 ₽ or place an order by phone 8 800 6006 966
Availability of goods in warehouses and stores, as well as the price of the goods is indicated on
15.05.2021 19:30
.
Prices and availability of goods in all stores and warehouses are updated once an hour.
If there is a sufficient quantity of goods in the store you need, you can buy it without pre-ordering. Internet price
– valid when ordering on the website or through a call center operator by phone
8-800-600-69-66
. Subject to sufficient quantity of goods at the time of order.
Price in stores
– retail price of goods in store sales areas without pre-order.
The period for moving goods from a remote warehouse to the warehouse of an online store.
The parts data presented on this page is for informational purposes only.
655fb67b7ef6e3381a593accb2b2065b
Add to cart
Available to order:
Order quantity:
Product successfully added to cart
!
How to check the starter
In order to check the starter for serviceability, you need to know what the most common breakdowns happen to it. So, among such breakdowns, there are only four malfunctions:
- When you try to start the engine, the starter does not turn it;
- The starter turns, but the crankshaft does not rotate;
- Insufficient starter speed;
- The starter does not turn off after starting the engine.
Let’s say right away that checking the starter is a simple procedure that even novice motorists can perform (see video about checking the starter below). The general scheme of such a check is as follows:
- We diagnose the starter;
- We check the operation of the relay mechanism;
- Checking the operation of the anchor;
- We check the brushes and windings;
- We diagnose the work of Bendix.
Starter test process
First, you need to dismantle and fix the starter in a vice. To perform the test, you will need to close the bolts that are located on the inside of the starter. This is done using a small piece of wire, or using any metal object. An important condition for this diagnosis is that the temperature of the mechanism itself should be about 20°C.
If the starter is working properly, then it will turn, and the cause of the malfunction will need to be looked for in the traction relay.
Video: How to check the starter
If the video does not show, please refresh the page or » style=»color:#CC3333″>click here
https://youtube.com/watch?v=H7k6u1e25EU
Checking the starter relay
Diagnostics of the starter relay is done using two low-resistance wires, which are connected according to the following diagram:
- We connect the first wire to the relay located on the starter housing and to the positive terminal on the battery;
- We connect the second wire to the body of the device and to the negative terminal on the battery.
After this connection, the armature should click and extend the gear. If this does not happen, then the relay is faulty and needs to be replaced.
Video: Checking the solenoid relay and starter contacts
If the video does not show, please refresh the page or » style=»color:#CC3333″>click here
To check the starter armature, you will need a 220V “control”. From the operational characteristics of the armature it is known that it can only be used with a resistance not exceeding 10 kOhm and vibrations of the order of 0.08 mm.
Anchor checking process:
- We connect the anchor to the power source;
- We connect the lamp to the device body.
If the lamp lights up or begins to spark, and a burning smell spreads, then the armature is out of order and needs to be replaced.
Video: Diagnostics of the stator and starter armature
If the video does not show, please refresh the page or » style=»color:#CC3333″>click here
Video: How to check the starter armature
If the video does not show, please refresh the page or » style=»color:#CC3333″>click here
Checking brushes and windings
Diagnostics of brushes is carried out using two wires and a 12-volt light bulb. The test is done by connecting this lamp to the brush holder and to ground. If the lamp lights up, the brushes are faulty and should be replaced (replacing starter brushes).
To check the winding, use the same lamp again, only now it is connected to the device body with one wire and to the winding terminal with another.
Do not forget that all the work described above must be performed while connecting all devices to the battery.
The bendix is checked in the following sequence:
- Using a soft gasket, fix the Bendix sprocket in a vice;
- The Bendix clutch alternately rotates neatly in both directions.
If the clutch is working properly, it will rotate in one direction and will not rotate in the other. Otherwise, the clutch must be replaced or the bendix must be replaced completely. At this point, the starter check can be considered completed.
Video: Replacing the Bendix starter
If the video does not show, please refresh the page or » style=»color:#CC3333″>click here
What's the result?
As you can see, the information above allows you to figure out how to check the starter yourself in a garage. There is no need to have special equipment. Often, a test lamp, a multimeter and a charged battery are enough.
This means that it is better to give the starter to trusted specialists, who will separately conduct in-depth diagnostics, after which they will eliminate the existing faults and return the starter to full functionality.
The starter clicks and/or buzzes, but the engine does not turn over. The main causes of starter failures, diagnosing and troubleshooting them yourself.
Why the starter may not work after turning the key in the ignition. The main causes of starter malfunctions: bendix, traction relay, brushes, winding.
The device of a car engine starter, the principle of operation. Common malfunctions: the starter does not turn, does not turn off after starting the engine, etc.
Why does the starter turn normally, but the engine does not catch and does not start? Main causes of malfunction, checking fuel supply and ignition systems. Adviсe.
What to do if the starter turns, but the engine does not crank. Checking the power supply system, ignition, electronic control of the internal combustion engine, etc. Recommendations.
Attachments for an automobile internal combustion engine: what is included in the list of this equipment, and also what it means to have an “engine without attachments.”
If the starter does not turn, then it must either be replaced or repaired. Before you begin repairing the VAZ 2107 starter, you should perform diagnostics to identify faults.
Main causes of malfunctions
The VAZ 21074 starter device is similar to UAZ and other models. For diagnostics, it is better to have a diagram from the instruction manual.
Engine starting unit
To diagnose, you need to remove the starter. Information on where the device is located and how to remove it can be found in the manual. The dismantled unit must be cleaned from outside of any dirt. To check the solenoid relay, its terminal “50” must be connected to the positive of the battery, and the body of the unit to the negative (the author of the video is AUTO RES).
The terminals, lugs and wire connections should be checked. If they are oxidized, they need to be cleaned, lubricated with Vaseline and tightened tightly.
To check the windings and armature, you need to perform the following sequence of actions:
- First, remove the back cover and disconnect the alkaline unit.
- The absence of a short circuit is checked by connecting one multimeter probe to the body, and the second in turn to the terminals of the starter windings. The resistance value must be greater than 10 kOhm.
- Then the probes need to be connected to the terminals of the windings. If the value tends to infinity, this indicates the presence of a cliff.
- To ensure that the armature is not shorted to ground, it is necessary to connect one multimeter probe to the body, and the second one in turn to the contact plates. Resistance readings should be more than 10 kOhm.
Checking the windings with an ohmmeter
There are several main reasons why the starter does not work on a VAZ 2107:
- After turning on the ignition, the unit does not turn, it only clicks. The battery may be low.
- The device turns, but it takes time to start the engine. It is necessary to identify faults and eliminate them.
- If, when you turn the key, the starting device spins, but the VAZ 2107 engine does not start, you need to change the bendix. When replacing, all threaded connections should be lubricated with lithol. In addition, it is advisable to check the condition of the flywheel rims.
Checking for poor contact at the battery terminals is not difficult.
To do this, you will need a control lamp, which should be connected to the ground of the car, and the other end should be connected to the nut on the solenoid relay, which clamps the positive supply wire from the battery. After this, turn on the starter. If the lamp goes out, then there is a bad contact somewhere and, by moving the wire from the starter to the battery, check the entire circuit. If the lamp goes out along the entire circuit, then connect one end to the positive terminal, and check the negative circuit with the other.
If you do not hear the characteristic click of the solenoid relay operating, then you should close the terminal to which the thin solenoid relay control wire is connected. Before closing, you should check the transmission shutdown. When closed, the starter should operate and crank the crankshaft. If this does not happen, then the starter must be removed from the car and checked.
If the starter works when closed, then there is no power on the solenoid relay control wire. The reason for this may be a malfunction of the ignition switch contact group (all models VAZ classic, VAZ-2110, IZH, etc.) or the intermediate starter relay (VAZ-2108 (09 - 15), GAZ, UAZ, etc.) . Checking the starter is difficult if there is a starter lock installed on your car.
admin12/06/2012
VAZ, VAZ faults, Starter
comments 3
Subscribe to comments
- Mikhail — December 26th, 2015 at 04:29 pm
Thank you for your help. I shorted the ends to the starter and the car started. I cleaned the contacts and started it with the key.
- Vladimir — October 22nd, 2013 at 20:14
THANK YOU!! I DID EVERYTHING AND CHECKED IT, I FOUND HURRAY!! THE ENTIRE THING WAS IN THE IGNITION SWITCH..
- Vladimir — March 27th, 2013 at 20:57
Thank you!!! there was a bad contact on the positive terminal of the battery, I cleaned all the wires and my swallow is asking to go again! Thank you!
A comment
Name *
Website
This site uses Akismet to reduce spam. Find out how your comment data is processed.
« Nissan Terrano generator
Fault code GAZ 061 (Mikas) »
Tags
VAZ, VAZ malfunctions Sensors Ignition Injector Devices Starter Circuits Electric cars Power supply VAZ 2110 gazelle gazelle business recorders car repair
Recent Entries
- Design and principle of operation of parking sensors
- Multifunctional device Roadgid X7 Hybrid GT
- Malfunction of the GAS ignition system
- Electric Xiaomi Mi Mijia M365
- Additional vehicle equipment (installation)
Archives
Archives Select month August 2021 July 2021 December 2021 August 2017 July 2021 June 2021 May 2021 April 2021 March 2021 December 2016 November 2021 October 2021 September 2021 August 2021 July 2016 June 2021 May 2021 April 2021 March 2021 February 2021 November 2015 October 2015 August 2015 July 2015 June 2015 May 2015 April 2015 March 2015 February 2015 January 2015 December 2014 November 2014 October 2014 September 2014 August 2014 July 2014 June 2014 May 2014 April 2014 February 20 14 January 2014 December 2013 November 2013 October 2013 August 2013 June 2013 May 2013 March 2013 February 2013 January 2013 November 2012 October 2012 September 2012 August 2012 July 2012 June 2012 May 2012 April 2012 March 2012 February 2012 January 2012 December 2011 November 2011 October 2011 November 2011 August 2011 July 2011 June 2011 May 2011 April 2011
Categories
- Accumulator battery
- Video
- Generator
- Sensors
- Diagnostics
- Ignition
- News
- Equipment
- Devices
- Repair
- Spark plug
- Starter
- Scheme
- Devices
- Electric cars
- Electricity supply
floods the generator
Anything that does not fit into any section of the auto repair shop
evgen32 Trainee Messages: 17 Registered: Sat Aug 28, 2010 19:05:12 Car model: Classic VAZ053 modified carburetor, reinforced TREC suspension, 06 devices, electric trunk drive, ignition switch 08, BSZ From: Bryansk Thanks to: 7 times Contact information:
floods the generator
Unread message evgen32 » Mon Sep 27, 2010 19:14:51
guys, please tell me what can be done to prevent the generator and its drive belt from flooding while driving through puddles!!!
evgen32
JET Registered on semerka.info Messages: 8309 Registered: Thu Dec 18, 2008 13:38:18 Car model: BOGDAN 21104 Engine type: Injection From: USSR Thanked: 253 times Thanked: 636 times Contact information:
Re: generator flooding
Unread message JET » Mon Sep 27, 2010 19:22:15
evgen32 1 Do not drive through puddles 2 Put on an engine boot.
JET
evgen32 Trainee Messages: 17 Registered: Sat Aug 28, 2010 19:05:12 Car model: Classic VAZ053 modified carburetor, reinforced TREC suspension, 06 devices, electric trunk drive, ignition switch 08, BSZ From: Bryansk Thanks to: 7 times Contact information:
Re: generator flooding
Unread message evgen32 » Mon Sep 27, 2010 19:48:39
Well, driving through puddles is impossible, we have no roads in Bryansk, only directions and what is the engine boot?
evgen32
byran Father of Russian classics Messages: 2931 Registered: Sat Jul 11, 2009 6:21:12 Car model: 2107 90 was, Opel Vivaro 1.9 cdti became...+ VAZ 2101 1976 for the soul)) Engine type: Carburetor From: Lvov, Brody Thanked: 93 times Thanked: 88 times Contact information:
Re: generator flooding
Unread message byran » Mon Sep 27, 2010 19:50:38
evgen32 wrote: and what is an engine boot?
I wonder what you didn’t understand from this...?!
DIMAR wrote: installing a mudguard, more details about installation here
or you don't know how to use the forum
Last edited
byran
Mon Sep 27, 2010 19:51:40, edited 1 time in total.
byran
JET Registered on semerka.info Messages: 8309 Registered: Thu Dec 18, 2008 13:38:18 Car model: BOGDAN 21104 Engine type: Injection From: USSR Thanked: 253 times Thanked: 636 times Contact information:
Re: generator flooding
Unread message JET » Mon Sep 27, 2010 19:50:52
evgen32 wrote: and what is an engine boot?
So follow the links provided
DIMAR
-ohm.
JET
VladiZlav Administrator Messages: 17408 Registered: Sat Jun 07, 2008 21:11:19 Car model: VAZ 2111, red, ESP and all that