Print this article Font size 16
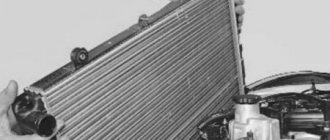
In simple terms, the cooling radiator is designed to remove excess heat from the power unit. That is, it serves to protect against engine overheating and does not allow the engine to fail.
But over time, under even the most gentle operating conditions, the radiator can fail. Some are trying to repair it, although in fact the repair will only give a temporary effect, allowing them to get to the service station under their own power. The best option is replacement.
What to do next
To replace the old VAZ-2110 radiator with a new device, repeat the above in reverse order, starting from the last point. In order for the radiator to work well, it is also worth checking the condition of the rubber bushing on the upper fastener. If the part is very worn, replace it with the one you just purchased.
The subsequent steps to install a new product are as follows:
- fix the air ventilation device;
- tighten the casing well;
- place the radiator in its original place in the VAZ-2110, put the lower mounting pads on the pins;
- When the radiator is already standing, add antifreeze.
Replacing a radiator on a VAZ 2110
Replacing a VAZ 2110 radiator with 16 valves is simple; you can use the instruction manual or consult a specialist.
Step-by-step instructions that will help you achieve the desired result:
Using the bottom plug, drain the coolant; Remove the battery from the seat, as it will interfere with the replacement; In the case of an injection engine, it is necessary to remove the air filter; It is imperative to disassemble the upper fasteners of the frame, release and dismantle the electric fan; Remove the steam inlet and outlet pipes; The radiator can be removed without unnecessary damage; to do this, you need to tilt it slightly to the side of the power unit; If small leaks appear without visible corrosion damage, it is possible to repair the radiator, but this is a risky endeavor, because the part, even after a very high-quality repair, can cause many problems; When installing new equipment, you should pay attention to the condition and appearance of the rubberized cushions necessary to support the lower part of the radiator housing
It is important that these pillows fit firmly into the holes located along the crossbar; Fill the new cooling system inside, connect each pipe, install the battery in its place, tighten each of the plugs in turn, check the fasteners on which the VAZ 2110 radiator frame is attached. Only after a complete check can you try to turn on the engine and check its performance, followed by checking the replaced one cooling element.. Although replacing the cooling radiator of a VAZ 2110 is a simple procedure, we absolutely must not forget about the subtleties, nuances, safety precautions, as well as consistency in work
Or you can simply go to a car dealership and entrust the replacement to specialists
Although replacing the cooling radiator of a VAZ 2110 is a simple procedure, we absolutely must not forget about the subtleties, nuances, safety precautions, as well as consistency in work. Or you can simply go to a car dealership and entrust the replacement to specialists.
Design
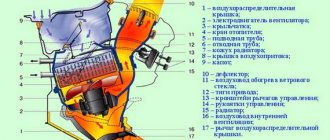
Diagram of the engine cooling system
The structural elements of the cooling unit being considered today are:
- Two body parts;
- Pipes;
- Cores;
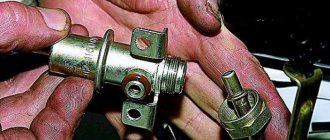
- Drain valve located at the bottom of the housing;
- Filler plug at the top of the housing with two valves (inlet and outlet).
Also in fairness, it is worth including a thermostat and an electric fan in the cooling system, which play an important role in cooling the engine.
- The housing consists of two tanks with adjacent pipes through which coolant passes.
- The core is a series of brass tubes that are soldered to the cooling fins. They can be found inside the case.
- The fill plug allows coolant to be redirected to the radiator, and the drain valve allows the coolant to drain when needed.
Instructions for installing a new heater
New sample
The “new” radiator has the following fastenings: a nut near the filter, a screw on the lower end of the windshield and two nuts located above the intake manifold. If your car has a heated glass system, you need to remove the expansion tank. The stove filter also needs to be removed and replaced if necessary. We remove it by unscrewing 4 screws, and then take out the filter. Now replacing the radiator of the VAZ 2110 stove:
The arrows indicate the fasteners that need to be removed to access the radiator.
- The new model heater is not one piece - it is assembled from two halves. They are connected using three self-tapping screws. Two screws can be found on the front side of the heater radiator, and the third is under the hose that goes to the heater fan. Finding the hose is not difficult - it is L-shaped.
The location of the radiator is under the hood of the car.
The fasteners have been removed, let's move on. Problems may arise when dismantling the heater, so you need to stop here. To remove the left part, we need to firmly grasp it with our left hand, and with our right hand, respectively, the right half. Now press on the heater and lift both parts up. The right side is easier to remove - you just need to pull it to the right with force.
The right side of the stove radiator. It needs to be disassembled into 2 more parts.
We dismantle both parts, then remove the steam exhaust hose through the hole in the soundproofing panel. If the left half of the heater is solid, then the right half is again divided into two parts. Metal brackets are installed as fastenings. We need to dismantle them along with the seal. After this, the right side will decompose on its own. Now a passage to the damper has opened. It’s better to replace it too; the ideal option is glued aluminum.
Disassembled right side of the radiator. The parts are fastened to each other using steel brackets.
After this, you can install a new part using the same principle.
For reference: there should be about 4 liters of liquid. Inspect the antifreeze: if it is relatively clear, then it can be refilled into the new heater radiator.
Old sample
- We follow all the steps to drain the coolant. Now you need to remove the seal installed in the windshield - if desired, you can also change it. Then you should remove the lining itself, which is called the “jabot”. It is secured with a screw located under the master cylinder. We unscrew it.
The arrows point to the frill. We need to take it down.
The main screw that holds the frill. It should be unscrewed.
Next, you need to unscrew the 4 fastenings of the upper clamps. The hoses and wires are held in place by two clamps - remove them.
4 fasteners that need to be removed.
Now you should disconnect the negative terminal of the battery - a standard procedure for repair and maintenance. Let's move on to the left side of the frill, it is held in place by 2 screws. Unscrew them and pull the frill towards you
Important: the frill should not come out completely
Pull out the negative terminal of the battery. This must be done to ensure safety.
The next step is to remove the windshield trim. Behind it there is an antifreeze level sensor - disconnect the plug from it and take out the hot air hose. It comes from the expansion tank.
Washer hose, sometimes difficult to find under the hood.
Now you need to remove the washer hose, which is attached to the windshield with four screws. We remove the heater housing clamps, windshield wipers and trim.
Arrows indicate fasteners that need to be removed.
We have a filter in front of us. He's also filming. As a result, you need to dismantle the steam supply and exhaust hoses, the filter housing, the antifreeze return and the rear part of the fan (not all VAZ 2110 cars have it).
Air filter mounts. After dismantling the filter, you can begin installing a new radiator.
Done, all that remains is to change the heater radiator. The work is performed in reverse order.
How to replace the radiator and cooling fan on a VAZ 2110-VAZ 2112?
Removal: 1) Before starting work, you will need to drain all the coolant so that when you disconnect the hoses from the cooling radiator, it does not flow out; you can read about how to do this in the article entitled: “Replacing coolant on a VAZ.” (By the way, you can essentially not drain the liquid from the cylinder block, but only drain it from the radiator itself and that’s it, but in this case, after installing a new radiator, you will only need to fill in new liquid of the brand that was filled previously, since when filling in a different brand and another manufacturer there is a mixture that can have a detrimental effect on the engine of your car)
Note! Draining the liquid and, in general, all work with the cooling system must be done only on a cold car, so as not to get burned on the coolant, since when the engine heats up, it gets very hot (For example, when the engine is warm, the temperature of the liquid can reach 85-110 degrees) !
2) Now you will need to remove the air filter housing because it is large and simply will not allow you to remove the radiator and fan; read about how to remove it in the article: “Replacing the air filter housing on a car.”
Note! After the housing, also remove the battery, as it will also interfere with the removal of the radiator and fan. For information on how to remove it, read the article: “Replacing the battery on a VAZ”!
3) After the liquid has been drained, look at all the hoses that are connected to the radiator, you will need to disconnect these hoses so that they do not interfere (A total of three hoses are connected to the radiator, two of these hoses are very large and one of them is connected to the top and the other to the lower nozzle, and the third hose is not large and looks very miniature compared to the others, the third hose is called a steam removal hose and due to it an air lock does not form in the system), and disconnecting them is as easy as shelling pears, pick up a screwdriver and using it, loosen all the clamps that hold the hoses to the pipes and then simply disconnect them.
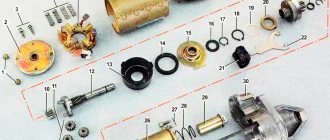
4) Then proceed to removing the fan, it is attached to only five nuts; in order to unscrew them, you will need to stock up on a wrench (instead of a wrench, you can take an extension) and a union head, and using them, after that, first unscrew the two side nuts securing the radiator (see. photo 2), as well as two upper nuts (see photo 3, one of these nuts, by the way, also secures the radiator) and one last lower nut (see photo 4) and after which you can freely remove the fan from the car, but only before Before you start removing the block of wires that comes from the fan with the connector, disconnect it. For clarity, see the photo under number 1 on how to do this.
5) Well, in conclusion, you will need to remove the radiator itself, to do this, simply tilt it back (toward the engine, this means tilt the upper part of the radiator) and then remove it from the engine compartment and replace it with a new one.
Note! If you suddenly need to disassemble the fan (For example, you install an impeller with a large number of blades and want the engine to cool better), then take the knob in your hand and put the socket head on it, then completely unscrew the three nuts that secure the electric motor to the casing (see. photo 1) and then pry it with a screwdriver and remove the harness with wires that is attached to the casing (see photo 2), and thereby disconnect the casing itself and the electric motor (see photo 3), and after disconnecting you can unscrew the central nut which attaches the plastic impeller itself to the electric motor (see photo 4) and then remove the impeller from it and replace it, for example, with a new one, or replace the electric motor itself if it has stopped working and thus the engine has stopped cooling!
Installation: All parts are installed in the reverse order of removal, but there are some nuances during installation, namely, on the bottom of the radiator there are two rubber pads, with these pads, when you install the radiator, carefully make sure that it fits into the holes of the cross member and stands firmly on them , in addition, when you assemble the fan in reverse order, pay attention to the fact that there is a groove on the impeller itself (see photo 1) and on the electric motor there is a small pin (see photo 2), so this very groove should be used when installing the impeller enter this very pin, so watch this carefully.
Replacing the heater radiator on a VAZ 2110
The radiator of the VAZ 2110 heater, like other car parts during the vehicle’s operation, may fail and heating the interior in cold weather will no longer be possible.
In this case, the failed heater radiator must be removed and replaced with a new one, or the already leaking one must be restored.
Before we begin describing the removal and replacement of the VAZ 2110 heater radiator, I would like to note that there is no need to disassemble the dashboard inside the car, since all work is carried out in the engine compartment.
On VAZ 2110 cars produced before September 2013, old-style heater radiators were installed. After September 2013, AvtoVAZ began equipping its “tens” with new-style heater radiators. The difference in removing and installing these parts is not significant, so the description of the process of removing the VAZ 2110 heater radiator will be presented immediately for the old and new model radiators.
If you find that the lower areas of the driver's and front passenger's side of the vehicle are wet or there is a puddle on the foot mat, check for the smell of the resulting liquid. If it turns out that this is antifreeze or antifreeze, then this is a sign of a leaking radiator of the VAZ 2110 stove, which will need to be replaced.
Also, leakage of the heater radiator can be determined by drips in the area of the heater housing in the engine compartment.
Replacing the heater radiator on a VAZ 2110
Instructions for removing the heater radiator VAZ 2110
Before you begin removing the heater core, have the following tools and spare parts ready.
- crosshead screwdriver
- Tweezers (for removing latches in hard-to-reach places)
- Four metal clamps
- And of course, you need to buy a new VAZ 2110 heater radiator (old or new model, depending on which one is installed on your car). Read about how to choose a VAZ heater radiator and which heater radiator is better in this publication.
- Before proceeding with dismantling, it is necessary to drain the coolant from the engine cylinder block. To do this, open the cap of the expansion tank and unscrew the drain bolt behind the ignition module, having previously installed a clean five-liter flat container under the engine.
After the glass liquid is removed, remove the rubber seal in the rear part of the engine compartment, which is located on the windshield, and then unscrew the fasteners and remove the frill. Next, remove the plastic windshield, having previously unscrewed the five screws and two 10 nuts at the edges. Under it there is a windshield washer hose, which we disconnect and move to the side. Then, having unscrewed the windshield wiper fastenings, remove them and take out the windshield trim. After this we have access to the stove body.
Replacing the heater radiator on a VAZ 2110
In order to separate the halves of the housing and replace the heater radiator, it is necessary to remove the metal clamps, which must be replaced with new ones during installation, since during the operation of the car they rust and become unusable.
Replacing the heater radiator on a VAZ 2110
You will also have to remove the cabin air filter by first unscrewing the fastening screws on the heater body. Now you need to turn off the heater fan, to do this, disconnect the positive connector and unscrew the negative terminal from the engine (the necessary connections are shown in the photo) On the back side of the edge of the upper housing cover there are three self-tapping screws, which You also don’t need to unscrew it, otherwise you won’t be able to remove the cover. After removing the front and rear covers of the VAZ 2110 heater along with the heater fan, as well as the cabin air filter housing, you can begin to dismantle the heater radiator itself. By loosening the clamps securing the coolant supply and return hoses, as well as the steam exhaust pipe, remove the leaking radiator.
Replacing the heater radiator on a VAZ 2110
Having cleared the internal and external surfaces of the VAZ 2110 stove from dust and debris, we install a new heater radiator in reverse order.
Important to remember! When assembling the VAZ 2110 stove, make sure that the heater body is in place, otherwise problems may arise in controlling the damper and it turns out that the stove does not heat.
Instructions for removing the VAZ-2110 cooling radiator
In order to replace the cooling radiator on a VAZ-2110, you first need to properly remove the old device. To do this, remove the battery, otherwise it will interfere. Then follow the sequential instructions:
- Remove the ignition module. Now the path is open for you to carry out repairs on plugs on the cylinder block and radiator.
- Remove the plugs and drain the old coolant into a previously placed container.
- If the machine has a built-in injection device, remove the air filter.
- Disconnect the wires going to the fan. To do this, remove the stamped block located on the fan and cut the clamp supporting the harness.
- Release the throttle linkage located right next to the fan shroud.
- After slightly loosening the casing connection, remove the cooling mechanism pipes from the thermostat mounting fittings.
- Set aside the disconnected pipe responsible for removing steam, leading from the radiator to the expansion tank in the area of fixation to the tank. Set the clamp aside.
- Remove the steam outlet pipe from the clamps connecting it. Usually in the VAZ-2110 these clamps are placed at 2 points - on the hose suitable for the expansion tank, and on the pipe connected to the water pumping device.
- Next, carefully disassemble the upper radiator fasteners located near the frame of the car. The fan is now freely available.
- Remove the radiator. To avoid having to pull it and use force, tilt it towards the engine.
- Disconnect the hoses and venting mechanism from the removed device. First, loosen the clamps and pull out the outlet and supply hoses, and remove the steam outlet. Then unscrew the bolts and nuts.
- If the pins located below have pads for a better fit, assess their condition after removal. If they are cracked or there are noticeable deformations, replace them with new devices.
- To determine the leak area, apply an air flow to the radiator with a pressure of up to 0.2 MPa and place it in water.
Model selection
For the VAZ 2110 you can choose either aluminum or copper radiators. To a large extent, the choice depends on what result you need: saving money or durability and reliability.
Their disadvantages and advantages:
- Aluminum. Lightweight, relatively cheap, the price depends on the manufacturer: - Luzar (2110-8101060) - about 1000 rubles; - Pramo (2110-1301012) - retail approximately 1600 rubles. But its thermal conductivity interferes, and it cools the engine worse. In addition, it is subject to fairly rapid corrosion; it takes less time for it to flow; Aluminum radiator cooling
- Copper. It is heavier, significantly more efficient in its cooling characteristics, and lasts longer, since the copper body is less susceptible to corrosion. For it to flow, mechanical action (impact, etc.) is most often required. Photo and video instructions for replacing the cooling radiator of VAZ 2110, 2111, 2112. You can do this work yourself. The disadvantage is that its price is higher, about 5,000 rubles, for a two-row one, with an increased efficiency of 40%. Copper cooling radiator with 40% increased efficiency
Replacing a stove (heater) radiator with video
The most labor-intensive work associated with the interior heating system on VAZ 2110-2112 cars is replacing the heater radiator, or heater, whatever you want to call it. Of course, it is not so easy to carry out this repair on machines of the tenth family, and there is little pleasure in it, but it is quite possible for everyone. The main thing is patience and, of course, having the right tool.
Necessary tool for replacing the heater core
In order to deal with this problem as comfortably as possible and carry out repairs with minimal labor costs, it is advisable to have the following list of tools on hand:
- Ratchet handles large and small.
- The head is 13 deep and 10 similar.
- Extension.
- A regular length screwdriver with a Phillips blade.
- Short screwdrivers: flat and Phillips.
- Magnetic handle.
Since the stove radiator is located in a rather hard-to-reach place, you will first have to perform some preparatory steps, namely:
And only after this you can directly begin the process.
Video on replacing the heater radiator on VAZ 2110, 2111 and 2112
In the usual style for everyone, first I’ll post my video review of the repair, and then I’ll give a few words regarding the replacement of this part.
Please note that for greater simplicity and convenience when performing this repair of the VAZ 2110, it is better to first unscrew the master brake cylinder, as well as the vacuum brake booster. And move all these parts a little to the side so that they do not interfere with the removal of the heater radiator.
Of course, there is no need to unscrew the brake pipes; just unscrew the two nuts securing the cylinder to the vacuum chamber, and then remove the entire assembly. As for the amplifier, on the interior side there are 4 nuts under the steering shaft that need to be unscrewed. And after that you can move this detail to the side a little.
To maintain the tightness of the heater system, or rather its body, be sure to ensure the safety of the sealing foam gasket, which is glued along the entire perimeter of the radiator.
How to fix problems
Now let's talk about eliminating these faults according to the list presented.
- Coolant cannot disappear with the wave of a magic wand; it does not evaporate under the influence of temperature. Therefore, you need to check all pipes, hoses, clamps, radiator and other components. There is bound to be damage somewhere causing a leak.
- If in winter you have to stand still for a long time waiting for the engine to warm up, try insulating the engine compartment. There are many ways to do this - from the classic “sheep coat” for the engine, to using simple cardboard in front of the radiator in winter, or using special insulation. Be sure to ensure that your insulation does not touch the generator belt.
- In the event of detonation, we can only sympathize with the car, since its owner completely ignored all the signals from the car that the CO was in a faulty state. If the simplest repair measures give a positive result, consider yourself very lucky. If not, then engine repair cannot be avoided. And these are completely different amounts of money.
- When the sensor needle is in the red zone, immediately take appropriate measures. Turn off the engine to prevent excessive overheating from leading to even worse consequences. Raise the hood and check for fluid in the reservoir. Just don't open it, it's very hot in there. With a timely reaction, you can avoid boiling and whistling from under the hood. But it’s better not to drive to the service station on your own. Call a tow truck.
- Situations where engine head gaskets break are not uncommon. But we don’t want anyone to encounter them. Such a breakdown indicates that you must begin a full engine repair. On your own or at a car service - decide for yourself.
Article on the topic: Tuning the VAZ 2110 bumper: trims, body kits, skirts
Causes and symptoms of cooling radiator malfunction
The driver will notice problems in the cooling system immediately. This will be clearly visible when the engine is running, especially when traveling long distances. If antifreeze begins to boil, and thick, acrid smoke is pouring out from under the hood, it means that the cooling system has outlived its usefulness. It is absolutely unreasonable to continue driving in such a situation. You need to immediately call a tow truck and tow the vehicle to the nearest service station.
It is far from a fact that it was the radiator that failed. For example, replacing pipes or a fan on a VAZ 2110 is carried out much more often. Therefore, first of all, a car mechanic needs to diagnose the cooling system. For this purpose, special equipment is used, which allows you to quickly identify the cause of problems.
Most radiator failures are associated with the use of low quality coolant. It has an incorrect chemical composition, so during operation, traces of scale form on the internal walls of the unit. This phenomenon negatively affects further operation. Firstly, scale leads to destruction of the radiator from the inside. It is impossible to notice this process, and its consequences will force a complete replacement, since it will not be possible to solder or weld the unit.
Secondly, scale particles sometimes break off and thereby interfere with the normal circulation of the coolant. This will lead to system failure and constant overheating of the motor.
Checking the radiator of the cooling system to ensure its serviceability is very simple. You must first remove the device from the car, then plug the pipes and lower the unit into a bath of water. If the radiator has not lost its seal, then air bubbles will not float to the surface. If they appear, it means that there is a leak in the system and the part needs to be replaced. To obtain a reliable result, it is necessary to tightly close the pipes so that they do not allow air to pass through.
Provided that the radiator has retained its tightness, you can try to descale it. To do this, a special liquid is poured into the system, which removes all foreign elements from the internal walls. Then you need to drain it, thoroughly rinse the radiator and blow it with air so that no particles remain inside.
To keep the radiator in working condition longer, it is necessary to fill the cooling system only with those brands of liquids that are recommended by the official manufacturer. All other models may simply be incompatible with the device, which is why it will very quickly use up its working life.
How to increase the lifespan of a cooling radiator
No matter how good the radiator of the cooling system in the VAZ-2110 is, if there is no preventive maintenance of its operation, it will still fail, which will ultimately result in big problems for the car enthusiast - the engine and the stove that heats the interior of the car will stop working. To avoid this, experts recommend flushing the device in a timely manner. 1-2 scheduled procedures per year are quite enough to prolong the operation of the system and engine.
What else does a novice car enthusiast need to remember? Filling with antifreeze to effectively use the iron horse is, of course, good, but without cleaning with special detergents, the new solution will very soon turn black.
Choosing something new
Before removing the cooling radiator from your VAZ 2110, you need to think about what unit will be in its place. There are not many options, but the choice should be made wisely.
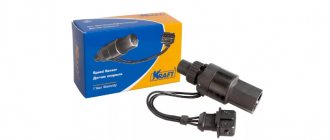
Kraft model
For the domestic “ten” there are two types of cooling devices - aluminum and copper
And here it is important to think about what exactly you want - reliable, long-term operation, or minimal financial costs for its purchase
- Aluminum. They are light in weight and quite cheap. Prices directly depend on the manufacturer. But such radiators have poorer thermal conductivity and do not cool the engine as effectively. Plus, aluminum units are characterized by the appearance of corrosion after a short period of operation. Among the most popular models, we note two: Luzar. Its cost is now about 1000 rubles;
- Pramo. You will have to pay about 1600 rubles for it.
The dismantling and replacement procedure is simple, if you first study the instruction manual, watch video tutorials, and consult with specialists.
Fasteners
Do the work step by step to achieve the desired result:
Drain the coolant through the bottom plug; Remove the battery from your seat, as it will interfere with you during the replacement process; If we are talking about an injection engine, then you will have to additionally remove the air filter; Be sure to disassemble the upper fasteners to the frame, and also free the electric fan. It will have to be dismantled; Additionally, remove two pipes - those that supply and discharge steam; Tilt the radiator slightly towards the power unit, which will allow you to remove it without much effort; With minor leaks and no corrosion damage, the radiator is completely repairable
Although we do not advise you to take risks, since even a well-repaired radiator can regularly cause various problems; When installing a new unit, pay attention to the rubber cushions. The radiator housing rests on them with its lower part
These pillows must fit firmly into the holes located on the crossbar; Pour new coolant into the system, connect the pipes, replace the battery, and tighten all the plugs. Only now can you turn on the engine and check the efficiency of the new element of the cooling system.
The procedure for replacing the cooling radiator on a VAZ 2110 car cannot be called complicated. Yes, it has certain subtleties and nuances, and requires compliance with safety measures and careful, consistent work.
There are more than enough schemes to deceive customers at car service centers. They may start changing the radiator, but say that you still have a whole list of serious problems there, which in fact do not exist. They will do basic work, if anything at all, and give you an invoice for a tidy sum.
But it's not all that scary. There are good auto repair shops, and an experienced car owner is able to solve a number of problems with his car through his own efforts.
The fastest way to replace the heater radiator on VAZ-2110, VAZ-2111, VAZ-2112 cars
The main reasons for replacing the heater radiator are : a leak in the heater core and a decrease (or complete absence) of heat transfer from the radiator. With the first reason everything is clear and understandable. The loss of antifreeze from the expansion tank and traces of its (antifreeze) appearance under the car are difficult to miss. Plus, on top of that, the smell of antifreeze will appear in the car interior. And the diagnosis suggests itself - the heater radiator is leaking. But with the second reason, everything is not so quick and clear. Since a decrease in the temperature of the air entering the car interior through the heater can occur for several reasons - insufficient coolant level in the car system, a faulty thermostat, an air lock in the cooling system, a problem with the regulator or heater flap control motor and, finally, a clogged radiator stoves _ Therefore, before blaming the heater radiator for poor interior heating, you must first check and make sure that the entire cooling/heating system is working (check the antifreeze level in the tank, check the thermostat, make sure the unit and the heater damper control motor are in good condition).
Only after this will it be possible to sign the final “verdict” on the stove radiator. But, before that, it wouldn’t hurt to carry out one simple check: warm up the engine to operating temperature, check the upper and lower heater pipes with your hand in the engine compartment (they should be the same temperature), turn the “heat-cold” knob all the way to the right, turn it on heater fan. If, in the first 10-20 seconds, the air flow was hot or comfortably warm, and after that its temperature began to noticeably decrease to “room temperature,” then you can safely prepare to work on replacing the stove radiator. And this photo report describing the fastest way to replace a new model heater radiator on VAZ 2110-2112 cars will be useful for you. At the very least, I hope so))).
Spare parts. For VAZ 2110-2112 cars, heater radiators are sold in two versions - old and new . Until the fall of 2003, dozens of them had old-style heater radiators installed. After 2003 - new. These radiators are not interchangeable. Therefore, before going to the car market, you must first decide which of the two options you should buy. The catalog number of the new stove radiator is 21110-8101060-00 . The catalog number of the old-style stove radiator is 2110-8101050 .
Then they answer the question, “Which manufacturer of the heater radiator is better to buy/install on a VAZ 2110? “. The correct choice of heater radiator (heater) for VAZ-2110, VAZ-2111, VAZ-2112 is a radiator manufactured by DAAZ ! And this is not advertising, but friendly advice. Excellent quality and excellent heat dissipation - time-tested. All other options will definitely lose. Either they will flow quickly, or they will heat poorly. Therefore, I recommend not to play roulette and not to try to save money, but to buy a DAAZ stove radiator.
List of tools that will be necessary to successfully replace the heater radiator (heater) of a new model on VAZ-2110, VAZ-2111, VAZ-2112 cars manufactured after 2003 : a container for collecting coolant, a Phillips screwdriver, a high 10-mm socket + a ratchet wrench , socket wrench for 17 and 13 (the presence of a universal joint, extension and ratchet wrench is welcome, as their presence greatly facilitates and speeds up the work).
Photo report describing a quick way to replace a new model heater radiator (after 2003) on VAZ-2110, VAZ-2111, VAZ-2112 cars:
First of all, you need to drain the coolant. We find the drain plug on the engine block (photo 1). We place a container under the engine to collect antifreeze and unscrew the plug (key 13). Then unscrew the cap of the expansion tank. While the liquid is draining, we begin disassembly.
If you have made a decision or there is a need to replace the coolant along with the heater radiator, then you will have to drain the antifreeze from the cooling radiator (photo 2)
Unscrew the clamps and disconnect the pipes from the expansion tank. Unfasten the fastening belt and remove the expansion tank (photo 3).
Remove the hood seal (photo 4).
We find and unscrew all the fastening screws of the left and right parts of the soundproofing lining of the engine compartment (photo 5, 6, 7, 8).
We disconnect the plastic clamps from the casing (photo 9).
At the bottom, the casing is attached to the car body with two nuts. We find them and, using a high 10 socket and a ratchet wrench, unscrew them (photos 10 and 11).
After which, you can pull out the trim from the engine compartment.
We disconnect the chip from the brake cylinder reservoir cap (photo 12).
Disconnect the hose together with the fitting from the vacuum booster (photo 13).
Using a 17 wrench, unscrew the two GTZ mounting nuts to the vacuum brake booster (photos 14 and 15). In order not to air the brake system, we do not unscrew the pipes from the main brake cylinder. It is enough to move the GTZ forward (in the direction of travel of the car) as far as the brake pipes will allow.
We climb into the car interior. Disconnect the wires from the brake light switch (photo 16).
Using a 13mm socket wrench, unscrew the four fastening nuts of the brake pedal bracket to the body (photos 17 and 18).
After which, you can return to the engine compartment and begin to pull out the vacuum brake booster along with the bracket and pedal. This is not an easy matter and it is unlikely to be done quickly. You will have to twist and turn the vacuum booster a little before you can pull it out. But, I can assure you that it is quite possible to remove the vacuum booster with the bracket without removing the plastic cover of the windshield (photo 19).
Now access to the new model heating radiator (stove) is open. Where the heater radiator is located on a VAZ 2110-2112 can be seen in photo 20.
All that remains is to unscrew the worm clamps of the two main and one steam outlet pipes (photo 21). Disconnect the connector from the damper control micromotor (photo 22).
And unscrew the three fastening screws of the radiator to the stove body (photo 23).
We take out the old radiator (photo 24).
We clear the niche of leaves and debris. And we install a new stove radiator (photo 25).
Just as fun as we pulled it out, we return the vacuum brake booster with the pedal bracket to its place (photo 26).
After which we carry out the assembly in the reverse order.
That's it! Replacement of the new type heater radiator on VAZ-2110, VAZ-2111, VAZ-2112 cars has been completed.
When using an article or photographs, an active direct hyperlink to the website www.avtorem.info is required!
Did you like the article? Share it on your page!
Choosing a radiator for VAZ-2110
The original radiator of the VAZ-2110 has lugs for fastening, but some manufacturers produce models without these fastenings.
Signs of malfunction and breakdown
Leaks can be caused not only by physical damage, but also by poor-quality coolants. In any case, repairing radiators using magic additives that close cracks and holes is detrimental to the engine. No one can say that this product will clog the cooling system. Therefore, there are two options - replacement or repair.
Articles
Sometimes repairing a radiator is completely impossible, and sometimes it will cost more than a new one. Therefore, we will immediately consider the market offers and the model. And there are only two models - for the 1.5-liter carburetor engine and for all the others. Later models for all injection engines are suitable for both Priora and Kalina. An old radiator for a carburetor engine has catalog number 2110-0810106000 and costs about 1000-1500 rubles. A new one with article number 2172-1300010, 2112-1301012, 21102-1301012, 2170-1301012-95 can cost from two to six thousand.
On “tens” since 2008 with radiators.
Prices
The price of a VAZ-2110 radiator depends on the material and manufacturer:
- Copper radiator.
It is produced by only a few factories: Orenburg, SHAAZ and several foreign companies. The high price is justified by its high service life, excellent heat dissipation properties and maintainability. The only downsides are the price and weight. It is heavier both in rubles and in kilograms. Copper radiator 2-row. - Aluminum.
The most popular type of radiators because they are the most affordable. Its advantages include what they don’t like about copper ones - weight and price. It's light and cheap. In other respects, it is much inferior to copper - in terms of corrosion resistance, strength, service life, and heat dissipation properties. In addition, aluminum radiators cannot be repaired. They are produced by several dozen domestic and foreign factories, and the most popular are radiators from DAAZ, Luzar, Kraft, Weber, Bautler and a number of other factories. Aluminum radiator 2112-1301012.
Replacing the cooling fan and radiator on VAZ 2110, VAZ 2111, VAZ 2112
Welcome! The engine cooling fan plays a very important role, since it cools the radiator, which in turn circulates coolant through the system and all of this together is a cooling system, but the fan sometimes fails, and the radiator sometimes gets punctured by pebbles, which is why it comes out of it Coolant begins to leak and it needs to be replaced.
Note! To replace both of these units, you will need to stock up on: Wrenches, as well as a socket wrench, in addition, you will need a small container (it should be wide) into which you will drain the coolant from the radiator of the cooling system, and you will also need a screwdriver!
Summary:
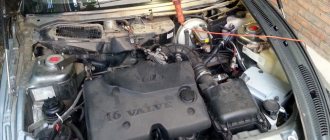
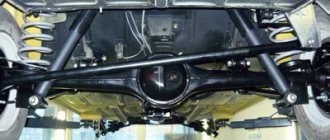
Where are the radiator and cooling fan located? Both of these units are located in the front of the car, you won’t be able to see them so easily, because they are large and therefore you can only see parts of them, for example, to see the fan you will only need to look under the TV of the car (The TV is its front part on which the headlights, bumper and other parts are located, the wings no longer belong to it) and you will see a fan thanks to which the car’s engine is cooled (For clarity, the fan is indicated by a red arrow, and the air filter housing has already been removed since it is very in the way review), and in order to see the radiator itself, you can also look under the same TV or look through the radiator grill (The radiator will be visible through it).
When do you need to change the radiator and cooling fan? The radiator, as mentioned earlier, needs to be changed when a hole or holes appear on it, which may appear due to a pebble getting into it (this happens through the radiator grille) or due to strong pressure in the cooling system, which may appear due to a valve malfunction in the cap of the expansion tank or in the radiator cap, if these valves or only one valve fails, the pressure in the system increases, and therefore the increased pressure in the expansion tank (Tank cap valve has failed) will ultimately lead to the fact that the tank is in in the literal sense of the word, it will explode, as for the radiator relief valve, it is still located on the same cap (On the radiator cap we mean) and when this valve fails, the pressure in the radiator begins to increase, and therefore it begins to leak from all the cracks of the radiator The fluid and radiator will eventually (if you drive at high pressure for a very long time) become unusable.
Replacing silent blocks on a car - step-by-step instructions
You should prepare for replacing silent blocks.
You will not be able to do without a jack or pit, a kit for replacing parts and the tools necessary to press out the silent block.
- The vehicle is placed in a “pit” (inspection hole) and the crankcase protection, if present, is dismantled.
- We unscrew the nuts that serve to secure the front arms. Use a #17 wrench to unscrew the nut that secures the stabilizer to the lever, and remove the bolt using a hammer (it’s very difficult to remove it manually).
- We tear off the bolts for fastening the front wheel and lift the side of the vehicle we need with a jack, after which we remove the wheel.
- Next comes unscrewing the next nuts - on the braces. You can't do without a shoulder key here. Note: before unscrewing, the nuts should be treated with VD-40 (a substance known to all motorists).
- After that - a ball joint, which is moved away from the rotary cam, and a couple more bolts, after unscrewing which the lever is dismantled.
- Now, using a special device, the silent blocks are dismantled and the eyes are cleaned of dirt.
- Next is pressing in new elements. In the absence of a special kit, a hammer, chisel and Russian ingenuity are used to replace them. But there is a risk of damage to the element or part of it.
- Next, the pressed silent block is lubricated with soapy water and installed in its rightful place. We return everything to its place, but in the reverse order (except for the old silent blocks, of course).
Important!
After replacing the silent blocks, a wheel alignment procedure must be carried out in case something was broken during dismantling. 7 good reasons to come for wheel alignment adjustment
Of course, if you have talent and minimal knowledge of car design, you can replace the above-described elements yourself.
But if you have the slightest doubt, entrust this labor-intensive procedure to specialists (replacing silent blocks on your own has more than once cost craftsmen a pretty penny). And don’t delay visiting the service station - safety is more important!
AutoPride will help you with replacing silent blocks, where you will find professionals with many years of experience, high-quality modern equipment and affordable prices.
Diagnostics of the heating system of VAZ 2110
If the function of the temperature regulator is malfunctioning, two most common reasons can be noted:
- incorrect operation of the control unit,
- damper malfunction.
If the temperature controller malfunctions, the first thing you need to do is pay attention to the condition of the temperature sensor. Temperature analyzer located next to the lampshade located on the ceiling
You can check the functionality of the temperature analyzer as follows: you need to turn the temperature knob several times and tactilely analyze the temperature of the air flow.
If the air flow temperature changes only when the regulator is in the extreme position, the analyzer must be replaced. If, however, the temperature of the air flow changes according to the position of the regulator, the sensor is functioning properly and the cause of the breakdown is the incorrect operation of the control unit.
In order to check the function of the VAZ 2110 heater, it is necessary to move the damper located in the engine compartment. Next, it is necessary to visually diagnose the tightness of the radiator. If the check shows a violation of the heater seal, it is necessary to replace it with a new one. Replacing the heater involves dismantling and completely disassembling the VAZ 2110 stove. If you have a new heater, you can replace it yourself.
modification of the engine cooling system
One of the main systems of the car, the engine cooling system, may not work correctly if the expansion tank cap does not release excess pressure in time. As a result, the pressure in the system will be too high, which will cause leakage of the pipes. Upgrading the expansion tank cap is designed to prevent this situation.
The pump is a simple assembly that consists of a housing, a bearing and an impeller. This cooling system pump circulates the coolant. If the pump does not work, then the engine will overheat. What is the service life of the pump and which pump to choose for the VAZ?
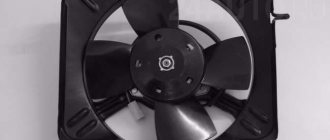
In the summer, the radiator fan of cars of the tenth family often turns on. To make it easier to cool the engine in hot weather, you can install two radiator fans instead of one. What modifications will be required for this and will 2 fans even fit in front of the engine radiator?
There is a known problem with new type expansion tanks, when it is always wet around the cap, and there are leaks in the corner between the engine shield and the fender. The reason is not a thin tank, but a stream of liquid that comes out of the upper steam outlet fitting. It is directed in such a way that it fills the neck of the tank and when the valve is activated, the antifreeze is carried out. We are trying to modify the expansion tank.
A car consists of several systems, one of which is the engine cooling system. If this system works properly, then we don’t even think about it. And if at least one part of the system fails, then a number of problems are possible, including the popular disease when the engine overheats. Let's figure out which radiator is better to choose.
If a car's radiator leaks, most of us resort to replacing it. However, in most cases, the radiator can be repaired rather than replaced. Sometimes no skills are required, but sometimes you can’t do without knowledge in the field of welding or soldering
We learn to determine the condition and try to restore the radiator with our own hands.
If you notice that the engine suddenly begins to heat up, then you should pay attention to the operation of the engine cooling system. The engine cooling radiator takes the brunt of dirt, dust, leaves and poplar fluff. This is why a dirty radiator is one of the reasons for engine overheating
Let's figure out how and how to clean a car radiator yourself.
The engine cooling system (ECS) plays an important role in vehicle operation. If it is not working correctly, then it may be that the engine is not warming up to operating temperature. Then the stove does not heat well and the life of the internal combustion engine is reduced. Either the engine overheats, then the car will “boil”. How to determine a malfunction of the engine cooling system with your own hands?
How a car's engine cooling system will work depends on many factors, but its main component is certainly the coolant (antifreeze/antifreeze). The operation of not only the engine and heater, but also the elements of the SOD itself depends on the quality of this fluid. How to choose high-quality antifreeze for VAZ 2110?
The new VAZ 2110 expansion tanks are installed without sensors, while the old tanks have a coolant level sensor. That is, to install a liquid level sensor at ten, you need to replace the new type tank with an old one..
What are the benefits of changing the Engine Cooling System (ECS) on the VAZ 2110 following the example of the Lada Kalina? How is SOD Kalina better than SOD VAZ 2110? What will be required for such a modification? Answers to these and other questions below..
If you decide to replace the thermostat with a new one, then at the same time you can immediately modify it. Modifying the thermostat brings its pros and cons. In this article we will focus on how you can remake the VAZ 2110 thermostat yourself, and what you will need for this.
Replacing a 5-hole thermostat with a 6-hole thermostat will make maintaining the coolant temperature more stable, and will also make your car noticeably warmer. How to install a 6-hole thermostat in a VAZ 2110? It turns out there are several solutions to this issue.
Installing an additional pump in a VAZ 2110
The cold weather is coming and every heat-loving car owner is wondering how to prepare his car for winter. After all, not everyone wants to freeze in the car all winter. The stove on the VAZ 2110 warms, but not as much as we would like. One of the disadvantages of the heater is its low efficiency at idle. Installing an additional pump will solve this problem.
Latest >>
Why does the engine overheat?
The engine on a VAZ 2110 can overheat for various reasons. The first priority is a decrease in the efficiency of the cooling system. Why does it stop working properly?
- The cooling system pipes may become clogged. Today such a situation is rare. Mainly provided that very low-grade coolant is used for CO. There is only one way out - change the pipes and use normal coolant.
- Various smudges and leaks lead to a decrease in the coolant level. Here you will have to replace all the components that are causing the leak.
- The housing is dirty. Over time, debris, dirt, leaves, insect corpses, and so on accumulate on the radiator housing. This negatively affects work efficiency. Therefore, be sure to periodically clean the exterior of the housing.
- Radiator leak. In such a situation, you will have to remove it, assess the extent of the damage and decide whether to repair it or replace it with a new one.
We replace the VAZ 2110 stove radiator with our own hands
Before you replace a leaking or possibly clogged radiator, you need to choose a new one. Here you have space, it is quite possible that you will want a copper, DAAZ or Priorovsky one. But try to decide for yourself, look at reviews of different models on the forums, and only then buy.
Pay attention to the condition of the pipes; it is quite possible that they also need replacement. You will need more clamps, try not to limit yourself to the three recommended, a supply, as you know, will not hurt
First of all, you need to drain the antifreeze
You will need more clamps, try not to limit yourself to the three recommended, as you know, a supply will not hurt. First of all, you need to drain the antifreeze.