04/23/2021 20 611 VAZ 2107
Author: Ivan Baranov
The problem of failure of the clutch fork in a VAZ 2107 car can be considered a disease of these car models. This kind of breakdown often occurs among owners of “Sevens”, and they have already learned how to solve it without dismantling the gearbox. Therefore, now we will tell you how to replace the clutch fork without removing the VAZ 2107 gearbox.
[Hide]
Clutch fork troubleshooting
The VAZ 2110 (BC) clutch drive fork is part of the vehicle’s transmission system; without it, the effective operation of all auto mechanics is impossible. The BC has the form of a lever, with the help of which the pressure plate is retracted, as a result of which the clutch is released. Sometimes the term “shift fork” is used to refer to the aircraft, since in the opposite direction, when the pedal is released, it engages the clutch.
When squeezing the pedal, this spare part helps move the clutch and release bearing, which ensures that the inner edge of the spring moves forward and then turns off the device.
The VAZ 2110 clutch fork requires replacement in the following cases:
- deformation;
- crack;
- curvature (distortion);
- defective legs at the point of contact with the liner coupling;
- foot wear.
Classic VAZ representatives often suffer from such a defect as cracking of the aircraft. This category of failure affects the reduction of clutch engagement positions, and its correction does not take much time. Therefore, to ensure high-quality operation of the transmission mechanism, the VAZ 2110 aircraft should be replaced.
All car parts are subject to wear and tear during operation, and the VAZ 2110 clutch fork is no exception. Factory defects in the production of this element are quite rare, since it is distinguished by significant structural simplicity. In the event of a sudden breakdown of the aircraft, the pedal fails and further movement of the car is simply unrealistic.
In addition, the breakdown is reflected in the unsatisfactory inclusion of speeds, which leads to repeated supply of the aircraft and further regulation of the freewheel. This malfunction causes the fork to deviate from the release bearing along the resulting crack. Auto-regulation lasts only a couple of days, and sometimes even several hours, depending on the size of the defect.
Clutch fork repair cost
At auto repair shops, specialists can provide you with services for replacing the clutch fork. This procedure will cost from 4,000 to 6,000 rubles. It is not necessary to buy parts separately if you are doing the repairs yourself. The entire clutch kit will cost from 3,000 rubles. The cost of the clutch fork itself reaches about 500 rubles.
Video of replacing a car clutch fork:
If the fork in the clutch mechanism becomes faulty, the car stops moving. The part is an important component of the transmission, so the breakdown should be repaired promptly. We will try to do this ourselves without contacting a car service.
If the car’s clutch does not work effectively and almost does not respond to pedal pressure, this means there is a flaw in the fork. When eliminating a defect, some perform adjustments with the fork freewheeling. As a result, the operation of the mechanism is temporarily resumed.
To assess the condition of the clutch, we will inspect the installation
.
✔
We'll put the transport in the pit.
✔ Slide the protection boot at the bottom, which covers the clutch fork.
✔ Then we check the part using a flashlight - looking for cracks.
In general, the fork can break due to wear. Then the pedal will immediately fall and the car will stop. If the product is bent, it means that a significant impact was reflected in the structure. That's why the deformation occurred. The device's feet may be worn out.
KAMAZ clutch device
The vast majority of KAMAZ vehicle models are equipped with a traditional mechanical transmission, which includes a clutch with manual (or rather, foot) control. This unit ensures interruption of the flow of torque removed from the engine flywheel and supplied to the gearbox at the moment of gear shifting, as well as for a smooth start of the vehicle from a standstill and performing other maneuvers associated with changing the speed limit (in particular, when braking).
Today, all KAMAZ trucks use dry friction double-disc clutches of two main types:
• Model 17 - diaphragm clutch. Clamping of the discs is ensured by a central diaphragm spring, integral with the basket; • Model 14 and 142 - clutch with coil (regular) springs. Clamping of the discs is ensured by a number of cylindrical pressure springs located around the circumference. The Model 14 uses 12 compression springs and the Model 142 uses 24 springs.
Diaphragm clutches are used primarily on new KAMAZ models, but traditional clutches with peripheral springs are also widely used. Both types of clutch have a similar design, differing only in the design of the release mechanism, which is mounted on the basket. Let's look at the design of each type of clutch, but first let's look at the part common to both types of clutch - the friction disc package.
The basis of the clutch is a package of two drive, one driven and one pressure plate. The drive and pressure disk are in engagement with each other using spikes on the outer surface, the inner drive disk is made in the form of a flywheel, it is connected to the engine flywheel through a shaft. The package of drive disks is assembled in such a way that they can move along the axis, as a result of which the distance between them changes.
Between the drive disks are driven disks (or clutch disks), mounted on a shaft directly connected to the input shaft of the gearbox. The driven discs are much thinner than the driving ones, they are made of a material with a high coefficient of friction, or they carry friction linings made of the same material. The discs are mounted on the shaft using a splined connection.
In the normal position, the disk pack is compressed (which is provided by springs), it rotates as a single unit, so the torque removed from the engine flywheel is transmitted through the drive and driven disk pack to the gearbox. If the driver presses the clutch pedal, the discs are moved away from each other using the release mechanism, and the flow of torque is interrupted. It is at this time that you can change gears or brake without fear of breaking the gearbox.
The main difference between a diaphragm clutch and a coil spring clutch is the design of the release mechanism and, as a result, the design of the basket.
Diaphragm clutch. The basis of the clutch is a housing called the basket. The housing is covered by a package of friction discs, and at its end there are petals of a diaphragm spring. The spring petals work like levers - in the center the clutch rests on them, and on the opposite sides they press on the pressure plate. In the working position, the disk pack is compressed by a spring; when the clutch is disengaged, the petals facing the center are pressed inward, and on the reverse side, rising, they move the pressure disk, as a result of which the drive and driven disks are moved away from each other.
Clutch with coil springs. This type of clutch also uses a basket, but the disc pack is compressed by 12 or 24 coil springs. The clutch is released using four release levers located in a circle above the discs. The principle of operation of the levers is the same as that of the diaphragm spring - the clutch is disengaged by the clutch, which pushes the arms of the levers facing the center of the basket, as a result of which the levers on the reverse side lift the pressure plate.
Compressing the disc pack (i.e., operating the clutch) is accomplished using a simple mechanism that consists of a clutch fork, a clutch fork shaft, and a shaft lever.
Clutch System Specifications
7.2. Replacing the clutch disc or drive part
| GENERAL INFORMATION |
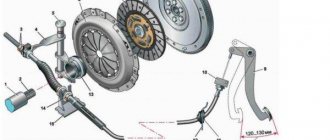
Clutch release lever
| 1 – mounting bushing on the ball joint, 2 – flaring the protrusions of the bushing fastening on the clutch release lever |
| EXECUTION ORDER |
| 1. Mark the position of the clutch drive part relative to the flywheel using a marker or paint. |
| 2. Evenly and sequentially, diagonally, loosen the pressure plate mounting bolts, turning them half a turn until the spring pressure is released and the bolts can be unscrewed by hand. |
| 3. Using a lever, remove the clutch drive assembly from the guide pins and remove the clutch disc. |
| EXECUTION ORDER |
| 2. If these defects are present, the clutch disc must be replaced. |
| 3. If the friction linings are in good condition and not worn to the grooves, the damper springs are securely fastened and the rivet joints are not loose, then the clutch disc can be installed in the car. |
| 4. If the clutch disc is contaminated with oil, check the left crankshaft or transmission input shaft oil seal. If necessary, replace the O-rings before installing a new clutch disc. |
| 5. Check the drive disk assembly for wear on the pressure plate, mechanical damage, reliability of the rivet connection, and damage to the clutch diaphragm spring. If the diaphragm spring is worn or damaged, or if spring tension is suspected to have changed, the drive plate assembly will need to be replaced. |
| 6. Check the working surfaces of the pressure plate and flywheel mating with the clutch disc linings. They must be clean, flat, free from scratches and wear. If there is warping from heat or cracks, they must be replaced. |
| 7. Check the release bearing, which should rotate easily, evenly and quietly. The working surface of the bearing acting on the pressure spring must be smooth, without cracks, local corrosion or wear. If these defects exist, the release bearing must be replaced. On the second type of clutch drive units, the entire unit must be replaced. |
How does the clutch work?
The principle of operation varies, but the most famous and common is frictional. The system is simple, the work occurs using friction. But in addition to it, there is a hydraulic principle system, a fluid that drives the entire system. There is also an electromagnetic system that uses an electromagnetic field to make the entire system work. Combined mechanisms are very rare.
There is a release disk system, which is also called a basket. It's placed between the springs and the flywheel, and in the center of it all is a thrust bearing. There is also a driven disk, which is attached to the clutch, clutches and springs. In addition to all this, there are pedals, levers and the fork itself, but everything listed above is the most important.
If the pedal is released, the driven disk rubs and thereby transmits torque to the box. But if the pedal is pressed, the disc no longer rubs, but instead the fork begins to work, which goes into the flywheel.
The clutch is a special system device that connects the engine and transmission. It performs important functions in a car. First of all, it transmits torque. However, in addition to this, it protects the engine and transmission from any damage or stress. Thus, it prolongs their performance.
The mechanism of the device consists of such parts as a pressure and release disk. Its other name is a basket, which is placed between a special flywheel and springs. There is a thrust bearing in the center. In addition, there is a driven disk, which is attached with a clutch, springs and friction linings. These are the most basic elements of the system. It also includes clutch pedals, levers and finally the clutch fork.
The whole principle of operation of the mechanism is that when the pedal is released, friction occurs on the driven disk, as a result of which torque is transmitted to the transmission. In the reverse position, the friction force stops acting on the disk and the clutch fork begins to work, due to which it goes back to the flywheel.
The concept and principle of operation of the clutch and its components
The clutch is a special system device that connects the engine and transmission. It performs important functions in a car. First of all, it transmits torque. However, in addition to this, it protects the engine and transmission from any damage or stress. Thus, it prolongs their performance.
There are several types of clutch mechanism. The most common type is friction. Its design is quite simple, and the principle is that it works due to friction. There is also a hydraulic mechanism, which is based on a special hydraulic fluid that powers the mechanism. And finally, the last type is the electromagnetic clutch. The essence of its work is that it uses an electromagnetic field to activate the entire clutch mechanism. There are cases when a combined type of clutch occurs, which combines two main types.
Replacement
In most cases, VAZ 2107 cars are equipped with a single-plate clutch, the operation of which is ensured by a special drive. Double-disc clutches are usually installed on more powerful vehicles and trucks. But this does not mean at all that the VAZ 2107 cannot have a double-disc element.
In any case, when you press the clutch pedal, the drive ensures the movement of the aircraft, which, in turn, acts on the bearing. The latter, as a result of moving the fork, presses on the petals of the spring element of the pressure plate. The spring bends towards the flywheel, simultaneously disconnecting from the pressure plate, thereby freeing it.
When the driver releases the clutch pedal, the pressure plate begins to interact with the driven components as well as the flywheel. At this time, torque is transmitted from the engine to the gearbox, which occurs due to friction forces. This process of clutch functioning is in no way possible without a working fork. The BC for the “classics”, which is 2107, is shaped like a slingshot.
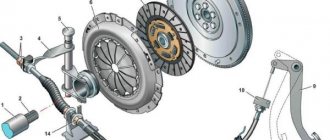
New and old forks for VAZ 2107
Replacing an element
Replacing the aircraft in a VAZ 2107 car can occur in several ways. In the first case, it is necessary to remove the gearbox, which is a rather labor-intensive process that cannot be accomplished by any driver. In the second case, you can change the element without removing the gearbox. Domestic motorists encountered this breakdown so often that they found a simpler way out of this situation.
Instructions for replacing the clutch fork on a VAZ 2107
- Remove the gearbox.
- Remove the pressure bearing.
- The next step is to remove the rubber cover by hooking it with a screwdriver. Pull it off the power plug. It also needs to be replaced if it becomes warped, cracked or hard.
- Use pliers to squeeze the locking tabs on one side of the crankcase. Using a screwdriver, pry up the plastic bushing of the fork axle. If there is noticeable damage or signs of wear on the cap, then it also needs to be replaced.
- We unfasten the clutch fork itself: by lifting it, you need to remove its axle from the bushing. First, the axle, then the lever, are removed from the outlets in the crankcase.
- You need to squeeze the ends of the fork spring retainer and remove it. A deformed retainer needs to be replaced.
- We replace the fork that shows signs of wear.
- It is usually recommended to replace the metal bushing as well, especially if it is noticeably worn.
- Before installing a new part, you need to lubricate both the metal and plastic bushings.
- Next, install the shutdown plug. Assembly is carried out in the same order, starting from the end. Carefully secure the plastic sleeve. The protrusion on it should be in the recess on the crankcase. The petals should firmly secure the sleeve, preventing it from falling out.
Clutch hoses often fail, which leads to loss of fluid in the hydraulic drive. All this interferes with normal gear shifting.
Signs of a hose failure are:
- the car shakes after fully depressing the pedal;
- drops appear at the ends of the tube all the time;
- puddles remain at the parking site;
- The pedal, when released, stays in the down position.
Replacement is carried out as follows:
- first of all, remove all fluid from the hydraulic drive;
- then remove the fastenings of the expansion tank and move it;
- unscrew the nuts connecting the hose and clutch tube;
- remove the bracket from the bracket;
- discard the end of the hose;
- from the bottom, disconnect its other end from the working cylinder;
- dismantle the unusable element.
Then all that remains is to replace it with a new one. All work is carried out in reverse order:
- a hose is attached to the cylinder;
- its second end is connected to the clutch hydraulic system;
- the tank returns to its place;
- fresh liquid is poured in.
As you can see, replacing the clutch on the 2107 model, although troublesome, is not too difficult. You will need a new unit and a completely normal set of tools. At the same time, remember - if you do not have confidence in your own abilities, then it is better to contact a service center. This way you are guaranteed to avoid troubles and even greater expenses.
Clutch problems
The VAZ 2106 clutch, although rare, still causes problems for the owners of this car. Malfunctions can be of various types and they also manifest themselves in different ways. Let's take a closer look at them.
Brake fluid leak
The working medium of the “six” clutch mechanism is brake fluid, which sometimes leads to some problems:
- Fluid leakage due to damage to the hose between the master and slave cylinders. The connecting element may become unusable when installing a low-quality product or as a result of rubber aging. To eliminate the problem, the hose will need to be replaced;
Drives the clutch
The concept of “clutch drive” is used when the mechanism is not completely disengaged. This can happen for several reasons:
- The driven disk was damaged, causing axial runout. The most correct solution is to replace the part;
- Cracks have formed on the driven disk linings. The appearance of defects is reflected in the inability to engage the clutch in a timely manner. In this case, you should replace the entire disc or the pads themselves;
- The rivets of the friction linings have failed. When the rivets wear out, the fixation of the linings weakens, which leads to problems when the clutch is disengaged and increased wear of the linings themselves;
- Air has entered the hydraulic system. The problem is “treated” by pumping fluid;
- basket distortion. Although the malfunction is rare, if it occurs, you will have to purchase a new pressure plate.
The clutch is slipping
When clutch slip occurs, the mechanism does not engage completely, but this happens for the following reasons:
- oil got on the friction elements of the driven disk. You will have to remove the gearbox and disassemble the clutch mechanism to clean the linings with white spirit;
- The compensation hole in the main circulation system is clogged. To fix the problem, you will need to remove the cylinder, remove the blockage, and then rinse the product in kerosene;
- Friction linings are burnt. The malfunction is eliminated by replacing the driven disk.
Clutch pedal squeaks
The pedal may squeak due to lack of lubrication in the bushings or when the bushings themselves are worn out. To fix the problem, the pedal will need to be removed, the bushings checked for wear, replaced if necessary, and lubricated.
Vibration
A faulty clutch can cause vibration, this is not surprising, because the assembly undergoes a rotational movement and imbalance causes vibration.
It happens that after replacing the clutch with a new one, vibration appears. It would seem that everything seems to be new, but when starting off there is some kind of vibration and jerking. Most likely, you came across a restored basket, the so-called refurbished, that is, the clutch is changed at a car service center, the old set is sent to the factory for restoration, and sometimes such imperfections happen. Such a set usually costs less than a new one, but it’s not a fact that they won’t push it on you under the guise of a new one. The box should say refurbished
.
On an old, battered clutch, if when starting off, the damper springs have become loose, or the basket begins to fall apart; if vibration occurs while driving, the basket is most likely torn; a slight vibration may indicate slight wear of the basket, especially if only the disk was replaced at the last time. In general, the clutch is a part that must be dynamically balanced; if the center of mass is suddenly disturbed, then in any case vibration will result at certain engine speeds. The flywheel will not give such a vibration for no reason, it just comes off and punches everything in its path if it is not screwed on properly.
Replacing the clutch VAZ 2110 2114
First of all, we drove into the pit and removed the engine protection. There shouldn't be any problems here. All the bolts came off with a bang. The oil can be drained to reduce the weight of the box. We will not pull the drive out of it, so there is no need to drain it.
Loosen the front wheels. Unlock both hub nuts and unscrew. It's better not to put the old ones back. Buy new ones. They cost about 70 rubles.
Raise the car and place blocks or sawhorses underneath it. Remove both front wheels.
Remove the clutch cable from the fork and unscrew it from the bracket located on the box. You will need two 17 keys. For convenience, it is better to remove the battery.
Disconnect the speed sensor connector.
Remove the air filter housing, having first disconnected the chip from the mass air flow sensor.
Unscrew the bolt securing the ignition module to the gearbox and another bolt nearby. It is one of those that connect the gearbox to the engine.
Unscrew the nut on the starter that holds the positive wire. Disconnect the terminal from the traction relay.
Unscrew the upper and lower starter mounting bolts, then remove it.
For prevention, you can treat Bendix with a small amount of lithol and similar lubricant.
There is another bolt at the top that holds the gearbox. It is located in the thermostat area. It is covered by fuel pipes.
This completes the work at the top.
We go down into the pit.
Many people write that the “saber” needs to be removed, but we took a different route. We unscrewed the ball from the hub and the bolt that connects the lever and the stabilizer. Then simply bent the lever down. This method is suitable if the hole allows it and you are not going to completely remove the gearbox.
Move the left hub and remove the drive.
Unscrew the flywheel protective shield. There are three bolts. I don’t know why, but they were different for me. Two were unscrewed with a 10 head and the third with an eight. I still don’t understand.))) Maybe someone can tell me why this is so?
Then disconnect the shift linkage by loosening one bolt. It is recommended to pre-mark the position of the rod to make it easier to adjust the speeds later. I used this advice, but during subsequent setup, for some reason it did not work. This is such additional information)))
Now loosen one gearbox mounting bolt, which is located under the starter (it has already been removed), but not completely.
And another bolt is located in the area of the right drive. We didn't notice it during disassembly and spent a long time trying to figure out why the box wouldn't come out. Take this bolt off too, but don’t unscrew it completely. This required a good extension cord and a reliable head.
Now you need to take a jack and install it under the engine. When we start unscrewing the pillows, the motor will remain on only one and may fall, breaking the heating hoses. Place a small piece of wood between the jack and the engine to prevent damage to the crankcase. It should be installed closer to the checkpoint. It’s also better to put a block under the box, just in case.
When the engine is securely fixed, remove the cushions.
First, let's remove the rear support. You can simply unscrew it from the body. It is held on by two studs, but this method is suitable if you are sure that the nuts will unscrew easily and will not break. We didn’t experiment; we did this: There is a bolt on the pillow itself, it points towards the interior. It needs to be loosened and unscrewed a little. Then disconnect the cushion bracket from the gearbox and move it as far as possible to the side. Maybe this is the wrong way, but the studs remained intact, and we are happy)))
Now unscrew the left pillow of the box. There are two nuts, one at the top and the other at the bottom. The fastening looks like a threaded pin on both sides. Unfortunately I didn't take a photo.
Now the two of you need to move the box away from the engine and lower it onto the bent lever. Do this carefully, without damaging the pipes and wiring. The box is heavy, about 30 kg if I'm not mistaken. We had enough))).
When you move the gearbox, make sure that its guides do not fall out. They are located in the lower holes of the gearbox mounting. They look like tubes.
The box will move back about 10 - 15 cm. This is enough to replace the clutch basket and disc, as well as the bearing and fork.
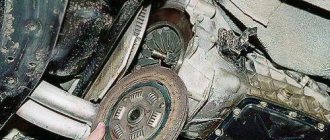
When we moved the box away, we saw that three petals of the basket had fallen inside. It immediately became clear that it was due for replacement.
Let's start removing the basket. It is bolted to the flywheel with six 8mm bolts. For us, they were unscrewed with great effort. I had to use leverage. Before unscrewing, secure the flywheel from turning. To do this you will need a screwdriver or something similar.
Having unscrewed the basket and taken out the disk, we decided to change both.
Clutch fork VAZ 2110 disengagement
The clutch system is designed to smoothly transfer torque from the crankshaft to the gearbox.
The clutch is single-plate, with a central pressure spring. Drive – cable. The housing is attached to the flywheel and pressure plate. There is also a driven disk.
The VAZ 2110 (BC) clutch drive fork is part of the vehicle’s transmission system; without it, the effective operation of all auto mechanics is impossible. The BC has the form of a lever, with the help of which the pressure plate is retracted, as a result of which the clutch is released. Sometimes the term “shift fork” is used to refer to the aircraft, since in the opposite direction, when the pedal is released, it engages the clutch.
When squeezing the pedal, this spare part helps move the clutch and release bearing, which ensures that the inner edge of the spring moves forward and then turns off the device.
Innovations affected the clutch of the VAZ 2110, but the mono-disc housing, dry type transmission and spring diaphragm in the center remained familiar. This unit was considered to be of high quality if it had produced more than 100,000 km.
Characteristic features of the structure of this unit in model 2110 include the following:
The specific structure of the diaphragm spring, which guarantees a reduction in the force to disengage the clutch. This quality creates favorable conditions for driving a car at medium and high speeds, and also affects the conversion of force on the clutch pedal in the area of partial/full starting. This design feature allows an inexperienced motorist to start moving smoothly, reducing the level of fatigue when driving in the city, where frequent engagement of the clutch is the norm.
Rational choice of the shape of the diaphragm spring, the number of blades, the proper structure of the spring supports, which is subject to mandatory control during production.
The nonlinear properties of the spring are carefully calculated taking into account the preservation of car parts: if the clutch begins to slip, it happens shortly before the critically acceptable degree of wear of the friction linings. Thus, the flywheel and clutch disc of the VAZ 2110 are protected from damage from the rivets of the linings and is a distinctive indicator for repairing the VAZ 2110 clutch.
Mechanized finishing of main disk blanks made of cast iron, which is carried out in order to optimize wear-resistant and friction properties. Their processing takes place on semi-automatic lathes with high precision, followed by monitoring the surface quality of the working surface.
VAZ clutch fork, device, purpose, principle of operation
The main role of the clutch is to provide short-term disconnection between the transmission and the engine, as well as their subsequent connection after changing gear. However, in addition, the clutch has another important task - to ensure smooth operation of the transmission elements and protect them from unnecessary loads and vibrations. All clutch components are located between the gearbox and the engine.
Nowadays, there are several types of clutches that arose and were modified along with the development of the automotive industry: electromagnetic, friction and hydraulic. Friction clutch, in turn, can be single-, double- or multi-disc.
Most modern cars are equipped with a single-plate clutch, the design of which includes the following elements:
- Clutch fork.
- Diaphragm spring.
- Release bearing.
- Release bearing clutch.
- Driven disk.
- Drive (pressure) disk.
- Flywheel.
The operating principle of this mechanism is:
- When the driver presses the clutch pedal, it acts on the clutch drive, which moves the fork of this mechanism.
- Next, the fork exerts an impact on the release bearing, due to which the bearing moves and affects the petals of the diaphragm spring of the drive disc.
- As a result, the spring petals bend towards the flywheel, and its outer edge moves away from the drive disk, giving it freedom. At the same time, the “squeezing” of the drive disk also occurs due to tangential springs.
- As a result, torque transmission stops.
- When the driver releases the clutch pedal, by triggering the diaphragm spring, the drive and driven discs are closed again, and contact between the spring and the flywheel is re-established. The transmission of torque to the gearbox is restored.
From the described process, the principle of operation of the clutch fork and its other elements becomes quite clear. This part plays an important role when disengaging and engaging the clutch between the transmission and the engine, that is, it forms free space between the driven and pressure plates. This is necessary to completely disconnect the gearbox from the engine.
If we talk about manual transmission, then its operation becomes impossible without a working clutch fork. Thanks to her:
- The maneuverability of the car increases when driving at low speeds.
- The vehicle can remain stationary even with the engine running and without neutral transmission being activated.
- The multi-structure mechanism for switching vehicle speeds is launched.
In addition, without a fork, the clutch cannot operate, since this element is an on and off switch. With its help, the motorist can control the operation of the engine and provide it with normal operating modes.
Video “Replacing the aircraft in a VAZ 2107”
In this video, the author explains how to replace a broken element in a classic car.
Gradually, the clutch pedal began to fail, the gears began to engage every once in a while and with a crunch. At first I blamed the working cylinder, because the boot on it was torn and there were brake leaks from there. I tightened the plug, it seemed to get better, but not for long. As a result, I finally got to the garage... I went and bought a new slave cylinder and started changing it. After removal, I could not unscrew the hose leading from the pipe to it. I think okay, I'll try to unscrew the tube. and also unsuccessfully. As a result, the tube broke... I bought a new hose and a new tube. I reassembled the entire line and started bleeding the clutches. I passed a bottle of brake fluid around and the pedal was still soft... Well, I think, well, probably the main one was screwed up... I bought the main one, installed it, pumped it and the same thing. (Then I think... maybe there’s something wrong with the fork?)) I shook it with my hand and it walks from side to side... I pulled it out and it burst across the floors)) So I changed the entire clutch line from the main to the working one... I even bought new return springs. 1st which is on the pedal in the cabin. and 2nd which is on the working cylinder))
Next with the fork...
I bought a new fork and started trying to insert it without removing the gearbox. after 4 hours of torment, he freaked out and began to remove the checkpoint. Removal took about 40 minutes for both of us. We also went and bought a new release valve because mine was already howling. Well, and a repair kit for the scenes. I express my deep gratitude to RooKLeZ for their help in removing and installing the gearbox and other work!)
The clutch is an important component of the transmission system. In turn, the clutch fork is an indispensable element that allows the parts to slowly connect and turn off the torque.
Each mechanism of the car is interconnected, the engine transmits torque to the gearbox, which in turn to the wheels. But it is worth remembering that there is a clutch mechanism between the engine and the gearbox. How quickly the gears will change and pick up speed will depend on its serviceability and quality of work.
The clutch fork is one of the mechanisms that helps change gears, but due to various circumstances, this part sometimes fails. Let's consider the principle of troubleshooting, the principle of replacement and the cost of work.
Replacing the VAZ 2110 clutch step by step instructions
1. “Tear off” the left wheel mounting bolts, then jack up the front of the car and place it on the sawhorses.
2. Remove the wheel and unscrew the two lower bolts.
Do-it-yourself VAZ 2110 clutch replacement video:
Features of replacing the clutch fork on a VAZ-2110, 2111, 2112
The clutch drive fork is necessary for the proper operation of the entire transmission system. This mechanism is a lever, when pressed, the following occurs: when the pedal is depressed, the clutch and release bearing move, this leads to the inner edge of the spring moving forward, and the clutch is disengaged.
When the pedal moves back, the clutch is engaged, so sometimes this spare part is called the release or engagement fork, respectively.
Typically, the clutch fork is found in mechanical gearboxes, and is occasionally included in hydraulic ones. The drive fork is a metal rod on which a lever and two legs are attached.
What are the usual malfunctions of the VAZ-2110 clutch fork that require replacement?
The clutch fork is subject to wear and tear, just like other parts. Factory defects are also possible, but due to the simplicity of the design, they are much less common.
- The clutch fork breaks. In this case, the pedal drops sharply, making it almost impossible to continue forward.
- Crack. The clutch grabs lower and lower, adjustment is almost ineffective. As the crack gets larger, the clutch pedal goes down again.
- Curvature.
- Paw wear.
- Defects of the paws at the point of contact of the liner coupling.
You need to change the fork in any case, since this part is necessary for the movement of your car. Without it, gear shifting is impossible.
The cost of spare parts is 300-500 rubles
When choosing, pay attention to the quality of the material and the thickness of the metal. Very often a fork made of thin iron bends almost immediately
Although the part is simple in design, it may not be so easy to replace it yourself. When contacting a car service center to replace the clutch drive fork of a VAZ-2110, you will have to pay from 1,500 to 2,500 rubles.
Replacing the release bearing on a VAZ 2101-VAZ 2107
Removal: 1) At the very beginning of the operation, you will have to remove the box from the car. (see details in the instructions: “Replacing the box on a VAZ”)
2) Now take a screwdriver in your hands and remove the springs securing the bearing to the fork.
3) Gradually pull along the shaft, in other words, pull the release lever towards you - it is removed from the shaft.
4) After removing the bearing, unclench the ends of the spring attached to the gear shift fork. After decompressing, simply remove this spring. If you find the bearing is in good condition, but the spring is not, replace the spring with a new one and continue to use your bearing. The spring is fine, but the bearing is not - take the spring and insert it into the new part.
Note! Please note that sometimes the bearing is still intact, but has already traveled quite a few kilometers, so you should not exclude the possibility of failure in the near future.
Clutch fork fault detection
Every driver should know the signs that can help identify a clutch malfunction. First of all, this is noise or knocking in the mechanism. There may be several reasons, the main ones being disc deformation, weak engine or gearbox mounting. To fix the problem, it is necessary to replace the parts and strengthen the fastening. Also, during operation, a characteristic burning smell may be heard. In this case, replace the damaged parts. If there is noticeable drag in the clutch operation, this indicates that the cylinders are not working properly or there is a hydraulic fluid leak. As in the previous case, parts are replaced. Another sign of a problem is poor pedal operation. Here, most likely the problem lies in the bearing or levers, and it can be solved by replacement.
The clutch release fork is rightfully considered one of the necessary elements of the entire mechanism. It moves the edge of the spring from the clutch and thus turns off the mechanism.
In addition to the above problems, the clutch fork can also fail. Basically, eliminating a fault is that it needs to be replaced. This procedure is quite simple. Its advantage is that there is no need to disassemble the gearbox. The hatch will serve as a workplace.
First of all, you should be careful when choosing a new part. It must be of high quality and be slightly ground down in order to tighten the bolts neatly and easily
During the work process, it is important to follow the basic rules and carry out actions carefully so as not to damage the parts
The whole process consists of two parts. The first involves removing the old plug. To do this, remove the return spring, bend the cylinder and take out the fork axle. The fork has a special coating that protects it. It is also subject to removal. Now all that remains is to pick up the fork.
The second part of the repair is that we replace and insert a new plug. To do this, insert the end of the spring into the hatch and carefully push it to the end. The part should smoothly and calmly pass past the springs and bearing coupling and reach a special recess where the spring petals will clasp it. To make the work easier, you can use a hammer, but you should not overdo it with the force of its pressure. After this, the entire mechanism is assembled and carefully tightened.
How to change the clutch
A slipping clutch indicates that it needs to be replaced. It is convenient to carry out all stages on an overpass. If this is not possible, use a jack, but be sure to place protective supports under the car.
To replace the unit in question, prepare:
- pliers;
- rags;
- mount;
- mandrel;
- set of keys and screwdrivers.
It is not at all necessary to completely remove the gearbox; changing the clutch is not difficult without this. It is enough to move it to the side so that the shaft moves out of the basket. Nevertheless, for your own convenience, it is better to dismantle the gearbox. This, by the way, will allow you to inspect the seals and crankcase along the way.
How to adjust the clutch on a VAZ 2107
A correctly adjusted VAZ 2107 clutch ensures normal operation of the vehicle and long-term operation of the machine’s components and parts. It is recommended to check the correctness of the adjustment at every vehicle maintenance. During operation, incorrect adjustment can result in two types of malfunctions:
- The clutch slips - when the pedal is fully released, the disc slips and does not transmit the full amount of engine power to the transmission;
- The clutch drives - when the pedal is fully depressed, the disc does not move away from the flywheel, which does not allow normal gear changes and makes the car move when it is not needed.
In addition, the clutch may engage too early or late, making it difficult to control the vehicle.
The adjustment process itself consists of two parts. The first is carried out in the cabin, the second - under the bottom of the VAZ 2107, from the inspection hole. Tools you will need:
- Key for 8 or 10, depending on the model of the clutch slave cylinder;
- Open-end wrench 13;
- Open-end wrench 17.
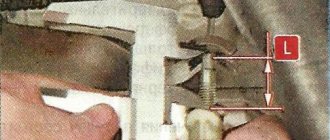
The first adjustment involves setting the clutch pedal travel. It is performed from the interior, under the steering column. To limit the full stroke, use a special adjusting screw secured with a lock nut. By tightening or unscrewing it, we achieve normal pedal travel, which should be approximately 140 mm. Usually there is no need to adjust the full stroke; it is set from the factory and is changed very rarely.
The second part of the adjustment is to set the pedal free play. In normal mode it should be 30-35 mm. However, some car enthusiasts adjust the freewheel to suit their individual habits and preferences. This approach is quite acceptable provided that it does not affect the performance and durability of the parts of the VAZ 2107 car.
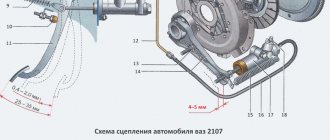
So, to check and adjust, we go down into the inspection hole. The clearance is checked by pulling the fork away from the pusher.
The free play distance should be 4-5 mm. If the gap differs significantly from the standard, it must be adjusted. For this:
- Remove the spring that pulls the clutch fork to its original position;
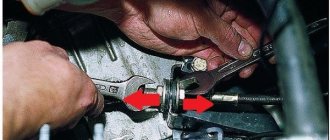
- Loosen the locknut on the pusher;
Holding the pusher with a 8 (10) wrench, screw or twist the thrust nut until the required clearance is achieved;
- Fix the thrust nut with a locknut;
- Checking the gap;
- We install the spring in place.
At this point the adjustment procedure can be considered complete. However, in order to ensure that the result obtained is correct, it is necessary to check the clutch in action. To do this, start the car, engage the gear and gradually begin to release the pedal. When adjusted correctly, the car should move off at approximately half the pedal stroke. Adjustment is allowed, including the clutch lower or higher, but engagement at the very top or bottom is unacceptable, as there is a risk of the above malfunctions occurring.
Clutch selection
When purchasing a new clutch kit for the VAZ 2107, experts recommend being guided by the following criteria. When assessing the driven disk:
- the surface of the linings must be smooth and uniform, without scoring, cracks or chips;
- all rivets on the disk must be the same size and located at an equal distance from each other;
- there should be no oil stains on the disc;
- there should be no play in the places where the linings and springs are attached;
- The manufacturer's logo must be applied to the product in one way or another.
Preparatory stage
Before changing the clutch on a VAZ 2110, you need to prepare a place for repairs and tools. For this process, the most suitable solutions are: a car lift or an inspection hole. If there are no such conditions, due to a hopeless situation, it is possible to replace the clutch with a 2110 in “Spartan conditions”. It is enough to find a flat surface area in a garage box, a parking space or in the yard.
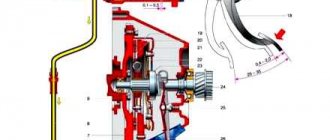
Clutch diagram for VAZ 2110: 1 - release bearing guide sleeve; 2 — gearbox input shaft; 3 — cable lead; 4 — clutch release fork; 5 — fork axle bushing; 6 — pressure disk assembly (basket); 7 — driven disk; 8 - flywheel; 9 — clutch pedal; 10 — mechanism for automatic adjustment of cable length; 13 — clutch release clutch (release bearing); 14 — lower tip of the cable sheath; 15 — bracket installed on the gearbox housing; A - the displacement distance of the leash, checked when installing the cable (27 mm).