Tool:
- Multimeter
- Open-end wrench 8 mm
- Open-end wrench 10 mm
- Open-end wrench 12 mm
- Straight box spanner 8 mm
- Small flat screwdriver
- Marker
Parts and consumables:
- Rotor rectifier diodes
- Stator rectifier diodes
- Voltage regulator
As standard, Lada Kalina cars are equipped with generators of option 5132.3771 or its modification 9402.3701-06.
Both power units are three-phase alternating current generators with a rectifier unit and an electronic alternating voltage regulator. Currently, such generators are considered quite reliable, however, they are not immune to malfunctions, which means that some basic knowledge about methods for diagnosing and repairing them would also be useful.
In other words, if the voltage generated in the car’s electrical system differs from the specified values or is simply unstable, then most often this indicates a malfunction of the voltage regulator or that the brushes have worked and do not fit tightly.
With some skill and effort, all these faults can be easily localized and eliminated. More complex failures are also subject to repair, implying, for example, the replacement of failed rectifier diodes, stator or rotor.
Checking the voltage regulator status
1. During a preliminary check of the general functionality of the voltage regulator, it is necessary to open access to the positive terminal of the generator (for which we move the protective rubber cover).
2. Next, we start the engine and wait for it to warm up until it reaches normal idle speed.
3. The measurement is made between the positive terminal and any nearest stable ground, and should be in the range of 14.5 to 15.1V. If the parameters deviate from the specified values, the regulator must be changed.
4. If desired, you can check the voltage regulator in the removed state, for which a 12V lamp is connected to its outputs, and the standard voltage is supplied to the inputs.
If the regulator is working properly, the lamp will light in the supply voltage range from 12 to 16V (at lower and higher voltages the lamp should go out).
Replacing the voltage regulator
If a decision is made to replace the regulator, this procedure is performed as follows:
1. Disconnect the negative wire directly from the battery.
2. We disconnect the excitation block from the generator, after which, after unscrewing the fastening nut, we disconnect the positive terminal.
3. Having removed the factory seal (if it is still there), unscrew the screws holding the plastic casing and remove it.
4. Unscrew the fastening screw and remove the voltage regulator.
Checking the brush assembly
When checking the brush assembly, the presence of free play in the brushes is monitored, as well as the degree of their operation - the brushes must protrude from the body at a distance of at least 5 mm.
In-depth diagnostics of the Lada Kalina generator
If there are no complaints about the operation of the voltage regulator, and the failure has not been eliminated, you have to further disassemble the generator in order to gain access to the rectifier unit, and, if necessary, to the stator and collector.
Such disassembly, with accompanying checks, involves performing the following actions:
1. Using a screwdriver, remove the ends of the stator windings from the spring-loaded contacts of the rectifier unit.
2. Using an “8” spanner, unscrew the bolts securing the rectifier unit.
3. Using a “12” wrench, unscrew the nut from the contact bolt and remove the rectifier block.
4. Before continuing to disassemble the generator, use a marker to place installation marks on the front and rear covers of the generator (this will avoid errors during assembly).
5. Using the “8” key, unscrew the screws holding the generator covers together.
6. We remove the back cover and remove the contact bolt from it (along with the insulating washer), as well as the plastic bearing bushing.
7. Using a screwdriver, slightly pry the stator out (do not forget to mark its original location again).
Checking individual generator elements
1. As for checking the individual elements that make up the generator, when monitoring the condition of the rectifier unit, the serviceability of all diodes is sequentially assessed, checking their conductivity in both one and the other direction (a serviceable diode passes current only in one direction).
Replacing a generator on Kalina
There seems to be nothing complicated about removing and replacing the generator on a Lada Kalina..
To replace the generator with a 16-cell. Kalina will need a warm garage with a pit and a set of keys: 13, 19; heads: 8, 10 and 13.
Be sure to remove the terminal from the battery.
Remove: the plastic engine protection and the washer reservoir (after all, it would be better to unscrew a few extra nuts than to suffer later). So remove the connectors from the washer motor and use keys “8” and “10” to unscrew the nuts securing the barrel. The barrel is screwed in 2 places.
Then remove the alternator belt and reset the “gene” chip.
If there is motor protection at the bottom, then we dismantle it too. Later disconnect the generator wires.
The wires are screwed in with 2 bolts (it’s easy to reach the top one, and the 2nd one from the bottom from the hole with a head and a key set to “13”, just for this it was necessary to remove the tank).
Remove the generator from the Kalina from the bottom, and if it is an 8-valve, then pull it out from the top.
By the way, be careful not to lose the nut when unscrewing the lower bolt, which is installed on the other side.
Naturally, you can remove the generator on Kalina without a hole, crawling from above with the keys, but this will be even more difficult.
Read:
Generator Lada Kalina: which one is installed, analogues and replacement
The article provides general information about Lada Kalina generators and explains how to replace the regulator relay and the entire generator itself.
DIY generator replacement
Usually, even factory generators on Kalina serve for quite a long time and do not require replacement, of course, unless you come across a car with a factory defect of this device.
If this electrical equipment unit fails, it will have to be replaced. Although this is not difficult to do, it will take at least an hour, especially if this is your first time doing this procedure.
So, we will need the following tools:
- Open-end or ring wrenches for 8, 13 and 19
- Small and large ratchets and heads for 8, 13 and 19 for more convenient and faster work
- Wrench with extension
Guide to replacing the Kalina generator yourself
So, let's proceed to a very detailed description of all the types of work that need to be performed. First of all, we need to loosen and release the belt tensioner and then remove it. So be sure to check out this Alternator Belt Replacement Guide first. After this, you can proceed directly to removing the device from the car.
Before carrying out any repairs related to electrical equipment, be sure to disconnect the battery by removing the negative terminal from it.
First, we disconnect the plug, which is secured with a plastic latch, just lightly press it and pull it to the side, it will come out without any problems:
And the wire terminals that are under the rubber protective cap, pry it off and unscrew the nut:
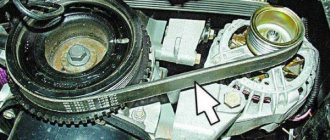
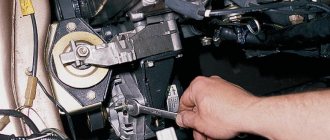
Then we unscrew the nut securing the upper part of the Kalina generator, this is clearly shown in the photo below. You can first move it with a knob, and then work with a ratchet handle:
And tapping the protruding bolt a little so that it moves, remove it from the back side, as shown in the photo below:
Next, we proceed to the lower fastening bolt, and proceed by analogy, only if necessary, hold the nut on the reverse side, since it can scroll:
Be careful when removing this rod as there are bushings there. Hold them immediately so that they do not fall and get lost. And holding the generator body with one hand so that it does not fall, we remove this bolt with the other hand:
Now almost everything is ready and you can safely remove this device from the engine compartment, turning it slightly from side to side, finding the most convenient position for its removal.
To replace the generator on the Lada Kalina, we purchase a new one and install it in the reverse order of removal, putting all the bushings in place in the same places as they were. The price of a new generator ranges from 4000-5000 rubles, so you will have to fork out a little.
Source:
How to remove the generator on the LADA Granta
The “Grants” generator has to be removed for various reasons: for repair, maintenance, modification of the unit. You can do this without the help of others if you know how to remove the generator on the Grant. Depending on the modification of the car (8 or 16 valve engine, presence of air conditioning), the procedure for dismantling the generator has its own characteristics, so it is worth considering each option separately.
How to remove a generator on an 8-valve Grant without air conditioning
The following will be useful for work:
Before removing the generator on a Grant without an air conditioner, you should disconnect the ground from the battery by removing the negative terminal. The procedure is as follows:
- unscrew the 2 rear bolts securing the motor protection;
- unscrew the 4 front motor protection bolts;
- remove the engine protection (mudguard) from the car;
- disconnect the wiring block from the generator;
- remove the protective cap of the nut holding the power wire;
- unscrew the nut and disconnect the generator power cable;
- unscrew the top nut securing the “Grant” generator;
- press out the generator with a mounting spatula and remove the upper mounting bolt;
- unscrew the lower bolt securing the generator;
- Move the generator away from the engine with a mounting blade and remove the lower mounting bolt ;
- move the generator towards the right mudguard;
- remove the generator belt from the unit pulley;
- pull out the generator;
- Remove the alternator belt from the crankshaft pulley.
To put the LADA “Grant” generator in place, you need to perform the steps in reverse order.
Important: when installing the generator belt, make sure that the pulley grooves and the groove tracks on the belt match.
How to change the generator on a 16-valve Grant
The generator mount on the 16-valve Granta variation is distinguished by the presence of a belt tensioning mechanism. Therefore, the procedure for replacing the generator on this model is slightly different. To work, you will need socket wrenches 8, 10 and 13. As when dismantling the generator from the 8-valve Granta, before starting work you need to remove the ground terminal from the battery to eliminate the possibility of a short circuit.
Removing the generator from Kalina and troubleshooting.
Removing the generator
Lada
Kalina
, change the armature contact rings.
Replacing the slip rings of the VAZ Kalina generator. How to remove the generator.
How to remove the generator
for 16th grade
Kalina
. If you have any questions, you can ask them in the VKontakte group -…
After this, you need to remove the engine protection by unscrewing the 4 front and two rear bolts securing it to the body parts. The 16-valve “Granta” generator is removed as follows:
- disconnect the block from terminal “D” on the generator;
- remove the rubber cap covering the “B+” terminal of the generator;
- Using a 10mm wrench, unscrew the nut holding the wire tip;
- loosen the tension bar nut using a 13mm wrench;
- by rotating the tensioner adjusting bolt counterclockwise, loosen the tension on the Grant generator belt (a 10mm socket wrench is required);
- move the generator towards the engine and remove the belt from the pulleys;
- Unscrew and remove the adjusting bolt of the belt tension mechanism from the generator mounting bracket;
- remove the tension bar;
- unscrew the lower nut securing the “Grant” generator;
- remove the spacer bushing and remove the lower mounting bolt ;
- remove the tension bar;
- pull out the LADA Granta generator.
Do-it-yourself replacement and tensioning of the alternator belt on a Priora with air conditioning
The newest Priora can be safely associated with economical foreign cars. The refreshed Russian car received the necessary set of options, which raised comfort to a new level. This was facilitated by the installation of power steering (power steering) and air conditioning. The only disadvantage of this modernization is that it has become more difficult to get to the generator and its belt.
In this article we will tell you how to replace and tighten the belt in new versions of the VAZ 2170 car. After reading the article, the reader will know what malfunctions the belt has in the version with air conditioning and when it needs to be changed or tightened.
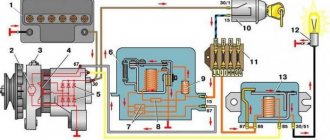
About the principle of operation of a car generator
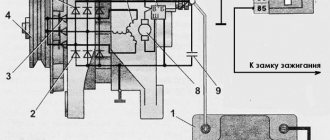
The operation of the Lada Kalina generator unit is based on the following principle: an alternating current is induced in the stator winding, which is subsequently transformed into direct current through a rectifier module located on the body of the unit. The generator cover is also equipped with an electronic voltage regulator and a brush holder. The rotor of the device receives torque from the crankshaft pulley. The transmission link is a poly V-belt.
The basic characteristics of the generator set include the following parameters:
- maximum generated current – 85-90 Amperes;
- operating range of on-board voltage – 14.4-15.1 Volts;
- rotation ratio of the motor and rotor – 1:2.4;
- right-hand direction of rotation.
The housing of the unit is held together by pins that tighten the stator with the covers. The mounting sockets of the indicated covers contain bearings, which ensure the ability of the rotor to rotate. The rear bearing is installed inside the cover with a minimum gap. The front element is equipped with the ability to slide along the surface of the rotor shaft. It is fixed inside the front cover with a slight interference fit, and a pressure plate covers it from the outside. The back of the device is protected by a plastic casing.
Let's move on to the switching diagram of the generator with the on-board network. The connection diagram is very simple. After turning on the ignition, power begins to flow to the voltage regulator through the battery discharge lamp circuit. When the motor starts, the excitation winding is supplied with supply voltage from three diodes mounted in the rectifier unit.
Using the indicated signal lamp, the generator unit can be checked. If the device is working properly, the lamp lights up when the ignition is on. It goes out when the engine starts. When this phenomenon is not observed and the lamp continues to shine, the generator set should be diagnosed for the presence of malfunctions. In some cases, replacement is required, and many are interested in how to remove the generator?
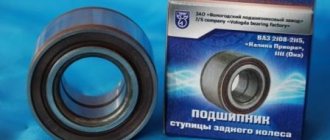
We change bearings in Lada Kalina
The rectifier units present in the designs of generator sets of the AvtoVAZ model range have received a considerable number of negative reviews during operation. This statement is also true for the Lada Kalina we are considering. These modules can break down even after a mileage of 10 thousand km, which requires repair or replacement of the device. It has also been revealed in practice that the cause of most malfunctions is the generator set bracket. However, bearings can also fail prematurely. It is gratifying that the owners are able to cope with such a problem on their own.
When to change?
VAZ Lada Kalina vehicles use a belt drive for auxiliary units. On cars with air conditioning, the service life of such a belt is less than thirty thousand kilometers. On regular versions of cars, the strap can last longer, but most owners try to change it after the same thirty thousand kilometers traveled. For various reasons, the belt may fail earlier, so during the operation of the car it needs to be inspected from time to time. There should be no cracks on the working track, and delamination on the outer part of the belt is unacceptable. If there are such flaws, we immediately change the strap. Another signal to replace this element is a whistle or other noise when the unit is operating.
READ Adjusting Valve Clearances VAZ 2106
The process of replacing the belt on a Kalina with air conditioning (sixteen valves) is presented in a video from the user Alexander.
If you need to replace the roller or brushes?
When, during operation of the engine, the owner of a Lada Kalina hears a distinct “rustle” coming from the rotating roller of the tension unit, then a detailed inspection of this element will be required and, if necessary, replaced.
To carry out this repair operation, it is recommended to stock up with ordinary keys and a screwdriver with a flat-tipped tip. All replacement procedures do not cause any difficulties, so we act with confidence.
- First, we resort to loosening the degree of belt tension. To do this, unscrew the stem.
- Using the designated screwdriver, carefully pry up the protective cap of the roller and unscrew the bolt holding the bearing.
- From the worn-out roller we remove the bushing together with the washer (they are necessary for installation in conjunction with a new product).
- The entire assembly is mounted in its proper place and secured with a bolt.
- We tighten the belt and start the engine. We make sure that the new product functions correctly.
One of the factors characterizing weak battery charging is wear on the brushes of the generator set. In order to eliminate this negative aspect, the generator brushes will need to be replaced. To monitor their condition, they will need to be dismantled. Replacing generator brushes is available both on a removed generator set and on one installed on a Lada Kalina car.
In order to achieve safety of work and eliminate the risk of a short circuit in the circuit, before repair work it will be necessary to disconnect the network from the battery (remove the terminals). Now you need to dismantle the protective cover and remove the plug. This can be done conveniently using the previously designated screwdriver.
At the final stage of the process, unscrew the bolts, after which we remove the regulator itself with the brushes present on it. Replacement of generator brushes is complete. Brush wear is assessed by measuring their height. This parameter should not be less than 5 mm. If the brushes are worn out, then replace them and the regulator included.
Replacement
Required Tools
We'll prepare everything you need for the repair:
- Lubricant WD-40.
- Keys to 19, 17.
- Two copies of the key for 13.
- Head on ten and 17.
- Jack.
- Special key for tensioning.
- Lever arm.
The alternator belt on the modified Priora with air conditioning and power steering runs around the engine support. The designers decided to carry out such a modification for the Sixteen Priora due to the fact that the power steering pulley is installed a little low. Hence there are additional actions that you need to know about.
Step-by-step instruction
- First we need to wet the bolts that hold the bracket and motor mounts. Wait 10-15 minutes for the lubricant to spread over the surface;
The replacement is complete, all that remains is to adjust the alternator belt with power steering and air conditioning. The new consumables on the Priora will have to be tightened a couple of times until you get the required tension. If the component whistles or a rumble is heard from under the hood, it means that it is necessary to carry out repeated adjustments until these shortcomings are eliminated.
How to replace a generator set?
How to remove the generator? In some cases, repairing the generator unit is impractical or cannot restore the functionality of the device.
Replacement is required here. The process itself is not an intricate undertaking, so it will not take much time from the owner of the Lada Kalina.
For a successful replacement operation we will need:
- Remove the belt, first loosening the tension element.
- Disconnect the plug together with the cable terminals.
- Unscrew the nut securing the upper section of the unit and remove the bolt.
- Use the same method to remove the bolt at the bottom of the device.
- Remove the generator unit from the engine compartment.
Replacement and installation of a new device is carried out using the reverse algorithm.
Let's sum it up
As it turned out, repairing or replacing the generator in a LADA Kalina car does not require much effort, so such manipulations are accessible even to inexperienced owners; a connection diagram is used to make the task easier. An important point in operation is periodic diagnosis of the condition of both the unit itself and its component elements, including the tension system. Timely prevention will significantly extend the life of the unit, and the owner of LADA Kalina will have considerable savings.