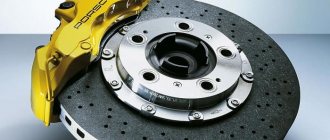
Why does the brake caliper squeak and jam?
Secondary causes of jamming:
- the pads are not installed correctly initially, so they begin to creak;
- discs are worn out by 70-80 percent - due to aggressive driving style or natural reasons;
- the lubricant is incorrectly selected or is missing;
- Dirt and moisture got inside the mechanism.
One of the main reasons why a mechanism creaks or jams is overheating. Friction during active braking causes heat production. This causes high loads not only on the pads, but also on the presser itself. Therefore, at least conscientious manufacturers try to make it from the most durable material.
Save the brakes: everything about caliper maintenance
They don’t brake, they jam, they get hot... At some point, the brakes, which previously pleased with the precise operation, begin to throw up unpleasant surprises. This is due to the fact that most motorists begin to deal with this unit only when problems arise, although this should be done much more often, our expert today is convinced. For obvious reasons, he asked not to give his first and last name, but he promised to clearly demonstrate what brake maintenance is in his understanding.
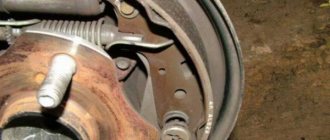
The main enemy is corrosion
— Let's not forget that brakes, in principle, work in very harsh conditions. During active braking, the discs can heat up to 600 degrees! The rest of the caliper parts get less, but they also constantly experience heating/cooling, and besides, disc brakes are exposed to water, dirt, salt, sand...
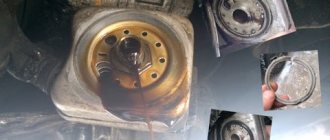
It is clear that the caliper working cylinder is initially protected by a boot plus an O-ring (cuff). But over time, corrosion may appear on both the cylinder itself and the piston. Yes, one of the reasons is water and dirt that enter through a damaged boot (we don’t check the rubber bands often). But due to constant heating/cooling, condensation may occur, and the protruding edges of the cylinder and piston may also begin to corrode. Like here - do you see this “fungus”? In general, for one reason or another, corrosion occurs and the surface of the cylinder is damaged.
At first, the piston begins to move with noticeable effort; over time, this problem progresses, which affects the quality of operation of the entire system. You press the brake pedal, but it is tight, you press harder, but “there are no brakes,” or they work normally every other time. The cylinder here is in very good condition, so in this case I will limit myself to running rust remover in there, then apply a special lubricant, and everything will be fine. But it is not always possible to resolve the issue this way, with little bloodshed.
Replacement or restoration?
If the problem starts, the piston generally gets stuck in the cylinder, and here you won’t get away with replacing the repair kit, which essentially consists only of rubber bands (boots and cuffs) - you need to somehow restore the surface of the cylinder, change the piston. The solution to the problem depends on the design features of the caliper, the car model, and the neglect of the issue. At a minimum, you will have to get (buy or grind) a new piston; at maximum, you will have to restore or buy a used or new caliper.
The last option is the most expensive. As a rule, people prefer to look for a used one or turn to workshops to repair or restore their parts - this turns out to be much cheaper. This is understandable: a new original or good licensed caliper for an inexpensive mass-produced model like the Opel Astra H will cost 3-4 million rubles, a used one will cost about 0.5 million, but will still require a rebuild and installation of a repair kit, so restoration is all it will still be cheaper.
By restoring a caliper, you get a new part. Pistons, guides, boots and cuffs are changed, and only the body remains old, which has been thoroughly cleaned (as a rule, they prefer to sandblast) and a new protective coating has been applied.
There are nuances...
Everything can look beautiful: pads, discs, and calipers - but the brakes “stick”! You start to figure it out and you find the reason.
If the mechanic at the station, when replacing the pads, did not carry out a complete cleaning procedure (on both sides!) of these “guides,” then it turns out that the pad simply jams in a certain position and does not brake. In order for the pad to press against the disc, you need to create additional force on the pedal - much higher than what was initially required.
I use a screwdriver so confidently now, because I have to change the disks anyway. Why? They are warped and hit when braking. And I suspect why.
There is an interesting point with some cars: the right disk is different from the left, and accordingly they have different numbers. Whoever knows this orders one right disk and one left one. Well, those who don’t know, choose any of them and order two identical (right or left) disks.
These discs are ventilated, the air channels in them are located at a certain angle. If we place the right disk on the left (and vice versa), then there will be no cooling provided, and overheating can easily occur during hard braking. And then they start saying: bad parts...
Now let's take new discs, clean them of grease with a special agent - and everything will be beautiful! There are no special nuances when installing a disk on the hub; the main thing is that the mating plane is smooth and clean.
The main thing is lubrication!
Why do caliper guides turn sour? As with cylinders, torn boots allow water and dirt to get inside. And also because the old lubricant develops its properties, or instead of a special high-temperature lubricant, a regular one, for example, graphite, was used. In a good way, you need to service the brakes at least once every six months: disassemble them, clean the guides and re-lubricate them - don’t wait until the pads run out.
Here the caliper is in good condition: it is clear that the car has been looked after. I also pay attention to the presence of cracks, corrosion, and the geometry of the brackets, because sometimes people drive with “crooked” brakes in the truest sense of the word! Due to heavy loads during braking (for example, on commercial vehicles driving with overload), the bracket moves and the guides begin to jam. They are sharpened, well lubricated, but the bent bracket itself must be replaced in a good way!
First, I completely remove the grease: on the fingers - just with a rag, from the guides themselves - using “chemistry” (rust solvent), and also clean with a special brush. I don’t regret the liquid and time: everything needs to be cleaned.
And we start fiddling around, getting all the old grease and dirt out of there. This all needs to be cleaned in such a way that the brush or rag remains clean. Then we take the remover and use it to wash and at the same time degrease the surface. Everything here has been cleaned.
For the guides I use a special high-temperature grease. Exactly this kind, and not graphite, as some mechanics use. We remember at what temperatures the brakes operate, right? Regular lubricant will not withstand them, and as a result we will end up with “rooted” guides and jammed brakes even faster.
We remove excess lubricant - they are of no use here. The lubricant is hygroscopic: like brake fluid, it accumulates moisture over time. And this, as we remember, is a source of corrosion.
It's the brakes!
Now we will process the bracket with a file, and then clean the brake pad guides. I have already said why this is important.
Often the block wears out unevenly, for example, due to the fact that the lower guide jams, because all the dirt flows onto it and it gets stuck. And it begins: the lower part stops moving, the block is pressed only by the upper part.
Accordingly, we get uneven wear at an angle. When the lining is completely worn out, the block begins to saw the disc with metal - that’s it, it needs to be replaced, since boring it in this case is useless. This is not my whim: if the metal part of the pad begins to cut the disc, according to technical operating conditions it must be replaced.
Well, now we’re putting everything together - what did we get? The same operating principle applies to the rear brakes: disassemble, clean, lubricate, adjust the handbrake. There are small nuances, but overall everything is the same.
"Soda" won't work
After replacing the pads and discs, we bleed the system. And the first 200 kilometers must be driven carefully. It is clear that efficiency will appear in a kilometer or two. But it is important that all the working parts, figuratively speaking, fall into place, the pads get used to the discs.
Brake fluid should be replaced every two years. And this is the maximum interval! If the car is used harshly, the brakes are often loaded, it is better to generally reduce the period to a year. And if the brakes have overheated at least once, definitely replace them! If the liquid boils, it becomes like soda - with tiny air bubbles that cannot be removed. In normal modes, this may not be so noticeable and will not affect the operation of the system. But if you have to brake sharply, you will be surprised to find out that you don’t even have brakes! You will press the pedal as hard as you can, but the car will somehow stop!
Afterword
When a car comes from Europe, the brakes always work equally well. And then you drive here for a while, change pads and discs, and this clarity disappears somewhere. And everyone points to bad parts. And everything is much simpler: you need to work on the brakes periodically!
I have never seen so much fuss with the brakes at any station. Only when the pistons in the cylinders or the guides are specifically wedged, then they are thoroughly taken care of. If everything on the larger side more or less works, then no one really touches them: they changed the pads, checked that everything seemed to be working, and oh well.
It just seems like you're wasting your time and money. But let's think about it this way. Firstly, you always have brakes that work efficiently, reliably, in any weather. Secondly, if we talk about fast cars with powerful brakes, calipers cost good money. It is cheaper to come every six months to develop brakes than to then have to replace calipers due to jammed cylinders. It's better to drive with working brakes!
Listened and recorded by Ivan KRISHKEVICH Photo by the author and Sergei BOYARSKY ABW.BY
find the necessary spare parts for repairs by using the search aggregator site BAMPER.BY. Here we have collected more than 310,000 offers from various Belarusian sellers with photographs and the price of each item. Search for any spare part in three clicks.
Symptoms of a problem
Symptoms of damage:
- oily spots on the visible or inner side of the wheel, which indicates a leak of DOT fluid, a decrease in its level in the expansion tank;
- unexpected, spontaneous pulling of the car to the side after braking - while the wheels are normally inflated and the suspension is fully operational;
- a grinding sound after releasing the brake pedal is the main sign of a situation where the piston is pressed in and does not return to its original position;
- The discs overheat greatly and give off an unpleasant burnt smell - even after driving with relatively infrequent braking.
What to do if you have symptoms of soured calipers
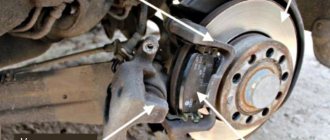
We unscrew the mounting bolts, remove the caliper and place it so that it is convenient to work with the piston.
First of all, we clean the dust and sand with a brush so that we don’t get it under the boot in the process. If the pads are fresh, then the piston sits deep, it needs to be squeezed out from there with a few pumps of the pedal, for example, on the Lacetti, six pumps of the brake pedal all the way to the stop in the front and one and a half at the rear are enough. It may be different on your car, do not overdo it, otherwise you risk completely pushing out the piston and creating a lot of problems for yourself.
Be sure to change the lubricant
When servicing the caliper, you should not use any universal high-temperature lubricant; only a special lubricant is needed to lubricate the caliper piston and guides. Always remove old grease. For the cleaning and replacement procedure, you will need a five-cc syringe with a needle. You will also need some brake fluid, which you need to draw into a syringe.
Flushing the working brake piston and guides
We pry the boot off with a screwdriver and push the needle under it until it hits, do not use force, then squeeze out all the brake fluid. Lightly knead the boot so that the liquid can disperse there better.
Then you need to press the piston back into the caliper, you can use a large gas wrench to do this. On a jammed caliper, the force is great, you won’t be able to get off easily. When the piston is almost pressed in, brake fluid will begin to squeeze out from under the boot, it is better to wipe it off immediately so that it does not drip where it is not needed. This will remove excess liquid and dirt from under the boot. For the piston to work properly, you need to repeat this procedure three or four times.
When you feel that the piston has begun to move much easier, put the caliper in place, rock it back and forth to find out the condition of the guides, it moves easily, which means everything is in order, if not, then you need to repeat the procedure with washing the guides too. The fact that the guides have become sour can also be seen by the wear of the brake pads.
Front caliper jammed
If the front brake caliper is stuck, this is often due to an aggressive driving style. This can be explained by the design difference of modern cars, where the brakes are applied faster at the front. Therefore, the burden here is incredible. Many cars are equipped with a pressure regulator or “sorcerer”. During heavy braking, it blocks fluid access, but only to the rear axle. The front axle continues to work and heat up.
However, if the rear caliper is equipped with a handbrake system, which is provided on some modifications, the likelihood of breakdowns and the rate of wear also increases.
All about squeaking and jamming brake calipers
For safe driving, it is extremely important that all elements work smoothly and smoothly. Especially when it comes to the braking system. Probably every driver at least once in his life has encountered a situation where the brake caliper sticks. This problem is considered quite unpleasant for the driver and passengers. The main purpose of the caliper is to press the brake pads against the disc when you press the brake pedal. If this does not happen, then the process of driving a vehicle cannot be called safe. Since the caliper is an indispensable and main element of the brake system, it is necessary to constantly monitor its good condition. The motorist should not allow a bad situation to develop when the caliper jams. In addition, under no circumstances should squeaks and knocks be allowed to appear in this complex mechanism.
What to do if the caliper is stuck on the road
The first thing that is recommended is to give the elements half an hour to cool down. Then identify the problem wheel by conducting an effective test. You need to drive 20-30 meters, stop and touch all four disks with your finger through the provided holes. If the part is hot, it is this particular wheel that jams. It is removed, the car is first placed on a jack.
Popular brands:
Nissan Almera
Cold water will help to quickly cool the elements, but you can water it on a surface that has already partially cooled. Otherwise, the disk will simply blow apart due to strong temperature changes.
If the handbrake cable jams, the inner or outer braid is most likely damaged. It is possible that the return spring has weakened and needs to be replaced with a new one. Also, both return brackets often become dirty. In this case, they must be cleaned of rust and treated with VD-40.
But what to do if sometimes you don’t have time for all this. Then the only way remains is to hit the return bracket with a hammer so that the cable returns to its original position. You can drive further, but just don’t use the handbrake again until it is repaired.
If the piston itself is jammed, a hammer can also quickly solve the problem. You need to tap it carefully, through a wooden spacer, throughout the entire mechanism. If the pads do not wedge, try inserting a screwdriver between the pad and the disc. Finally, the surest, but most dangerous way is to squeeze the hose with a clamp. But you must drive extremely carefully, without brakes.
Jammed caliper - symptoms and troubleshooting
Normal vehicle performance is only possible if the owner periodically carries out diagnostics. However, no one has canceled the wear and tear of the mechanisms. Each car owner replaces various elements several times a year - this extends the life of the car.
Saturated traffic does its job - the braking system gradually begins to fail. Since driving safety depends on this element, you need to monitor it more than carefully. The main failure during operation occurs in the calipers. This is a special element that presses the pads to the brake disc. When the caliper gets stuck on the road, the car will not be able to be stopped using the brakes. Let's look at what symptoms indicate that the caliper has failed and what to do in the event of an emergency failure.
Signs of a stuck caliper . First, it’s worth saying a little about the reasons. The most basic problem in this problem is simple overheating. This can be affected by improper installation of the pads. In addition, the lack of lubricant or the ingress of dirt and moisture can also lead to jamming.
Each car owner can determine wear and jamming of the caliper by the following symptoms:
- the discs begin to heat up to a high temperature, and a burning smell enters the interior;
- when the driver presses the brake, the car pulls to the side;
- when the driver releases the brake pedal, a nasty creaking sound is heard in the cabin;
- brake fluid drains quickly;
- Oily spots appear on the wheel rim.
If you find at least one of the listed signs, you should immediately take action - diagnose the brake system and eliminate the identified problems.
How to repair if the caliper is stuck on the road . Let's imagine a situation: a driver is driving along the road and suddenly notices a sign of a jammed caliper. In this case, the first thing you need to do is stop and turn off the engine. Many experienced drivers have repeatedly resorted to a simple repair method. To do this, you need to take a small board, place it on the surface of the caliper and knock a little. Of course, there is no 100% chance that this will help, but it is necessary to try.
If the driver has a little extra time, you can perform a quick diagnosis:
- Let the car stand cold for at least 15 minutes;
- Drive 100 meters to warm up.
- Stop the car and check each wheel. You need to look for the reason in the one that will be hotter.
After this, you can begin emergency repairs, for this you need:
- Raise the car with a jack and remove the wheel;
- If the handbrake cable is stuck in the mechanism, it can be easily cleaned if you have WD-40 on hand;
- If the piston is jammed, you need to use the wooden plank method described above.
Important! If you do not have similar experience in repairs, and this is your first time encountering the situation, it is better to call a tow truck and take the car to a mechanic.
Bottom line .
The caliper has a complex structure, so problems with it cannot be diagnosed in a few seconds. The unit operates at high temperatures, so the car owner must monitor its condition at least once a month.
Consequences
When the bracket wedges, the block remains pressed. This causes the discs to become very hot and the shoes to burn. If the speed of movement is high, and the degree of constriction is maximum, then it’s red-hot. It is obvious that braking efficiency drops sharply, the linings and disc become washed out and lose their properties.
After several heating and cooling procedures, the disks are sure to become deformed. After pressing the pedal, you will feel a beating, and you will not be able to brake at all. You will have to replace the repair kit, but the troubles will not end there, because the cause of the malfunction is in the caliper. If the hub begins to heat up, then the bearing will crumble and the CV joint will be destroyed.
Caliper repair methods
Caliper malfunctions can be different. However, we can highlight the most common cases, as well as recommendations for eliminating them.
Brake pads jam in caliper
This is noticeable when, with the caliper removed, the pads do not move freely. Usually the reason is rust on the stationary caliper pads, which prevents the pads from moving.
To eliminate the problem, you should arm yourself with sandpaper, a metal brush and a file (but only a small one). Then you need to clean off the corrosion from the metal, and then lubricate the surface with a high-temperature type lubricant. However, there should be no wear on the caliper - pits from corrosion. If they are present, cleaning will not help - the pad will not be pressed tightly enough or will not move away from the surface of the brake disc quickly enough.
Sometimes such a defect can be eliminated with a file (subject to insignificant wear), but usually you have to buy a new part of the caliper (fixed).
Something else useful for you:
Video: Passat front caliper rebuild
Corrosion on the caliper piston
It can be triggered either by a defective boot or a long downtime of the machine.
To eliminate the problem, it is recommended to remove and disassemble the caliper. Remove the rust-damaged piston from it and polish it with a special paste or fine rust. After this, thoroughly wash the piston seat with WD-40 and reassemble the caliper. Installing new cuffs won't hurt either. But the best option would be to buy a new piston or caliper assembly.
Prevention measures
Maintenance of the caliper must be carried out every time the pads are replaced, every two years. It is during this period that the lubricant loses its original properties. In Russian conditions, the timing of the inspection activity must be significantly reduced, and an inspection must be carried out in case of any extraneous sounds, the vehicle slipping and other signs of damage to the mechanism listed above.
The large loads to which the clamp is subjected require the use of special lubricants. Poor-quality compounds quickly harden and are destroyed by water or aggressive brake fluid. You need to use only high-temperature lubricant, with minimal dripping characteristics, moisture-resistant and not susceptible to chemicals. In addition, the correct lubricant must be compatible with plastic and rubber parts. A special type of lubricant is used for the fingers—the elements that guide the mechanism’s brackets.
What to do in such a situation
If you were able to diagnose creaking and signs of wedging in this unit, you need to perform a number of measures.
And here it is not necessary to contact a car service. You need:
- put the car on a jack;
- remove the wheel;
- unscrew the caliper;
- remove it;
- unscrew the problematic piston;
- remove the piston from the cylinder;
- visually inspect the element;
- check for chips, damage, corrosion;
- if there is rust, clean it;
- if severely damaged, replace;
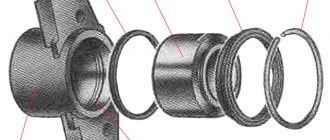
- drain the working fluid from the element;
- remove the sealing ring;
- clean all surfaces;
- dry;
- fill in new hydraulics;
- assemble in reverse order.
When putting the assembly back together, pay special attention to not accidentally damage the old boot. If you notice cracks on it, then no restoration will help. Replacement only.