Replacement of VAZ 2110 generator brushes
Brushes are the part of the generator that most often requires replacement, and therefore all manufacturers design generators so that no difficulties arise during the replacement process. Those who are familiar with the principle of operation of the generator know that voltage is supplied to the armature through the brushes , which not only starts the generator into operation, but also regulates its output power.
The regulation itself occurs due to a special device, a relay regulator, which can be implemented directly on the brush holder, or installed separately (on earlier models). Fortunately, brushes are not in short supply, and their price is quite reasonable. If repairs are not carried out in a timely manner, there is a possibility that you will soon need to purchase a new generator, and this is a completely different expense.
In order not to get into an unpleasant situation on the road, followed by calling a tow truck, it is better to have a spare set of spare parts.
Causes and symptoms of alternator brush malfunction on a VAZ 2110
The electrical system provides a fault indication in case the VAZ 2110 generator does not work - this is a battery charge lamp. On the instrument panel it lights up red with a battery icon. But don’t blame the generator; first you need to check the generator fuse and, if necessary, replace it. If everything is in order with the fuse and after replacing it, this lamp still does not stop lighting when the engine is running, then proceed to removing the generator and checking the brushes, diode bridge, etc.
Symptoms of failed brushes, in addition to the battery charge lamp, also include turning off some devices. For example, the turn signals stop working (provided that their fuse is intact), the panel instruments also begin to work worse (the lights have dimmed, the stove does not heat well) and the battery quickly runs out.
Quite often the cause is wear or sticking of the brushes. As a rule, such a malfunction manifests itself gradually, initially accompanied by short interruptions in the operation of the generator, and over time leads to its complete failure.
How to remove brushes from a generator located on a car
If the previous owner installed a brush block with a relay regulator in the generator, then the question of how to change the brushes on the generator without removing it from the car is much easier to solve than replacing individual brushes. If there is sufficient space in the engine compartment, it is also possible to replace the brushes separately without having to remove the generator.
All work on the vehicle's electrical equipment should begin by disconnecting the battery.
- The voltage regulator is removed;
- The production of brushes is measured;
- Old brushes are unsoldered;
- Contacts are cleaned;
- New brushes are soldered;
- The free movement of the generator brushes is checked;
- The regulator is installed in place;
- We connect the battery and start the car.
If everything went without errors, you won’t have to worry about how to check the generator brushes for a long time. Now, knowing perfectly the structure of the generator after disassembling it, it will not be difficult for you to fix other generator malfunctions with your own hands.
Procedure for replacing brushes on a VAZ 2110 generator
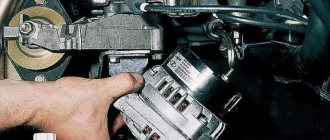
In VAZ-2107, 2110 and 2114 models, the generator is traditionally located on the right side of the engine compartment - near the headlight on the passenger side. The generator housing is attached to the engine, and you can recognize it by the pulley on which the drive belt is tensioned. If replacing the brushes does not require removing the generator, then repairing the brushes itself usually comes down to replacing them; the procedure is simple and usually takes a few minutes. To do this, just disconnect the negative terminal of the battery and the supply wire, unscrew the two screws securing the brush holder housing and remove the brush assembly from the generator housing, then evaluate their degree of wear, look at chips and cracks.
Check the dismantled unit for freezing, sticking of the brushes and their protruding, working part. In case of discrepancy, the parts must be replaced; brushes for the VAZ 2110 generator can be purchased at almost any auto parts store.
Having eliminated the malfunction, or purchased new brushes (it is better to buy small parts with a sample of old ones, so that you don’t have to change them later), they must be installed in the reverse order.
Replacement
The process of replacing old brushes with new ones does not take much time and does not require special knowledge. The only thing you need to prepare are the tools:
- socket wrench 13;
- flat screwdriver (ordinary);
- 8mm socket with ratchet.
Without removing the generator
If you are sure that the problem with the car breakdown is a malfunction of the generator brushes, then you can do without removing it.
- Turn off the negative terminal.
- Disconnect the wires.
- On the brush holder body, unscrew the two bolts holding it in place.
- We extract the structure.
- We check for damage and the size of the protruding part of the brushes (it must be at least 5mm).
- We install new elements and carry out installation in the reverse order.
With the generator removed
Poor charging of the car can be caused not only by the brushes, but also by the alternator belt. To eliminate this point, when replacing brushes, you should remove it to check the condition of the belt.
First, we dismantle the unit.
- We unscrew the bolt securing the generator belt.
- Move the unit towards the engine and remove the belt.
- Unscrew the tensioner bar and remove it.
- Disconnect the plug and terminals.
- We take out the part.
Let's move on to the brushes
- Open the protective casing (cover).
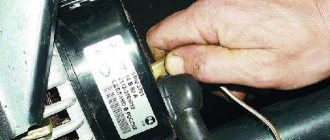
- Disconnect the brush power wires.
- We unscrew the two bolts securing the element we need.
- On the right side, using a 13mm wrench, unscrew one nut.
- The voltage regulator should be raised.
- We check the old brushes.
- We clear their location.
- We install new elements and assemble everything in reverse order.
Replacing the VAZ 2110 generator brushes yourself
During operation of the vehicle, after starting the engine, does the battery charging indicator light on the instrument panel continue to light or is it not fully illuminated? This means that the generator is faulty. According to all technical characteristics, the brushes of the VAZ-2110 generator must be replaced. It is worth noting that on a VAZ 2110, replacing the alternator brushes can be easily and simply done on your own.
Regulator check
After this, you need to check the operation of the voltage regulator:
- Connect a 12V control lamp to the brushes.
- Connect the wires + to the terminal, - to the ground of the brush holder with a voltage of 12V, the light is on.
- Using a rheostat, increase the voltage to 16 V, the light bulb continues to light.
This means that the brush holder along with the voltage regulator are out of order. They are subject to replacement. Before installing a new brush holder, check the protrusions of the brushes; they should be at a distance of more than 5 mm from the brush holder body. The capacitor is checked immediately (see Changing the capacitor (VAZ 2110 generator)).
Note: but in order not to waste time on subsequent repair work, it is better to immediately install a new capacitor.
Examination
It happens that the generator begins to act up ahead of schedule and the battery does not charge properly. Actually, it serves to ensure the operation of the source of electricity to power all cars - the battery.
We advise you to rely not only on our instructions, but also on video lessons that will allow you to carry out repairs and replacements with your own hands, even without much experience.
Troubleshooting
The first step is to determine whether your generator is actually the source of the problem. To check, you need to carry out a series of sequential activities.
- Start the engine and let it warm up to operating temperature.
- Increase the crankshaft speed to approximately 3 thousand rpm.
- Turn on all the headlights, activate the high beams, start the heater, emergency lights, heated glass, and wiper blades. That is, all electricity consumers should be turned on as much as possible.
- Measure the voltage on the battery.
- If the device shows less than 13V, then a short circuit or break has most likely occurred in the generator windings.
- Another option is a breakdown of the voltage regulator, oxidation of the contacts of the excitation winding ring.
You can check for breaks and the condition of other elements of the generator only by dismantling it. But if you don’t have any experience in disassembling a generator, then you shouldn’t try to go there with your own hands. Replace the entire assembly or entrust the repair to professionals.
Generator assembly
When assembling, you must select the correct position for installing the capacitor, otherwise it will not be possible to install the brush holder:
- The capacitor is screwed exactly along a certain protrusion in the generator cover.
- Reassemble in reverse order.
- It is necessary to demonstrate the accuracy of installation and the order preceding disassembly.
- Assemble the generator.
Note: before connecting the electrical terminals, it is necessary to clean them with fine sandpaper to remove any oxidation that has formed. Oxidation occurs from temperature changes and the formation of humidity in the environment.
- There is no place to install it.
- Tighten the nuts.
- Install the adjustment bolt.
- Put on the drive belt.
- Adjust the belt tension.
Note: this work is mandatory.
Since weak tension significantly deteriorates battery charging, this leads to early failure. If the belt is overtightened, this causes early destruction of the generator bearings. According to technical parameters, the belt deflection, when applying a force of 10 kgf, in the middle should bend by 10-15 mm. This check is carried out with a metal ruler, a corner 30 cm long. So:
- Place the corner on two pulleys - the crankshaft, the generator.
- Select the middle of the distance.
- Apply increased pressure on the end of the ruler.
- Measure the resulting deflection.
- If it meets the standards, then the tension was done correctly.
Generator and its repair
To recheck, you need to rotate the crankshaft. Place the wrench on the pulley mounting bolt and make two turns to the right. If necessary, repeat the adjustment process. After fully checking the tension of the generator drive belt, fully tighten the nuts of the upper and lower mountings of the generator. Advice from a qualified auto electrician:
- on the VAZ-2110 generator, the minus from the battery is connected to ground, the plus goes to terminal B (when connected in reverse, there is an excess voltage from the valves, which causes them to burn out);
- It is strictly forbidden to turn on the generator when the battery is disconnected - a short-term overvoltage occurs at output B, which leads to failure of the voltage regulator and damage to electronic sensors in the vehicle's electrical supply system;
- It is not allowed to check its operation with a short-term connection of output B to ground - this causes immediate failure of the valves; the operation of the generator is checked using an ammeter or voltmeter;
- It is not allowed to check the operation of the valves at a voltage of more than 12V using a megohmmeter - an increase in voltage causes a short circuit and they burn out;
- checking the insulation resistance of the stator winding must be carried out on special equipped stands in auto repair shops;
- Carrying out body work on a car using welding equipment requires disconnecting the supply electrical wires from the inputs of the generator and battery.
Dismantling
To disassemble, remove and repair or replace the generator, you will need to do the following.
- Drive onto an inspection hole or overpass to have access to the bottom and engine compartment.
- Remove the battery, otherwise it will not allow you to get to the nut that holds the generator you are looking for.
- Next, the same nut and adjustment bar are removed. Here you will need a 17 mm wrench. Use an extension cord. This will make the task easier; you will have to apply less force to unscrew the fastener.
- In the engine compartment, remove the shield that performs dirt protection functions.
- Now the drive belt is removed and the wires are disconnected.
- Be sure to remove the protective cap and use a 10mm wrench to unscrew the nut that holds the tip and positive cable of your battery.
- There is another nut on the fixing bracket, which will also have to be unscrewed.
- That's it, you can remove the generator. Just remember to pull out the long bolt first.
- When removing, keep an eye on the buffer sleeve. It won't be good if you lose it.
Dismantling works
This completes the procedure for removing the generator. You can proceed with partial repairs or complete replacement of the unit.
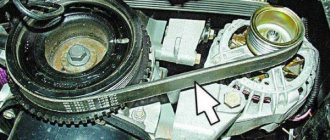
Belt
Often, the solution to a poorly functioning alternator is simply adjusting the belt.
Belt
- For the device to work effectively, it is necessary to ensure normal deflection of the belt;
- The deflection size should be 6-10 millimeters with a force of 98 N or 10 kgf;
- To adjust or replace the belt, you need to move the generator slightly to the side, towards the cylinder block;
- By rotating the adjusting bolt, you can adjust the belt tension.
If this measure does not help, you will have to pay attention to the voltage regulator and brushes.
Brushes and regulator
It is not recommended to repair the generator brushes, as well as the voltage regulator if they are worn out.
Experienced specialists advise purchasing a complete unit that includes both elements. Replacement is completed in a matter of minutes.
Brushes
But we will definitely tell you how you can change the brushes on your car’s generator with your own hands.
- Disconnect the negative terminal from the battery and remove the battery.
- Remove the generator following the instructions above.
- You can replace the brushes without removing the generator, but this causes certain difficulties. It is much easier to remove the unit.
- Remove the cover, which is the protective casing of the generator.
- The wires and the generator itself are disconnected from the brushes. To do this, simply unscrew a couple of bolts.
- On the right side of the dismantled device there is a nut that can be unscrewed by 13 millimeters with a spanner.
- Now lift the voltage regulator lever, which will allow you to get to the brushes.
- Using new brushes, install them in place of the old ones and reassemble the assembly in reverse order.
When reassembling, proceed as carefully as possible so as not to damage the repaired generator with your own hands.
Quite often, the cause of failure is not the generator itself, but its relay.
There may be several reasons for replacing the relay.
Cause
Peculiarities
The most common reason. This is due to the fact that when the brushes wear out, the contact with the relay disappears, because the generator does not receive enough power, and the operation begins to fail
Replacing the VAZ-2110 generator brushes: how to do it without removing the generator
The generator in the car design is responsible for supplying voltage to all components of the on-board network.
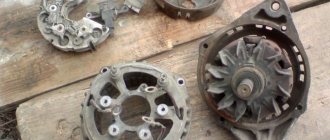
It is a fairly reliable unit, but it requires maintenance from time to time to prevent serious breakdowns. One of the stages of service work is replacing brushes. These stator elements, made of durable graphite, supply current to the rotating rotor of a car generator. Constant friction gradually wears out the brushes. It is not difficult to identify it - you will definitely notice the appearance of problems in the car's electrical supply system.
When may it be necessary to replace alternator brushes?
The manufacturer requires replacing the alternator brushes on a VAZ-2110 car every 50 thousand kilometers or every 4 years (it all depends on what comes first). But you may also need this procedure if any of the following symptoms of incorrect operation of the on-board network occur:
- spontaneous decrease in headlight brightness;
- periodic shutdown of the cigarette lighter, car radio, dashboard backlight lamps;
- sudden drop in network voltage;
- turning off all electronics on board the vehicle;
- rapid discharge of the battery and problems with restoring its charge.
If you notice at least one of these symptoms, it makes sense to check whether the generator brush is worn out and whether this device is working correctly.
In addition, you can perform a simple diagnosis using one of the following methods:
- visual assessment of the condition of the brushes. They should protrude slightly from the holder body. If this is not observed, wear is evident;
- measurement of brush resistance. It should be no more than 0.05 Ohm. Otherwise, the part needs to be replaced.
If problems are identified, it is urgent to install a new part, since further safe operation of the machine is not possible.
Diagnostics
First of all, you can check the condition of the brushes visually. To do this, you will need to turn off the power and remove the generator itself and see how far the brushes protrude from the holder body. If they are no longer visible, it means they have worn out and must be replaced. You can also use an electric multimeter to check the condition of the brushes, which many motorists have in their garages. This is a device that measures both current voltage and electrical resistance. It is enough to switch the tester to ohmmeter mode.
Then you need to take a 12-volt lamp with two wires and connect them to the B+ and D+ terminals of the car alternator. We apply the multimeter probes to different ends of the brush. A working brush has a resistance of 0.05 Ohm. If this value is higher, it is time to change the brushes.
How to replace alternator brushes on a VAZ-2110 car
Let’s immediately answer a very common question asked by domestic car enthusiasts: is it possible to replace the alternator brushes on a VAZ-2110 car without removing the alternator?
Yes, theoretically, such an operation can be performed, but we would like to warn you that there is a fairly high risk of damage to the unit, as well as breakdown of expensive parts located in the immediate vicinity of it. Replacing brushes on a car with a 16-valve engine will be a particularly difficult task, since, among other things, you will need to remove the crankcase protection, and also try to get to the generator from below, being under the bottom of the car. This is why we strongly recommend following the instructions in the video. In order to remove the generator and install new brushes, you will need to prepare all the necessary tools - keys 8 (socket), 10 and 13, as well as a flat-head screwdriver and a universal joint with a special extension. The entire procedure is performed according to the following scheme:
- disconnect the negative contact of the battery to de-energize the generator;
- unscrew the nut located on the positive contact. This is necessary to disconnect the generator from the system;
- loosen the lower and upper nuts, as well as the tensioner bolt, in order to quickly and effortlessly remove the generator belt;
- completely remove the adjusting bolt, and then remove the tension bar from the generator;
- remove the generator. All other work can be done in any convenient place, since it is now easy to provide quick access to the brushes;
- remove the battery and disconnect all wires connected to it from the generator;
- Using the cardan joint, we get to the bolt of the brush assembly and completely unscrew it from the body;
- install new brushes and reassemble the generator in the reverse order.
After this, you will need to secure the generator in a place specially designed for it and reconnect all the wires. Be sure to check the operation of the vehicle's electrical network after completing assembly and correct any errors, if any.
Replacing alternator brushes in a VAZ-2110 car is a relatively simple procedure, so you can handle it yourself even without the involvement of car service specialists. You just need to have at your disposal all the necessary tools, without which you will not be able to dismantle the unit.
How to replace the generator voltage relay?
If you have some skills, removing and disassembling the mechanism described in the article does not cause difficulties for a person. The most difficult thing is to change it for the first time, and subsequent replacements, as a rule, take place quickly and without problems.
The regulator on a VAZ 2110 is dismantled according to the following scheme:
- disconnect the negative terminal from the battery;
- disconnect the drive block from the terminal marked “D+”;
- unscrew the nut, which is located under the rubber boot (it needs to be moved a little to the side);
- disconnect all existing wires in the contact pin;
- unscrew the nut in the generating device circuit (this fastener secures the terminal) and remove it.
Then you will need to remove the generator casing by unscrewing the nuts (there are three of them) that hold it in place, as well as dismantle the relay housing and remove the screw securing the disassembled mechanism from the rectifier compartment. Now the VAZ 2110 voltage regulator can be easily removed. You can install a new device instead. After replacing the relay, all the described steps are performed in the reverse order.
Replacing generator brushes on VAZ 2110, VAZ 2111, VAZ 2112
Brushes are an integral part of the generator. They are inexpensive and can be replaced in literally 20-30 minutes. Thanks to the brushes, the battery is charged, and current from the generator is supplied to the on-board network. Failure is fraught with consequences: the car does not drive, the battery charge lamp immediately lights up, signaling that the generator is not working properly and requires inspection. Do not operate a car with a glowing light on the dashboard, because the battery will suddenly run out in the wrong place, the car will stall and you are unlikely to start the car (current stops flowing to the ignition system, and therefore the spark disappears and the fuel-air mixture stops igniting).
Tips and recommendations for replacing brushes on a VAZ 2107
Welcome, friends, to the DIY car repair website. Despite the large number of foreign cars, cars of the VAZ family are still in demand and find their use among motorists who know a lot about technology and appreciate the advantages of the domestic automotive industry.
As you know, operation and repair are inseparable concepts, and in the event of failure of any component, identifying and repairing the fault can be done on your own. Let's look at a simple repair using the example of a VAZ 2107 car generator.
Replacing brushes on VAZ 2110-VAZ 2112
Note! There are two replacement methods:
the first is to remove the generator from the car and replace the brushes (convenient, but takes more time, the procedure is described in detail in the publication: “Replacing the generator in a car”);
the second is to disconnect the minus terminal from the battery (read in paragraph 1 of the article: “Replacing the battery in a car”) and doing all the work on the installed generator on the car.
Perhaps the second option is not very convenient, however, if you do everything correctly, you will save a little time, and it is not difficult to remove the brushes.
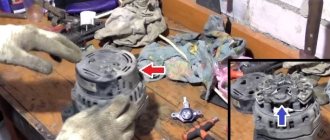
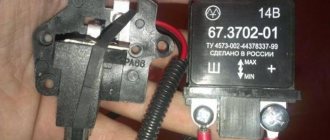
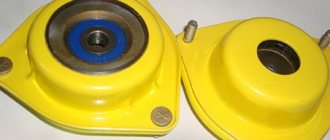
1. To change the brushes, first press out the three latches on the sides of the generator that secure the cover to it. By removing the cover (see small photo), you have access to the voltage regulator. It has two fastening screws (indicated by blue arrows), unscrew them and, by pulling the regulator, disconnect them and thereby remove them completely from the generator.
Note! You can completely change the regulator with brushes, but if this is not possible (for various reasons, for example, financial difficulties), replace separately the brushes attached to the regulator by soldering. More precisely, their wires are soldered to the terminals of the regulator - take a soldering iron and unsolder the wires coming from the brushes. Then remove them from the regulator and install new ones in the same way using soldering. We have attached a video for clarity.
2. Having removed the regulator, inspect the condition of the brushes: the length must be at least 5 mm (photo 1), otherwise replacement is necessary. We recommend checking the regulator as follows: connect a 12 Volt test lamp, as shown in Diagram 2 (to the brushes), and apply a voltage of 12 Volts. The battery may give in, run some thin wires from it “+” to the terminal, and “-” to ground. The lamp should light up. Perform a similar operation with a current not of 12 V, but of 15-16 V. A dead lamp means: everything is in order with the regulator and it does not need to be replaced.
Additional video We have attached a video