Features of a car generator
After turning the ignition key, current flows into the field winding. Here it is controlled by a voltage stabilizer, which is powered by the rectifier section.
A car generator produces alternating current, which, after rectification by a diode bridge, becomes constant. Thus, such a unit belongs to the group of DC valve generators.
Its distinctive feature is maintaining voltage within a narrow range of values. A special regulator, which is popularly called “tablet”, “chocolate”, “brushes”, is responsible for the voltage of the generator.
These devices increase the voltage to 13.6 Volts.
Today they are connected according to two main schemes. The older version is reliable, works stably, maintaining voltage at approximately a constant level. The updated scheme has many disadvantages.
The uniqueness of the automobile unit is that it generates electricity by converting the mechanical energy of the rotating engine crankshaft, which is connected to the generator pulley by a belt. At the same time, the engine speed is not a constant value.
Thus, the main task of this electrical unit is to charge the battery and supply all car consumers with stabilized voltage.
In this case, regardless of engine speed, the voltage should always remain within approximately 14 Volts. Otherwise, it will negatively affect both the battery and the electrical circuit. Overcharging and undercharging will have a detrimental effect on the battery.
Types of repair work
When the device is replaced, check the condition of the belts and rollers. These parts are classified as consumables and therefore must be replaced from time to time. Various components of the unit may fail. Let's name what repair work in this area is carried out most often:
- replacing the overrunning clutch. The part is not repaired, it is replaced with a new spare part;
- replacing an external or built-in relay;
- changing the device belt;
- replacing brushes.
Each of these parts must be in full working order. The successful functioning of the entire system as a whole depends on this. If even one element fails, this entails a malfunction of all other parts. It is important to promptly check the condition of each device component. This guarantees long service life of the unit in the future.
Source:
Cleaning contacts
Even modern generators and starters, designed for start-stop systems, are designed quite simply and have no fundamental differences from their ancestors. However, before taking tired components for repairs, it is important to make sure that the car’s electrical system is generally in good working order and that our heroes are not being terrorized by other enemies. Otherwise, you will soon have to pay decent money again for repairs or restoration.
The death of a generator is very often associated with a substandard battery, which significantly increases the load on the unit. For this reason, the diode bridge and stator winding in the generator often burn out, and on some BMW models, even the stator itself. After such a disaster, the generator can be safely thrown into the trash.
Also, the life of the generator drops noticeably if it ends up in an area of oil or antifreeze leakage. When the generator operates, the brushes naturally wear out and produce dust. And because of the oil that gets onto the generator, moistened dust particles return to the contact zone of the brushes and commutator - and, as they say, active abrasive wear occurs out of the blue.
In half of the cases, repairmen receive burnt starters, tortured by the car owners themselves. They turn the starter for too long (especially in winter) and overheat it in an attempt to start the engine, which may not start for a long time for a number of reasons.
Generator VAZ 2106: purpose and functions
A car generator is a small electrical device whose main task is to convert mechanical energy into electrical current. In the design of any car, a generator is needed to charge the battery and feed all electronic devices while the engine is running.
Thus, the battery receives the necessary energy for engine operation from the generator, so we can say that the generator is an indispensable attribute in the design of any car.
How exactly does the generator work on a VAZ 2106? All processes of energy conversion from mechanical to electrical are carried out according to a strict scheme:
- The driver turns the key in the ignition.
- Immediately, the current from the battery through the brushes and other contacts enters the excitation winding.
- It is in the winding that the magnetic field appears.
- The crankshaft begins to rotate, from which the generator rotor is also driven (the generator is connected to the crankshaft by a belt drive).
- As soon as the generator rotor reaches a certain rotation speed, the generator enters the self-excitation stage, that is, in the future, all electronic systems are powered only from it.
- The generator performance indicator on the VAZ 2106 is displayed in the form of a control lamp on the dashboard, so the driver can always see whether the device has enough charge for full operation of the car.
Design of the G-221 generator
Before talking about the design features of the VAZ 2106 generator, it should be clarified that it has unique clamps for mounting on the engine. On the body of the device there are special “ears” into which studs are inserted and tightened with nuts. And so that the “ears” do not wear out during operation, their internal parts are equipped with a high-strength rubber gasket.
The generator itself consists of several elements, each of which we will now consider separately. All these devices are built into a light-alloy cast housing. To prevent the device from overheating during long-term operation, the case has many small holes for ventilation.
Winding
Due to the fact that the generator has three phases, windings are installed in it immediately. The purpose of the windings is to generate a magnetic field. Of course, only special copper wire is used for their manufacture. However, to protect against overheating, the winding wires are covered with two layers of heat-insulating material or varnish.
Relay regulator
This is the name of the electronic circuit that controls the voltage at the output of the generator. The relay is necessary to ensure that a strictly limited amount of voltage reaches the battery and other devices. That is, the main function of the relay regulator is to control overloads and maintain an optimal voltage in the network of about 13.5 V.
Rotor
The rotor is the main electric magnet of the generator. It has only one winding and is located on the crankshaft. It is the rotor that begins to rotate after the crankshaft starts and gives movement to all other parts of the device.
Generator brushes
The generator brushes are located in brush holders and are needed to generate current. In the entire structure, it is the brushes that wear out the fastest, since the main work of generating energy falls on them.
Diode bridge
A diode bridge is most often called a rectifier. It consists of 6 diodes that are placed on a printed circuit board. The main job of a rectifier is to convert alternating current into direct current to maintain stable operation of all electronic devices in the car.
The pulley is the driving element of the generator. The belt is tensioned simultaneously on two pulleys: the crankshaft and the generator, so the operation of the two mechanisms is continuously interconnected.
What's wrong?
After eliminating possible problems with the car's electrical system and other defects, you can proceed to a detailed check of the starter and/or generator.
Diagnosis of a dead starter is simple. It is disassembled and defective. In addition to dead parts, it is important to update elements with significant wear so that you don’t have to open the unit again soon. Along the way, check the resistance of the windings of the solenoid relay and the Bendix for failure.
With modern generators it is more difficult. In their design, the relay-regulator is connected via a separate bus to the “brain” of the engine, providing a smart charging function. The trouble is that to check a relay from a specific manufacturer, you most often need an individual diagnostic device with an oscilloscope. It also allows you to check the regulator separately from the generator - this saves repairmen from defective relays.
The generator is also checked on the stand. Its behavior under load, in idle mode and during heating is assessed. Additionally, the noise of the bearings is listened to with a stethoscope.
Bench tests are carried out before and after generator repair.
What causes the battery light on the dashboard to light up?
When the ignition key is turned, the system displays all instrument icons on the panel. This is done to check the operation of the machine, therefore the bulbs are fully working. Next, we start the engine and the lights go out when the machine is running properly. If one light does not go out, then this indicates a problem.
Battery icon on dashboard
Also, if the battery icon does not go out, this indicates that the generator has low voltage or no voltage.
How to check the generator yourself
How to check a VAZ generator using the example of model 2109. Generator type 94.3701 alternating current, three-phase, with a built-in rectifier unit and an electronic voltage regulator, right-hand rotation.
Generator connection diagram . The voltage to excite the generator when the ignition is turned on is supplied to terminal “D+” of the regulator (terminal “D” of the generator) through indicator lamp 4 located in the instrument cluster. After starting the engine, the excitation winding is powered by three additional diodes installed on the generator rectifier block. The operation of the generator is controlled by a warning lamp in the instrument cluster. When the ignition is turned on, the lamp should be on, and after starting the engine, it should go out if the generator is working. If the lamp is brightly lit or glows half-lit, it indicates a malfunction.
The “minus” of the battery should always be connected to ground, and the “plus” should always be connected to the “B+” terminal of the generator. Failure to turn the battery back on will immediately cause increased current through the generator valves and damage them.
It is not allowed to operate the generator with the battery disconnected. This will cause short-term overvoltages to occur at the “B+” terminal of the generator, which can damage the generator voltage regulator and electronic devices in the vehicle’s on-board network.
It is prohibited to check the functionality of the generator “for spark” even by briefly connecting the “B+” terminal of the generator to ground. In this case, significant current flows through the valves and they are damaged.
How to remove the generator
Replacing a generator, especially on older cars, is a rather complicated and problematic procedure. You need to stock up on a set of tools in advance that will help you remove the generator from the car yourself. On some foreign cars, the generator can be removed from above, while on others you have to work through the wheel arch or even from below. First you need to decide how it will be easier to remove the generator on a particular car. In order to prevent fasteners from breaking, all fasteners must be treated with WD-40 liquid. To simplify the process of removing the generator, it is advisable to carry out work on a pit or a lift.
The generator can be removed in three ways:
- Up, pulling it towards you;
- Down, moving it under the engine;
- Or down, leading it out through the wheel arch.
How to get a generator must be determined on the spot, based on the model of your car. If you have a car owner's manual, these details will be noted there.
Which generator is better to put on a VAZ 2106
Electrical diagram of VAZ 2106
As a matter of fact, if we look at the electrical circuit of the VAZ 2106, which we have given below just in case, it turns out that it differs from the 2101 circuit only in the presence of additional electrical appliances, which entailed some changes. And the generator in the base of the six is the same as in the 2101, its name is G 221.
There can be no complaints against it as long as it works. But the fact is that the design of an electric machine is not at all designed to use such a number of consumers. As a result, insufficient current is supplied to the relay regulator, which in turn leads to undercharging and slow death of the battery. Disorder.
How to connect a standard generator G221
This is expressed quite clearly. Especially if the owner installs additional, non-standard consumers in the car that work almost constantly. It can be:
- fog lights;
- powerful audio system;
- preheater;
- refrigerator, TV, additional heater.
In short, any step that leads to an increase in electrical energy consumption threatens premature battery discharge, even on the road, with the engine running and at high speeds. That’s why it’s worth understanding how the VAZ 2106 generator connection diagram works and what alternatives there are.
Replacing a VAZ 2106 generator with a G222
The easiest option is to replace the standard generator. On new. It makes no sense to talk about the generator design as an electric three-phase synchronous machine. Not about that now. We are faced with the problem of connecting the standard G 221 generator in order to avoid mistakes when installing another, more powerful and stable G 222 generator, which was already installed on the VAZ 2105.
How is it better than the standard six? Actually nothing. With the exception of a few nuances that can be decisive when the load on the on-board electrical circuit increases. It can be installed on a VAZ 2106 engine using one of two methods:
- Install a generator with a built-in relay instead of the standard one.
- Install the modernized G 222 generator.
Actually, it’s much easier not to complicate life by altering the wiring, albeit minor, but to take the simple path.
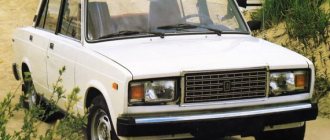
Instructions for replacing the generator on a VAZ 2107
In case of many generator malfunctions that can happen on a VAZ 2107, you have to remove it completely in order to replace some parts. This article will describe in detail the process of replacing (removing) the generator on a VAZ 2107 car and other “classic” models.
Before describing the entire procedure, I will give the necessary list of tools that will be needed:
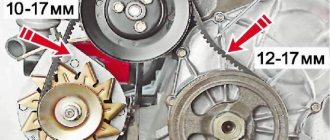
- 17 and 19 mm sockets
- Extension and universal joint
- Slip-on pick for 19
- A hammer is highly recommended
How to remove a generator on a VAZ 2107
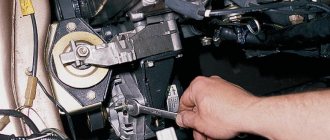
First you need to open the hood and remove the terminal from the battery, maybe the negative one. Then the nut securing the positive wires to the generator, as shown below:
And disconnect the wire from the brushes and from the diode bridge (two plugs):
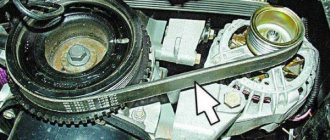
Then remove the alternator drive belt on the VAZ 2107, only after this can you carry out further work.
To unscrew the tensioner nut quickly and without unnecessary problems, you must use a ratchet with universal joints and a head. If you don’t have such a tool at hand, you can try to do this using an open-end wrench.
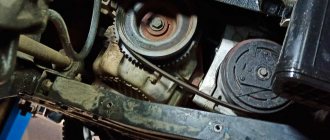
Then we climb under the car and use a 19mm wrench to unscrew the large mounting bolt from below. This is what it all looks like:
It is usually quite difficult to remove the bottom bolt by hand, so you can knock it out using the handle of a hammer.
And you can pull it out completely by hand, as shown below:
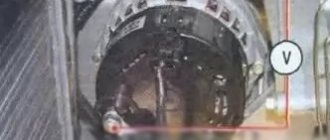
If the engine protection has been previously removed, then without any problems we remove the VAZ 2107 generator from below:
The result is the following picture, the device has been removed from the car and you can begin installation:
The price of a new generator ranges from 2000 to 4000 rubles. It depends on the modification (with or without an integral), as well as on the manufacturer. As a rule, KZATE are the most expensive and of the highest quality, just like the PRAMO company.
Connection diagram for the VAZ-2101 generator
Structurally, generator 2101 consists of the following main elements:
- The rotor is a moving part that rotates from the engine crankshaft. Has an excitation winding.
- The stator is the stationary part of the generator and also has a winding.
- Front and rear covers , inside of which bearings are installed. They have eyelets for attaching to the internal combustion engine. The back cover contains a capacitor necessary to cut off the alternating current component.
- Semiconductor bridge - called a “horseshoe” for its similarity. Three pairs of semiconductor power diodes are mounted on a horseshoe-shaped base.
- A pulley on which the VAZ-2101 generator belt is placed. The belt is V-shaped (on modern cars a multi-ribbed belt is used).
- The voltage regulator is installed in the engine compartment, away from the generator. But still it must be considered part of the structure.
- The brushes are mounted inside the generator and transmit the supply voltage to the field winding (on the rotor).
Checking the generator voltage regulator
To check the voltage regulator, turn off all consumers except the high beam and remeasure the voltage. The voltage should be in the range of 13.2-14.7 V. The battery charge lamp on the instrument panel is lit, this is a sign of a possible generator malfunction.
The battery charging lamp on the instrument panel is lit, this is a sign of a possible generator malfunction.
1. Disconnect the “-” wire from the battery.
2. Disconnect the generator excitation wire.
3. Using a ten key, unscrew the nut securing the wires to output “B+”...
...and remove them.
4. Remove the generator belt, unscrew the generator adjusting bolt and the fixing nut.
5. Remove the tension bar.
6. Using a 13mm wrench, unscrew the nut of the lower mounting of the generator.
7. Remove the bolt.
8. Remove the generator.
To begin with, clean the generator from dirt to make working with it more pleasant. I don’t like working like some craftsmen up to their ears in oil or fuel oil. Once I watched an engine being repaired on a Niva, a valve fell off the hood to the ground, and the master installed it into the engine without even wiping it. The question is how long the engine will work after such a “repair”. After cleaning, start disassembling.
9. Press out the three latches, pry the casing with a screwdriver...
10...and remove it.
11. Use a Phillips screwdriver to unscrew the two screws...
12...and remove the voltage regulator
13. Disconnect the wire, then remove the voltage regulator
14. Using a “10” wrench, unscrew the “B+” output nut.
15. Remove the spring washer and bushing, remove the capacitor wire lug.
16. Use a Phillips screwdriver to unscrew the screw...
17...remove the capacitor.
18. It is recommended to mark the location of the generator parts before disconnecting. 19. Through the hole in the high “21” head (held by a pipe wrench), insert a “8” hexagon and unscrew the pulley mounting nut.
20. Remove the pulley...
21... puck.
22. Using a Phillips screwdriver, remove the four screws that connect the covers. The bolts come out and during use they often oxidize or rust. It can be very difficult to unscrew them. Before unscrewing, it is advisable to treat them with WD-40.
When the bolts give way, use a felt-tip pen to mark both parts and the generator stator itself. The problem is that there are no marks on the housings and stator to control the assembly. If you do not put marks, then during assembly it is difficult to find the correct position of the parts.
23. Remove the front cover.
24. Using a Phillips screwdriver, unscrew the three screws securing the stator windings...After that, carefully bend the wires upward from the winding. Be careful not to break off the wires.
25... screw for securing the rectifier unit.
26. Remove the rectifier block, it is also called a “horseshoe” (the contact bolt will fall out)
27...and the stator.
28. Press down on the bushing...
29...push it and the rotor out of the rear cover.
30. Using a screwdriver...
31...remove the bushing from the rear bearing.
32. Use a two-jaw puller to press the bearing off the rotor shaft.
If you don’t have a puller, then place 8 nuts on both sides of the bearing and using two screwdrivers as levers, remove the bearing (this is clearly shown in the video)
Assemble the generator in reverse order (the video at the beginning of the article shows disassembly and reassembly).
Connection diagram for the VAZ-2107 generator
1 - battery; 2 - negative diode; 3 - additional diode; 4 - generator; 5 - positive diode; 6 - stator winding; 7 - voltage regulator; 8 — rotor winding; 9 — capacitor for suppressing radio interference; 10 — mounting block; 11 — battery charge indicator lamp in the instrument cluster; 12 - voltmeter; 13 — ignition relay; 14 - ignition switch.
Generator VAZ 2106: purpose and functions
A car generator is a small electrical device whose main task is to convert mechanical energy into electrical current. In the design of any car, a generator is needed to charge the battery and feed all electronic devices while the engine is running.
The generator's task is to ensure uninterrupted operation of all electrical systems of the machine and the battery.
How exactly does the generator work on a VAZ 2106? All processes of energy conversion from mechanical to electrical are carried out according to a strict scheme:
- The driver turns the key in the ignition.
- Immediately, the current from the battery through the brushes and other contacts enters the excitation winding.
- It is in the winding that the magnetic field appears.
- The crankshaft begins to rotate, from which the generator rotor is also driven (the generator is connected to the crankshaft by a belt drive).
- As soon as the generator rotor reaches a certain rotation speed, the generator enters the self-excitation stage, that is, in the future, all electronic systems are powered only from it.
- The generator performance indicator on the VAZ 2106 is displayed in the form of a control lamp on the dashboard, so the driver can always see whether the device has enough charge for full operation of the car.
Standard device for the "six"
Design of the G-221 generator
Before talking about the design features of the VAZ 2106 generator, it should be clarified that it has unique clamps for mounting on the engine. On the body of the device there are special “ears” into which studs are inserted and tightened with nuts. And so that the “ears” do not wear out during operation, their internal parts are equipped with a high-strength rubber gasket.
The generator itself consists of several elements, each of which we will now consider separately. All these devices are built into a light-alloy cast housing. To prevent the device from overheating during long-term operation, the case has many small holes for ventilation.
The device is securely fixed in the engine and connects to various car systems
Winding
Due to the fact that the generator has three phases, windings are installed in it immediately. The purpose of the windings is to generate a magnetic field. Of course, only special copper wire is used for their manufacture. However, to protect against overheating, the winding wires are covered with two layers of heat-insulating material or varnish.
Thick copper wire rarely breaks or burns out, so this part of the generator is considered the most durable
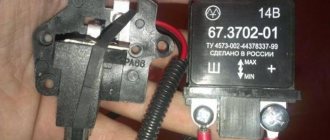
Relay regulator
This is the name of the electronic circuit that controls the voltage at the output of the generator. The relay is necessary to ensure that a strictly limited amount of voltage reaches the battery and other devices. That is, the main function of the relay regulator is to control overloads and maintain an optimal voltage in the network of about 13.5 V.
A small plate with built-in circuitry to monitor the output voltage
Rotor
The rotor is the main electric magnet of the generator. It has only one winding and is located on the crankshaft. It is the rotor that begins to rotate after the crankshaft starts and gives movement to all other parts of the device.
The rotor is the main rotating element of the generator
Generator brushes
The generator brushes are located in brush holders and are needed to generate current. In the entire structure, it is the brushes that wear out the fastest, since the main work of generating energy falls on them.
The outer side of the brushes can quickly wear out, which is why there are interruptions in the operation of the VAZ 2106 generator
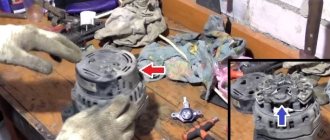
Diode bridge
A diode bridge is most often called a rectifier. It consists of 6 diodes that are placed on a printed circuit board. The main job of a rectifier is to convert alternating current into direct current to maintain stable operation of all electronic devices in the car.
Due to its specific shape, drivers often call the diode bridge a “horseshoe”
Pulley
The pulley is the driving element of the generator. The belt is tensioned simultaneously on two pulleys: the crankshaft and the generator, so the operation of the two mechanisms is continuously interconnected.
One of the generator elements