To be honest, the handbrake or handbrake is not particularly needed in the city, especially if you have an automatic car and you have a parking mode . Yes, and in manual mode, drivers mostly put the car in gear. Why? Yes, it’s simple - our climate is harsh, and therefore if you put on the parking brake in winter, you can get into an unpleasant situation - they will simply freeze to the rear drum brakes. However, as the traffic rules teach us, you need to set it to avoid emergency situations, for example, you left the car in neutral gear, forgot to put the handbrake on - GONE, and it rolled. It's not far from an accident! Therefore, when undergoing maintenance, this braking element must be checked; if it does not work (does not hold), then you will not pass the technical inspection. But why does this happen, what are the reasons? Let's find out...
The handbrake or handbrake is just a scourge on our VAZs. Very often it turns out that you lift the handle of this brake, but nothing happens - that is, the car rolls.
When undergoing a technical inspection, there is a golden rule:
If the car stops after three clicks, it means the handbrake is working and you can issue the coveted ticket. But if it doesn’t hold well with 4 or more clicks, then the performance is at a low level, or it doesn’t exist at all!
Faulty cars are sent to be repaired or the handbrake tightened, without it there is no way.
How do they work?
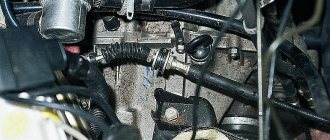
The operation scheme is banal and simple - there is a handle that is connected to a cable, which in turn is in a special braid (that is, the cable runs in it). Then this cable is hooked onto a special adjusting bolt (it can be tightened and loosened), which is engaged with a bar, along the edges of which there are two more cables that go to the two rear wheels. And these cables (extending to the wheels) are engaged with a special bracket, it is this that opens the pads and blocks the drums.
That is, in simple words, when you move the handle up (raise the handbrake), the cable stretches and pulls two separate cables to the wheels. Inside the drums, the brackets are unclenched, which spread the rear pads, due to which the wheels are blocked.
Let's watch a short video and it will become clearer.
Hydraulics or mechanics
It is worth noting that at the moment not all rear brakes are cable or mechanical; now there are quite a large number of handbrake brakes that operate hydraulically, this is especially true for rear disc brakes rather than drum brakes . Hydraulics duplicate the operation of the main braking system.
That is, when you lift the handle, a special piston creates pressure on the rear discs and they are blocked. If the handbrake does not work in such a system, then the reasons are significantly different from its mechanical counterpart.
How much does it cost to tighten the handbrake and can you do it yourself?
Actually the question is rhetorical, as you understand in different regions, the cost can range from 200 to 1000 rubles. For example, in the capital, the price is often 500 – 1000, but in the regions you can raise it for 250 rubles.
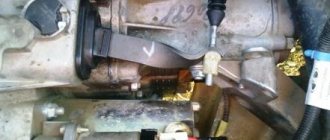
And to be honest, the work itself only takes a few minutes, the main thing is to find a hole or a lift, a key of 10 and off you go. You need to tighten the middle bolt, the one that is in the middle, it is the handbrake, tighten the nut and thereby tighten the cables.
Of course, if they are rusty or torn, then everything is much more complicated; it is better to trust the master, because replacing the cables from the rear drums is not at all an easy task.
That's all, read our AUTOBLOG, I think it clarified the situation.
( 11 votes, average: 4.36 out of 5)
Similar news
Rust converter composition. Can I do it myself?
How to unscrew a brake pipe. If it has soured and the edges are torn off.
Anti-squeak plates for brake pads. Why are i needed?
Add a comment Cancel reply
TOP articles for the month
The holidays are coming, which means most of our country will be drinking alcohol. Easy: -…
I have many different articles and videos on various gearboxes, for example here...
The vehicle battery voltage, as well as its capacity, are the most important indicators of this automotive unit,...
How to troubleshoot
You can determine that there is something wrong with the parking brake system in the Lada Kalina by placing the car on an incline with the handbrake and observing. If the car starts to roll, it means a check is needed. And only then can you decide whether the system simply needs adjustment or whether specific parts need to be replaced.
You should also pay attention to the sound of the brake drum rubbing against the pads from the rear wheels while driving. They shouldn't exist.
Malfunctions may occur due to:
- wear of parts, for example, drum brakes, the surface of which wears off and needs periodic replacement;
- Also, if the handbrake is in the raised position while driving, this wears down the pads very quickly.
Adjust or replace
You can determine whether the handbrake needs to be replaced or whether it is enough to just adjust it by remembering how long ago the drums and pads were changed. Such a replacement should be carried out at least once every 50-80 thousand kilometers.
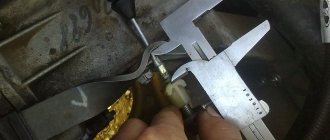
So, when inspecting the pads, you need to measure their thickness: if they are thinner than one and a half millimeters, new ones need to be installed.
Now you should check the diameter of the drum shield, which should not exceed 20 centimeters, otherwise it needs to be changed.
Parts also need to be replaced if the following are noticed on them:
- cracks;
- corrosion;
- attrition;
- other defects.
Owners of a Lada Kalina car may also be faced with a situation where all parts have been inspected and no damage is found, but the parking brake nevertheless does not function. The reason is a cable that has broken. In most cases, replacement is not necessary in such a situation; it is enough to just tighten it. However, if the cable has already been raised to the maximum level, you will still have to change to a new one.
Also, the need for adjustment or replacement is indicated by the fact that when the handbrake is tightened, the car owner hears less than two or more than four clicks of the pin.
Pulling up the handbrake
It is likely that you just need to tighten the parking brake on the VAZ 2110 to fix the problem.
- Drive to the inspection hole, from where it is most convenient to make adjustments. Another option is a lift. You'll find something here. This way you can easily get to the necessary nodes.
- Make sure the brake lever is in its lowest position.
- Take two keys. You will loosen the lock nut first and tighten the adjusting nut second.
- Tighten the adjustment nut until the cable is properly tensioned.
- It is strongly recommended to hold the rod when tightening the adjustment nut with pliers.
- Now make sure that the lever makes full travel in 2-4 clicks, no more.
- If after checking everything turned out to be good and the working stroke is correct, tighten the equalizer locknut while holding the adjustment nut with a second wrench.
- Release the handbrake lever down and turn the rear wheels by hand. Rotation should occur evenly without any jamming.
- But if the adjustment did not allow the cable to be tensioned, then the element must be replaced.
Checking the effectiveness of the parking brake adjustment is also simple. You drive onto an area with a slope, put the car on the handbrake and watch the car’s reaction. If the car does not move in neutral, it means you have done a good job.
Setting the handbrake on a Lada Kalina car
After inspection, making sure that the components in the system are in good condition, you can begin adjustments.
Note: The cable should be lengthened when locking occurs at a faster pace, and shortened (by trial) if more than 5 clicks are needed.
As mentioned above, no assistants are required to perform this type of work. But what is really needed is an overpass. You also need to have in stock:
- open-end and ring wrenches 13;
- wrench with extension and heads for 10 and 13;
- liquid key product.
The procedure is as follows:
- To begin with, the car is placed on an overpass, first or second gear is engaged, and stops are installed under the front wheels.
- A quarter of an hour before starting work, all threaded connections are treated with a liquid wrench. This is done to make it easier to remove the nuts without damaging the threads.
- Then you need to lower the handbrake lever and unfasten the muffler from the rubber holders.
- The next step is to unscrew the screws from the protective screen. Below it is located the parking brake rod, equalizer, as well as the left and right brake cables.
- Next, you need to loosen the additional nut located on the rod using a spanner wrench, while the main one is held using an open-end wrench. The main screw is required for adjustment. So, when the cable needs to be shortened, it needs to be tightened, but if the length needs to increase, it needs to be unscrewed.
- The handbrake is checked every three to five revolutions. It is necessary to ensure that the final blocking occurs within two to four clicks.
- Now you should check the brake by hanging the rear wheels. When the handbrake is raised, they should lock; when it is lowered, they should rotate smoothly. If everything is in order, you can tighten the holder.
- Then the mufflers and protective screen are installed in place and the nuts on the fasteners are carefully tightened.
The work performed should be checked by placing the machine at a 25% slope. If Kalina rolls away, you need to change the cable.
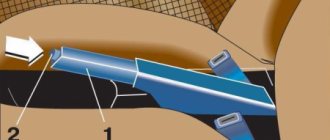
Handbrake diagram for VAZ-2112
For clarity, here is a diagram of a hand brake
1 - button that fixes the handbrake lever; 2 — hand brake lever; 3 — protective cover; 4 — handbrake rod; 5 — cable equalizer; 6 — adjusting nut; 7 - lock nut; 8 - cable; 9 — protective sheath of the cable.
In this circuit we need element number 6 . It is he, and only him!
What is required for adjustment?
In order to adjust the handbrake you need a platform or lift. If there are no such devices, then you can simply hang the rear wheels on the “goats”. They can be installed under the car using a jack. It’s also worth taking two “13” keys and pliers.
- The car is installed on an overpass or “goats”.
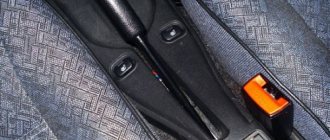
The lever position is set to the lowest possible position.
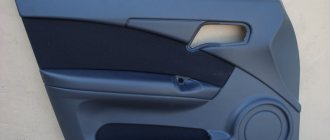
We put the handbrake at the very bottom. Do not pay attention to the scuffs of the console; we conducted an experiment with non-standard armrests. The iron fastenings of the armrest are visible. The photo shows the editorial car
Use a wrench to loosen the locknut.
- The second wrench holds the adjusting nut.
- The adjusting nut should be tightened until the cable is tensioned. It must be remembered that the rod should be held with pliers when tensioning the cable.
Tighten the adjusting nut
- After this, you should make sure that the full stroke of the handbrake lever is no more than 4 and no less than 2 clicks.
- When the stroke check is completed, the locknut is tightened. The adjustment is held with another key.
- If necessary, change the mechanism to a new one.
Everything is rusty, we changed the adjustment mechanism
- After releasing the adjusted lever down, you should spin the rear wheels. When the lever is in its lowest position, the wheels should spin freely.
If you cannot tighten the cable, then it should be replaced with a new one.
Adjusting the handbrake after tensioning
After adjusting the brakes, you need to check them again. To do this, the car should be placed on a road with a slope of at least 23%! The car should be in neutral gear in this area and with the handbrake pulled up. If the handbrake brakes hold the car in this area, then the handbrake is adjusted correctly.
Removing and installing the cable
- First of all, the car is prepared for work.
- Next, the brake drum shields and protective screen are dismantled and the lock nut is unscrewed.
- Afterwards, the adjusting screw is removed from the rod and the equalizer is removed from the cables.
- On the left rear wheel there is a brake mechanism, from which you need to remove the cable earring with a slotted screwdriver.
- Then, using a 10 mm spanner, unscrew the nut of the handle securing the cable to the left arm of the rear suspension, after which it can be carefully disconnected.
- The second element is removed by analogy.
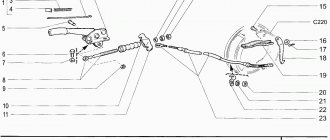
Removing and installing components and adjusting the hand brake VAZ 2110, VAZ 2111, VAZ 2112, Lada Ten
We install the VAZ 2110 car on an inspection ditch or a lift. Removing the parking brake cable is shown using the example of the right cable. Lower the parking brake lever to its lowest position. We remove the manual brake pad drive lever from the cable end of the VAZ 2110 (see Replacing rear brake pads).
Using a 10mm wrench, unscrew the nut of the bracket securing the cable sheath to the rear suspension beam.
Remove the cable fastening bracket.
We remove the cable sheath from the holder.
Using a screwdriver, bend the three brackets securing the cable sheath to the body of the VAZ 2111.
We remove the cable from the brake shield of the VAZ 2111.
Using a wrench and a high 13mm socket, unscrew the locknut and the rod adjusting nut.
We remove the cable tip from the equalizer slot.
Remove the end of the cable sheath from the bracket.
In a similar way, we remove the left parking brake cable of the VAZ 2112. Its dismantling (unlike the right cable) is hindered by the exhaust system.
Remove the cable and equalizer.
To remove the parking brake drive lever and the adjusting rod, unscrew the two nuts from the rod and remove the equalizer (do not dismantle the cables). Remove the cover and housing of the floor tunnel lining (see Removing the VAZ 2112 instrument panel and heater air ducts).
Using a 10mm socket, unscrew the four bolts securing the lever bracket to the floor.
Using a Phillips screwdriver, unscrew the two self-tapping screws securing the parking brake warning lamp switch bracket...
...and remove the bracket with the switch.
Move the lever forward and remove it.
Unsplint the axis of the adjusting rod.
Having taken out the axle, we disconnect the adjusting rod and the lever of the VAZ 2110.
Assembly occurs in reverse order.
After installing the brake drums, you need to adjust the travel of the parking brake lever.
You must have with you:
- socket wrench with ratchet 10;
- extension;
- 2 open-end wrench for 13;
- WD-40 – 1 bottle.
To begin with, the car is installed on the pit. Next, use a 10 key to disconnect the metal protection. Then, to get to the adjustment mechanism, you need to disconnect the rubber ring from the front muffler mount and slide the casing. Now, to raise the handbrake, use a 13 key to screw in the internal screw, while listening to the number of clicks. Upon completion of the adjustment, the position is fixed, and the second screw is tightened to 13.
We hope our article was useful to you!
How to tighten the handbrake on a Priora - sequence of actions
Replacing the handbrake cable on a VAZ-2110, 2111, 2112
The handbrake, or scientifically the hand or parking brake, is an irreplaceable part of the car, the benefits of which many people underestimate.
The handbrake is a lever that, in an unexpected situation, will help to perform emergency braking of the car, and in a difficult situation, to move away on a hill, without damaging the cars behind. Yet the main task of the handbrake is to keep the car from accidentally moving.
The handbrake makes life much easier for motorists, and sometimes even helps out. Therefore, so that a force majeure situation does not occur and the handbrake does not fail at the necessary moment, you need to monitor the condition of the cable and its serviceability.
How to identify problems with the handbrake? We list the main problems and reasons for the handbrake malfunction.
Basic malfunctions of the hand brake:
- It is difficult or completely impossible to put the car on the handbrake; the cable is difficult to move.
Reason: the threads burst in the middle and fluffed up;
- The car rolls, even with the handbrake raised.
Reason: the cable is loose;
- When I try to put the handbrake on, the car squats to one side.
Reason: one cable broke;
- The handbrake lifts too easily and the car rolls.
Reason: the cable was worn out, the threads began to break.
If a malfunction is detected, the cable should be replaced. If there is no car service nearby, arm yourself with two “13” wrenches, one “10” wrench, a wheelbrace and pliers. Go!
Is adjustment necessary?
First you need to determine whether the adjustment will really solve the problem of the handbrake malfunction.
To do this, a small test is carried out. Moreover, it is recommended to do a similar procedure after every 30 thousand kilometers, even if you are sure that the parking brake works well.
Drive your vehicle to an area where there is a slight slope. Place the car on it, turn on the handbrake and shift to neutral. If the car starts to roll down, everything is obvious - the handbrake needs repair.
Replacing the handbrake cable
1. Make sure that the car is not on the handbrake. If so, lower it. To ensure your safety and prevent the car from rolling away, put it at speed and place anti-roll bars under the front wheels.
2. Next, we tear off the wheel bolts with a wheel wrench counterclockwise, “jack up” the car and remove any of the rear wheels.
3. We unscrew the two drum bolts and, by screwing them into special holes in the drum, remove it.
4. Using pliers, remove the upper and lower springs, thereby loosening the pads, gaining access to the internal springs, by moving them aside, we can easily remove the pads.
5. Pull the cable out of the brake shield.
6. Loosen the cable holder on the beam and pull the cable out of it.
7. Move the resonator (muffler) to the side by hand; if that doesn’t work, remove the muffler.
8. Loosen the handbrake tensioner nuts (1.8). Remove from the mount (4) and lever (3).
9. Pull the cable jacket out of the equalizer and pull the cable out of the rod.
We do the same with the other wheel.
We assemble in reverse order.
Replacement
The process is longer than adjustment, but not much more difficult. Therefore, you can cope with the task in your own garage with a lift or inspection hole.
There is one important condition - you will need an assistant. His task will be to pull the cable tightly, which will allow the equalizer to be installed correctly.
The sequence of work to replace the cable is as follows:
- Lower the handbrake lever as far as possible;
- Remove the brake disc from the wheel where the element is being replaced;
- Remove the muffler from the suspension cushions and the resonator from the rear suspension;
- Lower the exhaust system down;
- Remove the adjusting nut and locknut;
- Remove the equalizer;
- Now remove the cable ends from the equalizer;
- Remove the tip of the equalizer shell from the bracket, which is located on the car body;
- Bend back the brackets that secure the cable;
- Remove the rear brake pad and remove the cable end from the lever;
- Slightly loosen the nut that secures the cable holder to the rear axle;
- Remove the cable from the holder, then from the bracket, and then pull it out through the brake spike;
- Place a new cable in its new location and perform the assembly procedure, following the reverse order of the indicated processes;
- Make sure that the cables in the bracket are positioned crosswise;
- After completing the installation of the new element, adjust the handbrake.
As you can see, the task does have certain nuances, but it is not difficult at all if you have some experience and rely on the VAZ 2110 operating manual. As a rule, everything is spelled out there.
It wouldn’t hurt to supplement your skills and knowledge with video tutorials or consultation with a friend from a service station. But if you are not confident in your own abilities, you should not risk replacing the handbrake cable yourself. It is better to spend more money, but entrust the work to specialists.
If you find an error, please select a piece of text and press Ctrl+Enter.