The thermostat is a key component of the cooling system, which is responsible for high-quality engine warm-up by timely redirecting coolant flows in a small or large circle.
Failure of this unit inevitably leads to a number of problems - overheating of the power unit or the inability of it to reach the desired temperature.
That's why a car enthusiast needs to know how to check the thermostat and what malfunctions of this device exist.
Common Causes of Thermostat Problems
During the operation of the car, the following thermostat breakdowns and the reasons for their occurrence are possible.
- INCREASED HEATING TIME OF THE POWER UNIT. The engine operates unstably (for example, troits), which leads to excessive vibrations of the device valve and damage to its seat. Due to exposure to strong vibration, damage to the temperature-sensitive element occurs. The result is that coolant gets inside the unit (wax comes out), which leads to a malfunction of the device, which stops opening or closing the valve when the required temperature level is reached.
- THE OPENING OCCURS EARLIER OF TIME. The cause of such a breakdown may be the ingress of coolant into a special element that controls the temperature level of antifreeze in the system. The result is an increase in the total volume of filler and premature opening.
- THE THERMOSTAT OPENING IS DELAYED. The reason is the appearance of a leak of a special filler that allows the device to respond to temperature changes. Changing the volume of this element downward will require more heating to open. The result is that the thermostat operates with a certain time delay.
- THE ENGINE OVERHEATS REGULARLY. For example, there may be situations where the thermostat allows coolant to pass through on time, but the engine still overheats. The reason is that the fluid is not passing through the main radiator, but is being discharged through the return line back into the engine.
- THERMOSTAT IS NOT COMPLETELY OPEN. The reason is mechanical damage. The result is a small volume of liquid entering the radiator, and, as a result, overheating of the power unit.
- NOT COMPLETELY CLOSED. This is possible when coolant “sneaks” into the working element. Due to the increase in the volume of the working element, the valve disc cannot close completely.
- INCORRECT OPERATION OF THE DEVICE. For example, opening and closing it ahead of time. This is possible in case of failures in the factory settings and excessive overheating of the cooling system of the power unit.
- DESTRUCTION OF RUBBER SEALING. Due to a breakdown, oil gets into the coolant. The latter acts as a solvent for the rubber seal (rubber simply cannot withstand aggressive influences).
How to determine if the thermostat is faulty
As is known not only to motorists, but also to people who are quite far from cars, there is a mechanical device in a car called a “thermostat”, and it is connected to the cooling system.
Indeed, a thermostat is a mechanical valve whose main task is to regulate the coolant in the system. Among the main functions of the thermostat for which it is responsible are:
- warming up the engine to operating temperature (by timely redirecting coolant flows in a small or large circle);
- avoiding motor overheating;
- injection of warm air into the cabin.
photo: gobdp.com
See also
Does the thermostat work in a car
? Thus, as soon as the thermostat fails, the motorist will definitely feel it in one of two ways:
- the motor will begin to overheat;
- Cold air will blow from the heater because the engine is not warmed up
Ways to solve problems
Possible solutions to the problem include:
1. If the coolant temperature exceeds the norm (provided the thermostat is working and it is correctly selected), it is necessary to replace the device, but with a higher opening temperature. As a rule, this step is recommended for motorists who operate cars in the mountains and in regions with hot climates.
2. When opening the thermostat late, it is important to ensure that there are no plugs and that the system is completely filled. If the problem is caused by a plug (coolant stagnation), then the best solution is to make a small hole in the plate (2-3 mm). As a result, the coolant flow around the thermostat is normalized, and the engine warm-up time increases.
3. Early opening of the thermostat is possible due to excessive pressure in the system. Zones of different pressure often appear around the device, which leads to its early operation. There are several reasons:
- failure of the cooling system;
- The thermostat spring has weakened;
- The engine runs at higher speeds during the warm-up period.
4. The engine takes too long to warm up.
Causes:
- incomplete closing of the thermostat;
- violation of the integrity of the valve plate (for example, a gap has appeared);
- Incorrect position (possibly changing the location of the air valve).
5. The engine heats up above normal even in a situation where the thermostat is fully open:
- traffic jams or low coolant level;
- failure of the radiator (clogging of its cells);
- failure of the cooling pump or fan;
- contamination of the cooling system.
The thermostat is not working. Signs and symptoms
Only the most irresponsible motorist can fail to pay attention to the incorrect operation of the VAZ 2110 engine cooling system. Constant overheating or, conversely, operation at a low coolant temperature threatens not only a high level of wear of rings, pistons and liners. In critical cases, overheating can cause the piston to stick or seize, rotate the main or connecting rod bearings, bend the valves, destroy the camshaft and many other unexpected troubles.
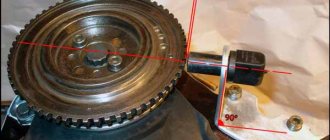
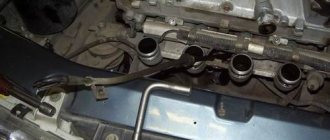
Old and new thermostat valves. Wear is obvious
How does the VAZ 2110 thermostat work?
Theoretically, a tens thermostat is a regular valve that is controlled by a temperature-sensitive element.
Depending on the temperature of the coolant, it either closes the gate and sends antifreeze in a small circle, bypassing the main radiator, or opens it and forces the liquid to circulate in a full circle, including the cooling radiator, heater, engine water jacket, and throttle heating system.
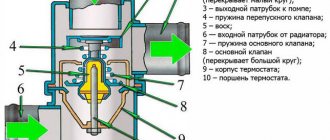
As shown in the diagram, the thermostat is designed as a spring-loaded bypass valve. Under the influence of a spring, it is in the open position and passes liquid in a full circle through the radiator of the cooling system. In this case, the liquid cools faster, but, naturally, warms up very slowly, especially in winter.
Checking the Thermostat
The problems described above can appear at any time. To avoid engine overheating and damage, you need to know how to check the thermostat directly on the car and after dismantling it at home.
It is important to know that after starting the engine, the thermostat is still closed and the coolant flows through a small circuit (through the cooling jacket and the stove). This allows the power unit to quickly reach the desired temperature.
As soon as the required level is reached, the valve opens and coolant flows through the main radiator.
Understanding this principle is very important when checking the thermostat.
Therefore, we invite you to familiarize yourself with the diagram.
Let's consider two diagnostic options.
Without dismantling
The easiest way is not to remove the unit, but to check it directly on the car. The main condition is a cold engine.
The diagnostic process begins with starting the power unit and warming it up for 2-3 minutes at idle.
This time is not enough for the engine to warm up and the coolant to circulate in a large circle, so the radiator is not yet connected to the general cooling system.
To check that the system is working correctly, touch the pipe that goes to the top of the main radiator with your hand.
The pipe should be cold, which signals the passage of coolant in a small circle (only through the engine and stove).
Therefore, the valve of the device under test is in the closed position (as it should be at this stage).
Continue to monitor engine cooling system performance. As soon as the coolant warms up to 90 degrees Celsius (can be controlled by the sensor), touch the inlet pipe. The thermostat should be open at this moment.
In this case, the coolant is directed in a maximum circle (encompassing the radiator). In such a situation, the pipe that extends from the radiator will be well heated.
By the way, the lower pipe of the cooling system, extending from the radiator, will also be hot.
If the condition described above is not met, then we can talk about a breakdown of the thermostat and its incorrect operation (for example, the valve could be jammed). In such a situation, you need to check it and replace it if necessary.
The second option is also possible, when after starting the engine the tube leading to the radiator warms up almost immediately.
One of the reasons is the valve jamming in the open position and, as a result, the coolant moving in a large circle at once.
The result in this case is obvious - the power unit will not operate in normal mode due to the impossibility of reaching normal temperature conditions.
Such a malfunction is not dangerous for the engine, but can lead to increased fuel consumption.
Situations are possible when the valve “hangs” in the middle position, that is, it does not close or open fully. The problem is diagnosed by the long warm-up of the power unit.
It is more difficult to determine a malfunction in “field” conditions.
In this case, checking the thermostat can only be done by dismantling it.
Checking the functionality of the thermostat by removing
If it is not possible to determine the breakdown without dismantling, then proceed as follows:
- pour the antifreeze into a container prepared in advance. In this case, first install the vessel, and then unscrew the drain plug. To speed up the process of coolant release, unscrew the cap on the expansion tank;
- If there is no such plug, then place a container under the lower part of the radiator pipe. loosen the clamp that holds the pipe to the radiator and remove the pipe itself. Wait until the coolant is completely drained into the container, and then proceed to dismantle the thermostat;
- dismantle the outlet pipe;
- take the thermostat and go to the kitchen. There you will need a stove, a saucepan (or any other metal container) and water. Pour in the liquid and set the pan to heat. Then place the assembly in water so that the body part does not touch the walls of the container itself;
- install a special thermometer in the water and monitor changes in its readings, as well as the actions of the valve itself;
- as soon as the desired temperature is reached, the unit should operate and open. This is possible thanks to the precise operation of the device’s working substance (artificial wax). When heated, the wax expands and allows the valve to operate. If it still does not work at the required temperature, then we can draw conclusions about the unsuitability of the entire assembly (we will talk about the operation temperature below);
- remove the thermostat from the water and let it cool. If the node worked earlier, it should close after a while. Again, if this does not happen, then it needs to be changed.
How to check the thermostat without removing it from the car
You can only conditionally check the operation of the device without removing it. The only exception is when it is jammed. In such a situation, a conclusion about the serviceability of the thermostat can be made by checking the temperature of the pipes, the period during which the heating took place and the temperature sensor.
To check, turn on the engine and wait 2 minutes, then touch the hose that goes from the thermostat to the radiator. During this time, the valve does not operate yet and the hose should be cold. If it is hot, there is some problem with the valve, and when after some time the hose does not become hot, the valve is jammed and the device should be repaired.
Only specialists can check the thermostat professionally. If there are any complaints about the operation of the engine, it would be better to contact experienced workers and fix the problem in a timely manner.
Latest articles
Features of testing on VAZ series cars
VAZ cars continue to be a truly “people's” vehicle. Let's look at how to check the thermostat on a car of this brand.
To begin with, we note that on all models of the Volzhsky Automobile Plant (VAZ 2107, 2114, 2109, 2110, 2114 and others), the principle of checking the thermostat is identical. The only thing that can change is the opening and closing temperature. But this information can be found in the instructions for your car.
As in previous cases, verification is carried out using two methods.
With device removal (home diagnostics)
The algorithm of actions is similar to that described above.
The thermostat is lowered into a container with heated water, then the temperature is measured and its operation is controlled.
As soon as the thermometer reading reaches 87-90 degrees Celsius, you can notice the valve moving.
Full opening should occur at 102 degrees Celsius. Normal stroke is 8 mm.
The response temperature can be seen on the thermostat itself.
Without dismantling (in the field, by car)
Start the engine and make sure that the lower (outlet) hose remains cold for some time after starting, and then quickly warms up. This indicates that the coolant has begun to circulate in a large circle.
Which thermostat is better to install on a VAZ 2110 injector
Until 2003, thermostats of the old design were installed on all VAZ 2110 engines. Its catalog number is 2110-1306010. After 2003, the thermostat was replaced and minor changes were made to the cooling system. In this regard, in dozens of later years of production, thermostats with article numbers 21082-1306010-11 and 21082-1306010-14 . The latter have a higher thermoelement response rate, so preference should be given to them. In addition, there are a huge number of non-original valves and thermostat assemblies on sale. Judging by the reviews of the owners, the valves and thermostats of these companies are considered to be of the highest quality:
- 92C 21082-1306010 , manufactured by LUZAR , the quality is unstable, but if you’re lucky, it will work well;
- assembled housing of the same company with five outlets with catalog number 92C 2190-1306010, LT 01081, without expansion tank fitting or LT 01084 with fitting;
- TN-LA21082 from AURORA;
- Pekar , article 21082-1306030 , good quality and average prices;
- Vernet , article number TH6595.85, one of the most inexpensive on the market;
- STARNER , article number S40 2112 ;
- Finwhale , T111 ;
- BAUTLER, 21082-1306010-11;
- MAHLE / KNECHT , catalog number TH 37 80 ;
- STARLINE , TS T035.92T, one of the best replacements for the original;
- Gates , proven quality, stable temperature, TH21992G1 .
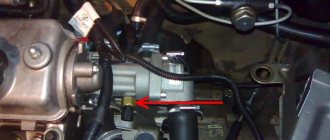
Checking the thermostat in operating mode is carried out only with the valve removed from the vehicle. In principle, if the thermostat is visually coked, shows signs of wear or physical damage, it is better to replace it immediately. And to check it is necessary to remove the thermostat housing from the engine. To do this we do the following:
- With the engine cooled down, drain several liters of antifreeze through the drain hole in the bottom can of the radiator. It is not necessary to drain all the liquid; it is enough to lower its level to the level of the thermostat connector.
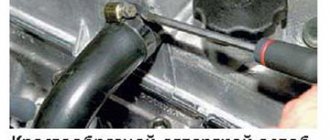
- Now we move the container with the drained antifreeze under the thermostat and unscrew it with a 13 key from the cylinder head (on engines manufactured after 2003) or loosen the clamps on older engines.
- We take out the insert with the thermostat valve and place it in a vessel with water.
- The water temperature should be monitored with a thermometer. If the valve opens at a temperature of 90 degrees, it is working. In any other case, the thermostat retires and is replaced with a new insert or assembled with the housing.
- Before installing a new thermostat, we clean the mating surfaces of the thermostat housing and the block head, remove the remnants of the old gasket, degrease the surface and apply a very thin layer of sealant to both surfaces.
- Install the gasket and install the thermostat housing. Depending on the instructions for using the sealant, tighten the bolts immediately or after the specified time. The same applies to adding antifreeze. The instructions for using the sealant may indicate that operation is possible only after a certain time has passed.
- We check the tightness of the bolts/clamps and fill the system with antifreeze.
After replacing the thermostat, we check it in the same way as indicated above, without removing the housing from the engine.
Replacing the thermostat
On the automotive spare parts market you can find a large number of thermostats from various manufacturers; their cost varies from 400 to 700 rubles. When choosing, it is better to stick to original AvtoVAZ spare parts. The catalog number for the standard thermostat on Kalina is 1118-1306010. Of the analogues, “Luzar” and “Pramo” have proven themselves well, but the first is often counterfeited, and the second has poor quality - the service life is on average about a year. The original device, which is installed from the factory, can last more than three years. Replacing a thermostat on Kalina with 8 valves or 16 is estimated at no more than 800 rubles, including removing air from the system. To avoid paying twice, you can change the part yourself. Just before this, you should check the device for functionality using the described methods.
What tools will you need?
To operate, you will need a working thermostat and a suitable container for draining the coolant from the SOD - a regular five-liter plastic bottle. The differences between replacements on an 8- and 16-valve engine are insignificant. On the latter, you will need to additionally remove the starter so as not to accidentally fill it with antifreeze. The rest of the procedure is similar.
To remove the assembly, you will need two socket wrenches, 13 mm and 12 mm, since Kalina uses nuts of different sizes.
To seal the seat, you will need a silicone sealant gasket. To remove the clamps, use a shaped screwdriver. The procedure lasts on average an hour and a half.
Replacement instructions
The replacement process is not complicated and can be done independently if you follow the instructions. First you need to disconnect the wire plug from the sensor on the air filter and remove it. It will take a few minutes to properly dismantle the filter:
- the two upper screws are completely unscrewed together with the nut from the power unit side;
- there is a recirculation valve on the filter housing; it must also be removed;
- lift the valve up and, without disconnecting the hoses, move it to the side;
- unplug the terminal from the air sensor and, loosening the clamps, disconnect the air pipe;
- After shaking the filter from side to side, turn its housing and try to pull it out.
Further procedure:
- Drain the coolant from the system.
- Using an 8 mm wrench or a shaped screwdriver, loosen all the clamps of all connecting hoses, then disconnect them.
- Unscrew the 12 mm nut on the thermostat and remove the wire.
- Using a 13 mm wrench, unscrew the fastening nut at the top and bottom of the thermostat on the studs, then try to remove the device by slightly loosening it. You don't need to make a lot of effort for this. Keep in mind that the thermostat operates at high temperatures, due to which the housing literally “sticks” to the seat.
- Clean the seat from dirt and remove the old sealing gasket. Then wipe the treated area with a clean rag, apply a thin layer of silicone cover and leave for 5-10 minutes.
- The new thermostat is installed in the reverse order. You should definitely replace the temperature sensor by removing it from the old device, and do not forget to connect the ground wire. To do this, it is fixed with a nut on the upper stud.
- Connect all hoses and fill the system with coolant to the maximum level.
After completing these steps, you need to start the engine and inspect all the places that were disconnected. You can make sure there are no leaks by lightly pressing all the hoses several times. The liquid level in the tank will drop, then you need to add antifreeze to the middle mark and screw the cap tightly.
Control check
After completing the work to replace the part, the problem with overheating or long warm-up should disappear. All that remains is to check the correct functioning of the thermostat. To do this, periodically you need to pay attention to the temperature indicator arrow. If it does not rise above 90-95 degrees, then the system is working normally. When replacing, you should take into account the specific temperature conditions of the products - it can be either lower or higher than average.
When carrying out vehicle maintenance, the thermostat must also be inspected, despite the fact that this is not included in the regulations. Timely replacement of a faulty device will prevent premature wear of engine parts and prevent overheating of the power plant. A small device with one valve can affect the functioning of the entire heat removal system from the internal combustion engine.
The thermostat is one of the most important elements of the cooling system of an internal combustion engine. It is designed to regulate the direction of movement of the coolant (coolant) depending on the degree of its heating.
When starting a cold engine, a working thermostat is closed, which forces the coolant to move in a small circle without passing through the cooling radiator. This is necessary so that the engine heats up faster.
When the coolant temperature reaches 85-90 degrees, the thermostat valve will open and antifreeze or antifreeze will flow into the radiator for cooling.