Which generator is better
put on VAZ
2106
and 2107? Several variants
Probably wondering which generator is better?
install on VAZ 2106 and 2107. After all, the standard device has some shortcomings that negatively affect the performance. Standard generators were developed quite a long time ago, and they were not designed for significant volumes of energy consumers. The office one used a couple of light bulbs and a starter. It is clear that with a larger number of devices, the generator cannot cope with its obligations.
We have to find a suitable replacement for him. For this purpose, it is important to take into account what remains for our client to do about the electronic circuits of the machine. The new device must fit this list one hundred percent.
Which generator is better to install on VAZ 2106 and 2107?
The question is quite difficult. It is necessary to consider it, starting with the development of the most ordinary option. Any manufacturer will say that a specific standard version must be installed on the car. Let's look at the features of the standard version G221.
Here, in the type of relay generators, the regulator is installed separately from the brush assembly. This, within certain limits, simplifies the work to eliminate certain defects. The advantage is the ease of installation; there is no need to adjust the wiring for connection; our client can only do it according to the standard scheme. However, such a generator is low-power, it produces a maximum charge of 42, which is not enough for the majority of modern batteries.
Replacing the VAZ 2106 generator with a more powerful one.
From all this, they conclude that the standard generator is naturally excellent. However, if you have additional devices, it is not entirely profitable to use it. It is best to choose a more powerful option.
This generator is intended for use on Niva cars. It is capable of delivering 50 A of current, which is enough for real electrical work. Its difference from a standard “six” generator is the range of built-in regulator relays. Here it is assembled into one unit with brushes. For installation on VAZ 2106
, it is very important to make small improvements. This electronic machine is installed on 2107 without any special interference or modifications.
VAZ Generator Replacement
If you have set a goal to MAKE EARNING ON YouTube You must: 1. Make your own channel 2.7. Connect it to AIR by filling out .
There are several methods for modifying such a generator. The most common would be to install brushes from generator . They are perfectly installed in the area of the relay assembled with the brush assembly. No modifications are needed, this allows you to install such a generator, even for people without special abilities. It is possible to install the G222 with a standard regulator, but for this purpose you will have to redo the generator connection diagram. Otherwise, nothing is possible.
Replacing the VAZ 2106 generator with a VAZ 2107.
> myth the device is quite often installed on 2106, 2107. This is all due to its greater efficiency, it produces a charging current of 55 A, which is quite enough for the majority of motorists. If your car has more than just equipment, then it is better to choose something more powerful.
These generators are similar in terms of mounting, so there will be no problems with the installation itself. This is if you remember to remove the terminal from the battery. The fun starts when you connect. What remains for our client to do, what exists, that 4 wires are connected to the native device. There are only 3 for the “eight” one. This is all connected with the integrated voltage relay. To obtain the usual result, you need to insulate the dark wire, and connect the others as usual. While the generator is operating, the light indicating the discharge will glow. This is a common occurrence with this connection. Accordingly, it should fade away in the absence of charging.
By and large, this is already an option to drive, but if you want to do everything possible, as expected, you will have to make some more modifications. We remove the old relay and replace it with an ordinary power relay. Now the light will glow only when the engine starts, and at low speeds, which is completely acceptable.
To install on a VAZ 2107 you will only need to add a power relay.
Fans of various additional equipment require an even stronger “gene”. Of course, they should be advised to install a device from a VAZ 2107i. > myth the unit produces 80 And this is quite enough to perform the work of all electronic systems added by the owner. In purchasing such a generator
, please note that there are a number of their varieties. For installation on a VAZ 2106, only model 2107-3701010 is suitable; on carburetor “sevens” there is an option to install any generators of this series.
Replacing the VAZ 2101 generator with a more powerful one.
It is better to modify the device for installation on the “six”. For this purpose, the relay regulator is replaced with a similar one from G222. The connection is quite similar to working with a figure-of-eight generator.
Conclusion
. Initially, rather weak generators were installed on the “sixes” and “sevens”. But, in the process of technology development, their power was no longer enough to provide adequate power to the car. So the question arose, which generator is better to install on the VAZ 2106 and 2107. Fortunately, there is plenty to choose from. The next generations of devices are perfect for old Zhiguli cars after a little modification.
Recent Entries
BMW 530e Hybrid revised for 2021
The BMW 530e PHEV has been updated with a new battery, improved efficiency, lower emissions and increased electric power range. The hybrid BMW 530e was
Watch a plane crash land on a public road, caught on police dash cam
Starman Adventures Is a Big Hit Among Teslas - SpaceX Fans
New deal offers drivers a free car - life-saving brakes for drivers up to £1,600
Categories
Test Drive
Ferrari Portofino 2019 review
Ferrari Portofino. this is a super stallion that you will ride every day Maximums Spectacular gearbox with excellent shift mechanics
Generator VAZ 2106: purpose and functions
A car generator is a small electrical device whose main task is to convert mechanical energy into electrical current. In the design of any car, a generator is needed to charge the battery and feed all electronic devices while the engine is running.
Thus, the battery receives the necessary energy for engine operation from the generator, so we can say that the generator is an indispensable attribute in the design of any car.
How exactly does the generator work on a VAZ 2106? All processes of energy conversion from mechanical to electrical are carried out according to a strict scheme:
- The driver turns the key in the ignition.
- Immediately, the current from the battery through the brushes and other contacts enters the excitation winding.
- It is in the winding that the magnetic field appears.
- The crankshaft begins to rotate, from which the generator rotor is also driven (the generator is connected to the crankshaft by a belt drive).
- As soon as the generator rotor reaches a certain rotation speed, the generator enters the self-excitation stage, that is, in the future, all electronic systems are powered only from it.
- The generator performance indicator on the VAZ 2106 is displayed in the form of a control lamp on the dashboard, so the driver can always see whether the device has enough charge for full operation of the car.
Design of the G-221 generator
Before talking about the design features of the VAZ 2106 generator, it should be clarified that it has unique clamps for mounting on the engine. On the body of the device there are special “ears” into which studs are inserted and tightened with nuts. And so that the “ears” do not wear out during operation, their internal parts are equipped with a high-strength rubber gasket.
The generator itself consists of several elements, each of which we will now consider separately. All these devices are built into a light-alloy cast housing. To prevent the device from overheating during long-term operation, the case has many small holes for ventilation.
Winding
Due to the fact that the generator has three phases, windings are installed in it immediately. The purpose of the windings is to generate a magnetic field. Of course, only special copper wire is used for their manufacture. However, to protect against overheating, the winding wires are covered with two layers of heat-insulating material or varnish.
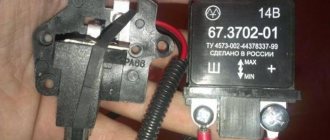
Relay regulator
This is the name of the electronic circuit that controls the voltage at the output of the generator. The relay is necessary to ensure that a strictly limited amount of voltage reaches the battery and other devices. That is, the main function of the relay regulator is to control overloads and maintain an optimal voltage in the network of about 13.5 V.
Rotor
The rotor is the main electric magnet of the generator. It has only one winding and is located on the crankshaft. It is the rotor that begins to rotate after the crankshaft starts and gives movement to all other parts of the device.
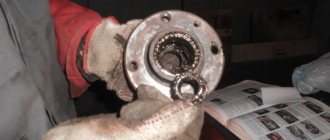
Generator brushes
The generator brushes are located in brush holders and are needed to generate current. In the entire structure, it is the brushes that wear out the fastest, since the main work of generating energy falls on them.
Diode bridge
A diode bridge is most often called a rectifier. It consists of 6 diodes that are placed on a printed circuit board. The main job of a rectifier is to convert alternating current into direct current to maintain stable operation of all electronic devices in the car.
The pulley is the driving element of the generator. The belt is tensioned simultaneously on two pulleys: the crankshaft and the generator, so the operation of the two mechanisms is continuously interconnected.
Types of generators
There are different types of generators for VAZ cars depending on their design. The most common generators are compact in size - 94.3701 and others.
Owners of Russian-made cars install brushless inductor-type generators. For example, devices modification 955.3701. Such generators differ from traditional equipment by the presence of permanent magnets on the rotor and field windings on the stator. Thanks to this, the design of the generator set does not contain slip rings and an alkaline unit, which is one of the most vulnerable and poorly protected.
Technical characteristics of the VAZ 2106 generator
The “six” comes from the factory with a G-221 generator, which is classified as a synchronous alternating current device. The device is fixed to the engine on the right side, but it can only be adjusted or changed from under the body, since it is difficult to get to the generator from above due to the presence of many hoses, devices and instruments.
The nominal voltage of the G-221 corresponds to the voltage of a typical VAZ battery - 12 volts. The generator rotor rotates to the right (when viewed from the drive side), since this feature is due to the position of the generator relative to the crankshaft.
The maximum current that the VAZ 2106 generator is capable of delivering at a rotor speed of 5000 rpm is 42 amperes. Power indicator - at least 300 watts.
The device weighs 4.3 kilograms and has the following dimensions:
- width - 15 cm;
- height - 15 cm;
- length - 22 cm.
What generators can be installed on the “six”
Structurally, the VAZ 2106 is ready to install a generator not provided by the manufacturer. The question arises: why change the “native” G-221 at all? In fact, for its time, this generator was the optimal device, since Soviet Zhiguli cars used a small number of electrical appliances.
However, over time, the VAZ 2106 began to be equipped with more modern devices, each of which requires “its share” of energy . In addition, drivers connect navigators, cameras, pumps, powerful audio systems and other devices to the battery, which makes it difficult for the generator to generate the required amount of current.
Therefore, car owners began to look for equipment options that, on the one hand, would allow all the equipment in the car to operate in normal mode and, on the other hand, would have an optimal effect on the battery life.
Today the following types of generators can be installed on the VAZ 2106:
- G-222 is a generator from the Lada Niva, which is designed for higher loads and produces 50 amperes of current. The G-222 design already has its own regulator relay, so when installing it on a VAZ 2106, the relay will need to be removed.
- G-2108 can be installed on both “six” and “seven” and “eight”. The device in normal operation produces 55 amperes of current, which even by modern standards is quite enough for the functioning of all electronic devices in the car. The shape and fasteners of the G-2108 are identical to the standard G-221, so there will be no problems with replacement.
- G-2107–3701010 produces 80 amperes and is intended for lovers of high-quality acoustics and additional electronic devices in the car. The only caveat: the generator for the VAZ 2106 will have to be slightly modified, since the regulator relay is not suitable for this model.
Operating principle and design of generators
We will not consider ancient DC models within the scope of this article. This is the lot of owners of equipment originally from the 60s. Starting from the seventies, AC alternators with external excitation and V-belt drive from the engine crankshaft pulley began to be used. The voltage regulator from the external device (“chocolate bar”) moved to the brush assembly and received the popular name “tablet”. Such models are used on carburetor VAZ cars.
With the advent of injection engines at VAZ, a lot of electricity was needed to power the control unit (ECU, “computer,” “brains”) and the electric fuel pump (EFP). Dynamos became more powerful; the traditional V-belt drive could no longer cope with the increased load and began to slip. This is how poly-V-belts (wide) belts came into automotive electrical installations.
If the number of auxiliary units is more than two (air conditioning compressor, power steering pump), then deflection rollers are used to increase the contact area of the belt with the pulleys. The tension force is adjusted by a tension roller or by moving the generator housing or hydraulic pump.
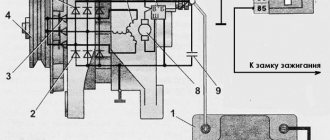
Generator connection diagram
Being an electronic device, the generator needs to be connected correctly. Therefore, the connection diagram should not cause double interpretation.
A schematic diagram of exactly how the G-221 is connected to a VAZ 2106 can be viewed here.
Many car owners wonder when replacing a generator where which wire should be connected. The fact is that the device has several connectors and wires, and when replacing, you can easily forget which wire goes where:
- orange is not useful for connection, it can be left as is, or connected to gray directly to autostart the car;
- a gray thick wire goes to the brushes from the regulator relay;
- a gray thin wire connects to the relay;
- yellow - coordinator of the control light on the control panel.
Thus, when working independently with the G-221, it is better to sign the meanings of the wires so as not to connect them by mistake later.
Generator malfunctions on VAZ 2106
Like any other mechanism in a vehicle, the “six” generator can work incorrectly, break down and fail. However, cases of unexpected breakdowns are extremely rare, since the driver can always track the occurrence of a “disease” by noticing its first signs.
The charging indicator light came on
There is a lamp on the instrument panel that indicates the functionality of the generator. It can blink or stay on continuously. In any case, the activation of this indicator is considered the first signal of a malfunction in the generator.
| Cause of malfunction | Remedies |
| Slipping of the generator drive belt Break in the connection between plug “85” of the charge warning lamp relay and the generator The battery charge warning lamp relay is misregulated or damaged Break in the power supply circuit of the excitation winding The voltage regulator is misaligned or damaged Wear or freezing of the generator brushes; oxidation of slip rings Open circuit or short circuit to ground of the excitation winding of the generator Short circuit of one or more positive diodes of the generator Open circuit in one or more diodes of the generator Open circuit in the connection between plugs “86” and “87” of the charge control lamp relay Open circuit or interturn short circuit in stator winding | Adjust the tension of the generator belt Check and restore the connection Check the relay, adjust or replace it Restore the connection Clean the contacts, adjust or replace the voltage regulator Replace the brush holder with brushes; wipe the rings with a rag soaked in gasoline Attach the winding leads to the slip rings or replace the rotor Replace the radiator with positive diodes Replace the generator rectifier unit Restore the connection Replace the generator stator |
Battery won't charge
The generator can work, but the battery is not charging. This is the main problem of the G-221.
| Cause of malfunction | Remedies |
| Weak tension of the generator belt: slipping at high speeds and when the generator is running under load. The fastening of the wire lugs on the generator and battery is loose; battery terminals are oxidized; Wires are damaged Battery is faulty Voltage regulator is misaligned or damaged | Adjust the tension of the generator belt Clean the battery terminals from oxides, tighten the clamps, replace damaged wires Replace the battery Clean the contacts, adjust or replace the regulator |
The battery is boiling over
If the generator connection is poor, there may be a problem with the battery.
| Cause of malfunction | Remedies |
| Poor contact between ground and voltage regulator housing Voltage regulator is misaligned or damaged Battery is faulty | Restore contact Adjust or replace voltage regulator Replace battery |
The generator is very noisy
The device itself should make sounds during operation, since the rotor is constantly rotating. However, if the operation sound is extremely loud, you need to stop and find out what's wrong.
| Cause of malfunction | Remedies |
| The generator pulley nut is loose The generator bearings are damaged Inter-turn short circuit of the stator winding (generator whine) Brush creaking | Tighten the nut Replace the bearings Replace the stator Wipe the brushes and slip rings with a cotton cloth soaked in gasoline |
Symptoms of a problem
You can determine that there are problems with electrical equipment by the following signs:
- Charger. The battery charging light flashes and goes out when the headlights are turned on. Knocks out the jumper in the voltage regulator. When the ignition is turned on, the charging indicator does not light up.
- Movement. Speed spontaneously increases when moving. Jerking when moving at low speed. Unstable idle. Loss of power during acceleration.
- Wiper. The wipers move jerkily. Windshield wipers do not turn on or do not work in rainy weather. The wipers move jerkily.
- Closures Fuse No. 9 burns out after turning on the ignition or at the start of movement. Fuse #1 blows. Fuse No. 7 burns out when the lights are turned on.
- Dashboard. When the power grid is loaded, the devices begin to display incorrect values.
- Start the engine. The starter does not turn or turns weakly.
- Lighting fixtures do not work.
Basic electrical wiring faults: short circuit or break. In the event of a short circuit, fuses, relays, devices burn out, and even a fire is possible. In the event of a break, either some node, system or device, device, etc. fails. You need to be able to understand the wiring diagram of VAZ 2103, 2104 and other models, find and fix faults (video author - MR.BORODA).
How to check the generator
Checking the functionality of the device will give the driver confidence that it is working properly and there is no cause for concern.
It is prohibited to check the generator on a VAZ 2106 when it is disconnected from the battery while the engine is running, as a voltage surge is possible. In turn, instability of operation can damage the diode bridge.
Checking the functionality of the generator can be done in various ways. The most common are:
- checking with a multimeter;
- at the stand;
- when using an oscilloscope.
Self-check with a multimeter
This technique is the simplest and does not require special devices or extensive knowledge of how the car works. However, it is necessary to purchase a digital or indicator multimeter, and also enlist the help of a friend, since the test involves the work of two people at once:
- Set the multimeter to DC measurement mode.
- Connect the device to each battery terminal in turn. The voltage should be between 11.9 and 12.6 V.
- The assistant should start the engine and leave it idling.
- At this time, the measurer must carefully monitor the multimeter readings. If the voltage in the network drops sharply, it means that the generator is not working fully, or its resource is not enough to charge.
- If the indicator is more than 14.5 V, the driver needs to know that such operation of the device will in the near future lead to the boiling of the battery.
Testing at the stand
The check is carried out on a computer stand by service station specialists. In this case, the generator will not need to be removed from the car, since the computer is connected to the device through special probes.
The stand allows you to simultaneously check a working generator in all respects with high accuracy. Current performance indicators will be displayed on the computer screen, so the car owner can determine the “weak” points of his generator in real time.
Checking with an oscilloscope
An oscilloscope is a device that reads basic voltage readings and converts them into waveforms. The device screen displays curved lines, from which a specialist can immediately identify defects in the operation of the generator.
Lada 2107 LadaComfortVV › Logbook › Priora Luxe 140A generator in VAZ-2107
We go to LOSK and stock up on everything we need...
Generator KZATE 140A 9402.3701-14M (2100 UAH)
Lower generator mounting bracket from Niva 21214 Belt tensioner bar from Niva 21214 Fastening bolt (320 UAH)
Pulley from Niva 21214 (120 UAH) Connector for Lada Kalina generator (40 UAH)
We arrive home and begin the installation. We remove the old generator, unscrew the fastening and screw on the new one, it becomes as it was there, having previously sharpened it from the inside so that the generator itself can fit in.
I changed the pulley on the generator without any problems, the only thing I had to do was add a couple of washers to prevent the pulley from clinging to the generator housing.
Many people start aligning the tensioner bars there, bending them, drilling them, and so on, I took a simpler route, turn the classic tensioner bar 180° and screw the bar from the field
At the bottom, the bar is screwed to the generator until it stops, and the tension is applied at the top between the two bars. The axis also became perfectly straight, the engine spun up to 5 thousand, the belt was in place
After installation, I noticed that during operation the tensioner bar rests against the cooling system pipe
And it starts to rub this place.
Therefore, in order to avoid chafing of the pipe and contact of coolant with the generator, we mark on the bar with a felt-tip pen the place protruding beyond the ear of the generator
And we grind it, in this place and, just in case, rounding the edges from sharpness
Put it in place and notice how space appears
Now the bar does not reach the pipe
We connect the wires, the main one and the one that goes to the lamp on the tidy. There are 2 wires on the generator block, unlike the classic 1. The block itself has a rectangular edge and a rounded one, so our wire needs to be connected to the rounded side on pin L
. And everything works smoothly.
The only difference... On the old generator I set the idle speed to around 600 rpm
and at these speeds charging was already underway and I liked how the engine slowly droned on at these speeds.
After installing the generator prior, the idle speed had to be raised to 900 rpm
since it only starts giving out charge at 850 rpm, now the car runs louder at idle, but the charge is now stable... at idle it produces
14.1-14.2V
Turning on the low beam lights, fog lights, heaters, heated rear window and mirrors, and heated both front seats, the voltage remains stable at
13.8V
, I think this is already an achievement ☺️
After installing the generator, the sun just came out and I made a video of what the tidy looks like in the sun. I like.
Good luck to everyone on the roads and stable voltage☺️
Source
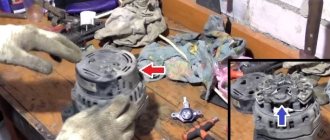
How to remove, disassemble and repair a generator on a VAZ 2106
The G-221 generator on the “six” cannot be called a simple device. Therefore, in order to carry out certain repair work, careful preparation will be required, since you will have to first remove the device from the car and then disassemble it.
Removing the generator from the car
To quickly and safely remove the G-221 from the machine, it is recommended to prepare the tools in advance:
- open-end wrench 10;
- open-end wrench 17;
- open-end wrench 19;
- mounting blade.
Removing and replacing the generator on VAZ 2101, 2102, 2103, 2104, 2105, 2106, 2107
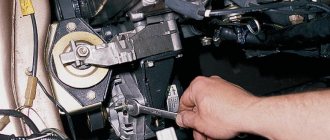
Hello, in this article you will learn how to replace the generator on a VAZ 2101, 2102, 2103, 2104, 2105, 2106, 2107. The generator is needed to generate charging for the battery and provide voltage to all electrically dependent parts of the car. The generator does not have a specific service life; it can last 100,000 km, but it can fail even after 10,000 km. The first sign of a generator failure is a constantly draining battery (in rare cases, the cause may be in the battery itself). To check the operation of the generator, you need to use a tester to check the voltage at the battery terminals with the car running. The voltage values should be between 13.8 and 14.5 volts; if it is lower, then the generator definitely needs to be repaired or replaced with a new one. Most often, the generator can be repaired; usually the diode bridge or voltage regulator fails; replacing these parts will cost much less than buying a new generator, since its average cost in the automotive market is about 5,500 rubles. To remove the generator you will need: keys or sockets for 10, 13, 17 and 19. First of all, we remove the terminal from the battery. After this, unscrew the nut that secures the generator to the adjusting bar (depending on the type of generator, you will need a 13 or 17 socket here)
Next, move the generator so as to loosen the tension on the generator belt and remove the generator belt. Then remove the terminal from the generator
The next step is to unscrew the nut securing the positive wire using a 10mm wrench and remove the terminal
Now use a 19 mm socket to unscrew the generator mounting bolt and remove it by removing the bolt from the bracket
Installation of the generator is carried out in reverse order.
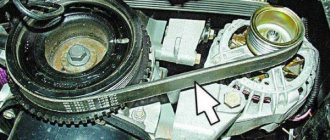
Generator belt
Of course, the G-221 will not work without a drive belt. The belt for the VAZ 2106 generator is 10 mm wide and 940 mm long. It is wedge-shaped and toothed in appearance, which allows it to easily cling to the teeth of pulleys.
The belt resource is designed for 80 thousand kilometers.
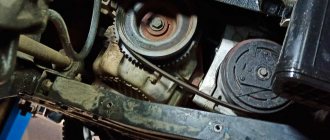
How to tighten a belt
Tensioning the alternator belt after installing it is considered the final stage of work. For fast and high-quality work, you will need to comply with the factory tension regulations:
- Loosen the self-locking nut (on the top of the generator).
- Loosen the lower generator fixing nut.
- The body of the device should move slightly.
- Insert a pry bar between the generator housing and the pump housing.
- Move the pry bar to tighten the belt.
- Without releasing the mount, tighten the self-locking nut.
- Then check the belt tension.
- Tighten the bottom nut.