One of the problem areas in the electrical system of the domestic Lada Vesta car is the generator assembly together with the drive belt. The latter is generally a consumable component, the breakage of which causes undercharging of the battery and failure of some electrical appliances. It is quite possible to carry out repair work on your own if you choose original consumables and spare parts.
What generators are installed on the Lada Vesta
The main function of the generator is to provide electricity to all devices when the engine is running and charge the battery, leading to the restoration of its expended capacity. Without this assistant, the battery life is quickly wasted, so you should pay attention to the signals of the warning lamp, which warns of a current or upcoming malfunction.
The automobile plant itself, located in Togliatti, does not manufacture generators for its vehicles, and these functions are assigned to third-party suppliers. Based on this, generators for Lada cars are supplied by manufacturers such as Bosch and Valeo. These products are sold under production article 8450006900. On the domestic market you can find other analogues that are installed by car enthusiasts during operation. The most famous of them is the StarVolt company.
Generator design and functions
A car generator is one of the auxiliary devices without which the operation of a vehicle is impossible. Its task is to provide sufficient electricity to all consumers on the car and charge the battery.
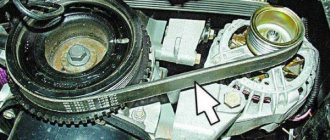
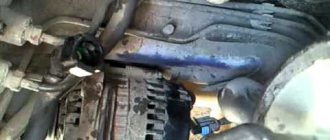
Generator belt. Photo source: https://www.drive2.ru/l/503533995397480550
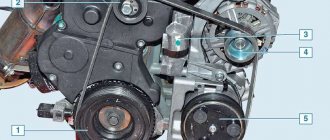
The generator is a mini power plant that produces three-phase alternating current. Then it is converted into a permanent one that powers the vehicle's electrical network. The device operates synchronously with the engine, driven by a poly-V-belt that transmits rotation from the crankshaft to the rotor. This generates electromotive force in the stator windings.
To assemble such a device, more than 20 parts are required. Main nodes:
An additional impeller is provided, the blades of which rotate along with the rotor and provide more efficient cooling by increasing air flow.
What belts are installed on the Lada Vesta
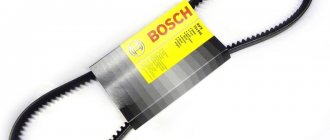
The size of alternator straps on Lada Vesta may vary depending on the specific modification. There are different versions for cars equipped with and without air conditioning systems. So, for Vesta with air conditioning, modification 6РК1039 is used, and for those without such an option - 6РК778. Contitech and Gates companies are official suppliers for AvtoVAZ for the installation of alternator drive belts.
The tension and support rollers deserve special attention. They provide the necessary level of tension so that the strap does not fly off, but allows the generator to produce the maximum possible charge for the on-board electrical network. If these parts are made with high quality, then they do not require adjustment for a long time.
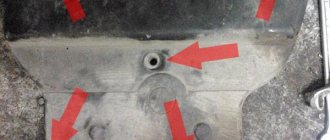
Support roller for auxiliary units 8450006996 for VAZ Vesta, X-Ray
- Manufacturer: INA
- 0 reviews
- Description
- Characteristics
- Video
- Reviews 0 ? '(' + product.reviewsCount +')' : »>>
Dear customers, in order to avoid mistakes when sending the tension belt pulley for the Lada Vesta / XRAY generator with air conditioning, in the “Comment” line, indicate with or without air conditioning, your car model, year of manufacture.
In accordance with the maintenance regulations for Lada Vesta and Xray vehicles, the condition of the auxiliary drive belt is checked every 15 thousand km, and replaced every 90 thousand km, regardless of the condition of the belt.
Support roller 8450006996 for the auxiliary drive belt, installed on Lada Vesta and XRAY vehicles equipped with air conditioning. The belt tension is adjusted automatically by a tensioner.
The design of the belt roller 8450006996 is such that it allows you to install and tension the belt with a given force. No tightening or tension adjustment is provided during the operation of the belt until it is replaced due to mileage or due to complete wear. If, during a belt check, significant defects are found or the mileage has reached 90 thousand km, then change the belt.
The belt should not be too dry or lose its elasticity, and there should be no cracks on the side of the rivulets. It is unacceptable to continue using a belt that has begun to slip on the pulleys (a sign is a characteristic whistle immediately after starting the engine).
During installation, sharp bends of the toothed belt with a radius of less than 20 mm are not allowed, so as not to damage the cord.
Other article numbers of the product and its analogues in catalogues: 8450006996.
Lada Vesta / Lada Vesta, Xray with air conditioning.
Any breakdown is not the end of the world, but a completely solvable problem!
How to independently replace the support roller of the auxiliary drive belt on a LADA Vesta family car.
AvtoAzbuka Internet Store, repair costs will be minimal.
Just COMPARE and BE SURE.
Don't forget to share the information you find with your friends and acquaintances, as they may also need it - just click one of the social networking buttons below.
How to check the belt
If the alternator belt whistles, then every owner of a Lada Vesta will decide on replacing it as soon as possible. However, it is not at all necessary to reach this point. According to the regulations, you can safely change the strap without checking it after 10-15 thousand kilometers traveled.
However, if there is a need to check the condition, then first of all we lift the engine screen up to provide access to the unit. With your finger we look for the area in the middle between the generator pulley and the coolant pump. We press on it with a force of approximately 8.0 kgf. The deflection value should be around 12 mm from the original position. If necessary, tighten the belt or replace it with a new one.
Self-replacement of parts
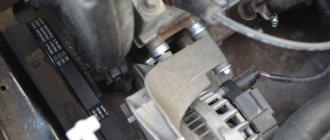
The procedure for replacing the belt drive on Vesta is made difficult by the compact arrangement of the units in the engine compartment. Access to the belts is limited by the closely located side member of the body, so the removal of additional elements is required.
To complete the work you will need:
- lift or inspection hole,
- additional supports to support the power plant.
Carrying out the work requires knowledge of the car's design; if the owner does not have repair skills, it is recommended to transfer the car to a specialized service center.
Required Tools
A set of tools required when replacing timing drive parts on a VAZ Vesta:
- 10, 13, 15 and 17 mm socket wrench;
- 17 mm spanner;
- hex key size 5 mm;
- Torx heads T30, T55 and E12 and a key for installing the nozzle;
- hydraulic or mechanical jack;
- set of flat blade screwdrivers;
- an original key for changing the position of the tension roller (it is permissible to use a tool to remove the retaining rings);
- mounting blade.
Preparing the car
- Open the hood of the car and remove the decorative plastic cover.
- Remove the protective fender liner installed in the arch of the right front fender.
- De-energize the on-board network by removing the terminal from the negative pole of the battery.
- To access the mounting points, you need to jack up the car and then remove the wheel.
- Install a safety support under the body sill to prevent the vehicle from falling if the jack slips or breaks.
- Using a 10 mm socket, unscrew the bolts securing the protective screen located under the engine.
- Loosen the bolt securing the pulley to the engine crankshaft. To perform the operation, you will need the help of a second person who presses the brake pedal.
If there is no assistant, then you need to unscrew the 3 mounting bolts and then remove the starter. To fix the crankshaft, use a screwdriver, which is inserted into the gap between the clutch housing and the ring gear on the flywheel.
- Place a jack under the engine crankcase, having previously installed a wooden spacer, and then remove the cover of the auxiliary drive belt tension roller. To reduce the tension, use a Torx T55 wrench and turn the roller bracket clockwise.
- Unscrew the bolts securing the engine mount; the power unit must be lowered to the ground by 50-70 mm, which will allow you to dismantle the roller and remove the belt from the pulleys. It is recommended to inspect the parts; if worn, a new set (belt and roller) is installed.
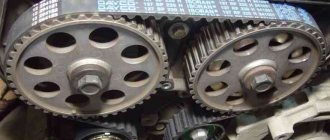
Removing the timing belt on VAZ 21129 and 21179 engines
The procedure for removing worn parts on a VAZ-21129 engine:
- To change the belt, you will need to unscrew 5 bolts securing the top plastic cover covering the timing drive.
- Unscrew the bolt and remove the pulley from the engine crankshaft; under the part there is a guide disk, which is also removed from the machine. When removing, it is necessary to control the position of the pulley, which can damage the shaft position sensor.
- Remove the 3 bolts securing the bottom of the protective screen.
- Set the timing marks, turn the engine crankshaft using a bolt with a set of spacer washers screwed into the toe of the crankshaft. It is possible to rotate the shaft by rotating the suspended wheel when 5th gear is engaged. There are marks on the camshaft gears that align with mating parts on the rear of the belt guard. To fix the camshaft gears, devices made of polyurethane bushings with a bolt are used.
- Check the alignment of the mark on the crankshaft gear with the counter rib on the oil pump housing. Loosen the bolt securing the tension roller; the mechanism will rotate automatically under the force of the tensioned drive.
- Pull the belt off the pulleys; if further use of the part is planned, then a mark is first applied to it indicating the direction of movement during operation. If you plan to replace a part, then a set of rollers (tensioner and intermediate) is installed at the same time.
- Check the condition of the pump; if bearing play or antifreeze leakage is detected, the unit must be replaced. Before removing the pump, the coolant is drained from the engine jacket (through a special hole in the block).
Signs of belt and tensioner wear
The drive and electric current generation system in the vehicle can function correctly for a long time, and the driver does not even have to look into the hood compartment. However, the driver should be aware of the approximate symptoms that may indicate a malfunction of the belt or its tensioner.
The following signs may indicate a drive malfunction:
- characteristic whistle when starting the engine. Indicates a faulty or overly worn belt. It is necessary to immediately check its surface for wear criteria. If almost none are identified, it is worth taking measures to check the degree of tension;
- the appearance of transverse or longitudinal cracks on the surface, scuffs and burrs. If there are too many of them, then it’s time to change the belt drive;
- abrasions on the surface of the roller can lead to uneven wear of the strap and, as a result, to its sagging in certain areas.
The importance of belt tension
The degree of belt tension in a given belt drive is a critical parameter that it is advisable for car owners to regularly monitor. With significant weakening, there is a risk of slipping along the pulley profile, because rotation is transmitted due to friction. Due to the low interference, the friction coefficient decreases, and the voltage generation is lower than the standard established by the car manufacturer. Due to low voltage, negative factors arise:
- lack of battery charging;
- the on-board electrical system experiences a voltage shortage;
- electrical appliances included in the circuit operate with increased load, which negatively affects their service life.
Motorists should also not tighten the strap too much. Such actions will also not bring positive results. Great effort results in rapid wear and also often leads to the transmission breaking at an unexpected moment. A high tension force negatively affects the operation of the bearings, which must be installed on the generator output shaft and on the crankshaft output shaft. Exceeding the optimal load accelerates their production. Long-term operation in extreme conditions reduces their service life.
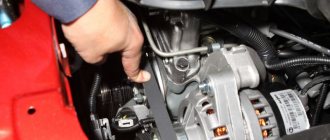
How to replace the alternator belt on Vesta
To ensure that replacing the alternator belt on Vesta does not take a lot of time, effort and nerves, we will prepare the tools in advance. So, we will need a flat-blade and a Phillips screwdriver, a set of open-end wrenches, a balloon wrench, a 13-socket wrench, and 20-, 30-, and 55-size Torx keys.
If all this is prepared, and the machine itself is already in the pit, you can proceed to the following step-by-step sequence of actions:
- If the car is not in the inspection hole, then use a jack to hang the right front wheel.
- After unscrewing the self-tapping screws, remove the wheel arch liner.
- Now you can remove the metal engine protection.
- If a manual transmission is installed on Vesta, then the hydraulic clutch cylinder is additionally removed, and then its mounting bracket is removed.
- Without touching the electrical wiring, unscrew and hang the starter. This will allow access to the flywheel.
- The crankshaft damper mounting bolt is unscrewed so that it can be disconnected.
- Remove the plastic plug from the roller using a screwdriver.
- Next, loosen the tension roller nut.
- Taking the Torx 55 key in your hands, rotate the roller until it reaches the top position, counterclockwise.
- You can remove the generator drive belt.
- Reassembly is carried out in the following sequence: first install the damper, then the air conditioning compressor, and then the generator and tension pulley.
- Once this work is completed, all that remains is to tighten the belt and check the degree of tension.
By rotating clockwise, the tension roller moves from the upper position to the lower position. Once this position is reached, the roller will lock into place, providing the required degree of tension. You can tighten the fastening nut.
List of works for maintenance 6 (90,000 km or 6 years)
- Repeat all the procedures prescribed by TO 1, TO 2 and TO 3 - change the engine oil and oil, air and cabin filters, as well as spark plugs and brake fluid.
- Replacing the alternator belt for cars without air conditioning. Article 8450006327, price - 800 rubles.
- Replacing the accessory drive belt for vehicles with climate control. Article 8450006328, belt price - 1100 rubles. If the belt tensioner roller (automatic) is worn out, then we change it too: article number - 8660001575, price - 3500 rubles.
- Replacing the coolant. The manufacturer recommends using Antifreeze Sintec LUX G12 red-orange, article number 614500, and the price is for 5 liters. canister - 460 rubles.
How to replace the tension roller
Experts recommend changing both the strap and the roller needed for tension at the same time. Such recommendations are also given by the manufacturer. On a Lada Vesta, you will have to hang the engine to remove it. Therefore, the first thing we must do is dismantle the alternator belt, and then proceed to install a new roller to replace the old one.
So, the step-by-step algorithm of operations will consist of the following actions:
- We remove the lower cross member to make it possible to install a jack.
- We dismantle the upper support of the power unit.
- Using a jack, we will lower it closer to the ground until the pin is below the spar. This will free up the space required to access the video.
- Unscrew the fastening nut and remove the old roller.
- We install a new one and tighten the nut without final tightening.
- Using a jack, we lift the motor up to the reverse position so that it becomes possible to install the upper supports.
- Having removed the jack, we fix the cross member located below.
- We throw on the generator strap and give it tension.
- Tighten the fastening nut from the roller until it stops.
Work on tensioning the belt drive or replacing it can be done on your own, since this does not require special qualifications. But it is best to trust the replacement of the generator to specialized specialists in the technical maintenance service. Anyone who has their own experience of performing such work or has questions after reading the review, please share them in the comments below.
Refueling volumes
As mentioned above, three different engines were installed on the Lada Vesta - 11189, 21129 and HR16DE-H4M. It was also equipped with different gearboxes - 2180, 2182 and JHQ. Based on this, some Vesta filling containers have different volumes, while others are the same for everyone.
The following table will help you figure out how much of a particular technical fluid needs to be filled:
| Nominal filling volumes of Lada Vesta | |
| Capacities | Volumes (l.) |
| Engine lubrication system (including oil filter): 11189/21129 (stamped oil sump) 11189/21129 (cast oil sump) HR16DE-H4M | 3,2 (2,9) 4,4 (4,1) 4 |
| Cooling and heating system* : 11189/21129 HR16DE-H4M | 5,95 7,0 |
| Gearbox : Gearbox 2180/2182 JHQ | 2,25 3,34 |
| Hydraulic clutch and brake system | 0,559 |
| Hydraulic brake system (for cars with AMT) | 0,517 |
| Washer reservoir | 4,7 |
| Expansion tank (for cars with 21129 | 5.75 (max) 5.35 (min) |
| Air conditioning system (freon R134 “A”) | 0,475 (± 20) |
*A mixture of coolants of different brands should not be allowed.
In the same repair and maintenance manual for Lada West there are also the following volumes of coolant for the engine cooling system:
- for 11189/21129 with pre-heater - 9.3 l., without heating - 8.7 l.;
- for HR16DE-H4M with pre-heater – 7.6 l., without heating – 7.0 l.