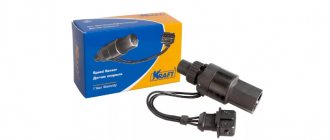
What is a crankshaft position sensor on a vase
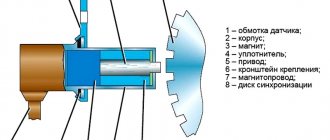
The induction type crankshaft position sensor is installed next to a special disk located in conjunction with the crankshaft drive pulley. The special disk is called a reference or master disk. Together with it, it ensures angular synchronization of the operation of the control unit. Skipping two teeth out of 60 on the disk allows the system to determine the TDC of the 1st or 4th cylinder. The 19th tooth after skipping should face the DPKV rod, and the mark on the camshaft should be against the bent reflector bracket. The gap between the sensor and the top of the disc tooth is in the range of 0.8-1.0 mm. The sensor winding resistance is 880-900 Ohms. To reduce noise levels, the crankshaft sensor conductor is shielded.
Advertisements
After turning on the ignition, the control program of the unit is in the waiting mode for the synchronization pulse signal from the crankshaft position sensor. When the crankshaft rotates, the sync pulse signal arrives instantly to the control unit, which, in accordance with their frequency, switches the electrical circuit of the injectors and the ignition coil channels to ground.
The control unit program algorithm works on the principle of reading 58 teeth passing by the magnetic core of the DPKV, skipping two. The skipping of two teeth is a reference mark for determining the piston of the first (fourth) cylinder in the top dead center position, from which the unit analyzes and distributes the switching signals that control the opening of the injectors and the spark on the spark plugs over the engine operating strokes.
The control unit detects a short-term failure in the synchronization system and tries to resynchronize the control process. If it is impossible to restore the synchronization mode (lack of contact on the DPKV connector, cable break, mechanical damage or broken master disk), the system issues an error signal to the instrument panel, lighting the Check Engine warning lamp. The engine will stall and it will be impossible to start it.
The crankshaft position sensor is a reliable device and rarely fails, but sometimes malfunctions occur due to the inattentive or negligent attitude of specialists servicing the engine.
The crankshaft position sensor is a reliable device and rarely fails, but sometimes malfunctions occur due to the inattentive or negligent attitude of specialists servicing the engine.
For example, a VAZ-2112 has a 21124 engine (16 valves where the DPKV cable is located very close to the exhaust manifold ) and the problem usually arises after repairs, when the chip on the cable is not secured to the bracket. When the cable comes into contact with a hot pipe, it melts, destroying the connection circuit and the car stalls.
Another example could be a poorly manufactured drive disc , the rubber coupling of which can rotate along the internal connection.
The electronic control unit, receiving a single signal from the DPKV, determines the position relative to the crankshaft at each moment of time, calculating its rotation frequency and angular velocity.
Based on sinusoidal signals issued by the crankshaft position sensor, a wide range of problems are solved:
- Determination at a given time of the position of the piston of the first (or fourth) cylinder.
- Control of fuel injection timing and injector open duration.
- Ignition system control.
- Control of variable valve timing system;
- Control of the fuel vapor absorption system;
- Ensuring the operation of other additional systems related to engine speed (for example, electric power steering).
Thus, the DPKV ensures the functioning of the power unit, determining with high accuracy the operation of its two main systems - ignition and fuel injection.
Before purchasing a DPKV to replace it, you need to clarify the type of device installed on the engine.
Functions and purpose
On an engine with 8 or 16 valves, the DPKV is designed to perform not control options, but to implement phase synchronization for gasoline injection. Also, the crankshaft sensor on the VAZ 2110 transmits an impulse to ignite the air-fuel mixture in the combustion chambers of the power unit. Therefore, if the controller breaks down, this can lead to various vehicle systems not functioning coherently. This means that normal operation of the engine will be impossible.
VAZ 2112 crankshaft sensor
The VAZ 2110 crankshaft sensor itself is an inductive type device; this controller must respond to the passage of teeth on the master disk. This disk is mounted on the generator drive pulley, and the controller itself is installed next to it. There are 58 teeth on the pulley, between which there is a cavity the size of 2 teeth. This cavity allows synchronization with the top dead center of the engine pistons. The moment the depression passes the controller, a corresponding signal is sent to the engine control unit.
There are quite a few designs of devices of this type; the principle of their operation is based on a regulator such as the VAZ 2110 Hall sensor. In the latter case, the regulator also responds to a rotating shaft, but its operation is carried out as a result of the passage of a permanent magnet.
Inductive (magnetic) DPKV
The device is based on a magnetized core placed in a coil. At rest, the magnetic field is constant and there is no self-induction emf in its winding. When the top of the metal tooth of the driving disk passes in front of the magnetic core, the magnetic field around the core changes, which leads to the induction of current in the winding. When the disk rotates, an alternating current appears at the output, and the frequency of the current varies depending on the speed of the shaft rotation. The work is based on the effect of electromagnetic induction.
A special feature of this sensor is its simple design, which operates without additional power supply.
Hall effect sensor
The type of these sensors operates on a microcircuit, placed in a housing with a magnetic core, and the drive disk creates a moving magnetic field with magnetized teeth.
The sensor provides high accuracy of signal output in all specified crankshaft rotation modes. A sensor operating on the basis of the Hall effect requires a constant voltage connection.
Optical sensors
It is based on the physical phenomenon of the photoelectric effect. Structurally, it is a light source with a receiver (photodiode). Rotating between the source and the receiver, the perforated disk periodically closes and opens the path to the light source, as a result the photodiode produces a pulse current that arrives in the form of an analog signal to the control unit (the system has limited use and was previously installed in the distributors of injection cars, for example, Matiz).
Where is?
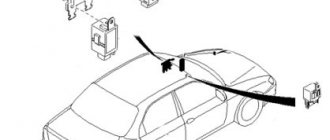
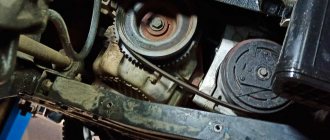
If malfunctions are noticed in the operation of the engine, then before you begin to identify the breakdown and signs of malfunction, you need to find out where the regulator is located. Where is the crankshaft position sensor located on an 8- or 16-valve “ten”? If you open the hood, you will notice that the regulator can be found directly on the oil pump cover. As you can see, the location of the regulator is not particularly convenient. VAZ engineers thought through this point, thinking about the convenience of replacing the controller, so they equipped the DPKV with a long 80 cm wire.
Location of the DPKV under the hood of the car
What cars is the crankshaft position sensor suitable for?
| Model | Engine code | Year | Engine capacity, l. |
| 110 (2110) 1.5 | BA3 2111 / VAZ-2111 | 1995 — 2005 | 1,5 |
| 110 (2110) 1.5 16V | VAZ-2112 | 1995 — 2010 | 1,5 |
| 110 (2110) 2.0 i | C 20 XE | 1996 — 2000 | 2 |
| 110 (2110) Wankel | VAZ-415 | 1997 — 2004 | 2,6 |
| 110 (2110) 1.6 | VAZ-21114 / VAZ-21124 | 1995 — 2012 | 1,6 |
| 110 (2110) 1.6 16V | VAZ-21124 | 2004 — 2010 | 1,6 |
| 110 (2110) 1.6 LPG | VAZ-21114 | 2004 — 2007 | 1,6 |
| 111 (2111) 1.5 | VAZ-2111 / BA3 2111 | 1996 — 2005 | 1,5 |
| 111 (2111) 1.5 16V | VAZ-2112 | 1995 — 2005 | 1,5 |
| 111 (2111) 1.6 | VAZ-21114 / VAZ-21124 | 2004 — 2013 | 1,6 |
| 112 (2112) 1.5 | VAZ-2111 | 1995 — 2005 | 1,5 |
| 112 (2112) 1.5 16V | VAZ-2112 | 1995 — 2005 | 1,5 |
| 112 (2112) 1.6 | VAZ-21124 / VAZ-21114 | 2005 — 2011 | 1,6 |
Crankshaft sensor (DPKV) VAZ 2114 signs of malfunction
The crankshaft position sensor plays an important role in engine stability. Perhaps this is the only sensor in the electrical engine control circuit, due to a malfunction of which the engine may not start.
Types of crankshaft sensors
According to their design features, crankshaft position sensors can be magnetic, based on the Hall effect, or optical.
A magnetic (magnetoresistive) type sensor operates under the influence of a magnetic field arising from a permanent magnet passing in close proximity. In a Hall sensor, the current strength varies depending on the magnitude of the magnetic flux - according to the principle of operation, this model resembles an ignition distributor. The optical sensor has a toothed disc built into it.
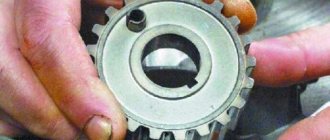
Gear
The gear is always present where there is a crankshaft position sensor (CPS). When teeth pass near the sensor, the direction of the magnetic flux changes, and the sensor transmits the changed signal to the engine control unit. The unit synchronizes the data received from the DPKV with the injectors, supplying a spark to the cylinder at the moment when the piston is at top dead center and the compression cycle is in progress.
The teeth are located around the circumference of the wheel every 6 degrees. If a circle of 360 degrees is divided by 6, then there should be 60 teeth. But in this circle there is a gap of 2 teeth, so there are only 58 of them. This is done so that the sensor can determine through the crankshaft when the top dead center of the first piston will be cylinder.
Structurally, the teeth can be made on the crankshaft pulley, on the crankshaft itself, on the flywheel, and even on the clutch basket. Accordingly, the DPKV is located next to the gear wheel. The distance between the sensor and the edge of the tooth should be approximately one millimeter. This gap is necessary to create a magnetic field.
Features of injection systems
The injection system operates thanks to a sensor system and a control unit. All signals are input to the microprocessor unit, which regulates the operation of the actuators. The following sensors are responsible for the correct operation of the engine:
- Crankshaft positions.
- Camshaft positions (not on all versions).
- Intake manifold pressure.
- Lambda probe.
- Speed.
- Mass air flow.
- Throttle position.
And the main role is played by the VAZ-2110 crankshaft sensor (8 valves or 16), since the moment of injection and supply of high voltage to the spark plug electrodes depends on it. The design has a temperature sensor, but it has virtually no effect on operation. It is necessary to control the engine temperature and send a signal to the dial indicator (or to the on-board computer). But it will be indispensable if it is necessary to implement automatic switching of fuel types (from gasoline to gas and back).
Algorithm of operation of the injection system
The microprocessor has several inputs and outputs. The inputs receive signals from all sensors. But first, these signals are converted and, if necessary, amplified. The microcontroller is programmed to work with sensors and actuators. Programs (firmware) can provide various engine characteristics.
You can achieve an increase in power (gasoline consumption will increase) or a decrease in consumption (power will suffer). But most motorists prefer programs that provide work with average parameters. In this case, the signal from the VAZ-2110 crankshaft position sensor does not change; only the reaction of the actuators to changes in input data is adjusted.
Repair of VAZ crankshaft sensor wiring - A116.RU Kazan
Repair of wiring connector of the Crankshaft Position Sensor (CPS) VAZ.
Quite often, the cause of the car jerking and its complete stop is an open circuit of the DPKV (error P0335 or P0336)
A wire break most often occurs at the base of the sensor connector. The connector needs to be replaced with a new one. In the article we will look at how to do this most correctly, and you will also learn how you can repair the old sensor connector if you suddenly cannot purchase a new one.
Everything was done indoors, so the part with attaching the restored connector to the car wiring is for demonstration, that is, you need to do everything the same, only not on the table, but on the car).
We cut off the connector from the car wiring at a distance of 3-5 cm from the connector. We remove the plastic wire retainer (to be honest, it doesn’t really prevent the wires from breaking at the root - so you don’t have to put it back if you’re too lazy...)
Using a wire with a diameter of 0.8 mm (we used a piece of welding wire from a Kempy semi-automatic machine) we press the fixing stops of the contacts through a special groove (it’s enough just to insert the wire until it stops).
Use the remaining wires to pull the contacts out of the connector. They come out quite tightly due to the rubber seals. We open the contact petals around the rubber seals and break off the old wires at the root.
We find a couple of pieces of wire 10-15 cm long, suitable in cross-section and color. Don't forget to put rubber seals on the wires.
We strip the ends of the wires by 3-4 mm and carefully solder them to the contacts. We used a 25-watt soldering iron, POS-61 solder and active flux based on zinc chloride.
We clamp the rubber seals with the contact petals, slightly bend the contact latches....
We insert the contacts with the wires into the connector until the latch lightly clicks. We put the plastic wire clamp on the back of the connector. The connector has been restored!
Next, let's move on to the car. We strip the DPKV wire - no more than 5 cm. We bend the screen back, strip the white and green wires by 15 mm.
We put heat-shrinkable tubes on the connector wires and twist the corresponding wires with electrical twist.
We stretch the heat shrink onto the twists and heat it with whatever comes to hand - we came across a lighter. But if you have a hairdryer on hand, it will be better... at least according to Feng Shui, that’s how it’s supposed to be.
Source
A little about the crankshaft
The crankshaft is the most important element of any internal combustion engine. It is driven by the starter (at the moment of starting) and the pistons (in operating mode). From it, torque is transmitted to the gearbox, gas distribution system, and auxiliary mechanisms. And in order for fuel injection to be carried out in a timely manner, a spark to form at the right moment, a VAZ-2110 crankshaft sensor is needed.
It monitors the position of the pulley and transmits a signal to the electronic control unit. The pulley has teeth, the distance between them is the same. But in one place there is a gap - two teeth are missing. The position sensor reacts to the approach of metal. When an empty area passes near the sensor, a signal is generated - the control unit is notified that one revolution of the crankshaft has occurred.
Device and classification
Despite the fact that the VAZ crankshaft sensor may have a different design, its operating principle is based on a single electromagnetic effect. That is, the signal is generated without direct contact with the crankshaft.
The most common type of DPKV is induction. Such a part consists of two main elements - a magnetized rod and a special winding. Induction sensors read information from the crankshaft toothed pulley. When a metal tooth passes near the DPKV, an EMF is formed in the latter, which is captured by the electronics. On the VAZ-2110, the crankshaft sensor is installed of the induction type.
DPKV can also be based on the Hall effect. Such a sensor is constructed in approximately the same way as an induction sensor, however, when a metal shaft passes near it in the winding of the device, the resistance changes. Structurally, it consists of a permanent magnet.
It should be noted that both the first and second types of sensors are used to read data from the crankshaft pulley. It can be toothed or all-metal. In the latter version, there is a special recess that passes by the sensor and generates a signal that is sent to the vehicle’s electronic engine control unit.
Replacing chips and pinout of DPKV VAZ 2110
Over time, the wires going to the DPKV chip wear out. Located in the lower part of the engine and not far from the front wheel, as a result, dirt, snow, oil, and aggressive chemical media in the form of salt get on the DPKV and its chip and settle, which leads to slow oxidation of the wires on the chip and subsequently to their breakage. Since the wires from the chip are combined into a single bundle, when replacing it, a repair chip is provided with protruding two wires 15 cm long. Having removed the damaged chip, install a new one with a twist. The twist points are insulated using heat shrink or electrical tape.
From the diagram below it can be seen that their pinout is not complicated and two wires are directly connected to the signal input contacts in the control unit, passing along the entire length of the harness. The polarity of the connection between the signal wires of the sensor and the control unit must be observed. If the polarity is reversed, the synchronization system will not work. To restore the operation of the DPKV, you simply need to swap the wires and check the functionality by starting the engine.
Signs of breakdown
Any malfunction of the VAZ 2110 crankshaft sensor will cause the engine to be unable to start after a long period of parking. If the controller starts to malfunction while operating the car, in 90% of cases the engine will stall, since the ECU will not generate a signal to the ignition system, and the internal combustion engine safety function will work. Signs of a sensor malfunction when the unit begins to break down:
- Check Engine is activated on the dashboard;
- engine speed becomes unstable, traction decreases by 50%;
- The VAZ 2110 crankshaft sensor must be urgently changed if the following sign of a malfunction appears: when the speed increases, a hum is felt in the engine area and knocking;
- An injection engine is characterized by the appearance of popping noises in the exhaust tract area.
When the VAZ 2110 dpkv is completely faulty, the engine stalls because the computer does not send signals to form a spark.
These symptoms do not always indicate that a complete replacement of the VAZ 2110 crankshaft sensor is necessary, since all faults of the element are conditionally divided into four groups:
- surface clogging;
- damage to the winding of the device and violation of its integrity;
- manufacturing defects;
- open circuit or short circuit in the circuit.
Checking the sensor begins with cleaning the part. The cleanliness of the contacts, their security, the cleanliness of the connector are checked, and oil stains are eliminated. The design of the sensor is quite simple, but 20 percent of device failures are factory defects. The wiring break is repaired after ringing the circuit. The VAZ 2110 crankshaft sensor is not repaired, since the cost of the consumable does not exceed 100 rubles; the unit is replaced with a similar one after a short diagnosis.
Symptoms of a problem
If you have a multimeter and a regular screwdriver at your disposal, you can independently check the operation of the device without any problems.
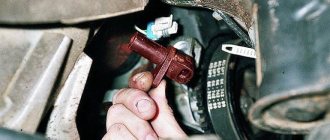
Unscrew the nut
Signs of a faulty crankshaft sensor include:
- A warning light comes on on the dashboard, recommending that you check the engine;
- When idling, the engine behaves unstable;
- Thrust drops;
- Engine speed drops and rises;
- Detonation occurs, that is, shots from the intake or exhaust manifold;
- The engine cannot be started.
Causes of failure
There are a small number of reasons why a sensor may fail, but they still exist.
- Mechanical damage;
- Aging;
- Electrical damage;
- Open circuit control;
Let's consider each of the breakdown options in more detail.
Mechanical damage. May be caused by any impact to the sensor. For example, when trying to dismantle the sensor, similar breakdowns are possible.
Aging. Often on older cars the sensor may fail due to its aging and demagnetization of the core.
Electrical damage. With such a breakdown, the coil inside the sensor most often breaks, and it stops sending a signal to the ECU.
Open circuit control. A break in the control circuit does not refer to a sensor failure. If there is a break, the wiring that transmits the signal from the sensor to the ECU is affected.
Checking the DPKV for serviceability
To verify the suspicion of a breakdown of the crankshaft sensor, the two most likely cases of its malfunction are considered.
In both of these cases, you will need to dismantle the device using a ten-threaded wrench. Before the operation, marks are drawn on the crankcase and the sensor itself, which will later help to tighten the device to the initial angle of rotation. Also, the motorist should not forget to measure the clearance between the synchro disk and the sensor before dismantling, which cannot go beyond the size of 0.6-1.5 mm. If there are no mechanical damage such as scratches, dents, or damage to the material structure, the sensor is checked using other measuring instruments:
- checking with an ohmmeter. In this case, it is necessary to measure the resistance of the sensor winding. Since the standard value of this indicator, set by the manufacturer, ranges from 550 to 750 Ohms, going beyond the specified limits indicates the malfunction of this device, which is important for the correct operation of the car - which means it is faulty. It is worth noting here that the manufacturer still allows a slight discrepancy in resistance with the nameplate values, but in any case they must correspond to the data specified in the machine’s operating instructions;
- checking with a voltmeter, inductance meter and transformer. This method is more complicated, but more effective - the resistance is measured with the same ohmmeter, after which the inductance is checked (should be from 200 to 4000 millihenry), with a sensor winding voltage of 500 Volts. Next, you need to measure the resistance with a megger and make sure that it does not exceed 20 MOhm.
If the sensor still does not pass these tests, it must be replaced. During this procedure, it is necessary not to forget about the distance between it and the synchronization disk regulated by the manufacturer, as well as alignment with the marks on the crankcase that were made on the previous device. Before installing a new sensor, be sure to check it, since even if all installation procedures are followed correctly, it may not work properly.
A new DPKV is checked according to the same procedure as a supposedly faulty one, and based on the test results, the device can be installed instead of the previous one or rejected. When installing, the bolts are tightened with a torque of 8 to 12 Nm. However, in any case, before carrying out all the actions to replace a rather expensive and hard-to-reach component, you should definitely make sure that it is the one that has failed, because cars produced by our automotive industry can often bring unpleasant surprises.
First way to check
In this case, you will need an ohmmeter , which you will use to replace the resistance on the winding. According to the manufacturer's standards, the indicator ranges from 550 to 750 Ohms.
It's okay if your numbers are slightly different from the norm. If the deviations are serious, you will definitely have to replace the sensor.
It should be noted in fairness that the crankshaft position sensor on VAZ 2110 models rarely breaks down. Among the main reasons for its failure to function normally is the accumulation of dirt, mechanical damage, as well as banal factory defects.
Features of testing on other cars
As for other cars, for example, VAZ-2109 with an injection engine, VAZ-2112 and VAZ-2114, their check is carried out identically to the VAZ-2110 car.
It is noteworthy that for VAZs, when checking the resistance of the crankshaft sensor coil, an additional check can be carried out.
But to do this, the multimeter must be switched to voltmeter mode with a measurement limit of 200 mV.
Then connect the probes to the DPKV terminals and pass them with any metal object, for example, a screwdriver, at a short distance from the core.
If the sensor is working properly, it will react to metal, the multimeter will show voltage surges on the display. The absence of these bursts will indicate a faulty element.
As for a car like the Reno Logan, the difference from the VAZ in this car comes down to slightly different readings of the resistance of the sensor coil when measured with an ohmmeter.
A working Logan DPKV has a normal resistance of 200-270 Ohms.
For Daewoo Lanos, the coil resistance should be in the range of 500-600 Ohms.
But on the ZMZ-406 engine, installed on Volga and Gazelle cars, the normal coil resistance is in the range of 850-900 Ohms.
Second method
Here you will need a voltmeter, a transformer and an inductance meter. It is advisable to measure resistance under compact temperature conditions.
Once the ohmmeter readings are obtained, arm yourself with an inductance measuring device. Normally, the device should show from 200 to 4000 units (millihenry).
A megger measures the resistance when the crankshaft position sensor winding is powered at 500 volts. Under normal conditions, the readings will be no more than 20 MΩ.
Replacing and checking the crankshaft position sensor on LADA
DPKV (crankshaft position sensor), also known as TDC sensor (top dead center sensor) is the only sensor of the engine management system, if which breaks down, the engine will definitely not start. This sensor has no mechanical moving parts, so it rarely fails. Most often, corrosion-damaged wiring is to blame for its failure.
Signs of a faulty crankshaft sensor
A completely faulty DPKV will not allow the engine to start. In other cases, sensor malfunctions can be identified by:
- poor engine starting;
- unstable motor operation;
- reduction in engine power;
- detonation with increasing load.
Replacing the crankshaft sensor
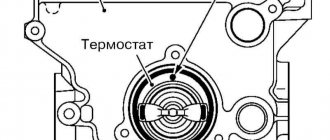
Where is the crankshaft sensor located? On all LADA cars, the DPKV is attached to the engine crankcase (to its lower part) using one bolt. On the diagram it is number 2.
To change the crankshaft sensor, disconnect the block with wires from it and unscrew the mounting bolt (10mm wrench). On Renault-Nissan engines (for example, H4M), you will first have to remove (move aside) the protective casing.
Installation of the DPKV is carried out in the reverse order. Using a set of feeler gauges, we check the gap between the end of the sensor and the teeth of the crankshaft pulley. The gap should be 1±0.41 mm; it is specified by the design of the sensor and is not adjustable.
How to check DPKV with a multimeter
Set the multimeter to ohmmeter mode and connect the probes to the DPKV contacts. The resistance should be between 550-750 Ohms.
Set the multimeter to voltmeter mode (with a measurement limit of up to 200 mV). Connect the probes to the sensor contacts and bring a steel object to the sensor core several times. If the sensor is working properly, the device should detect voltage surges. You can more accurately check the DPKV without removing it from the engine. Rotate the crankshaft pulley and monitor the voltmeter readings. In a working DPKV, the voltage at the terminals reaches 0.3 V.
If the DPKV turns out to be serviceable, and the error (for example, p0335) in the engine control system has not disappeared, then you should clean the sensor of dirt and check the integrity of the wire and the quality of the connections in the circuit.
Let us remind you that the engine control system includes a number of other sensors that we talked about earlier.
Controller diagnostics
Diagnostics of the crankshaft position sensor is carried out on the dismantled controller. It is recommended to set a timing mark on the crankcase before removing it so that when installing a new element, the correct gap between the tracking device and the timing disk will be maintained. The permissible gap is 0.6–1.5 mm.
We remove the element with a 10mm wrench and carry out a visual inspection. Before checking the crankshaft sensor, the battery is disconnected and the contact points are checked. During a visual inspection, the integrity of the housing, wires, connectors, and the absence of cracks and dents on the housing are checked. If there are no signs of mechanical damage, the DPKV is checked with a multimeter.
Testing of the node can be carried out both by resistance and voltage parameters. Testing for resistance is much simpler, so it is used in most diagnostic options.
The resistance on the working controller winding should be in the range of 550–750 Ohms. Measurements are taken on two contacts of the part. For a 16-valve injector engine, a resistance deviation of 5% is considered acceptable.
Drivers rarely use the second testing option, although diagnostics with a voltmeter are considered more reliable. To check, you will need a transformer and an inductance meter, for example, the MY-6243 multimeter model is often used to measure capacitance and inductance. Checking step by step.
- Calculate the inductance dpkv. The working element at a voltage of at least 500 mV will show an inductance in the range of 200–4000 iH.
- Check the resistance; a working sensor shows a parameter of 20 mOhm.
Examination
Before you can check it, you first need to get to it. And the device is located in a not very convenient place on the engine. So be prepared to spend some time on this.
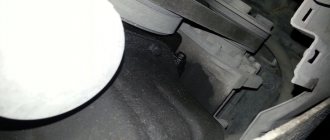
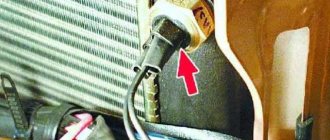
In general, the sensor we are looking for is located on the oil pump cover. You need to look for it directly near the generator pulley.
Now to the question of how to check it. Let's look at the two most common situations, but first, let's remove the element.
- The sensor is removed with a 10 mm wrench;
- Be sure to make special marks on the crankcase and sensor before removing. This will allow you to return it to its original place, or install a new regulator in the correct position;
- If there is no external, visible damage to the crankshaft sensor, then you need to use a multimeter;
- Don't forget to measure the distance between the sensor and the timing disk. In the normal position, the gap ranges from 0.6 to 1.5 millimeters.
To change or not to change?
Let’s make a reservation right away: before deciding that the DPKV needs replacement, you need to check:
- Condition of the wiring going to the DPKV;
- Availability of high-quality contacts in the circuit;
- No damage to wire insulation;
- No oil on the crankshaft position sensor. Since the oil pump is located next to the DPKV, oil leakage can also cause its malfunction.
Functional crankshaft position sensor
If you have already examined everything, you need to check the sensor itself. But to do this you need to remove it.
How does he work
Let's figure out how this element works. The regulator reads data on the crankshaft speed and also reports its current position using magnetic pulses.
Location
Since the engines installed on the VAZ 2110 differ from each other, different PCV sensors are used. Therefore, when replacing, be sure to choose a similar device, since a regulator with other characteristics simply will not work, so the system will still not work even if you have a high-quality, serviceable sensor.
Replacement
If signs of a malfunction of the DPKV are associated with damage to the device, it is replaced without repair. The controllers are located in an inconvenient place; they are attached to the oil pump cover with a single bolt. How to remove an element step by step.
- The ignition is turned off, the negative terminal of the battery is removed.
- The oil pump where the sensor is located is determined, and the connector is removed. There is an 80 cm wire from the controller to the block; you can determine the location of the connector by the wire.
- Use a 10mm wrench to unscrew the only screw.
- The device is removed.
Before installing a new element, you must thoroughly clean the sensor seat and connector plug, and check the integrity of the wiring. This will avoid rapid failure of the new part.
If the problem in the operation of the internal combustion engine is due to the lack of a signal from the sensor connector on the computer, check the integrity of the wiring. Electronics diagnostics, if there is a signal but no response from the electronic unit, are carried out in a specialized workshop. In 90% of cases, flashing of the control system and replacement of electronic components is required.
In half of the cases, the sensor fails due to simple dirt. The controller is located in close proximity to the oil pump, which can throw out drops of liquid. Oil getting on the sensor reading element clogs the surface, oxidizes and interferes with the full transmission of data.