Reasons for failure
There are many reasons for bearing failure, but there are several main reasons, which are discussed below.
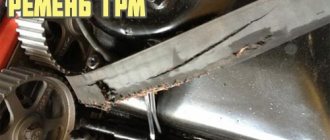
Wear
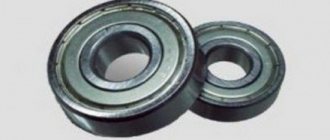
On the left are old bearings, on the right are new bearings.
Wear is a typical cause of bearing failure, since the number of revolutions of the generator rotor is huge over the Nth period of time. Consequently, the lubricant in bearings under the influence of high temperatures loses its properties and the bearing ceases to receive the required slip coefficient, which causes heating and increased clearances in the ball part of the bearing.
Belt tension
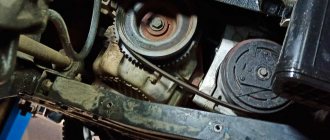
Excessive tension on the alternator belt greatly affects the life of its bearings. It is necessary to tension the belt correctly, observing all norms. The generator belt should bend under the influence of 10 kg. by 5-7 mm.
Replacing the rear and front bearings of the VAZ 2110 generator (2114, 2112, 2111, 2115)
Before you start replacing the bearing, watch a detailed video of removing the generator and disassembling it.
The replacement process is divided into operations:
- Preparatory activities;
- Removal and further analysis of the mechanism;
- Dismantling of old parts;
- Repair and installation of new parts, replacement, assembly, installation, testing the functionality of the unit.
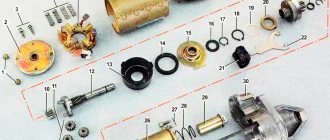
Design of the VAZ 21XX generator, preparation for repair
The detail of the unit is presented in two diagrams, assembled and disassembled.
To install the bearings, prepare a set of tools: - Heads with a ratchet, keys (27, 13, 10, 8, and for 17 - preferably two); - Minus, Phillips screwdrivers; - Vise; - Hammer; - Pliers; - Two-pin puller with paws; - WD-40 liquid and marker.
Next, place the car in a place with good lighting above the hood to remove the mechanism without difficulty, open the hood, find the belt on the pulleys, as well as the terminals. Now we move on to removing the generator and dismantling the bearing.
The process of dismantling the generator and replacing old bearings
- First, disconnect the negative terminal of the battery, then the terminals of the device itself. To do this, you need to unscrew the fastenings of these terminals.
- Study the fastener diagram to begin dismantling the mechanism.
- Next, remove the crankcase protection, then climb under the car. Next, unscrew the fasteners that secure the generator to the frame (positions 5, 2 in the diagram). The process is shown in detail in the photo.
- We hold the mechanism with our hands when unscrewing the last fastener.
- We take out the unit, remove the dirt, and wipe it with a rag. Lubricate the threaded connections with WD-40.
- Now we move on to removing the protective plastic back cover on the generator; we do this carefully with a screwdriver.
- We unscrew the fastenings of the brush holders and the voltage regulator with a Phillips screwdriver. The sequence is shown in the photo.
- After this, remove the pulley from the axle and clamp the product in a vice.
- Using an adjustable or other wrench, unscrew the nut on the pulley so that the shaft does not rotate; insert the hexagon into a special groove at the end.
- Now remove the washer and disassemble the unit body by unscrewing the corresponding bolts; before doing this, be sure to mark the positions of the body halves with a marker . The entire disassembly process is shown in the photographs.
- We remove the plastic casing and the front ball bearing, gaining access to the armature.
- Now we press the rear bearing of the generator from the armature in two ways:
- Next, we press the rolling element out of the cover of the generating unit.
- We knock it out with a hammer with a mandrel to fit the outer size of the ball bearing (see dimensions below), a 27 socket head is also suitable.
Replacing the rear and front bearings of the VAZ 2110 generator
- Before installing a new bearing in the VAZ 2110 generator, you should wipe the seating surfaces (rotor, housing cover hole) with a rag.
- Next, carefully remove the seal and add thick lubricant to the ball bearing, for example Litol.
- Let's start pressing the rear bearing onto the shaft. To do this, secure the assembly in a vice, place the new part on the shaft, and use a pipe and a hammer to press the part onto the rotor. The force is applied strictly to the inner race.
- We press the front bearing into the front cover of the generator using the old rolling element or a 27-inch head. We insert the new product into the hole evenly, without distortions, place the old element on top, then hammer the part into the hole. We apply force only to the outer ring.
- After replacing the bearings, reassemble the mechanism in the reverse order and install it back on the car. Watch the video for assembly procedure.
- This completes the replacement. Don't forget to read the tips and tricks at the end of the article.
Diagnostics
If noises and hums appear in the operation of the engine, it is necessary to check and find the culprit of the noise. Most often it is the generator, but in order to exclude other culprits it is necessary to diagnose it.
It is not difficult to independently check the condition of the bearings; this only requires compliance with the points described below.
- Remove the generator belt from the crankshaft and generator pulleys
- We start the engine and listen
- If the noises, whistles, vibrations have disappeared and the internal combustion engine is working properly and smoothly, then the culprit is definitely the generator bearings.
- You can also grab the generator pulley and shake it up and down; there should be no play. Turn the rotor manually, there should be no whistles or squeaks, the rotor should rotate smoothly and softly.
Is replacement required? Diagnostics and testing of generator bearings on a VAZ 2110
Signs that indicate that the VAZ 2110 generator bearings are faulty:
- Whistle, hum when the rotor rotates in the generator;
- Instability of battery charging due to problems with shaft rotation;
- The pulley turns;
- Intense heating due to friction of worn parts;
- See the generator noise in the video.
If the listed symptoms appear and you suspect that the bearing is faulty, then carry out a simple diagnosis:
- Remove the belt from the pulley;
- Start the car;
- If the whistle, hum, and other signs disappear, this means that a new generator bearing needs to be installed.
- Next, we move on to repairing the VAZ generator.
- Watch how to check the node yourself in the video.
Reasons why a bearing fails: 1. Wear of p/w parts (raceways, rolling bodies, cage, seals).2. Insufficient quantity or leakage of lubricant.3. Rotation of the outer race in the housing or the inner race on the rotor shaft (due to low accuracy of the product or when parts are worn out).4. If abrasive particles get inside the element, a squeak appears.5. Expiration of service life before failure. 6. Pulley imbalance, belt malfunction. 7. Rotating the pulley.
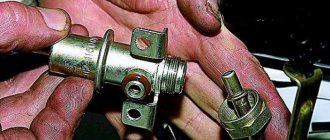
Size and catalog numbers
These parameters of the ball bearing are necessary for purchase, since without these numbers it is very difficult to buy the right part suitable for your car.
The dimensions of the bearings varied depending on the year of manufacture of the car, so the selection of a bearing can be carried out based on the year of manufacture. auto.
Cars manufactured before 2001 with carburetor engines they have bearings of type 6302 front and 6202 rear.
Cars produced after 2001 with injection engines, have bearings type 6303 front and 6203 rear.
Catalog numbers (articles) and external dimensions
| Bearing, no. | vendor code | Dimensions, mm |
| 6303 | 180302 | 17*47*14 |
| 6203 | 80203 | 17*40*12 |
| 6302 | 180303 | 15*42*13 |
| 6202 | 80202 | 15*35*11 |
How to check car generator bearings
Checking the rear bearing of the generator
Checking the front bearing of the generator
Checking the generator cover
xn--2111-43da1a8c.xn--p1ai
Replacement
To replace it, you will need to remove the generator from the car and some plumbing tools. It would also be a good idea to have a generator bearing puller. Having all the necessary tools, you can handle the job with basic mechanical knowledge.
Puller
The puller greatly facilitates bearing replacement work, saving time, effort and nerves. This device is a faithful assistant not only when working with a generator, but also with other car parts.
It consists of claws and a thrust bolt. There are a large number of different pullers, they are: two-jaw and three-jaw. In our case, when working with a VAZ 2110 generator, it is best to use a two-jaw one; it is the most compact and convenient to dismantle the bearing.
Its cost varies from 200 to 1000 rubles, depending on the quality of the part.
Necessary tool
The tools you will need to complete the work are presented below:
- Ratchet;
- 13mm, 10mm key;
- 21mm head;
- 8 mm hexagon;
- Gas key;
- Powerful screwdriver “+”;
- Hammer;
- Puller;
- Punch;
- WD-40 (lubricant)
- Rags;
- Marker;
Stages of work
1. Disconnect the negative terminal from the battery. We unscrew the wires on the generator with a 10mm wrench and remove the generator excitation chip.
2. We remove the generator from the car. To do this, unscrew the generator belt tension bolt and remove the belt, unscrew the generator from the mounts and remove it from the car. Be careful not to lose the rubber bushing and washers when removing the lower mounting bolt.
3. Let's start disassembling. Remove the plastic cover of the diode bridge by bending the three latches. Unscrew the two screws securing the brushes to the body and disconnect the connector from the brushes. We mark the alignment of the covers with a marker so that in the future we can assemble everything correctly.
4. Using a screwdriver, unscrew the screws of the ends of the generator winding from the diode bridge and bend them. Unscrew the screw securing the capacitor and separate the diode bridge from the generator.
5. We unscrew the generator pulley with a 21 mm socket, holding it with a gas wrench and holding the rotor shaft with an 8 mm hexagon. We take out the generator pulley and thrust washer.
6. Unscrew the 4 bolts of the cover and remove it along with the stator winding.
7. We take out the back cover by pressing the manifold with our fingers and pull the cover towards ourselves, remove the plastic bearing bushing.
8. Remove the bearings using a puller.
We assemble the generator in the reverse order.
When replacement is required
If you hear creaking and howling while the generator is running, then you have discovered the main sign of bearing failure. The only correct solution is replacement.
Creaking and howling occur due to the fact that the bearing separators lose lubrication, they wear out, and are destroyed as a result of prolonged use under heavy loads.
Sometimes a thin creaking sound can be heard from the generator, which is often confused with bearing failure. In fact, it could be the timing belt pulley or the water pump. Because to make sure, just remove the belt. If the sound remains, then the culprit is the bearing.
What to use
Before you start replacing the bearings on the generator, you need to determine what elements are on your car, as well as what they can be replaced with.
| Bearing | Number | |
| Old generators | New generators | |
| Front | 6302 | 6303 |
| Rear | 6202 | 6203 |
When choosing bearings, pay attention to the hub manufacturers. For VAZ 2110, bearing hubs are produced in the city of Samara and are marked SPZ-4. But there are also Vologda and Saratov hubs marked 23 GPZ and 3 GPZ, respectively. It is not recommended to purchase bearings with unmarked hubs, much less use Chinese generator elements.
Front and rear
Dimensions
It will not be superfluous to know what dimensions the standard front and rear generator bearings for your “ten” should have in order to make sure that the spare parts are selected correctly.
The rear bearings of the new type, marked 6203, have the following dimensions:
- Inner diameter - 17 millimeters
- External diameter - 40 millimeters
- Width - 12 millimeters.
The front bearings marked 6303 have the following dimensions:
- Inner diameter - 17 millimeters
- External diameter - 47 millimeters
- Width - 14 millimeters.
Based on the dimensions, you can understand why rear and front bearings are often called small and large, respectively. It’s easy to visually distinguish them from each other, so you definitely won’t confuse the elements when replacing them.
Disassembled device
Replacement instructions
You can replace the generator bearing either at a car service station or in a garage. The only condition for replacing it yourself is that you must have a vice, as well as a special puller for dismantling. From the tool kit, you will need a standard mechanic's tool, including screwdrivers, wrenches and a hammer (the author of the video about replacement in garage conditions is the Expert R channel).
Stages
- First you need to disconnect the battery and remove the timing belt. To do this, use a 13 wrench to unscrew the fastening nut, and then, using a 10 wrench, loosen the tensioner; the fastening screw itself must be unscrewed.
- You need to disconnect all the wires from the generator device, after which you need to unscrew the lower clamp using a 13mm wrench, remove the screws, and dismantle the assembly itself.
- After removal, we proceed to disassemble the mechanism. First, unscrew the pulley, for this you use a 24mm wrench, at this stage you may need a vice. To remove the pulley from the axle, you must use a puller.
- After removing this element, the brush assembly, control device, capacitor, and diode rectifier are dismantled. All these components are located under a plastic cover. To disassemble, you will need to unscrew the four mounting bolts; they are used to secure the second part of the case. These bolts are typically welded and can be difficult to remove, so spray them with WD-40 and wait a few minutes before removing them.
- When the bolts are unscrewed, the front cover of the device can be removed - the front bearing is installed in this cover. To remove this device, you will have to use a special mandrel, and its diameter should be slightly smaller than the diameter of the outer ring. Alternatively, you can use a piece of pipe. The mandrel is mounted directly onto the ring, after which a hammer will be used to knock out the bearing part.
- When the device is removed, a new part is mounted in its place, then it is pressed into the cover, for this a mandrel with a hammer is also used.
- After completing these steps, the rear bearing is replaced; to do this, it is necessary to dismantle the stator. After removal, the plastic support of the part is pushed out and removed from the rotor. Only by doing this will you gain access to the bearing.
- The procedure for dismantling the device is carried out with a puller; when the part is dismantled, a new bearing is installed. Only in this case, the diameter of the mandrel must correspond to the size of the inner ring. When installing, try not to damage the ring itself; also during installation, keep in mind that under no circumstances should you clamp the rotor in a vice. This is because the rear part of the rotor is quite soft; therefore, when it is installed in a vice, scuffing may occur. And they, in turn, will not allow you to assemble the unit correctly.
- It is best to use a hydraulic pump to mount the part, but if it is not available, then the rotor should be placed on a wooden surface during installation. It is necessary to screw any nut directly onto the thread itself on which the pulley is installed; this will make it possible to further protect the thread from possible damage.
- When the bearing element is pressed into the structure, you can begin assembling the unit. The assembly procedure is carried out in reverse order.
Replacing generator bearings on a VAZ 2110. How to do it
- ohmmeter - resistance indicator;
- charger and starter;
- screwdrivers with flat and figured nozzles;
- pliers;
- hammer;
- puller;
- punch.
- Choosing a place for repairs;
- We turn off the engine and put the car on the handbrake, secure it with shoes under the wheels;
- Disconnect the positive terminal from the battery;
- Disconnect the chips with wires;
- Using the “13” socket, unscrew the upper bolt-fixing mechanism of the generator and loosen the tension;
- We remove the belt itself directly;
- From under the bottom of the car, unscrew the remaining two bolts with bushings and carefully remove the unit;
- Having access to the generator, we provide ourselves with access to the bearings; to do this, it is necessary to remove the three retaining springs that secure the casing;
- Unscrew the two bolts connecting the two halves of the generator;
- We disconnect the winding by also removing two bolts;
- What remains in front of us is the rectifier block, which we also remove;
- All procedures are carried out very carefully, so with the slightest tug the wires can break off;
- By unscrewing the contact nut, disconnect the bolt;
- Mark the front and rear radiator covers with paint or pencil;
- All that remains is to move the outer ring out of the way and access to the bearing is provided;
- We remove old and unusable bearings using a puller, after holding the pulley in a vice;
- We clean the place where they are planted from various waste and waste with a dry cloth;
- Soak the new rollers in regular machine oil for additional lubrication;
- We select the head according to the diameter of the bearing and begin to press it evenly;
- Having pressed both, we begin assembling the unit in the reverse order, strictly adhering to the order;
- Having completed the installation, before installing it in the engine compartment, check the integrity of the belt; if there are cracks or defects, replace it;
- We install the generator in the compartment, put on the belt;
- We start the car and test it at different speeds.
AutoFlit.ru
Recommendations and tips for repairing a generator
1.Before assembling the mechanism, check the condition of the brushes. These should be replaced immediately so as not to remove or disassemble the structure again. You will also need to replace the body bolts, if their edges are “licked”, be sure to check the condition of the rotor. 2.To make disassembling the case easier, moisten the fasteners, nuts and other threaded connections with WD-40 penetrating lubricant. 3.If you can’t remove the pulley with a hexagon, try fixing the rotor with a screwdriver inserted into the holes in the housing. 4.When removing the product from the front cover, make sure that it does not fall apart, otherwise it will become more difficult to remove. 5.Use an impact screwdriver when disassembling the housing to prevent the nut and bolt heads from being deformed. 6. When repairing a generator or replacing elements in it, be careful with the stator winding and housing, as it is made of fragile aluminum alloy. 7. Carefully watch the video on how to replace a bearing in a generator.
Trade marks
Depending on the volume of your orders per month, we offer our clients the following prices:
Wholesale 1. – for orders from 70,000 to 170,000 rubles. Wholesale 2. – for orders from 170,000 to 400,000 rubles. Wholesale 3. – for orders over 400,000 rubles. Wholesale 4. – VIP price for individual contracts. Retail - Price for retail sales and small single purchases.
All prices are indicated including VAT in Russian rubles. You see prices according to your access level.
- ✅ Contents of the article:
- 1. How to check the bearings of a VAZ 2110 generator
- 2. Generator design and preparation for replacement
- 3. Dismantling the generator and removing the bearing
- 4. Install new bearings in the generator
- 5. Features of choosing new parts
- 6. Advice from experts and recommendations for replacement
Replacing a VAZ 2110 generator bearing with your own hands is an operation that should be performed by every average motorist independently , since a car service center will charge from 2,000 rubles for such a service.
A generator is a device for renewing energy in a car, converting mechanical energy into electrical energy. On VAZs, generators require increased attention during operation. Problematic elements of the mechanism: terminals, stator winding, brushes, pulley, armature, as well as bearings. The design of the VAZ 2110 (2114, 2112, 2111, 2115) generator has two bearings - rear and front, wear of which occurs in case of long-term use of the car, as well as when exposed to internal and external factors.
After reading the material, you will be convinced that this type of repair, such as replacing bearings in a VAZ generator, does not require specialized tools, as well as the experience and knowledge of a professional car mechanic. First, we will carry out competent diagnostics according to the instructions, then we will carry out the correct selection of new parts and replace them. All activities are described in detail in this article.
Self-diagnosis
- the appearance of an uncharacteristic hum and whistle after starting the engine;
- the battery has become unstable in charging, this is due to problems in the operation of the shaft;
- turning the pulley;
- overheating of devices as a result of friction of worn elements.
Worn and new bearings for the “ten”
If these symptoms appear, it is quite possible that the reason lies precisely in the bearing device.
If you have suspicions regarding the performance of this part, we recommend that you perform a simple check of the devices by performing the following steps:
- First of all, the belt must be removed from the assembly pulley.
- Then the car engine starts.
- If, after startup, the hum and whistle, as well as other symptoms of a malfunction, disappear, this indicates the need to replace the device.
For what reasons could this part fail:
- Some components of the structure have worn out as a result of long-term use. In particular, we can talk about the surfaces of the raceways, the rolling elements themselves, the separator, and the sealing component.
- The bearing device has run out of lubricant; this may be due to leakage.
- Wear of devices, as well as low accuracy of the manufactured product, can lead to rotation of the outer race on the housing or the inner race on the shaft of the rotor itself.
- Also, malfunctions in the operation of parts can be caused by abrasive elements getting inside the device. This problem leads to increased squeaking.
- Perhaps the failure of the bearing is due to the fact that it has simply exhausted its service life.
- Another possible reason is an imbalance of the pulley itself or wear of the strap (the author of the video is Anton Volokhovich).