Brushes are an integral part of the generator. They are inexpensive and can be replaced in literally 20-30 minutes. Thanks to the brushes, the battery is charged, and current from the generator is supplied to the on-board network. Failure is fraught with consequences: the car does not drive, the battery charge lamp immediately lights up, signaling that the generator is not working properly and requires inspection. Do not operate a car with a glowing light on the dashboard, because the battery will suddenly run out in the wrong place, the car will stall and you are unlikely to start the car (current stops flowing to the ignition system, and therefore the spark disappears and the fuel-air mixture stops igniting).
Note! You will need the following tools: wrenches, sockets with a wrench, new brushes and screwdrivers.
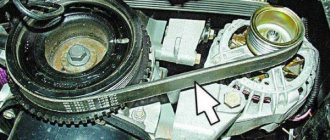
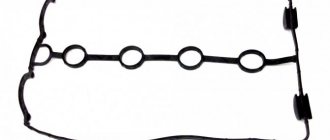
Location of brushes
They are located under the generator cover (indicated by a red arrow). Remove it and unscrew the screws securing the voltage regulator (the regulator is indicated by a blue arrow). It comes complete with brushes, the screws do not attach the brushes directly, but the regulator, the brushes are inserted into it.
Time to change brushes?
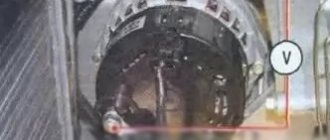
In the photo below, the arrow indicates a lamp indicating possible problems with the generator. If you see this, check the fuse going to the generator and replace it if necessary. Is everything okay with the fuse, and even after replacing this lamp does not stop lighting while the engine is running? Proceed to removing the generator and checking the brushes, diode bridge, etc.
Symptoms of failed brushes:
glowing battery charge lamp;
some devices turn off (for example, turn signals stop working, although the fuse going to them is intact);
The appliances are working worse (the lights are dim, the stove is blowing weakly).
The above points are a clear signal: the battery will soon run out, be careful.
Replacing VAZ 2112 generator brushes and regulator relay with capacitor
If the battery of your VAZ2112 car is periodically discharged, the headlights are dim, while the engine is running, the battery discharge lamp is lit or blinking on the dashboard, all this indicates a malfunction of the generator. There can be many reasons, but you shouldn’t rush to change the entire generator, or rush to a service station where you’ll pay good money for a crap repair (this happens quite often). Most often, the reason lies in a small regulator relay block with brushes and a capacitor. Replacing the brushes of a VAZ 2112 generator usually solves problems for a long time and seriously, it is not expensive, takes minimal time, and anyone can do it with their own hands (you don’t even need to remove the generator from the car for this!). Brushes serve to transmit electrical contact from the generator rotor to its outputs and then to the battery and other parts of the machine’s electrical circuit. Good contact and stable transmission of voltage from the generator, stable charging of the battery and the brightness of the headlights when the engine is running depend on their condition.
Which generator brushes should I install on a VAZ 2110?
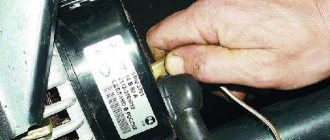
There is no original number. For replacement, use the analogue ENERGOMASH 67370202 - 461 rubles.
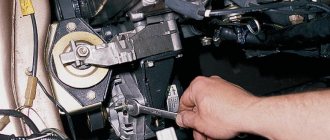
Disconnect the negative cable from the battery. Disconnect the generator excitation wire.
Brushes are the part of the alternator that requires replacement in most cases, which is why all alternator manufacturers are designed to be hassle-free during replacement. Those who are familiar with the mechanism of operation of the generator understand that voltage is supplied through the brushes to the excitation armature , which not only starts the generator into operation, but also regulates its output power. In particular, the regulation itself is determined by a special device, a relay controller, which can be implemented specifically on the brush holders or installed separately (on earlier models).
Fortunately, there are not enough brushes, and the value on them is quite applicable. If you don't complete the repairs on time, chances are you'll soon need to buy a new generator, which will cost something completely different.
To avoid getting into an unpleasant situation on the road, it is better to have a spare set of spare parts the next time you call a tow truck.
The electrical system produces defects if the VAZ 2110 generator does not work. This is the battery charging indicator. On the device panel it glows red with a battery icon. But don't blame the generator, first check the generator fuse , and change it as necessary. If the fuse is ok and after replacing it, this lamp does not stop the camera when the engine is running, then remove the generator and check the brushes, diode bridge, etc.
Symptoms of broken brushes, in addition to the battery light, also include certain devices turning off. For example, the turn signals stop working (provided that their fuse is not damaged), the panels also begin to work worse (dim light, the plate does not heat up well) and the battery is installed quickly.
How is the replacement performed?
You will need a Phillips screwdriver. On a VAZ 2112, replacement of alternator brushes is carried out in the following order:
- Disconnect the battery terminal wires
- Then we disconnect the block with the wiring from terminal “D” of the electric generator and the wiring from the bolt (terminal “B+”)
- Push back the three latches and remove the plastic protective cover.
- Using a screwdriver, unscrew the two screws securing the brush holder (arrows point to them in the photo below)
Using a screwdriver, unscrew the screws securing the brush holder
- Carefully remove the brush holder to keep the brushes intact, and disconnect the block with wiring from it
- Then remove the fastening nut from the contact bolt
- We take out the spring washer
- Remove the spacer washer, then disconnect the capacitor wire tip from the contact bolt
- Unscrew the screw securing the capacitor and remove it
Removing the capacitor from the electric generator
That's all, the removal process did not take much time, the cost of repairs, buying a new unit is a pittance, is it worth overpaying and going to a service station?
Replacing generator brushes
If the alternator brushes on VAZ 2110-2112 cars are critically worn, the battery charge may sharply decrease or disappear altogether. This indicates that it is necessary to carry out minor repairs, namely, replacing the brush assembly.
This work can be done without any particular difficulties, but you will first need to remove the generator from the car. Once this is done, you can begin to do the work itself. And for this you will need the following tool:
So, when the generator has already been removed from the car, you can carefully remove the plastic cover by first prying the latches on three sides:
Next, disconnect the plug from the contact on the brushes, as is clearly shown in the photo below:
Next, it remains to unscrew the two small bolts securing the brush holder:
And now all that remains is to loosen the nut with a 13mm wrench, which is visible in the picture below:
And now the generator brush assembly can be removed without any problems:
Pay attention to the length of the protrusion of the brushes from the body: if it is less than 5 mm on at least one side, then the entire assembly must be replaced with a new one. The price of new generator brushes for VAZ 2110, 2111 and 2112 is about 300-400 rubles.
Installation of this part is carried out in reverse order.
Source
Fault diagnosis
Now that we have the brush holder with the regulator and the capacitor in our hands, replacing the generator brushes on the VAZ 2112 is carried out together with the brush holder and the relay regulator, but we need to make sure that the cause of the malfunction lies here, so we begin to look for the fault. So:
- It is necessary to clean the contact on the brush holder with sandpaper, they are marked in the photo below; poor contact in this place can also cause poor operation of the electric generator
Clean the contact highlighted in red
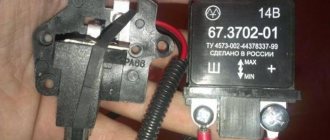
- We check the serviceability of the relay - voltage regulator, to do this we connect a 12 Volt light bulb to the brushes
- We apply a voltage of 12 Volts, “+” goes to the terminal, and “–” goes to the ground of the brush holder
- The indicator light should light up
We connect the light bulb to the brushes and apply 12 volts to the contacts of the relay-regulator
- Next, we apply a higher voltage: 15–16 Volts - the light should go out
- When the light is on or does not light up in both cases, this means that the regulator is faulty and needs to be replaced along with the brush holder
- We check the ease of movement of the brushes in the brush holder body and the height of their protrusion
- If they protrude from the body by less than 5 millimeters, replacement is needed; the brushes of the VAZ 2112 generator are changed along with the relay - voltage regulator and brush holder
Required brush height
- If you find chips and cracks on the brushes, then replace the generator brushes on the VAZ 2112
- To change the brushes alone, we pull out the holder from the relay housing - voltage regulator, to do this we press on terminal “B”
- Before installing the voltage regulator with new brushes in place, blow the installation socket on the generator from dust and wipe off oil
This completes the replacement of brushes on the generator for the VAZ 2112; we move on to the last small but important part - the capacitor (see Changing the capacitor (VAZ generator)).
Tip: When there is already wear on the slip rings of the electric generator, it is recommended to slightly grind down the contact corners on the brushes, so that the new brushes will fit more easily into the grooves of the worn slip rings
Capacitor functions and testing
If you have never dealt with capacitors, these instructions will help you:
- The capacitor is designed to protect all electronic equipment of the car from voltage pulses (jumps) appearing in the ignition system; it also reduces radio interference
- If the capacitor is damaged or its fastening on the electric generator is loosened (contact with the housing worsens), it sharply increases the interference of the radio receiver when the engine is running
- We connect the probes of our tester to the terminals of the capacitor
- It should show infinity before connecting
- Resistance decreases only at the moment of connection, and then must return to infinity again
- This means the capacitor is working properly
- Otherwise, the capacitor must be replaced
Attention: The K73-58-4 capacitor is installed on the VAZ2112 electric generator. The marking is located on the side of the case. To avoid problems, it is not recommended to install a different type of capacitor.
- We screw the capacitor back, pay attention that it is important to accurately orient the capacitor relative to the special mounting protrusion located on the cover of the electric generator, otherwise the brush holder will not fall into place
- We connect the connector back to the brush holder (the bend of the output wire faces up), screw it back, and the brushes must fall onto the slip rings
- Snap the plastic cover, insert and screw the wires back
- If there is a spring washer on the “+” bolt under the nut, it must be removed; dirt and moisture often accumulate under it, which often leads to oxidation and deterioration of contacts
- We put the terminals on the battery
That’s all for the VAZ 2112 generator, replacing the brushes is over, if some points are not entirely clear to you, we recommend watching the video.
Checking and replacing the brush holder and capacitor of the VAZ 2110 2111 2112 generator
Details Parent category: Car repair VAZ 2110 2111 2112
Functions and testing of the generator capacitor on a VAZ 2110 2111 2112 car
The capacitor serves to protect the vehicle's electronic equipment from voltage surges in the ignition system, as well as to reduce interference with radio reception. Damage to the capacitor or loosening of its fastening on the generator (deterioration of contact with the housing) is detected by an increase in interference to radio reception when the engine is running. Approximately the serviceability of the capacitor can be checked with a megohmmeter or tester (on a scale of 1-10 MOhm). If there is no break in the capacitor, then at the moment the probes of the device are connected to the terminals of the capacitor, the arrow should deviate in the direction of decreasing resistance, and then gradually return back.
The VAZ 2110 2111 2112 generator has a K73-58-4 type capacitor installed. The marking is located on the side of the capacitor body. Do not install any other type of capacitor.
Criteria for serviceability of brushes on the VAZ 2110 2111 2112 generator.
If the brushes are worn out and protrude from the brush holder by less than 5 mm, then replace the brush holder with brushes. To replace, pull the brush holder out of the voltage regulator body by pressing terminal “B”. Before installing the voltage regulator with a new brush holder in place, blow the installation socket in the generator from coal dust and wipe it from oil.
PROCEDURE FOR CHECKING AND REPLACING THE BRUSH HOLDER AND CONDENSER OF THE GENERATOR VAZ 2110 2111 2112
1. Disconnect the wire from the “–” terminal of the battery.
2. Disconnect the block with the wire from terminal “D” of the generator and the wire from the contact bolt (terminal “B+”).
3. Unscrew the three latches and remove the plastic casing.
4. Unscrew the two screws securing the brush holder.
5
Carefully remove the brush holder so as not to damage the brushes and disconnect the block with wires from it
6. Unscrew the nut securing the contact bolt.
7. Remove the spring washer.
8. Remove the spacer washer and disconnect the capacitor wire tip from the contact bolt.
9. Unscrew the mounting screw and remove the capacitor from the generator.
10. Check the serviceability of the voltage regulator. Connect a 12V test lamp to the brushes. Apply a voltage of 12 V “+” to the terminal, and “–” to the “ground” of the brush holder. In this case, the control lamp should light up.
11. Then apply a voltage of 15–16 V - the lamp should go out. If the lamp is on or off in both cases, then the regulator with brush holder is faulty and needs to be replaced.
12. Check the ease of movement of the brushes in the brush holder and their protrusion. If the brushes protrude less than 5 mm from the brush holder, replace the voltage regulator with brush holder. If chips or cracks are found on the brushes, also replace the regulator.
13. The serviceability of the capacitor can be checked with a megometer or tester (on a scale of 1–10 MOhm). Connect the tester probes to the capacitor contacts. Before connecting, the device shows infinity. At the moment of connection, the resistance decreases and then returns to infinity again. In this case, the capacitor is OK. The faulty capacitor must be replaced. Capacitor capacity 2.2 µF ±20%
14. Install the capacitor and brush holder in the reverse order of removal
Please note that the capacitor must be precisely oriented relative to the mounting protrusion on the cover, otherwise the brush holder will not fit into place
Replacing generator brushes on VAZ 2110, VAZ 2111, VAZ 2112
Brushes are an integral part of the generator. They are inexpensive and can be replaced in literally 20-30 minutes. Thanks to the brushes, the battery is charged, and current from the generator is supplied to the on-board network. Failure is fraught with consequences: the car does not drive, the battery charge lamp immediately lights up, signaling that the generator is not working properly and requires inspection. Do not operate a car with a glowing light on the dashboard, because the battery will suddenly run out in the wrong place, the car will stall and you are unlikely to start the car (current stops flowing to the ignition system, and therefore the spark disappears and the fuel-air mixture stops igniting).
Note! You will need the following tools: wrenches, sockets with a wrench, new brushes and screwdrivers.
Location of brushes
They are located under the generator cover (indicated by a red arrow). Remove it and unscrew the screws securing the voltage regulator (the regulator is indicated by a blue arrow). It comes complete with brushes, the screws do not attach the brushes directly, but the regulator, the brushes are inserted into it.
Time to change brushes?
In the photo below, the arrow indicates a lamp indicating possible problems with the generator. If you see this, check the fuse going to the generator and replace it if necessary. Is everything okay with the fuse, and even after replacing this lamp does not stop lighting while the engine is running? Proceed to removing the generator and checking the brushes, diode bridge, etc.
Symptoms of failed brushes:
glowing battery charge lamp;
some devices turn off (for example, turn signals stop working, although the fuse going to them is intact);
The appliances are working worse (the lights are dim, the stove is blowing weakly).
The above points are a clear signal: the battery will soon run out, be careful.
How to Change Brushes on a VAZ 2112 Generator
Replacing generator brushes on a VAZ 2110, VAZ 2111, VAZ 2112
Generator brushes are one of the most important parts of the generator, which costs a penny and is replaced in just 20-30 minutes. If you have repaired cars and replaced these brushes more than once, then you can do it in 10 minutes. By the way, the brushes are charged from the battery and current from the generator is supplied to the on-board network, but when they fail on the car, as they say, you will not train, because the charging lamp (we will introduce you to this lamp later) , indicating that the alternator is not supplying voltage and that it needs to be checked (in this case, the device will run on one battery), and if suddenly - if the battery does not sit in the right place, the car will go away and you will not start it again ( when the battery dies, the current stops flowing to the ignition system, causing the spark to disappear and the air-fuel mixture stops burning, and thus the car stops immediately), so the ignited car caught fire after turning on the AK simulator dashboard, not recommended at all .
To replace alternator brushes, you need to take out the tools: wrenches, store with a ring wrench if you have one, and even better with a wrench cap, in addition to purchasing new brushes (if you are sure they are worn out) if the alternator is still is not removed and is already in the brush, then there is no need to buy anything because the brushes are visually checked and incorrect, I wanted to replace them because the alternator is not current and has been replaced), and grab a pair of screwdrivers to unscrew the brushes (they are screwed to the alternator )!
Where are the generator brushes?
They are located under the generator cover, which will need to be removed (marked with a red arrow), and then unscrew the screws that secure the voltage regulator (the regulator is marked with a blue arrow), ask what the regulator means, explain the regulator assembled with brushes, and not the brushes themselves, fixed screws and regulators, and the brushes themselves are inserted inside the alternator, so don't forget about this as we will be mentioning this voltage regulator again and again in this article.
If you have turned on the same battery light, which is indicated by an arrow for clarity in the photo below, then you should consider checking the fuse that goes to the alternator and replacing it if necessary, if the fuse does not stop and after replacing while the engine is running, remove the alternator and check the brushes, diode bridge, etc. for signs of faulty brushes, let's just say firstly if something happens to them, the battery light on the car will turn on, some devices may also turn off (for example, turn signals will stop working if the fuse connected to them is not damaged), the devices may start worse (the indicator dims, the heater starts to worsen) well, the battery will soon run out, so be careful, otherwise the car will stop and will not start again.
REPLACING THE GENERATOR BRUSH. REGULATOR GENERATOR REGULATOR. VAZ, LADA.
REPLACING THE DIRECTOR REGULATOR GENERATOR
.
GENERAL SHIELDS
.
replacement of generator brushes
.
VAZ
2110.
Replacing the voltage regulator VAZ 2110-2112
Instructions for removing and installing video generator
on
VAZ
2110-2115 cars. Description also.
How to replace generator brushes on a VAZ 2110-VAZ 2112?
There are two ways to replace the brushes you choose, one of which you decide, the first way is to remove the alternator from the car and replace the brushes (this is convenient but takes more time), the second way is to simply disconnect the negative terminal from the battery (How to remove the terminal , read paragraph 1 of the article: “Replacing the battery in a car”) and do all the work on the generator installed in the car (it’s not very comfortable, but removing the brushes is not difficult, if everything is done correctly, it will save time, but if there are no short and suitable tools , then doing such work doesn’t even make sense, it’s better to do everything on a remote generator, but how to remove the generator , read the article: “Replacing the generator in a car”)!
1. To replace the brushes, first press on the three latches on the sides of the generator, this will secure it closed, and then remove this cover from the generator (see small photo), now you have access to the voltage regulator, it has two screws, that secure it (marked with blue arrows), you unscrew these screws and then you pull the regulator, disconnect it and thus completely remove it from the generator.
When you remove the handle you can use the whole brush change or if you don't have this option (it's not available where it is sold or the controller just doesn't have the money) you can find the brushes separately and just replace them, they are attached to the controller with using soldering (or rather, their wires are soldered to the terminals of the regulator), so in this case, take a soldering iron and solder the wires coming from the brushes, then remove them from the regulator and new ones in the same way, install them in the same way in the place of soldering, everything is visible in the video below, but there is no sound in it, but in principle the video is beautifully capricious!
Replacing brushes on VAZ 2110-VAZ 2112
Note! There are two replacement methods:
the first is to remove the generator from the car and replace the brushes (convenient, but takes more time, the procedure is described in detail in the publication: “Replacing the generator in a car”);
the second is to disconnect the minus terminal from the battery (read in paragraph 1 of the article: “Replacing the battery in a car”) and doing all the work on the installed generator on the car.
Perhaps the second option is not very convenient, however, if you do everything correctly, you will save a little time, and it is not difficult to remove the brushes.
Causes and symptoms of alternator brush malfunction on a VAZ 2110
The electrical system provides a fault indication in case the VAZ 2110 generator does not work - this is a battery charge lamp. On the instrument panel it lights up red with a battery icon. But don’t blame the generator; first you need to check the generator fuse and, if necessary, replace it. If everything is in order with the fuse and after replacing it, this lamp still does not stop lighting when the engine is running, then proceed to removing the generator and checking the brushes, diode bridge, etc.
Replacing the VAZ-2110 generator brushes: how to do it without removing the generator
The generator in the car design is responsible for supplying voltage to all components of the on-board network. It is a fairly reliable unit, but it requires maintenance from time to time to prevent serious breakdowns. One of the stages of service work is replacing brushes.
These stator elements, made of durable graphite, supply current to the rotating rotor of a car generator. Constant friction gradually wears out the brushes. It is not difficult to identify it - you will definitely notice the appearance of problems in the car's electrical supply system.
We install the voltage regulator of the VAZ 2110 generator
The voltage regulator on a modern car automatically and continuously adjusts the excitation current of the generator. Moreover, this process proceeds in such a way that when the current load and rotation speed of the generator changes, the value of its voltage remains in a strictly defined range.
Voltage regulator - its main functions
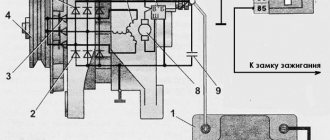
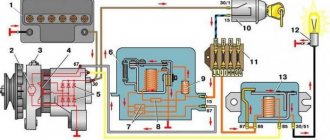
On a VAZ 2110 car, the voltage potential in the generator is formed under the influence of alternating current. This phenomenon becomes possible due to the presence of silicon diodes in the generating device of the vehicle. The generator rotor (the rotating component of the mechanism) operates according to the following diagram:
- First, the crankshaft begins to function, which is affected by the current;
- the crankshaft sets the movement of the rotor;
- After this, the generating device itself begins to work.
All stages of the sounded process are monitored by a voltage regulator, which is also often called a relay. It is this that is considered the main control unit of the generator.
Without a regulator, the current-generating mechanism of the VAZ 2110 will not perform its tasks, which are listed below:
- starting the generator;
- control (in offline mode) of current supply;
- “holding” in a certain voltage range.
The described relay cannot be repaired. In the event of a breakdown, the regulator must be replaced, which is done after checking the functionality of this unit.
When may it be necessary to replace alternator brushes?
The manufacturer requires replacing the alternator brushes on a VAZ-2110 car every 50 thousand kilometers or every 4 years (it all depends on what comes first). But you may also need this procedure if any of the following symptoms of incorrect operation of the on-board network occur:
- spontaneous decrease in headlight brightness;
- periodic shutdown of the cigarette lighter, car radio, dashboard backlight lamps;
- sudden drop in network voltage;
- turning off all electronics on board the vehicle;
- rapid discharge of the battery and problems with restoring its charge.
If you notice at least one of these symptoms, it makes sense to check whether the generator brush is worn out and whether this device is working correctly.
In addition, you can perform a simple diagnosis using one of the following methods:
- visual assessment of the condition of the brushes. They should protrude slightly from the holder body. If this is not observed, wear is evident;
- measurement of brush resistance. It should be no more than 0.05 Ohm. Otherwise, the part needs to be replaced.
If problems are identified, it is urgent to install a new part, since further safe operation of the machine is not possible.
Replacement of VAZ 2110 generator brushes
Brushes are the part of the generator that most often requires replacement, and therefore all manufacturers design generators so that no difficulties arise during the replacement process. Those who are familiar with the principle of operation of the generator know that voltage is supplied to the armature through the brushes , which not only starts the generator into operation, but also regulates its output power. The regulation itself occurs due to a special device, a relay regulator, which can be implemented directly on the brush holder, or installed separately (on earlier models).
Fortunately, brushes are not in short supply, and their price is quite reasonable. If repairs are not carried out in a timely manner, there is a possibility that you will soon need to purchase a new generator, and this is a completely different expense.
In order not to get into an unpleasant situation on the road, followed by calling a tow truck, it is better to have a spare set of spare parts.
How to replace alternator brushes on a VAZ-2110 car
Let’s immediately answer a very common question asked by domestic car enthusiasts: is it possible to replace the alternator brushes on a VAZ-2110 car without removing the alternator? Yes, theoretically, such an operation can be performed, but we would like to warn you that there is a fairly high risk of damage to the unit, as well as breakdown of expensive parts located in the immediate vicinity of it. Replacing brushes on a car with a 16-valve engine will be a particularly difficult task, since, among other things, you will need to remove the crankcase protection, and also try to get to the generator from below, being under the bottom of the car. This is why we strongly recommend following the instructions in the video.
In order to remove the generator and install new brushes, you will need to prepare all the necessary tools - keys 8 (socket), 10 and 13, as well as a flat-head screwdriver and a universal joint with a special extension. The entire procedure is performed according to the following scheme:
- disconnect the negative contact of the battery to de-energize the generator;
- unscrew the nut located on the positive contact. This is necessary to disconnect the generator from the system;
- loosen the lower and upper nuts, as well as the tensioner bolt, in order to quickly and effortlessly remove the generator belt;
- completely remove the adjusting bolt, and then remove the tension bar from the generator;
- remove the generator. All other work can be done in any convenient place, since it is now easy to provide quick access to the brushes;
- remove the battery and disconnect all wires connected to it from the generator;
- Using the cardan joint, we get to the bolt of the brush assembly and completely unscrew it from the body;
- install new brushes and reassemble the generator in the reverse order.
After this, you will need to secure the generator in a place specially designed for it and reconnect all the wires. Be sure to check the operation of the vehicle's electrical network after completing assembly and correct any errors, if any.
Replacing alternator brushes in a VAZ-2110 car is a relatively simple procedure, so you can handle it yourself even without the involvement of car service specialists. You just need to have at your disposal all the necessary tools, without which you will not be able to dismantle the unit.
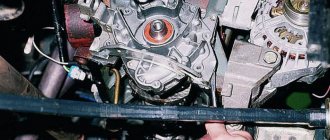
Procedure for replacing brushes on a VAZ 2110 generator
In VAZ-2107, 2110 and 2114 models, the generator is traditionally located on the right side of the engine compartment - near the headlight on the passenger side. The generator housing is attached to the engine, and you can recognize it by the pulley on which the drive belt is tensioned. If replacing the brushes does not require removing the generator, then repairing the brushes itself usually comes down to replacing them; the procedure is simple and usually takes a few minutes. To do this, just disconnect the negative terminal of the battery and the supply wire, unscrew the two screws securing the brush holder housing and remove the brush assembly from the generator housing, then evaluate their degree of wear, look at chips and cracks.
Check the dismantled unit for freezing, sticking of the brushes and their protruding, working part. In case of discrepancy, the parts must be replaced; brushes for the VAZ 2110 generator can be purchased at almost any auto parts store.
Having eliminated the malfunction, or purchased new brushes (it is better to buy small parts with a sample of old ones, so that you don’t have to change them later), they must be installed in the reverse order.
Comments • 46
Bro, thank you very much, you really helped!
Thanks buddy, very useful video, I’ll change it today too
I didn't mess anything up! Call a spade a spade! you replaced the entire assembly with the voltage regulator, not the generator brushes! Well, call the video by your name!
Friend, I watched the video, thank you, please tell me, when I start it cold, it shows 11.5, but not always, but as soon as I start, it starts to show 14.2 normally, when the headlights are on, 13.7, what is my reason?
They have such a charge and should be as much as you need or something else, this is the norm - 13 something
Tell me if the speed drops when you turn on the headlights, what is the problem? The tape recorder also turns off when I turn on the headlights and the instrument panel blinks, plus I remove the terminal, the car works
Bro, this cannot be described in a nutshell, you can start with a bad mass (minus on the body), and you can end up either repairing the generator or buying a new one, the battery may also be bad!
This is the first time I've removed the entire generator! Tomorrow I'll do it like you! Why the hell do they stick!