Advantages and disadvantages of a fuel pump
Despite its apparent simplicity, understanding the purpose of the fuel pump requires some explanation. The fact is that in most cases, this also applies to cars of the Lada Kalina family, the gas tank is located on the opposite side of the car from the engine. Therefore, efficient operation of the fuel pump is required to ensure that the fuel travels a significant distance at the required pressure.
The design of the Lada Kalina uses an electric fuel pump as a more modern and efficient device.
Among the main advantages of a fuel pump are several:
- ensuring the supply of the required amount of fuel taking into account the needs of the engine;
- high reliability and simplicity of design;
- high level of safety, since the pump stops working immediately after the engine stops.
At the same time, the electric fuel pump has a number of disadvantages that can affect its operation:
- noise during operation;
- need for cooling;
- demands on fuel quality.
It is the use of low-quality gasoline and untimely replacement of fuel filters that lead to a decrease in performance or failure of the gasoline pump.
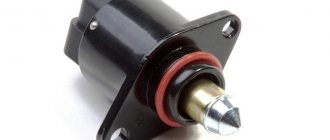
Fuel purification
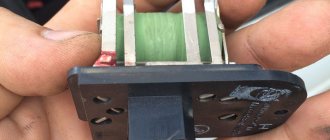
Electric fuel pump without protective cover
To prevent fuel pump failure, you must not only avoid refueling with low-quality gasoline (use only proven refueling), but also promptly replace the fuel filter.
Keep in mind that preventing contaminants from reaching fuel system parts occurs not only in the fuel filter.
Impurities can be filtered out in the following places:
- mesh at the inlet to the fuel pump;
- fine filter in the fuel line after the fuel pump;
- mesh in front of the fuel pressure regulator;
- mesh in front of the fuel injector entrance.
It is the first two positions that directly affect the proper operation of the pump. The frequency of replacing the fuel filter is determined at 30 thousand km, but owners do this more often, taking into account the low quality of the gasoline being poured.
The frequency of replacement of the Kalina coarse fuel pump mesh is not determined by the factory, and for this reason it is forgotten until a situation arises when the fuel pump begins to malfunction.
At the same time, it is recommended to clean the mesh, and if necessary, for example, if it is damaged, the fuel pump mesh is replaced. It is recommended to carry out such a replacement every 50-60 thousand km.
Cleaning the dirt-collecting mesh of the fuel pump
What to do Lada Kalina won't start
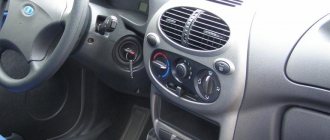
Stylish crossover Kalina
A lot of time has passed since AvtoVAZ announced the launch of a new project called Lada Kalina. Grandiose advertising and hope for a bright future did their job: millions of Russians, out of patriotic feelings, decided to choose the domestic Kalina, discarding numerous projects by Renault, Volkswagen and other factories positioning reliability and quality. But the joy was short-lived.
Already in the first months, Kalina did not show her best side, showing a capricious disposition. And it turned out that Kalina’s owners began to spend more time in the garage doing repair work than on trips. Engineers know their shortcomings and try in every possible way to get rid of them in each next generation of cars, to come up with something to increase the reliability of the car.
But for some reason the results are still little noticeable. As before, the car cannot please you with its endurance and wear resistance. The most unpleasant problem is that Kalina does not start from time to time. To return the machine to working order, it is necessary to find out the causes of the malfunction, and there are many of them. So, let's try to figure out why the Lada won't start.
Procedure for servicing the fuel pump, possible malfunctions
You should not always resort to immediate replacement of the Kalina fuel pump, because first you can repair it. But for this you need to select the right tool in advance.
For this device, two parameters are usually monitored: operating pressure and operating performance. After removing the device, you can check the current consumption at rated and full load. But for such measurements you will need a specialized stand.
The initial point of control will be the voltage of the connector that supplies the fuel pump from the vehicle’s on-board power system. Not only should it be equal to 12 V or even slightly exceed this value, but also when the machine is operating, the noise of the operating device should be clearly audible.
The disadvantage of this control method is the inability to detect unreliable contact in the electrical circuit on the way to the connector. Any loose connection in the fuse box, fuel pump relay, will result in the 12 V received at the terminals upstream of the pump showing the same 12 V. But a working pump will receive only a few volts and will not be able to work normally.
Also, a malfunction in such a situation may be a breakdown of the fuel pump relay. This malfunction is easy to diagnose, since special symbols are displayed on the instrument panel, which allows the driver to see an error in the operation of this part.
All control relays are located inside the car and, when malfunctioning, distinguish themselves with characteristic clicks. Replacing the fuel pump relay yourself is not difficult; it is enough to recognize the location of its installation by the special printed symbols.
Fuel pump parts disassembled
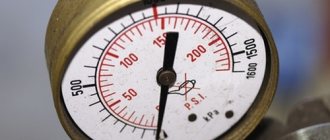
Checking the pressure created consists of monitoring this parameter in the pump pumping mode, when it turns on after turning the key for 1.5-2 seconds to add fuel to the pipeline system. For Lada Kalina this figure is 0.8-1.2 kgf/cm2. If the pressure turns out to be underestimated, then you should look for the cause of this phenomenon, checking each link in turn: filter, mesh, fuel pump. Ultimately, the part that prevents the pressure from quickly building up to normal will be replaced.
One of the malfunctions of the fuel pump is the rapid loss of pressure in the fuel line after stopping the engine. Moreover, this malfunction should also be diagnosed correctly, because there may be several reasons for the pressure drop. This is a weak nozzle of the power system, and a check valve of the pump, and the pressure regulator itself.
Rapidly falling pressure will cause uncertain or long engine starting, which is especially important at sub-zero temperatures. Despite a generally serviceable power supply and ignition system, starting the engine in cold weather can simply drain your battery or prevent the engine from starting at all .
So, if it is nevertheless determined that the fuel pump is not working or the fuel filter needs to be replaced (the work operations are largely the same), then the necessary work must be carried out in the following order:
- Relieve pressure in the fuel line. To do this, simply let the car sit for 30 minutes after the last start. To be more sure, after turning off the power to the fuel pump, you need to briefly start the engine to exhaust the gasoline in the fuel line.
- Be sure to turn off the power to the car by disconnecting the negative terminal on the battery.
- Provide access to the gas tank hatch. To do this, recline the rear seats and, having unscrewed 4 self-tapping screws with a Phillips screwdriver, carefully open the hatch, preventing possible contaminants from entering the tank.
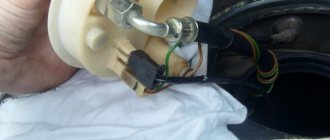
- Disconnect the electrical connector from the plastic fuel module cover and
The process of removing an electric fuel pump with your own hands
fuel pipes from the cover. Work should be carried out without applying unnecessary force to avoid breaking the plastic parts of the cover. Remove the retaining ring, which will require a special puller. If you use a handy tool, you need to be patient.
- You can begin dismantling the pump block by carefully lifting the structure up. Care must be taken as the float can easily be damaged. When removing, you need to tilt the entire block slightly, pulling it diagonally.
- If the fuel pump does not work and needs to be replaced, installing the new mechanism should be done in the reverse order. Before installing a new pump, it is advisable to fill it with fuel, since a dry fluid supercharger may not be able to pump fuel to start the pump. The fuel pump is not a suction device, but only a pressure device.
Return to contents
How to check the fuel pump yourself
| The car won't start, but when you turn the ignition key you can't hear the fuel pump running? Don’t rush to replace it with a new one; it’s better to first find out how to check the operation of the gas pump yourself. |
Procedure: 1. Checking the fuel pump fuse. This is where you should start checking the fuel pump. On a VAZ 2110 it is located near the left foot of the front passenger.
2. How to check the fuel pump relay. The relay is located next to the fuse, so let's check that right away. We check the voltage at the control terminals one by one (87, 86 and 85 in turn), and touch the ground with the other end. The testing tool can be a multimeter or a test lamp with a current consumption of no more than 0.25A. If the lamp does not light and the fuse is good, then we check the wiring and serviceability of the ECU.
Sometimes they check differently, for example, instead of a relay, they connect a test lamp between pins 85 and 86. When the ignition is turned on, the lamp should light up. You can also place a jumper between pins 87 and 30. Does the fuel pump start when you turn the key? This means the relay is faulty. You can also check the fuel pump relay by replacing it with a known good relay.3. How to check if the fuel pump is working. Without removing it, we check the voltage on its chip using a test lamp or multimeter.
Checking the switching circuit when the starter is faulty.
If the starter has worked and the crankshaft rotates at normal speed, then you should find a fault in the retractor relay switching circuit. To do this, put the wire removed from the relay back into place, swap relay K3 with the adjacent one in the mounting block and check the operation of the starter by turning the ignition key.
If the starter does not work, remove the starter activation relay K3 from the mounting block and briefly bridge terminals 30 and 87 in the vacated socket. In this case, the starter should start working. If this does not happen, then check with a test lamp for the presence of a plus at pin 30 of the socket. Connect one end of the control lamp to the car body, and touch pin 30 with the other, the control lamp should light up. If this does not happen, then most likely the current-carrying path in the mounting block is damaged.
Fuel pump repair on Kalina
Welcome! Fuel pump - in general, the fuel pump cannot be repaired and is immediately replaced, but in this article we will talk to you not about the fuel pump itself (This is its second name), but about repairing the fuel module, which includes the fuel pump itself, as well as the Fuel Level Sensor and fuel pressure regulator (There are still some parts on the module, but we won’t describe them all; as you read the article, you will come across them anyway, so it just doesn’t make sense to talk about them again).
Note! To repair the fuel module, you need tools, namely: Pliers and a set of screwdrivers, you don’t need anything else, but this is provided that the fuel module itself has already been removed from the car, if you only have to remove it, then these tools are added to a hammer and a drift, which you also need to stock up on (If not, then you can do without it; a screwdriver, by the way, can even replace it)!
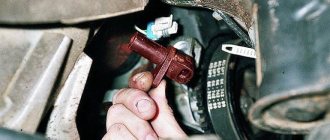
Where is the fuel pump located? The fuel module itself is located inside the gas tank; if you remove it and remove the glass from the module at the same time (You will learn in more detail how to do this operation as you read the article, there will be pictures) then you will have access to all the parts of the fuel module (To all the parts include the pump itself, as well as the mesh, fuel pressure regulator, etc.), for clarity, just below we have placed a photo in which the glass has already been removed from the module, and the red arrow indicates the fuel pump itself, which is located inside the housing.
When does a fuel pump need to be repaired? As soon as the car stops driving and the pump begins to make a lot of noise (you will immediately recognize this noise when the engine is running), and the car may still twitch, then this indicates that the pump has become unusable and needs to be replaced (But the fuel filter may also be clogged or the mesh of the fuel module may also be clogged, in this case the car will work identically as if the fuel pump fails), as for the Fuel Level Sensor which is present on the fuel module, and so if it fails, the fuel indicator which is located on the instrument panel will begin to incorrectly show the remaining gasoline in the tank (For example, the indicator needle may fall and show nothing at all), in addition to this, there is also a fuel pressure regulator on the module, so if it fails, the car may also start to drive poorly and start up just as poorly , the next part that is present on the fuel module is a mesh for cleaning the fuel entering the car engine (This mesh is scientifically called a coarse fuel filter), it becomes clogged over time and must be replaced (a new mesh costs a penny) or if you don’t have There are no stores where it is sold or you just feel sorry for the money, then you can still wash it, you won’t wash away all the dirt, but it will be much better, so when it fails, the pump itself has to work for wear and tear (with all its power) and therefore will soon fail behind this mesh, the fuel pump itself will become unusable, the symptoms of a clogged mesh are exactly the same as when the pump malfunctions, that is, it starts to make noise (Because you have to work harder), the car starts to drive poorly, as if it’s stalling (But it’s not tripping, it’s completely different, just twitching you might say), etc.
How to repair a fuel pump on a VAZ 1117-VAZ 1119?
Disassembly: 1) Before starting the repair, you will need to remove it from the car, all this is done in about 10-15 minutes, if you previously removed it, you can do it in 5 minutes, for more details on how to remove the fuel pump from the car, read the article entitled: “Replacing the fuel pump on a car.”
2) Now proceeds to the disassembly itself, first you will need to disconnect the drain pipe from the fuel module with a screwdriver (see photo 1), to do this, pry it up with a screwdriver and it will thereby be disconnected, then grab the body of the fuel module with your hand and move it until it stops up (you don’t need to use too much force), by the way, before moving it up all the way, remove the retaining ring from one of the guides with a screwdriver (the ring is indicated by an arrow in photo 2), as soon as it is removed and the body is directed all the way to the top , disconnect the wire terminal from the pressure regulator (see photo 3) and then, using a screwdriver, also press the latch that secures the wire block (see photo 4) and thereby disconnect the wire block from the intermediate connector.
3) We go a little further and now you will need to disconnect the second block of wires (see photo 1), this block is connected to the fuel pump itself and before pulling it, you will need to press the latch that secures it, followed by two side fastening clamps Unclench the Fuel Level Sensor (see photo 2) and move the sensor to the top, remove it, after which the fuel pressure regulator must be removed, it is secured using a spring clamp which can be removed from the grooves with a screwdriver (see photo 3) and after that the sensor itself can be removed possible (see photo 4).
Repair parts
It is worth carrying out independent equipment repairs if you are completely sure that the malfunction lies precisely in it. A large number of plastic elements make the pump very fragile. For this reason, care must be taken when disassembling.
- Using a screwdriver, you need to pry up and remove the drain module of the part.
- The ground wire will be disconnected from the equipment.
- The intermediate wire connector is disconnected (from the inside).
- The pressure regulator is removed.
- The gasoline element module is removed by pressing the plastic retainer.
- The filter mesh is removed from the housing. If it is dirty, it can be cleaned. But it is more advisable to install a new mesh.
Replacing the fuel pump on Kalina
Welcome! Fuel pump - is responsible for supplying fuel from the tank to the car engine; if it fails, fuel stops being supplied to the engine and therefore the car will not start, or over time it may simply start to work worse and in this case the car will twitch when driving and it will lose dynamics (the fuel pump in such a situation will still pump fuel into the engine, but it will do it very much), besides this, the fuel pump no longer serves anything, although if you think about it, it goes first together with the Fuel Level Sensor , secondly, there is still a mesh on it that cleans gasoline from dirt, so we can say, thanks to the gas pump, we also find out how much fuel is left in the tank and even before this fuel goes into the engine, it is cleared of small particles of dirt, by the way, we will give advice, If you don’t want to change the fuel pump very often, then try never to bring the gasoline in the tank to the very minimum and especially do not drive the car until it runs out of gas (Only do this in rare cases or because of the situation), otherwise such trains will not lead to anything good and soon the fuel pump (this is its second name) will become unusable.
Note! To replace this pump on a car, you will need a set of tools in which: Screwdrivers will be lying around, a hammer and a drift, but in principle, the help of screwdrivers will be enough (But this is only if you don’t have a hammer with a drift, if you do, be sure to take them)!
- Replacing the fuel pump
- Additional video clip
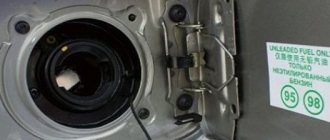
Where is the fuel pump located? It is installed inside the tank and through fuel pipes it pumps fuel from the tank to the car's engine, but not all people know where the tank is located on front-wheel drive cars, let's explain briefly, on classics many people even saw it when the trunk was opened (It's just that on classics it's in installed in the most visible place and if the trunk is not covered with a trim, as for example on a VAZ 2101 car this is done, there is no trim unlike the same 2107, for example, then the gas tank can be easily seen), but with regards to front-wheel drive, the gas tank is located under the bottom , and the fuel pump is inserted into it from above, so in order to get to the pump it will be enough to remove the rear seat cushion and then, by folding back the standard carpet and unscrewing the fuel pump flap (Indicated by a red arrow), you will immediately see the pump itself, for clarity it is indicated by a blue arrow in the photo below:
When should you change the fuel pump? As soon as the car begins to drive poorly (twitches, does not accelerate at all at high speeds, etc.), then you need to think about the pump, besides, by the way, it will also make a lot of noise (you will understand this right away), so if you lose power and If there is an extraneous sound, then you should think about replacing the fuel pump with a new one, but before you change any part, you can check it for functionality, to learn more about how to understand that the fuel pump has failed, read the article: “Checking the pressure in the power system on a VAZ” and be sure to also watch the video in this article that says everything.
How to replace the fuel pump on a VAZ 1117-VAZ 1119?
Note! The fuel pump can be changed either separately from all other parts, or it can be completely replaced with a module; replacing the entire module with the entire module will be more expensive because the new module will have a Fuel Level Sensor, a pressure regulator and many other parts (Just why would you change them if they you are already in normal condition, most likely, if your sensor has become unusable and the regulator is still acting up, then change everything together), and separately, if you replace the fuel pump, then this is only one new part, and all the others will remain in place, if If you decide to replace the fuel pump separately, then in this case, after removing the pump itself, read the article entitled: “Repairing the fuel pump” in which everything is described!
Removal: 1) At the very beginning of the operation, fold back the rear seat cushion so that it does not interfere, this is done very simply, by hand pull out the hinges from under the inside of the seat (see photo 1) and then by pulling these loops, the rear seat cushion reclines like this shown in the figure under number 2, this gives you access to the fuel pump hatch and to the pump itself. As soon as access opens, fold the standard carpet to the side (it will be cut there specifically for the fuel pump, see photo 3 for more details) and remove the four screws which secure the hatch that closes the pump itself (see photo 4) and then remove it.
Main signs of fuel pump malfunction and diagnostics
Gasoline pump Lada Kalina
Before proceeding with repairs, it is necessary to determine whether the fuel pump is faulty. There are direct and indirect factors that indicate this. So, let's look at the main signs of a malfunctioning gasoline pump on Kalina:
- Poor engine start when cold.
- The car moves jerkily.
- The motor does not start.
- Insufficient pressure in pipelines.
All these reasons may mean that the fuel pump needs repair or replacement.
Removing the fuel pump
Before you begin removing the Kalina fuel pump, you need to assemble the tools. To carry out this operation you will need: pliers and a screwdriver. So, let's get straight to the process:
- Disconnect the “minus terminal” from the battery.
- Relieve the pressure in the system.
- We dismantle the rear seat sofa.
- Under the carpet we find a hatch from which you need to unscrew the 4 fastening bolts.
Under the rear seat and carpet there is a panel that covers the Kalina's fuel pump.
The place where the fastening ring should be so that the fuel pump can be pulled out
Now the fuel pump has been dismantled and you can begin troubleshooting and repairs.
Repair operations
Before you begin repairing the fuel pump on Kalina, it is worth noting that you need to be 100% sure that this is where the problem lies. If you are not sure, then it is worth checking all other systems, since it is not recommended to disassemble it unless absolutely necessary.
It is also worth noting that repairing this unit should be done slowly and carefully, since the part is fragile and careless movement can only cause harm. So, let's consider the sequence of disassembly and repair processes:
Causes of gasoline pump malfunction
If Kalina’s fuel pump does not pump, then the reasons will be in the equipment itself or in other parts of the system. First, you should make sure that there is fuel in the tank, a spark in the spark plugs, the battery is charged, and the starter is working. If everything is in order, then you need to continue checking. If the cause of the malfunction is identified, for questions regarding the purchase of auto parts to eliminate it, you can contact the specialized online store automechanika38.rf.
Electromechanical equipment may not function correctly or stop working due to a malfunction in either the mechanical or electrical components of the system.
- The fuel pump fuse has blown - you should remove the element from the fuse box (located in the engine compartment). If the contact has visible damage, the part needs to be replaced.
- The equipment relay is faulty - check the electrical wiring, contacts between the unit and the diagnostic block, as well as the relay. Using a test lamp or multimeter, check the presence of voltage at the pump chip. A correctly operating relay makes clicks when the ignition is turned on, after the required pressure has been reached in the fuel line.
- There is no contact of the equipment with “ground” - it is necessary to apply ground to the part chip. The wire is located under the instrument panel and runs through the interior of the car. It is worth checking it, cleaning the contacts, and fixing them securely on the pump.
- The electronic control unit is faulty - the ECU needs to be repaired or replaced.
- A breakdown in the car alarm, poor installation of the security system - electrical wires may be mixed up, errors may have been made when connecting the alarm.
- Insufficient pressure in the fuel line may be the result of contamination of the gasoline filter or the filter mesh of the pump itself.
Many car owners prefer to drive with a half-empty fuel tank. However, the fuel pump in this case often overheats, which will ultimately lead to equipment malfunction. The reasons why the fuel pump on Kalina does not turn on may be the breakdown of individual parts of the unit. To determine the problem, it is necessary to remove the equipment and diagnose it.