Idle speed is an engine operating mode in which the gearbox is isolated from it. In this case, the throttle valve is in the closed position. This mode is designed to warm up the engine to the operating temperature of all ICE (internal combustion engine) systems. When the gas pedal is released, engine speed is maintained by the idle air control (IAC). It is this device on the Lada Kalina that ensures the supply of a minimum amount of air-fuel mixture to the cylinders.
Where is the IAC located and how does it work?
The Kalina idle speed sensor performs four main functions:
- Maintaining a certain number of engine revolutions.
- Providing conditions for starting the engine in winter at sub-zero temperatures. This means that the IAC can increase the speed so that the engine warms up faster. As operating temperature is reached, the speed gradually decreases.
- Maintaining minimum engine speed when the gas pedal is released. Many motorists underestimate this function until problems with starting and unstable engine operation begin.
- Creation of a fuel-air mixture with the required percentage of fuel and air. This ensures optimal fuel consumption and stable operation of the power plant.
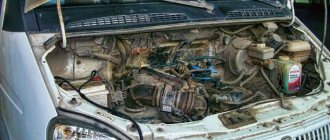
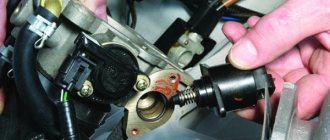
Since the IAC is responsible for supplying air to the cylinders, it is located on the throttle assembly. The regulator on almost all naturally aspirated gasoline engines is located next to the throttle position sensor, and Kalina is no exception.
Where is the idle speed sensor on the Lada Kalina and its replacement
Car: Lada Kalina. Asks: Ivan Vinokurov. The essence of the question: I want to replace the idle speed sensor, but I don’t know where it is located?
Good afternoon, I recently had this problem. When I stop at a traffic light, the idle speed starts to fluctuate, up and down! Friends say that the reason may be in the idle speed sensor, but I don’t know where it is located. Please tell me how to find it and how to solve my problem?
The idle speed sensor or, in other words, the idle speed controller (IAC) is designed for stable engine operation when the gas pedal is released. It is this device that provides a minimum supply of air and fuel when the car is stationary and idling.
The following two tabs change content below.
Expert on Renault cars I own a Renault Megane 2, before that there were Citroens and Peugeots. I work in the service area of a dealership, so I know the car inside and out. You can always contact me for advice.
Operating principle of IAC
When the engine is running without increasing speed, that is, at idle, a minimum volume of air enters the combustion chambers of the cylinders. This occurs regardless of the throttle valve being in the closed position. The volume of intake air consumed is monitored and measured by the MAF (mass air flow sensor), which sends data to the ECU.
Based on the information received, the control unit supplies the required amount of fuel to the cylinders through the injectors. At the same time, the controller monitors the crankshaft speed using its position sensor (DPKV). According to the data obtained, the IAC needle opens or closes, controlling the air supply past the throttle valve, which at this stage is not involved in the operation of the engine.
If the engine has not yet reached the set temperature, the controller uses the IAC to increase the air supply, increasing the crankshaft speed to warm up the power unit faster. Thanks to this mode, the car can start moving almost immediately, without the need to reach operating temperatures.
Technically, the IAC is not a sensor, it is an actuator, so the controller cannot diagnose its malfunction. This means that the “Check Engine” icon will not light up on the instrument panel if the regulator breaks down. In their symptoms, IAC malfunctions are similar to TPS (throttle position sensor) malfunctions. But in the case of the latter, the icon will definitely light up, indicating engine problems.
Troubleshooting
The difficulty in diagnosing the idle speed sensor lies in the fact that its problems will not be shown by the on-board computer, and its functionality can only be checked manually. The same cannot be said about the throttle position sensor, because they have the same symptoms of malfunctions, and the most ordinary on-board computer can identify the latter.
Checking the sensor circuit
- Before you start checking the sensor, make sure that the multimeter is working and ready for use.
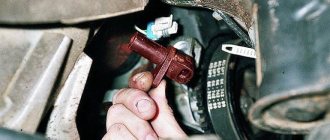
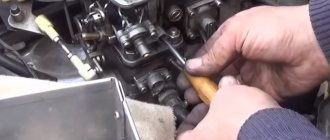
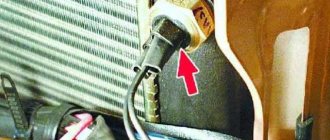
The idle speed sensor and its “wires” are below the throttle sensor. The throttle sensor is marked with an arrow. The block has been removed from the idle speed sensor.
- Next, open the hood and disconnect the power supply from the sensor.
Please note that on cars equipped with a 1.6-liter engine, it is necessary to remove the throttle assembly mount and move it away from the receiver itself by about a couple of centimeters.
Take a multimeter
- Then, on the multimeter, set the “voltmeter” test mode.
- We connect the black probe to ground, and fix the red one on the terminals of block A - D.
This is what the pin layout looks like on the IAC power supply block. - With the help of an assistant, turn on the ignition and look at the parameters given by the multimeter. The readings must be at least 12 volts . If the voltage is lower, then there are problems in the battery, and when there are no values at all, then the problem should be looked for in the wires or the motor control unit.
If after checking it is determined that the circuit is working properly, then you can proceed directly to the sensor.
Checking the idle speed sensor
When testing the sensor itself, you must connect the sensor to resistance test mode as follows:
- Regardless of polarity, connect the probes to the terminals first A And B, and then C And D. If the sensor is working, then the values should be about 53 Ohms.
The values are normal.
- Next, we connect them in the same way, only to outputs A and C , B and D , here the values should show “infinity”.
If the test readings were abnormal, you can try to clean it with carburetor cleaner, or purchase a new one.
Signs of IAC malfunction
Among the signs that directly or indirectly indicate incorrect operation of the idle speed sensor are the following:
- the engine does not start well - it becomes impossible to start the engine without pressing the gas pedal;
- when switching to neutral gear, “dips” in speed and their instability are observed;
- when changing gears, the speed drops or the engine stalls completely;
- the engine does not warm up well at low temperatures, since increased speeds (1500 rpm) are not reached;
- after turning on energy consumers (high beams, heater, air conditioner), the speed begins to “sag” or “float”;
- The engine spontaneously increases and decreases speed.
The IAC cannot be repaired; the device must be replaced. Before changing the idle air regulator, it is advisable to flush the throttle assembly.
How to check the regulator
There are a lot of ways to diagnose ICC. The most effective and simple methods for checking the Kalina idle speed control:
- Routine IAC testing for performance. To do this, the device must be removed from the throttle assembly and the terminal block connected if it was disconnected for dismantling. After this you need to start the engine. At the moment of startup, the needle of a working device should extend. If this is not observed, the regulator is broken.
- Checking the supply of the required voltage to the sensor. You need to disconnect the terminal block from the IAC and connect a voltmeter to the terminals. After this, one person turns on the ignition, and the second measures the resistance at all terminals of the block. If there are no faults, the voltmeter reading should be approximately 50 ohms. The voltage should be at 12 V. If it is significantly less, this indicates a battery malfunction or an electrical circuit break in one of the sections.
- Measuring the resistance of the internal and external windings of the regulator. To do this you need to use a multimeter. The measurement results should not be lower than 40 Ohms and higher than 80 Ohms. If you deviate from the specified range, the idle air control must be changed.
Knowing the signs of problems, you can promptly diagnose IAC malfunctions and take measures to eliminate them. Although the regulator cannot be repaired, it is worth trying to clean it. In some cases this is enough.
Checking the sensor yourself
The sensor is located in the throttle body, and removing it to check is enough to remove two screws.
To remove the throttle, disconnect the block and unscrew the two screws.
Before proceeding with disassembly, clean the dust and dirt from the assembly area and remove the negative battery terminal. But first you need to check this.
Sensor connection diagram.
We look at the sensor connection diagram and check it with a conventional multimeter in the following sequence:
- Check the sensor power supply. To do this, measure the voltage at the two extreme contacts of terminal block A and D. Turn on the ignition, apply the black probe of the multimeter to the engine ground, and the positive probe to the contacts in turn. The voltage should be within 12 V. If it is lower or not at all, we look for an open circuit or blame the electronic unit. But first, let’s check the voltage on the wires from ECUs 4 and 54. Here, naturally, there should also be 12 V. The voltage is normal.
- Set the multimeter to ohmmeter mode and measure the resistance between terminals AB and CD on the sensor itself. As can be seen in the diagram, we check the resistance of the stepper motor regulator winding. The nominal resistance between these pins is 40 to 80 ohms, with the default being 53 ohms.
- Check the electric motor for a short circuit in the winding. Measure the resistance at terminals AD and BC. The resistance should tend to infinity, that is, there should be no contact between the two windings. If resistance is present, regardless of its value, we conclude that the windings are shorted. It cannot be cured, replace the sensor with a new one.
The voltage is normal.
It cannot be said that this testing method 100% guarantees the functionality of the sensor; we only tested its electrical part. The mobility of the cone valve and the magnitude of its stroke are of great importance. And this can only be checked on a special stand or a special tester.
Operating principle of the throttle valve
This device reduces or, conversely, increases the air supply to the engine cylinders, enriching or leaning the mixture with fuel.
When the driver presses the gas pedal, the throttle valve opens, allowing more air into the combustion chambers. Oxygen is mixed with fuel, after which the prepared mixture burns. The more the driver presses the gas pedal, the wider the throttle opens and the more air flows in. But often carbon deposits accumulate on the walls of the damper, and its loose closure causes disturbances in the operation of the power plant.
The throttle assembly is located behind the engine air filter. This arrangement is typical not only for the Lada Kalina, but also for many other cars. Depending on the engine type, the damper operation can be controlled by an electronic gas pedal or a cable drive.
Removing the throttle
Before cleaning this device, it must be removed. You can wash it without removing it, but this method is less reliable and effective. The dismantling process is as follows:
- Disconnect the air pipe that goes from the air filter directly to the throttle body.
- Remove the throttle cable drive.
- Disconnect the throttle body heating hoses that supply coolant - it is best to carry out the work on a cool engine. To avoid draining antifreeze, these hoses can be plugged.
- Disconnect the terminal blocks from the throttle position sensor and IAC.
- Unscrew the 4 fastening nuts and remove the throttle assembly assembly.
This completes the dismantling. The work is not difficult, even a beginner can do it.
Cleaning the damper
Using cleaning products, you can wash the damper at home. Additionally, you will need several pieces of clean rags. Algorithm for the cleansing process:
- After dismantling the throttle assembly, you need to remove the idle speed control and TPS, as well as all accessible rubber seals, since the cleaning agent is quite aggressive and can corrode them.
- Typically, cleaning fluid comes in an aerosol can. The jet must be directed to the damper, all air channels and internal walls. External cleaning is not necessary.
- After treatment, you need to wait 10-15 minutes for the product to eat away carbon deposits and dirt.
- Next, wipe the surfaces with a rag; if the surface is heavily soiled, the treatment can be repeated.
Never use metal brushes or other abrasive materials to clean the throttle body. The internal surface of the unit is coated with molybdenum, damage to which can lead to metal oxidation and corrosion.
Replacing the idle air control
To do the job you only need a shaped screwdriver. If dismantling involves removing the entire throttle assembly, you need to prepare a set of standard socket wrenches or sockets.
- First, wait until the engine has cooled down, after which you can disconnect the terminals from the battery.
- The clamps must be removed from all hoses.
- From the idle speed control and throttle position sensor, disconnect the wire chips and remove the throttle cable.
- The throttle heating hoses must be removed and plugged.
- Use a 13mm wrench to unscrew the fastening nuts, then the throttle assembly can be removed.
- Next, all that remains is to unscrew the two screws holding the idle speed control and remove it. A new IAC is installed in its place and secured with two screws.
You should not touch, much less move, the sensor rod - such manipulations can lead to failure of the device. If, after starting, increased engine speeds are observed (more than 1500 rpm), then there is nothing to worry about. If such a situation occurs, you need to turn off the engine and start it again - the position of the IAC valve will be calibrated and the speed will return to normal.
The throttle assembly is installed in the reverse order of removal. If cleaning of the damper is not required, the sensor can be replaced without dismantling the unit. When tightening all nuts, be careful not to loosen the fasteners. Otherwise, the sensor will vibrate when the engine is running and will quickly become unusable.
During operation of the car, you need to periodically check all its systems and mechanisms, diagnosing possible malfunctions in the early stages. IAC Lada Kalina should also be tested occasionally. The needle and, in general, the entire throttle assembly should not be allowed to become heavily contaminated.
At the slightest disturbance in the stability of the engine, it is necessary to carry out a thorough check and eliminate all possible malfunctions. Only in this case will the car work reliably and for a long time.
The idle speed sensor in the injection system of the Lada Kalina model is a special electronic device. Such a component can be found in any other car that runs on gasoline and has distributed injection. The design of the sensor is represented by an electric motor, paired with a conical needle by the manufacturer. Note that the device is controlled by an ECU.
The idle speed sensor rarely experiences malfunctions, but if such a fact occurs, it causes a malfunction in the idle speed of the engine. They begin to “float”, and the engine, in turn, ceases to function normally. As a result, achieving a timely return to operating temperature after a cold start becomes problematic.
How to replace the idle speed control on a VAZ 1117-VAZ 1119?
Removal: 1) First, check the regulator, maybe it works and you are going to change it for a new one, this is done as we already said using a multi-meter, namely, turn off the ignition of the car (But there should be wires on the battery) and then from regulator, the block of wires is disconnected, it has a latch, you will need to press on it to remove this block and when the block is disconnected, get into the car and turn the key to turn on the ignition (This is when all the devices light up), then on the tester turn on the voltmeter function and connect the red probe coming from it to terminal “A”, and throw the black one to ground (the ground can be the engine or the throttle assembly), carry out exactly the same operation with terminals “B”, “C” and “D” ( There are only four terminals, in other words, do this with all the terminals) and if the voltmeter gives a reading of 0.4-12 V, then everything is fine with the regulator, but there is another test for resistance, do that too, this is what it means, the tester is switched to the ohmmeter function and the two wires coming from the tester are connected to two contacts “A” and “B” at once (that is, for example, connect the red wire to terminal “A”, and the black wire to “B”), exactly the same operation with terminals “C” and “D” produce a result that the tester should give about 0.040-0.080 kOhm, if it gives other readings, then change the regulator.
2) Let’s move on to removing the regulator, in fact there is nothing difficult in removing it, it’s just not located in a very convenient place and in order to get there, it is best to remove the throttle assembly from the car, otherwise you are unlikely to get to the regulator mounting screws, this one is removed the unit is very easy, you unscrew several nuts securing it and after that the unit is removed from the receiver studs, read more in the article: “Replacing the throttle unit on a car”, but you don’t need to disconnect any hoses from the fittings of the unit, just unscrew the nuts and remove it and put it (You can also hold it in your hand).
Note! In fact, the unit does not have to be completely removed, but it will simply be more convenient, but still, if you do not want to remove it, you can slightly unscrew the nuts that secure it and move the throttle unit along the studs from its installation location so that it is slightly came out and didn’t stand close to the receiver!
3) Now take a screwdriver and use it to unscrew the two screws on the sides that secure the idle speed control to the throttle assembly (One of the screws is indicated by an arrow), then pull the control and remove it from its seat.
Installation: The new regulator is installed in its place in the reverse order of removal, before installation or even before purchasing, it is advisable to use a ruler or something else to measure the distance between the end of the valve needle and the mounting flange (This distance is indicated by the letter “L” in the small photo), it should not exceed o, otherwise the regulator will be damaged during installation (Because its needle will rest against the seat if the distance is too large), in addition, clean the seat where the regulator was installed and, if possible, the air channel inside the throttle body from dirt. clean the assembly (we explained to you at the beginning of the article that the throttle valve needs to be cleaned periodically) and by the way, the new regulator has an O-ring (Indicated by the arrow), you lubricate it with engine oil and after that install the regulator in its place and tighten the screws that hold it fasten with a torque of 3-4 N•m.
.
We determine the malfunction ourselves
The regulator is designed to maintain idle speed in a given range and ensure correct and timely warming up of the engine.
Although malfunctions in the functioning of the engine in this mode rarely occur on the Lada Kalina, practice has made it possible to establish a certain set of signs indicating a malfunction of the regulator.
- difficulties starting the unit;
- when the gearbox is in the neutral position, “floating” engine speeds are observed;
- when switching transmission stages on the move, the engine stops without authorization;
- Once the unit begins to warm up at low outside temperatures, the speed is not able to overcome the 1500 per minute mark, which “delays” the time it takes to reach operating temperature.
Observant owners of Lada Kalina testify to a decrease in speed after turning on the air conditioning compressor. This often leads to the engine stopping, and the lubricant pressure symbol in the unit lights up on the instrument panel.
The most common breakdown is instability of speed. For mileages exceeding the 50,000 mile mark, and if such symptoms appear, we first recommend cleaning the cavity of the throttle assembly. Only after this can the regulator be replaced. This device cannot be repaired, so this action becomes a non-alternative measure.
Replacing the sensor is not characterized by any difficulties and allows you to do it as quickly as possible, the main thing is to know where it is.
Replacing the idle speed sensor
The sensor replacement begins, we dismantle the device.
- We remove the engine screen from the LADA Kalina and disconnect the cable connectors from the corresponding blocks on the throttle unit and the idle speed controller.
- To disconnect the heating pipes, you will need to partially drain the antifreeze. We carry out the indicated manipulations.
- To dismantle the device itself, we need a regular screwdriver with a cross-shaped profile.
- We remove the pipe leading from the crankcase ventilation system. We do this by loosening the clamps and moving them. We are temporarily putting this hose aside.
- We repeat such manipulations with the refrigerant supply pipes (if they have not been previously removed) and the purging of the absorber circuit.
- Using the key set to “13” (the head is more convenient), we remove the throttle block. It is attached to the inlet receiver with nuts.
- Let's look at the gasket. If damage is found, we must replace it, otherwise the intake system will receive unwanted air leaks.
- Installation of the regulator in the LADA Kalina car is also simple and is carried out with an eye to the reverse sequence of manipulations during disassembly.
- It is important to pre-measure the needle here. The optimal position will confirm the exit from the regulator body to a length of at least 23 mm. For measuring action we use a caliper. If the required value is not achieved, then you will need to “recess” the valve itself into the regulator body. Here we connect the positive contact of the device to the corresponding terminal of the battery (you will need a temporary cable).
We apply the bare edge of the element to the negative contact. The needle moves slowly, and therefore quite a lot of such touches will be required.
Replacing the sensor on a VAZ
Dismantling and installing a new device is not so difficult, the main thing is to determine exactly where it is located.
To remove, you will need to do the following:
- remove the engine screen and disconnect the cable connectors on the throttle unit and regulator;
- drain the antifreeze and turn off the heating pipes;
- Using a Phillips screwdriver, unscrew the fasteners and remove the device;
- disconnect the pipe from the crankcase ventilation system by loosening the clamps and moving them to the side;
- carry out a similar operation with the pipes through which the refrigerant is supplied and with the absorber purges;
- Unscrew the fasteners and remove the throttle block.
It is necessary to carefully examine the gasket; if it is damaged, it needs to be replaced so that unwanted air does not enter the intake system.
The dismantled sensor should be inspected. If the rod (needle) extends 2.3 cm from the body, then the device is operational. It is recommended to take measurements with a caliper. If carbon deposits are noticeable on the IAC, but there is no mechanical damage, then it requires washing with a carburetor cleaner. Once dry, it will be fully functional.
Installing a new sensor is carried out in the same way in reverse order.
Let's sum it up
Having completed the assembly process, we check the correct functioning of the valve-regulator on the LADA Kalina car. If the idle speed is within the specified limits, then the device is installed correctly, and no third-party air leaks are observed in the intake system.
The idle speed regulator is designed to stabilize the engine speed. A logical question arises: is the presence of this device so important and necessary? And also whether it is possible to do without it at all and how to properly carry out repairs in the event of a malfunction. The entire operation of the car depends on this device.
In order to understand what work processes are affected by the idle air regulator and why there is a need to regulate its operation, it is necessary to have an understanding of what the principles of its operation are.
Principle of operation
It is very important that fuel and air are in certain proportions. Because if one or another indicator deviates, the combustion process will not be perfect or will be completely absent. The main task of the idle speed regulator is to regulate the amount of air supplied while in idle mode. The supply does not occur through the throttle valve, since it opens when the gas pedal is pressed.
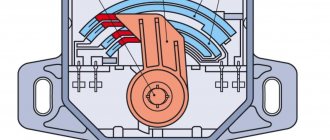
The idle speed control consists of a stepper motor and a spring-loaded cone needle. In order to regulate the amount of air when the car is idling, it is necessary to use the regulator to change the cross-section in the passage channel. Simultaneously with the IAC, a special sensor operates, which records the amount of air. In turn, the controller supplies fuel.
Probably, most people who are not privy to the intricacies of a car’s operation, when the phrase “idle” is mentioned, think that this is the simplest and easiest mode of operation of the car, but this is far from the case. This mode is the most tiring for the engine, since it is very difficult to work at low speeds. And there are reasons for this:
- it is necessary to make efforts to heat cold fuel to the required temperature, since the car cannot operate fully with fuel of the wrong condition;
- The efficiency is very low and there is quite a lot of wear and tear on engine parts. This is due to the fact that the pressure between the intake and exhaust manifolds is too different, which means that the products that are formed during the combustion process again end up in the middle of the cylinders;
- exhaust gases contain huge amounts of carbon dioxide
VAZ-2112 How to check IAC: signs of malfunction
On a VAZ-2110 with an injector, the crankshaft speed of the power plant at idle is maintained by the XX (IAC) regulator. The task of this regulator is to stabilize and maintain crankshaft speed at a given level under different conditions - abruptly releasing the gas pedal, creating a significant load on the on-board network (when the heater, headlights are turned on, etc.). A malfunction of the VAZ-2110 idle speed control does not affect the performance of the engine, but the lack of idle speed causes a number of inconveniences when operating the car.
The principle of operation of the XX (IAC) regulator on the VAZ-2110
Let's consider the principle of operation of the XX regulator. This element is part of the design of the throttle assembly, which dispenses the air entering the cylinders.
When the gas pedal is released, the throttle valve closes the main air intake channel. To ensure the engine operates in this position of the damper, an additional channel of small cross-section is made in the throttle body, through which air is supplied to the cylinders, bypassing the damper. The idle speed control is designed to change the cross-section of the additional channel, which allows the ECU to maintain speed regardless of conditions.
It all works like this: when the throttle valve is closed, the XX regulator slightly opens the bypass channel. Using the mass air flow sensor, the amount of air entering through the additional channel is determined. Based on this information, the ECU regulates the amount of fuel injected. Using data from other sensors, the control unit determines the crankshaft speed and, if they do not correspond to the norm, sends an impulse to the IAC in order to stabilize the engine operation by changing the channel cross-section.
Symptoms of a problem
The VAZ-2110 idle speed control is a structurally simple mechanism consisting of a stepper electric motor and a spring-loaded needle, the displacement of which leads to a change in the cross-section of the channel. But despite the simplicity of the design, this part often breaks. Symptoms of a broken XX regulator:
- Unstable “floating” crankshaft speed during idle operation;
- Inconsistency of speed with the normal indicator (800-850 rpm);
- Spontaneous stopping of the power plant when releasing the gas pedal;
- No increased speed when starting a “cold” engine (“warm-up” mode);
- Drawdown in speed after creating a load on the on-board network;
The XX regulator is an actuator, and it has no “feedback” from the ECU. Therefore, this sensor does not fall under self-diagnosis. As a result, regulator failure occurs only in the engine. As for the TPS, this element is checked by the system, and if it malfunctions, the “Check engine” will light up.
Causes of failure. Node check
The reasons for the malfunction of the XX regulator are breaks in the electrical winding. engine and needle jamming due to dirt or corrosion. But the sensor is not always the “culprit” for missing idle speed. Therefore, before removing and checking the sensor, check its power supply circuit.
For all checks you will need a multimeter. The power circuit is checked with a device set to “voltmeter” mode. Diagnostics is simple - we disconnect the block with wires from the regulator, connect the “negative” probe of the multimeter to ground, and the positive one to the terminals marked with the letters “A” and “D”.
With the ignition on, we take measurements. If the circuit is working properly, the readings should correspond to the rated voltage of the circuit. If there is no voltage, you should check the computer and relays responsible for powering the sensor.
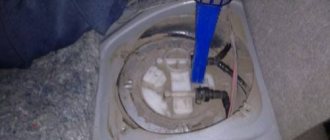
To make it easier to check the sensor itself, remove it from the car. To do this, you only need a screwdriver. To remove a part you need:
- Disconnect the on-board network (remove the terminal from the battery).
- Find the regulator (installed on the throttle assembly).
- Disconnect the wiring (after operating the lock).
- Unscrew the two fastening screws;
- Remove the regulator.
The element is checked with the same multimeter, but switched to “ohmmeter” mode. We first connect the probes to terminals “A” and “B”, and then to “C” and “D”. With this measurement, the readings are 50-55 Ohms.
Then we connect the probes to terminals “A” and “C”, and then to “B” and “D”. During this test, the ohmmeter shows infinity.
If the readings are correct, there is no break inside the sensor, and its incorrect operation is due to the needle getting jammed.
There is an alternative verification method that does not require the use of measuring instruments. This check is simple:
- Remove the sensor from the car.
- We connect the block with wires back to it.
- We power the on-board network (connect the battery).
- Holding the regulator in your hand, place your finger on it.
- We ask someone to turn on the ignition.
If the element is working properly, when the ignition is turned on, the needle will move, which will be clearly felt by your finger. Needle jamming can be eliminated by washing. For these purposes, use WD-40 or carburetor cleaning aerosol.
We use these products to treat the needle and spring. Next, we dry the sensor and check its functionality.
If a break in the winding in the regulator is detected or washing does not bring results, we replace the part.
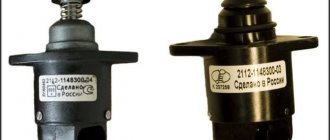
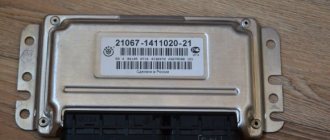
Choosing a replacement regulator
On the VAZ-2110 with both 8-valve and 16-valve injection engines, a sensor with catalog number 2112-1148300 is used. Additionally, at the end of the marking there is a prefix consisting of two numbers, for example, 01, 02, 03, 04. This index indicates the manufacturer of the regulator (01 and 03 - “Pegasus”, 02 and 04 - KZTA). When choosing a replacement regulator, pay attention to two nuances - the seal and the height of the needle protrusion above the body. Factory spare parts use a red seal, while counterfeits use a black rubber element. The height of the needle protrusion above the body is 23 mm.
Before installing a new regulator, it is recommended to coat the sealing ring with a thin layer of engine oil to ensure a tight fit of the part in the seat and eliminate the possibility of air leaks.
The most common idle speed problems
The possible occurrence of malfunctions associated with the operation of the idle air regulator must be taken very seriously, as they can lead to dire and undesirable consequences. There are a number of specific signs that indicate that there is a malfunction of the idle speed sensor. These include:
- a sharp change in the number of revolutions down or up;
- when the engine is switched to idle mode, there is no change in speed;
- when you turn on additional vehicle functions, there is a noticeable decrease in speed;
- When idling and pressing the gas pedal, the engine stalls.
You need to know how to check the serviceability of the idle speed sensor, since some signs of failure may indicate a malfunction of other parts of the car.
Causes of problems
There are many reasons that could lead to this malfunction. You shouldn’t waste a lot of time guessing, but you need to fix the problem as quickly as possible. After all, long-term use of a car with it can lead to more serious problems with the engine. There are two most common causes of malfunctions:
- guide needle wear;
- broken contacts in the middle of the sensor body.
Idle speed sensor VAZ-2112: design features and do-it-yourself replacement
From the article you will learn about the idle speed sensor VAZ-2112. To be more precise, this is not really a sensor - it does not make any measurements. This element is installed in the throttle assembly and adjusts the air supply. Everyone is familiar with the so-called “choke” on carburetor engines - a manually operated lever that allows you to open and close the air supply to the carburetor. The IAC function (idle air control) is exactly the same, only it is controlled exclusively electronically. It is the operating features of this device that will be described below.
Features of operation of the IAC
On VAZ-2112 cars with a 16-valve engine, an exclusively injection system is installed. It is controlled by an electronic unit. For the system to function properly, it is necessary that the mixture enters the combustion chambers in a ratio of 14:1. If it contains less or more gasoline, the engine will not be able to work properly. But sometimes it is simply necessary that a minimum amount of air enter the fuel rail. This is necessary when starting a cold engine.
And one device can close the air supply to a VAZ-2112 with a 16-valve engine - the idle air regulator. This is a stepper type electric motor that allows you to smoothly open and close the air channel. Moreover, the shape of the channel is such that it is blocked by a cone-shaped needle. When the regulator is operating, the mass air flow sensor monitors the total amount that enters the fuel rail.
How does idle work?
Most people who are little familiar with automotive technology have little idea what engine idle is. It is quite possible that some believe that this mode is the easiest to implement. But in reality this is far from true, because it is quite difficult for the engine to operate at low speeds for the following reasons:
- It takes effort to warm cold gasoline to normal temperature. After all, you need to take into account that when using a fuel mixture with a low temperature, the engine will not be able to operate normally.
- The efficiency value is quite low, therefore, the wear of parts increases. This happens due to the fact that there is a very large pressure difference between the intake and exhaust manifolds.
- The exhaust gas contains a very large amount of carbon dioxide.
All this happens because the fuel is supplied at a very low speed. And if the amount of incoming air is incorrectly adjusted, the motor will not function correctly.
Idling faults
Before checking the idle speed sensor of the VAZ-2112, you need to find out what kind of breakdowns can occur in it.
You need to start repairs if you find the following symptoms:
- A change in engine speed up or down.
- When you release the gas pedal, the rotation speed does not change.
- When additional equipment is turned on (high or low beam, heaters), a significant drop in crankshaft speed occurs.
- If the engine is running in idle mode and you start to press the gas pedal, the engine will stall.
Now let’s learn about the causes of such breakdowns and methods for eliminating them.
Why do problems with IAC occur?
There are many causes of malfunctions, but they need to be identified as soon as possible in order to completely eliminate the breakdown. If you continue to operate a vehicle with a faulty idle system, you may experience more serious damage. The most common causes of breakdowns of the idle air regulator are:
- The needle is heavily worn.
- Violation of the integrity of the contacts inside the device body.
How to check the regulator
First you need to find out where the idle speed sensor of the VAZ-2112 is located. You can see it on the throttle body, not far from the air filter. Before starting repairs, be sure to secure the vehicle and set it to speed. In our material we will look at the simplest and most accessible methods for diagnosing a device.
First of all, you need to disconnect the regulator from the power supply, then check the voltage value. When the ignition is turned on, the voltage should be about 12 V. If the voltage is too low, you need to check the battery and charging. The resistance of the regulator winding should be no more than 53 Ohms.
Try turning on the ignition and connecting the power wires to the IAC. The rod must change its position. If no movements are observed, we can talk about a malfunction of the device.
How to replace the regulator?
When replacing the idle speed sensor on a VAZ-2112, you must follow the following sequence of actions:
- First, turn off the engine, let it cool a little and disconnect the negative terminal from the battery.
- Disconnect the plug from the regulator.
- Unscrew the bolts securing the device body and remove the regulator.
- Install the new device in reverse order.
The setup procedure looks like this:
- Connect the power wires to the regulator.
- Be sure to tighten all fasteners as tightly as possible.
- Perform calibration after connecting the battery. To do this, just turn on the ignition, but do not start the engine.
Checking the serviceability of the regulator
Before starting the process of checking the idle air control, it is necessary to ensure that the vehicle is stationary, that is, tighten the handbrake and place shoes under the wheels. Let's look at the simplest and most accessible diagnostic methods.
The device is removed from the general electrical circuit and the voltage is checked using a voltmeter. When the ignition is turned on, the resulting voltage should not go beyond the standard limits, that is, 20 volts. If the voltage is much lower, there is a problem with the battery charging; if it is absent, it is worth checking the entire circuit.
You should check the resistance level. It should not exceed 53 Ohms.
If you turn on the ignition and apply the power supply to the idle speed control, the sensor needle should change its position; if not, this indicates a malfunction.
It is possible that the main malfunction is in the operation of the IAC itself. With certain skills and knowledge, you can replace a faulty idle air control yourself, without the help of car service workers.
How to check the sensor?
If you have a tester, checking is easy:
- Set the VAZ 2110 to the handbrake;
- Disconnect the IAC connector to check;
- Check the voltage of the VAZ 2110, 2112 sensor circuit, while connecting the “minus” to the engine, the “plus” to the removed block, namely to terminals A: D (marked on the block, you can see the diagrams);
- The ignition is turned on and the readings given by the idle speed regulator are checked, which should be about 12 V. The value will be less - most likely the battery is discharged. When there is no voltage, it is necessary to check the entire circuit, and then the electronic control unit. There are no malfunctions, which means the circuit is working - the IAC installed on VAZ 2112 engines and other modifications are checked;
- The tester terminals are connected to the block, the circuit is as follows - first to terminals A: B, then to C: D. The resistance should be within 53 Ohms;
- Next, pairs A: C, B: D are checked - in this case, the resistance on a working product will be infinitely large.
IAC diagram
When, as a result of these checks, the sensor reveals a discrepancy in the readings, it should be replaced. Also, the inoperative state of these VAZ 2110, 2112 engine sensors, in the unscrewed position, can be checked by attaching a block to them, then you need to turn on the ignition.
When the power is connected to the working product, the rod with the needle will change position. No changes will occur on a broken sensor. If a breakdown of the idle air regulator is detected, of course, it must be repaired. But there is no need to rush to a car service center - you can do the repairs yourself, saving money and time. But first, in general, it is worth cleaning the IACs; often after this they return to “life”.
Regulator replacement
In order to adjust the idle air regulator in carburetor-type cars, there are special screws that allow you to make the replacement manually. But you will need additional devices such as a tachometer and a gas analyzer. In general, the process of replacing the idle air control valve on these vehicles is characterized by a certain complexity.
But on new vehicles this procedure can be done much easier and faster. True, you will have to strictly follow some tips and recommendations:
- According to safety rules, all repair and diagnostic work is carried out only with the engine turned off.
- The four-pin connector must be disconnected.
- Then special contact bolts are unscrewed, after which the previous IAC is removed. Installing a working idle air control valve occurs in the reverse order.
- The bolts must be tightened well, since the idle air control regulator should not rattle.
- After installation, you can connect the connectors.
- Next, the sensor is calibrated. To do this, you need to turn on the ignition, but so that the engine itself does not start.
- Then, after calibration, you can operate the vehicle.
There is one small but important nuance that concerns the repair of the idle air control. It is simply not provided for. Some faults can be eliminated by treating the surface with special chemicals. For example, WD-40 or carburetor cleaner.
IAC cleaning
Do-it-yourself troubleshooting of the idle air regulator consists of simply washing it to remove carbon deposits. To do this you need to follow the instructions:
- disconnect the wire plug from the sensor;
- Unscrew the two fastening screws with a small shaped screwdriver and remove the sensor from the mounting socket;
- Clean the needle cone using WD-40 or carburetor cleaner.
The same means can be used to wipe the regulator contacts and the entire throttle assembly.
After cleaning, the IAC is installed back. In this case, you need to measure the distance from the end of the needle to the body - it should be approximately 2.3 cm.