02 March 2017 Lada.Online 48 363 4
DPKV (crankshaft position sensor), also known as TDC sensor (top dead center sensor) is the only sensor of the engine management system, if which breaks down, the engine will definitely not start. This sensor has no mechanical moving parts, so it rarely fails. Most often, corrosion-damaged wiring is to blame for its failure.
Signs of a faulty crankshaft sensor
Signs of a malfunctioning crankshaft position sensor:
- disruption of the smooth combustion process of the fuel-air mixture (detonation) in the engine under dynamic load;
- at idle speed becomes unstable;
- low vehicle engine power level;
- reduction in the level of vehicle dynamics;
- the engine does not respond to ignition, i.e. it won't start;
- the car jerks as it moves;
- uncontrolled increase or decrease in speed.
Reasons for failure:
- Short circuit between turns in the DPKV winding. As a result, the impulses are lost to the ECU. Here it is necessary to replace the device.
- Breakage of the teeth of the drive ring.
- Non-working contacts that are located in the winding and wire supply system. In these circumstances, it is not necessary to change the DPKV, but to clean the connection and winding.
- The reason for the failure of the DPKV can also be the presence of mechanical damage that was received during the period of work under the hood.
- Another circumstance that can lead to crankshaft failure may be the entry of foreign objects into the area between the DPKV and the toothed pulley.
These errors and malfunctions in the vehicle may be caused by other breakdowns. The crankshaft position sensor, signs of malfunction of which can be caused by various circumstances, requires careful inspection.
Next, let's talk about signs of breakdown. What are the main symptoms of a bad crankshaft sensor? This question is relevant. The main signs of failure of the crank pulley position regulator are:
- Engine knocking (knocking of hydraulic compensators) under heavy loads or driving uphill at low speeds.
- The motor began to work less steadily. Particularly at idle, you will notice a drop and a sharp increase in rpm. Additionally, your vehicle may stall at idle, either while driving or when stopped at a traffic light.
- The engine cannot operate at full power, and you can notice this drop in speed without instrument readings. Engine power may periodically fall and rise, regardless of any factors.
- Significant reduction in the dynamic characteristics of the vehicle.
- There may be problems starting the internal combustion engine.
- In addition, one of the most noticeable signs of a breakdown of this regulator, as stated earlier, is the inability to start the engine.
- Another sign of a malfunctioning crankshaft position sensor is that the spark disappears, not completely absent, but does not appear periodically.
Of course, such malfunctions may indicate other problems with the engine. For example, a drop in power and speed may indicate a clogged fuel pump or a broken fuel filter. But the information below will help you diagnose the device.
The first thing worth noting is that the DPKV does not act up and does not work from time to time; it either functions in a given mode or does not work at all. This is due to the simplicity of the element design. The process of part failure is irreversible. If he has lost his ability to work, he will not work again. This part is non-repairable. If the test confirms its malfunction, it is replaced with a new one.
Often, the breakdown of DPKVs is due to their wear and tear (during long trips). Incorrect operation of the DPKV is manifested by the following symptoms:
- weak engine power;
- the engine does not work, the engine stops when starting - “stalls”;
- idle speed is low;
- spontaneous change in engine speed.
The appearance of the “Check-Engine” icon on the control panel (the engine should be checked), and the on-board computer error No. 0340 90% guarantee the cause of engine malfunction due to a broken crankshaft sensor.
To clarify the suspected cause of the breakdown, you can calculate the resistance of the crankshaft sensor, namely its coil (normally 550-700 Ohms), using a multimeter. In the resistance section of the multimeter, set the pointer to 2000 Ohms, because the normal value of 550-700 is in the range between 200-2,000 Ohms.
Checking and replacing the crankshaft position sensor Lada Kalina
The crankshaft position sensor is designed to generate signals by which the ECU synchronizes its operation with the engine operating cycles.
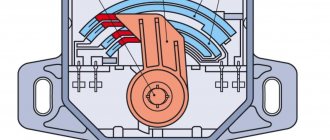
Therefore, this sensor is often called a synchronization sensor. The operation of the sensor is based on the principle of induction - when the teeth of the crankshaft pulley pass past the sensor core, AC voltage pulses appear in the sensor circuit. The frequency of occurrence of pulses corresponds to the speed of rotation of the crankshaft. The teeth are located around the circumference of the pulley (every 6°).
Two of them are separated from each other at an angular distance of 18°.
This was done to form reference signals in the sensor circuit - unique reference points, relative to which the ECU determines the position of the crankshaft - top dead centers in the first - fourth and second - third cylinders.
It is impossible to operate an engine with a faulty crankshaft position sensor. The crankshaft position sensor cannot be repaired; in the event of a malfunction, it is replaced as an assembly.
- Removing and installing the crankshaft position sensor
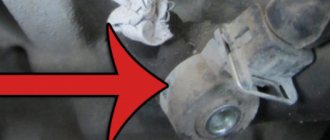
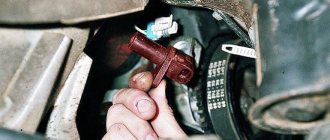
- Use a screwdriver or finger to press out the plastic latch securing the wiring harness block and disconnect the block from the sensor.
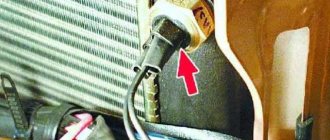
Unscrew the sensor mounting bolt with a 10mm wrench
...remove the sensor from the cover boss hole.
Check the sensor resistance. For a working sensor it should be 0.55–0.75 kOhm.
- Install the crankshaft position sensor in the reverse order of removal.
- Using a set of feeler gauges, we check the gap between the end of the sensor and the teeth of the crankshaft pulley.
- The gap should be 1±0.41 mm; it is specified by the design of the sensor and is not adjustable.
- With the ignition off, disconnect the engine management system wiring harness block from the crankshaft position sensor.
- We connect the tester probes to terminal “B” of the wiring harness block and engine ground.
- With the ignition on and the crankshaft stationary, the tester should record a voltage of about 2.5 V.
- A similar voltage should be between terminal “A” of the wiring harness block and engine ground.
- If the voltage values do not correspond to the norm, check the serviceability of the circuits (open and short to ground) between terminal “B” of the wiring harness block and terminal “34” of the controller, as well as between terminal “A” of the block and terminal “15” of the controller.
- If the voltage values do not match and the circuits are working, the controller is faulty.
- You can also check this way:
- We connect a multimeter to the sensor terminals (in voltmeter mode with a measurement limit of up to 200 mV).
- We quickly bring the blade of a screwdriver near the end of the sensor, while we observe voltage surges on the voltmeter.
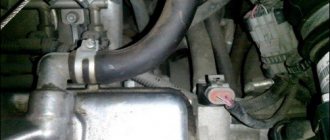
Crankshaft sensor location
The location of the DPKV is a bracket that is located in the central part of the pulley on the generator drive. It is installed next to the drive toothed pulley structure with a gap of 1-1.5 mm.
To replace the sensor or adjust it, you need to connect a wire 50-70 cm long to it. To set or correct the position, you need to adjust the washer, which is fixed above the DPKV mounting socket.
Before replacing this device, it is recommended to diagnose it. Many car enthusiasts are concerned about the question of what else needs to be done before removing it - measurements should be taken based on the ratio of the mounting bolts to the body and the position of the DPKV.
The stable operation of the engine depends on the serviceability of the crankshaft sensor, so automakers place it in an easily accessible place to quickly troubleshoot the problem. Despite the dense arrangement of parts under the hood, it is quite easy to determine where the synchronization sensor is located.
Reference disk. Other names are master or synchronizer.
Most often it is located on a bracket between the generator pulley and the flywheel.
Among other electronic sensors, it stands out because of its wire (70 cm long) with a special connector for connecting to the vehicle’s on-board network.
To replace and install the DPKV, you only need to correctly set the gap between the rod and the synchronizing disk. The gap size varies from 0.5 to 1.5 mm and depends on the make and model of a particular car. The distance is adjusted using special washers located between the device and the installation site.
Causes of detonation and measures to prevent it
Of course, the quality and type of gasoline used in the car is decisive. For example, the lower the octane number of the fuel, the less resistance to detonation. Fuel quality also plays an important role in the stable operation of the engine.
Therefore, always pay attention to the choice of gas station, do not fill with low octane gasoline. The causes of the problems may also lie in faulty spark plugs, as a result of which the fuel in the cylinders does not ignite properly, which is why signs of detonation appear
What happens if the causes of detonation are not eliminated in time?
If you ignore problems associated with the engine, as time passes, small vibrations will inevitably develop into stronger ones. As a result, serious damage will occur in the form of destruction of the piston group. In addition, the internal combustion engine will constantly heat up, and if no active action is taken in this situation, a major engine overhaul will not take long.
Symptoms indicating problems with the knock sensor (DS)
1. Knock when the internal combustion engine is running; 2. Deterioration of acceleration (loss of traction); 3. Significant increase in fuel consumption (which does not depend on the time of year); 4. Engine tripping; 5. Disturbed exhaust (increased amount of exhaust gases, appearance of soot, persistent smell of gasoline). 6. Errors appear: 0325 - 0328 inclusive.
Common malfunctions of the Kalina knock sensor Device breakdowns can be caused by various reasons, including: - a short circuit in the network; — mechanical failure of the device itself; — breakage of wires or braid; — oxidation at the junction of the contact block with the sensor; — malfunction of the engine control unit.
Overview and functionality of sensors installed on the Lada Granta Liftback
Used to monitor the temperature of the liquid (antifreeze) in the cooling system of the power unit. Based on the data received from the scanner, the ECU increases (lowers) the crankshaft rotation speed in order to maintain the optimal degree.
The qualitative and quantitative composition of the fuel mixture depends on the correctness of the DTOZ readings. DTOZH has a long service life and fails extremely rarely, only in the event of mechanical damage from the outside.
The standard installation location is the thermostat cover.
The DD is installed to record high-frequency vibrations inside the cylinder and engine block. The cause of detonation is poor quality fuel and incomplete combustion in the chamber.
In order to set the maximum ignition timing, the DD scans the sequence (moment) of ignition of the combustible mixture. In the Lada Grant, the DD liftback is installed between the second and third cylinders.
Cannot be repaired or prevented.
The ECU calculates the number of pulses to control the fuel injectors and ignition coil.
If there is a malfunction or unstable operation, the power unit will not start. Standard installation location: surface of the oil pump cover.
The DF is installed to transmit a signal to the ECU about the position of the cylinder at the top (bottom) dead center. This allows you to quickly respond and correct the enrichment (leanness) of the fuel mixture.
If the DF is faulty, the ECU automatically goes into emergency mode, which negatively affects engine performance. There are difficulties with starting, detonation at idle, a drop in acceleration dynamics, and increased fuel consumption.
The DF cannot be repaired, only replaced with a new one.
DBP and DTV
The absolute pressure sensor and temperature sensor Grant Liftback are installed in one housing - a block. The standard location is the reverse line of the modular inlet.
DBP and DTV are not subject to partial repair and prevention; only replacement with a new one is possible.
The scanner evaluates the amount of unburned fuel and the concentration of exhaust gases. The data is transmitted in the form of a signal from the ECU, where the percentage ratio of fuel and oxygen is adjusted.
Dislocation: the outer surface of the Lada Granta Liftback catalyst, which is installed on the rear side of the engine, in its lower part.
The importance of the functioning of this meter is underestimated by many, but in vain.
Correct and accurate calculation of the supplied amount of oxygen will ensure maximum performance of the power unit.
The air flow sensor cannot be repaired, only replaced with a new one.
Its main purpose in the Lada Granta Liftback is to measure speed online and transmit data to the dashboard.
Incorrect operation or failure makes it difficult to determine the speed at which the driver is moving at a particular moment in time. This is unsafe, since failure to comply with the speed limit increases the emergency situation on the road.
The standard location of the Lada Granta Liftback speed sensor is: the upper contour of the crankcase, above the drive housing on the right side. Despite the fact that the design of the scanner is quite simple, it cannot be repaired.
The DDM is located on the rear side of the cylinder head, near the timing belt.
The purpose of the meter is to monitor the level of engine oil in the cylinders and crankcase of the power unit. And also, timely notification of the ECU about a low (critical) indicator. In turn, the ECU informs the driver through an indication on the dashboard.
A malfunction of the DDM leads to catastrophic consequences, including a major overhaul of the engine. Due to the lack of indication on the dashboard, the driver is not able to quickly respond to possible breakdowns.
Automatic adjustment of valve length on the intake stroke will allow you to achieve maximum engine power. Malfunction or unstable operation of the DNDC leads to a decrease in power, increased fuel consumption, and detonation during idling.
Despite the simplicity of the design, DNDK cannot be prevented; only replacement with a new one will help.
Based on the strength of the DST pulse signals, the controller distinguishes the position of the pedal at each specific moment. Regulates the load on the power unit.
When the pedal is pressed, the load is reduced and vice versa. DST cannot be repaired. The standard location is the pedal assembly of the Lada Granta Liftback car.
The Lada Granta Liftback model is equipped with a number of digital and mechanical sensors for transmitting data to the electronic engine control unit (ECU).
During engine operation, information is summarized at the digital level, the ECU “makes” a decision on each indicator, adjusting the system for maximum performance.
The total number of sensors is over ten. They are installed around the entire perimeter of the car. The lion's share falls on the engine compartment, the front part of the car's interior.
If you have experience, the car owner can replace most scanners himself. Contacting service is necessary in the event of a critical breakdown.
“Check Engine” is the first signal about a malfunction in the car, a breakdown of the scanner. In the article we will look at the purpose and methods of replacing sensors on the Lada Grante Liftback.
Where is the sensor located
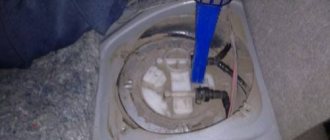
On Kalina, the crankshaft sensor is located to the right of the engine, next to the generator drive pulley. It is on the bracket.
- To get to the sensor, you need to remove the plastic engine cover.
The photo shows a 16-valve 126 engine. This one is installed in the LUX package.
The crankshaft sensor is located on a bracket near the oil filter.
It is more convenient to unscrew the sensor using a 10 mm socket with a ratchet (there is no need to remove the timing cover!).
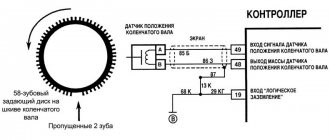
The drive disk is combined with the generator drive pulley and is a gear with 58 teeth spaced at 6° pitches and a “long” cavity for synchronization. Formed by two missing teeth. When the middle of the first tooth of the gear sector of the disk after the “long” cavity is aligned with the axis of the crankshaft position sensor, DPKV 191.3847, 37.3847, 21120-3847010-00/04, the engine crankshaft is in position 114° (19 teeth) to top dead center 1 th and 4th cylinders.
When the master disk rotates, the magnetic flux in the sensor's magnetic circuit changes. By inducing alternating current voltage pulses in its winding. The ME17.9.7 or M75 controller determines the position and speed of the crankshaft based on the number and repetition rate of these pulses and calculates the phase and duration of the control pulses for the injectors and ignition coil.
The wires of the crankshaft position sensor, DPKV 191.3847, 37.3847, 21120-3847010-00/04 are protected from interference by a screen shorted to ground. If a malfunction occurs in the crankshaft position sensor circuit, the engine stops running. The ME17.9.7 or M75 controller stores a fault code in its memory.
Connection diagram for electrical circuits of the crankshaft position sensor 191.3847, 37.3847, 21120-3847010-00/04.
Error code P0335 - Crankshaft position sensor circuit is faulty.
Error code P0335 is entered if:
— The crankshaft turns. — Change in the mass air flow sensor signal above a certain value. — There is no signal from the crankshaft position sensor.
When this code occurs, the fault warning light does not come on.
Description of checks of the crankshaft position sensor 191.3847, 37.3847, 21120-3847010.
The sequence corresponds to the numbers on the diagnostic card.
1. Check the wires and resistance of the crankshaft position sensor. Resistance may change slightly as temperature increases. 2. The output signal of the sensor must have an alternating current voltage amplitude of at least 0.3 V when the crankshaft is cranked by the starter.
Diagnostic card for checking the crankshaft position sensor 191.3847, 37.3847, 21120-3847010.
After repair, start the engine, reset all error codes and make sure there is no malfunction.
Diagnostic information.
Failure of contacts in the sensor or controller block can cause the intermittent code P0335 to be entered. Check the drive disc on the crankshaft pulley for tooth damage, runout or other damage. The radial runout of the damper rim should be no more than 0.4 mm.
How does the crankshaft sensor work?
Many people are interested in the question of why a crankshaft sensor is needed. This device directly affects the performance of the car engine.
A violation provokes malfunctions of the internal combustion engine or engine shutdown, affecting engine operation.
The functions of the DPKV include:
- synchronization of fuel injectors;
- synchronization of the ignition system.
The principle of operation of the DPKV is that it sends a signal to the ECU. This message indicates the position of the crankshaft. Such a signal contains information about the frequency and direction of rotation of the crankshaft.
How to independently replace the crankshaft sensor on a VAZ 2112 car
There are 3 ways to check for a faulty crankshaft sensor:
- measurement using an ohmmeter;
- checking the inductance value;
- using an oscilloscope.
Checking the crankshaft position sensor using an ohmmeter:
- For this test you need to purchase a multimeter.
- It must be placed in the resistance measurement position.
- Then measure the resistance level of the inductor: use the probes of the device to touch the coil terminals.
- Acceptable value is 500-700 Ohm.
- If the measurement results are within the specified range of values, then the crankshaft is normal.
Checking the crankshaft sensor using an inductance measurement:
- You need to get a megohmmeter and a network-type transformer. You also need to purchase an inductance meter and a voltmeter.
- Using a multimeter, measure the inductance.
- Normal values are 200-400 mH.
- Using a megohmmeter, measure the insulation resistance between the coil wires.
- The obtained data should not be lower than 0.5 Mohm.
- The coil is demagnetized using a network transformer.
- A deviation from the norm indicates that the crankshaft sensor needs to be replaced.
- Connect the probes to the wires that lead to the coil.
- Open the software for working with the oscilloscope.
- Pass a metal object in front of the DPKV.
- All data will be reflected on the screen.
If the DPKV detects the movement of a metal object, then the sensor is in good condition. This diagnostic method is recommended to be carried out with the engine running, so the results will be more accurate. To do this, you will need to connect the probes in parallel to the sensor terminals.
To do this, you can use several methods. We will not consider all of them, but will devote time to only two, the most basic and most accurate methods. In any case, to perform diagnostics you need to dismantle the element to check its functionality. When dismantling the crank pulley position regulator, you should visually inspect it - perhaps the malfunctions will speak for themselves.
Often, a visual inspection makes it possible to identify certain damage to the element body, as well as the condition of the block itself and the contacts themselves. If the regulator is too dirty, it must be washed with alcohol, since its contacts must always be clean. If this diagnostic method does not help detect a breakdown, then you should check the sensor more carefully.
First way
Using an ohmmeter, you can measure the resistance of the winding of the synchronization device. If your car's regulator is in working condition, then the ohmmeter readings should vary around 550 - 750 ohms.
Voltmeter for diagnostics
But before you start diagnosing the pulley position regulator, check the manual for your machine for the exact range of indicators for DPKV. The manufacturer indicates this nuance most accurately and you will need to navigate according to it. If the results obtained differ from those indicated in the instructions, then the DPKV must be replaced because it is faulty.
Second way
This method will allow you to more accurately determine the state of the component. To test your device you will need:
- digital voltmeter;
- megohmmeter;
- inductance measuring device;
- network transformer.
Megaohmmeter for device diagnostics
To make the indicators more accurate, it is recommended to carry out diagnostics at an air temperature of at least 20 and no more than 22 degrees.
Required materials and tools:
- key to “10”;
- head, knob;
- rags;
- additional lighting as needed;
- new DPKV;
- flat head screwdriver.
Regulations:
- We place the car on the inspection channel, secure the wheels with wheel chocks, and squeeze the parking brake;
- from the end of the engine, in the area where the oil pump is located, use a screwdriver to pry up the block with terminals, remove it, and move it to the side;
- Unscrew the screw (to “10”) - the clamp from the sensor;
- remove the controller;
- We carry out troubleshooting of the seat, wipe it, clean it from residual dust and dirt;
- insert a new controller;
- screw it in and assemble the structure in reverse order.
DIY replacement completed.
Smart choice
The Lada Kalina 8 valve has certain differences from the 16 valve engine. However, automotive specialists sometimes install a mechanism with 8 valves to 16, and the engine works correctly.
To avoid situations of inconsistency, purchase a mechanism according to the characteristics of the engine
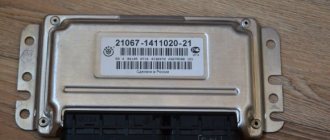
No need to pay attention to the manufacturer's markings. The spare part number according to the VAZ catalog (Granta, Largus, Kalina, Priora) will always be the same:
- engine with eight valves - 21110370604000;
- 16-valve – 21120370604000.
Definition of failure
The device is located close to the cylinder head, on the power unit. It is easy to understand the first signs of poor functioning of the mechanism, especially for an experienced car enthusiast.
Here are the main criteria for recognizing a breakdown:
- a light comes on and goes out, designed to constantly monitor the engine while turning the ignition key in the car;
- “Check engine” lights up on the dashboard after the starter makes three to four revolutions and the engine comes into action. The sensor will be triggered if the electronic control unit does not receive the necessary information and has to use data from the DPKV;
- engine dynamics become worse - the vehicle slowly picks up speed (this is easy to notice when driving downhill). In this case, there are three reasons for the problem. The first - the camshaft sensor is broken, the second - the mass air flow sensor is broken, the third - the compression is reduced;
- high fuel consumption - this “symptom” is not very accurate and has a number of possible causes. You shouldn’t take it as a separate criterion for a problem, but you can use it as one of several.
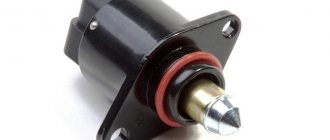
DPKV device
The part is a steel core with a copper wire winding, placed in a plastic case and filled with compound resin.
There are 3 types of synchronization sensors available:
- Induction. The operating principle is based on the use of a magnetized core with copper wire wound on it, at the ends of which the change in voltage is measured. In addition to fixing the position of the crankshaft, it measures its rotation speed, which is also necessary for high-quality operation of the internal combustion engine. Induction sensors are the most common and frequently used in automobile devices.
- Optical. Their design is based on an LED, which emits a luminous flux, and a receiver, which captures the light on the other side. When a light beam hits a control tooth, it is interrupted, the receiver records its absence, and the information is transmitted to the computer.
- Hall Sensor. It works based on the physical effect of the same name. A magnet is placed on the crankshaft; when it passes the sensor, a direct current appears in the latter, fixed by a synchronizing disk.
The versatility of an induction-type device and a Hall sensor make them the most popular in the design of modern motors.
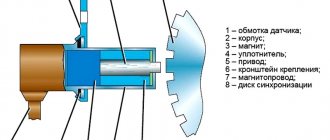
The system of this crankshaft element includes:
- Sensor winding
- Frame
- Sealant
- Drive unit
- Mounting bracket
- Magnetic core
- Sync disk
Repair involves the need to ring the DPKV using an ohmmeter. For these purposes, it is necessary to measure the resistance on the winding of the unit.
Methods for diagnosing DPKV
You will learn how to diagnose the regulator at home on your own from the video.
Technological progress in the automotive industry is displacing outdated carburetor engines, replacing them with injection ones. This leads to the need to know the design and operating principle of modern engines, in terms of the synchronization of spark formation and the supply of gasoline to the cylinders. DPKV is not provided on cars that do not have an on-board computer, and on carburetor engines.
The sensor is available in the design of only injection and diesel internal combustion engines. The stable functioning of a modern car depends on the ECU, which is its “brain”. The unit receives information about the condition of the vehicle from the installed sensors, which is processed, and based on the results obtained, the operation of all systems is adjusted. One of the main sensors responsible for engine operation is the crankshaft position sensor.
When determining the serviceability of the crankshaft position sensor, we are guided by the principle - from simple to complex. In other words, first an inspection, then checking the characteristics with instruments (ohmmeter, oscilloscope or computer). The absence of moving parts and the simplicity of the design of the element make it a fairly reliable part.
Before you begin diagnosing an electronic component, you need to note its original position on the motor. After dismantling, the device is checked for defects in external surfaces. If the DPKV is dirty or has corrosion on the contact group, then it must be cleaned with alcohol. If the inspection shows no defects, it can be diagnosed using special instruments. It is advisable to carry out the test using a multimeter, which can be switched to different modes.
This method is simple and accessible, but does not guarantee detection of a breakdown. It is used to measure the resistance of the coil. To do this, it is enough to simultaneously touch the coil terminals with the probes. The polarity of the touch is not important in this case.
The resistance value depends on the characteristics of the coil and is usually in the range of 500-700 Ohms. To determine the resistance value of your sensor model, you need to look in the description of the DPKV or search on the Internet.
The multimeter is used as follows:
- We set the measured parameter (resistance) in a range close to the measured value, but not lower.
- We touch the ends of the sensor with the probes and look at the readings.
If the indicators are close to the standard values, then the coil is working properly. The disadvantage of this method is that it does not always indicate a faulty crankshaft sensor. Therefore, it is advisable to check using other methods.
When excited, all coils display an inductance indicator, including the coil located in the crankshaft sensor housing. The diagnostic method boils down to measuring this indicator.
When checking inductance, you must have a megohmmeter, a network transformer, an inductance meter and a voltmeter. To determine the indicator, carry out the following steps:
- Use a multimeter to measure the inductance of the coil (standard values are in the region of 200-400 mH).
- Using a megohmmeter, measure the resistance of the insulating layer between the ends of the DPKV (the data should be above 0.5 MΩ).
- A network transformer is used to demagnetize the sensor coil (deviations indicate the need to replace the part).
Examination
Checking the DPKV is carried out in two ways: visually and using a diagnostic tool.
Visual inspection
When checking, you must pay special attention to the condition of the sensor; it must be in good condition and free from the following defects:
- There should be no cracks or chips;
- The sensor head must be free of dirt and chips;
- The connector must be clearly fixed and not loose;
- The wire must be without damage to the insulation and screen;
- The wires near the connector should not be exposed;
Also, during a visual inspection, it is necessary to check the pulley itself. Its teeth should stand out clearly and not be clogged with dirt. Particular attention should be paid to its damper, quite often the pulley crown rotates on the damper and the sensor reads incorrect readings from the sensor due to the displacement of the pulley crown.
Testing with the device
This check can be carried out at a service station or using a Chinese ELM327 scanner.
Summarize
Taking into account the above, we can conclude that the crankshaft sensor is one of the most important elements in the overall electronic control circuit of the power unit. Failure of the DPKV will lead to a complete stop of the engine; malfunctions in its operation greatly complicate the operation of the vehicle or make driving a car almost impossible.
As for checking and replacement, at the very beginning you should make sure that there are no foreign objects in the gap between the sensor and the synchronization disk, and that the gap itself is within acceptable limits. At the same time, it should be taken into account that the device may be serviceable and operational, but the cause of failure is dirt on the DPKV core.
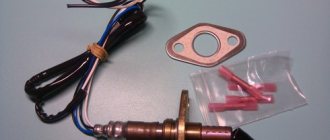
Purpose and operating features of the camshaft position sensor (camshaft position sensor) on gasoline and diesel engines. Checking and replacing the sensor yourself.
Why does the starter turn normally, but the engine does not catch and does not start? Main causes of malfunction, checking fuel supply and ignition systems. Adviсe.
Purpose, design and operating principle of the crankshaft position sensor (synchronization sensor). How to check and install the crankshaft sensor.
Why spark plugs flood on injection and carburetor engines: the main reasons for wet spark plugs. How to dry spark plugs and start the engine, tips.
Position sensor device (sensor based on the Hall effect). Design features, purpose and principle of operation. How to check the sensor on a car yourself.
Design and operating diagram of the injector. Pros and cons of an injector compared to a carburetor. Malfunctions of injection power systems are common. Useful tips.
The phase sensor has failed - error 0343
About a week ago, after checking the compression in the engine of my Kalina, an error appeared from BC State: 0343 - high signal level of the phase sensor. But the "Check" did not light up. At first I thought that this was a temporary error, since I was turning the engine with the starter without spark plugs. But after long-term manipulations with resetting all errors and even after resetting the ECU on my Kalina, I did not achieve any results.
After the reset, the error disappeared, and for some time the on-board computer did not show any faults. But this did not last long, approximately after the next start of the engine, a warning with code 0343 was again displayed on the State display. I tried to remove the terminal from the battery and move the connector on the ECU, I thought it might come off a little. But nothing helped.
I went to the store, looked at the prices of the phase sensor for Kalina, and there they were 280 rubles each. I decided to go to the car market in the hope of finding something cheaper. But in each tent the prices were 300 rubles. But after haggling a little, the seller knocked off as much as 50 rubles. I immediately put it in place, and - Oh, miracle, the error disappeared and for several days now I haven’t remembered it. We can say that this is the first real breakdown on my Kalina in 2.5 years of operation.
I put the old camshaft position sensor in the glove compartment, just in case. Although, I think that even after this sensor fails, you can drive quite well. Tested from personal experience with my Kalina - after removing the plug from the phase sensor, the engine characteristics do not change in any way, even instantaneous fuel consumption remains the same.