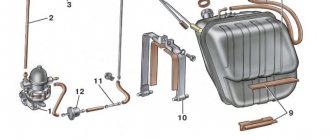
Adjusting the fuel pump drive for VAZ 2108, 2109, 21099 cars
As you know, on VAZ 2108, 2109, 21099 cars the fuel pump is mechanical, driven from the camshaft through a pusher.
The performance of the fuel pump, and therefore the normal operation of the engine, directly depends on how correctly the fuel pump drive is adjusted. If there are dips, jerks, twitches in the engine operation, throttle response has decreased at medium and maximum loads, or no fuel is supplied to the engine at all, it makes sense to adjust the fuel pump drive. The essence of the adjustment is to change the amount of minimum protrusion of the pusher relative to the plane of the heat-insulating spacer and gaskets of the gas pump, in order to ensure its optimal performance.
if the minimum protrusion of the pusher is greater than the norm, then its maximum protrusion will increase, which will lead to the creation of excess pressure by the fuel pump (as a result, “overflow”)
Adjusting the fuel pump drive for VAZ 2108, 2109, 21099 cars
— Remove the fuel pump from the car engine
In this case, the heat-insulating spacer and gaskets remain on the engine.
— Rotate the crankshaft until the pusher protrudes to a minimum
The moment of minimum protrusion can be determined visually by placing a finger on the pusher. Using a large slotted screwdriver, we slowly rotate the crankshaft by the flywheel teeth in the hatch on the clutch housing, and use our finger to control the movement of the pusher.
— We measure the minimum protrusion of the pusher
There is a special device for these purposes (67.7834.9506), but you can get by with a caliper. In the image below, the measurement was made generally using a conventional drill (1 mm). The minimum protrusion of the pusher should be in the range of 0.8 - 1.3 mm.
measuring the protrusion of the VAZ fuel pump pusher using a drill
If the obtained value is less than the required one, the performance of the fuel pump will be low. As a result, the negative consequences for engine operation described above occur. Otherwise (the value is higher than normal), an “overflow” of fuel occurs in the carburetor, since the fuel pump produces high fuel pressure, and the valve in the float chamber is not designed for such a load.
You can adjust the minimum protrusion by selecting gaskets for the fuel pump. There are two of them: between the heat-insulating spacer and the engine (0.27-0.33 mm), between the fuel pump and the heat-insulating spacer (0.79-0.80 mm).
fuel pump gaskets
If the protrusion of the pusher is insufficient, replace the gas pump-spacer gasket with a thinner one similar to the spacer-engine gasket (0.27-0.33 mm). If the protrusion is greater than normal, then install a thicker gasket for the fuel pump-spacer (1.10-1.30 mm). Such a thick gasket can be taken from the fuel pump repair kit or cut from a paronite sheet of the required thickness. The gasket between the heat-insulating spacer and the engine does not change and is not involved in adjustment.
If it is impossible to adjust the fuel pump drive by selecting gaskets, it is necessary to replace the pusher.
Notes and additions
— The performance of the fuel pump of VAZ 2108, 2109, 21099 cars is 1 liter per minute at an engine speed of 2000±40 rpm and an air temperature of 20 degrees. The fuel injection pressure is 0.21-0.30 kgf/cm².
More articles on the fuel system of VAZ 2108, 2109, 21099 cars
Source
Checking and adjusting pump pressure
Bleeding the brakes of VAZ 2108, 2109, 21099 cars
It’s no secret that any part of a car has a certain resource. The “nine” fuel pump, like any part, eventually stops pumping gasoline properly, our instructions will help you figure it out:
- Moreover, on the VAZ 2109 the problems with the fuel pump are always the same
- As a rule, the reasons are not tightness of the valves or housing, fuel wire, or diaphragm, perhaps the fuel filters are clogged, or the fuel supply lines are overheating
- The main problem is ultimately insufficient gasoline pressure at the outlet of the fuel pump.
- And in the case when your fuel pump initially could not show the appropriate (required) output pressure, then all the problems stated above only aggravate the situation
- You need to know exactly the output pressure (immediately before the carburetor) that the fuel pump should develop when the engine is idling.
- As a rule, all fuel pumps - both cars and trucks - must produce a pressure in the range from 0.20 atmospheres to 0.35 atmospheres. When your gas pump has a similar output pressure, then you should not have problems with gasoline supply
- The pressure is measured with a pressure gauge that has a scale with divisions of 1.6 atmospheres - on such a pressure gauge it will be possible to record the pressure of the fuel pump
- When the pressure is measured and it turns out to be below normal, you may just need to adjust the pump
- It is possible to adjust the fuel pump either by moving it closer or further from the engine block (by changing the thickness of the gasket)
- The second method is to strengthen the spring (washers are placed under it, the operation is performed taking into account the wear of existing parts and the strength of the spring)
- The third option is to change the length of the rod
- Any of the listed measures (or all in combination) make it possible to increase the pressure of the fuel pump to the level of 0.20 - 0.30 atmospheres
- The best thing, of course, is to bring the figure to 0.30-0.35 atmospheres at idle speed
- When the engine starts running at higher speeds, this figure will increase a little more.
Characteristics of the VAZ 2109 fuel pump
To understand how a working pump works and check its operation, it is important to know its operating characteristics:
- The length of its rod is 82.4 millimeters
- In this case, the rod protrudes above the gasket by 0.8 - 1.3 millimeters
- The thickness of the very first gasket is 0.3 millimeters
- And, the stroke of the rod is 2.5 - 2.8 millimeters
Useful tips
A couple of very useful recommendations for beginners on what to do if a fuel pump malfunction occurs on a VAZ 2109:
It is important to note that on machines that have a return line, the problem may arise due to the release hole being too large, then most of the pressure is relieved by the return line. In the event that the installed pump on your machine cannot be adjusted, you will have to replace it Today on the market Dozens of models of pumps for VAZ from different manufacturers are sold. In order not to buy a fake, you should approach the purchase very responsibly - choose a company store and a reputable manufacturing company, purchase exclusively models of gasoline pumps recommended by the VAZ plant. And the most ideal option is to contact an official dealer of VAZ spare parts in in your region, then you will receive the required part quickly, and you won’t worry about whether you got a bad quality fuel pump, and you won’t have to look for and buy a new pump a second time
How to adjust the fuel pump drive?
Using the example of the fuel pump of the engine power supply system 21083 of the VAZ 21093 car, we will adjust the fuel pump drive.
On a VAZ 21093 car, the fuel pump is mechanical, driven from the camshaft through a pusher. The performance of the fuel pump, and therefore the normal operation of the engine, directly depends on how correctly the fuel pump drive is adjusted.
If there are dips, jerks, twitches in the engine operation, throttle response has decreased at medium and maximum loads, or no fuel is supplied to the engine at all, it makes sense to adjust the fuel pump drive.
The essence of the adjustment is to change the amount of minimum protrusion of the pusher relative to the plane of the heat-insulating spacer and gaskets of the gas pump, in order to ensure its optimal performance.
Adjusting the fuel pump drive of a VAZ 21093 car
Removing the fuel pump from the car engine
In this case, the heat-insulating spacer and gaskets remain on the engine.
Rotate the crankshaft until the pusher protrudes to a minimum
The moment of minimum protrusion can be determined visually by placing a finger on the pusher. Using a large slotted screwdriver, we slowly rotate the crankshaft by the flywheel teeth in the hatch on the clutch housing, and use our finger to control the movement of the pusher into the spacer.
We measure the minimum protrusion of the pusher
There is a special device for these purposes (67.7834.9506), but you can get by with a caliper. In the image below, the measurement was made generally using a conventional drill (1 mm). The minimum protrusion of the pusher should be in the range of 0.8 - 1.3 mm.
If the obtained value is less than the required one, the performance of the fuel pump will be low. As a result, the negative consequences for engine operation described above occur. Otherwise (the value is greater than normal), fuel “overflow” occurs in the carburetor, since the fuel pump produces high fuel pressure, and the valve in the float chamber is not designed for such a load, fuel “overflow” will occur.
What is a fuel pump and what is it for?
So, the first thing I want to talk about is what a fuel pump is and what it is intended for. As you can already understand from the name, the gas pump comes from two words: gasoline and pump, that is, it is a pump that pumps gasoline, everything seems to be clear here, and there is nothing complicated about it. In the fuel system, the fuel pump - if compared with the human body, can be called a heart, since our heart is also a kind of pump or pump that pumps blood, providing the body with everything vital. Life is impossible without a heart (fuel pump), and this also applies to a car with a non-working gas pump. The car turns into a static pile of metal that is incapable of anything.
What fuel pumps were installed on VAZ 2108/2109 cars
Most VAZ 2108/2109 cars were equipped with gasoline engines with carburetor injection of a combustible mixture into the combustion chambers. Only their latest modifications were equipped with fuel injection systems.
Table: serial engines of VAZ 2108/2109 cars
| Engine modification | Volume, cm 3 | Number of valves, pcs | Injection type | Years of manufacture |
| VAZ 2108 | ||||
| 2108 | 1289 | 8 | Carburetor | 1984–1997 |
| 21083 | 1499 | 8 | 1986–2005 | |
| 21081 | 1099 | 8 | 1987–1997 | |
| 2111–80 | 1499 | 8 | Injection | 1994–2005 |
| VAZ 2109 | ||||
| 2108 | 1289 | 8 | Carburetor | 1987–1997 |
| 21081 | 1099 | 8 | 1988–1997 | |
| 21083 | 1499 | 8 | 1988–2004 | |
| 2111–80 | 1499 | 8 | Injection | 1994–2004 |
| 11183–20 | 1596 | 8 | 1994–2004 | |
Absolutely all carburetor “eights” and “nines” were equipped with DAAZ mechanical fuel pumps produced by the Dimitrovgrad Automotive Accessory Plant. They were and are now produced under catalog number 2108–1106010.
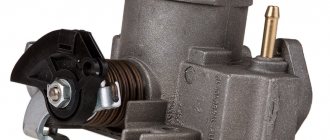
Mechanical fuel pump DAAZ 2108–1106010
VAZ 2108/2109 injection engines were equipped with electric submersible gasoline pumps produced by Russian enterprises Pekar, Utes, SAAZ, as well as pumps of joint and foreign production. Fuel pumps were installed on the latest modifications. The catalog number of the submersible electric fuel pump VAZ 2108/2109 is 2112–1139009.
Electric pump "Bosch" 2112–1139009
Features of the design and location of fuel pumps VAZ 2108/2109
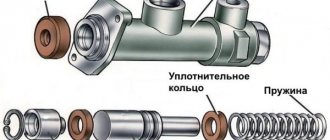
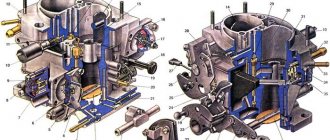
The DAAZ gasoline pump has a simple mechanical design. It includes:
- a body consisting of an upper and lower part;
- lid;
- mesh filter;
- valves (inlet and outlet);
- diaphragms (3 pcs) with spacers;
- the rod to which the diaphragms are attached;
- return spring;
- manual pumping lever.
Design of the DAAZ fuel pump
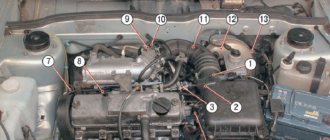
The VAZ 2108/2108 mechanical fuel pump is located in the engine compartment of the car and is installed on the auxiliary drive housing (in front of the ignition distributor). It is driven by the camshaft through a cam mechanism and a rod (pushrod). The camshaft rotates an eccentric, which transmits force through a pusher to a balancer at the bottom of the pump housing. The latter raises and lowers the rod with the diaphragms. Thus, a vacuum is formed at the pump inlet, and pressure is formed at the outlet. Valves located in the device body are responsible for its maintenance.
The VAZ 2108/2109 mechanical fuel pump is located on the auxiliary drive housing
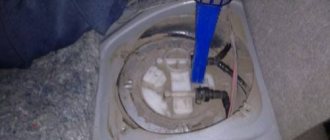
On injection VAZ 2108/2109, the fuel pump is not a separate device, but an element of the fuel module. It also includes:
- plastic storage cup;
- coarse mesh filter;
- fuel level sensor.
Fuel module assembly
The module is located in the car tank. Its lid (base) is located at the top of the container. You will find it by removing the back seat and peeling back the carpet.
The electric fuel pump in the injection VAZ 2108/2109 is located in the car tank
Structurally, the fuel injection pump VAZ 2108/2109 is an electric motor with an impeller on the shaft, which, rotating, pumps gasoline, creating a vacuum at the inlet fitting and pressure at the outlet. The pump is powered from the machine’s on-board network, protected by separate relays and a fuse.
Design of the electric fuel pump VAZ 2108/2109
An article dedicated to self-repair and replacement of the gas tank on a VAZ 2109 is located here: https://vazweb.ru/desyatka/pitanie/zamena-benzobaka-vaz-2114.html
Pump operating principle
The VAZ 2109 fuel pump has a fairly simple design; the injector functions only thanks to it. It is based on two elements - an electric motor and a pump with a filter element.
Please note that the “diaper” (as people call the filter due to its similarity) needs to be changed on time - try not to let it work for more than 20 thousand km
Otherwise, it becomes saturated with metal shavings, dirt and other rubbish, which gets into the line and clogs the injectors.
The fuel rail contains a mixture of gasoline and air (also purified, by the way). The proportion is always the same - 14 parts of air and one part of gasoline. This is the ideal mixture for combustion to occur.
But you need to pay attention to the fact that the VAZ 2109 fuel pump relay, which is controlled by an electronic unit, is involved in the operation. It is used to supply power to the pump motor.
The pump's performance is high, so the engine does not run constantly, but intermittently (and depending on the operating mode of the engine, the pauses between starts may be different).
For control, there is a pressure regulator installed on the ramp. To drain excess gasoline - a check valve. With its help, all excess gasoline flows back into the tank. The VAZ 2109 fuel pump (injector) is removed if it is being repaired or replaced. The following tools will be useful:
- Pliers.
- Keys for “6”, “8”.
- Phillips and flathead screwdrivers.
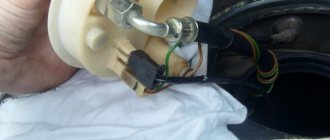
Raise the lower part of the seat, opening the rear doors completely. Unscrew the screws securing the plastic cover. Disconnect the power supply and connection to the level sensor. Loosen the clamps and remove the hoses
Please note that the pressure in the system must be reduced in advance. Using an “8” wrench, unscrew all the nuts that secure the pump to the tank body. Carefully remove the pump from the hole. The main thing in this matter is accuracy, as there is a risk of damaging the fuel level sensor
And one more thing: before removing the VAZ 2109 fuel pump, you need to get rid of dirt and dust. Therefore, blow the installation area with compressed air or at least clean it with a brush
The main thing in this matter is accuracy, as there is a risk of damaging the fuel level sensor. And one more thing: before removing the VAZ 2109 fuel pump, you need to get rid of dirt and dust. Therefore, blow the installation area with compressed air or at least clean it with a brush.
To verify the serviceability (or malfunction) of the fuel injection pump of the VAZ 2109, just remove it and connect it directly to the battery. If it works normally, without any extraneous sounds (and air pressure is felt from the outlet), then there are no problems with it. But if it does not turn on even this way, you should think about replacing it. The price of a new one will be about 2000 rubles. Is it worth repairing an electric motor? It is unlikely that this will improve the situation for a long time, but as a temporary solution it is quite normal. But you can do this procedure only if you are confident in your abilities and have an understanding of how electric motors work.
To provide information more conveniently, we will divide the article into two large parts:
How to measure the pressure in the fuel system with your own hands
There are many ways to find out the pressure in the fuel rail. For example, buy a device to check fuel pressure. A kit with a fuel pressure gauge, adapter and drain will cost you 1200-1300 rubles. Pay RUB 300 to the service station and take measurements there. You can also measure the pressure in the fuel system with an air pressure gauge, which is used to measure tire pressure. This is where I will dwell in more detail. Since the site is dedicated to cars of the tenth family, then further figures and some nuances will relate specifically to the VAZ 2110. Otherwise, the procedure is similar to any other car.
How to check a mechanical fuel pump VAZ 2108/2109
Checking a mechanical fuel pump involves determining its performance, i.e. measuring the amount of fuel pumped per unit of time. And according to the characteristics of the device, it should be at least one liter per minute. To determine it, you will need an assistant, as well as the following tools and tools:
- screwdriver with Phillips bit;
- a piece of fuel hose;
- 2 empty plastic bottles;
- 1.5 liters of gasoline;
- watch with stopwatch.
- Using a screwdriver, unscrew the screw on the outlet fitting clamp, loosen it and remove the fuel hose.
- Pour gasoline into a plastic bottle. We lower the free end of the fuel hose (removed from the outlet fitting) into the bottle to the bottom. Through it, gasoline will be sucked into the carburetor when the fuel level in the float chamber decreases.
- We put the end of the prepared hose onto the outlet fitting of the fuel pump. Place the other end into an empty bottle.
- We ask the assistant to start the engine, start the stopwatch. If the car has a tachometer, stick to 2000 rpm. If it is not there, we rely on hearing.
We lower the hose from the outlet fitting into an empty bottle
If the amount of gasoline pumped in one minute is less than a liter, the pump is faulty
Further diagnostics should be aimed at identifying the faulty pump element. To carry it out you need:
- screwdriver with Phillips bit;
- wrenches 10 and 13;
- caliper (ruler).
- First of all, we check the operation of the valves. Unscrew the screws of the clamps securing the fuel hoses to the pump fittings. We remove the hoses. We put our finger (palm) against the outlet fitting, plugging it. Press the manual pumping lever several times. At the same time, the pump should make slurping sounds, and air pressure should be felt at the fitting. We check the intake valve in the same way. When you press the pumping lever, your finger should be sucked into the fitting. If there is neither pressure at the outlet nor vacuum at the inlet, either the valves or the diaphragms are faulty.
You should feel a vacuum at the inlet fitting, and air pressure at the outlet
The mesh filter must be clean and free from mechanical damage.
If the diaphragms are damaged or deformed, they must be replaced
The length of the pusher should be 82.5 mm
Mechanical fuel pump repair
The functionality of a mechanical fuel pump can be restored by replacing its faulty elements. You can buy them at any automobile store. But it is better to buy not individual spare parts, but a repair kit. It includes all the elements that can fail:
- intake and exhaust valves;
- diaphragms with spacers, “plates”, rod;
- pusher;
- thermal spacer;
- gaskets
Replacing valves
To replace the pump valves you will need a slotted impact driver and a small hammer. The valves are held in their seats by punching at three points. These areas must be carefully knocked off with a screwdriver. After this, the valves can be removed. Having installed the new parts, we secure them with cores. To do this, place the tip of the screwdriver on the edge of the housing along the circumference of the socket and strike it lightly with a hammer. We fix each valve in three places.
How to change apertures
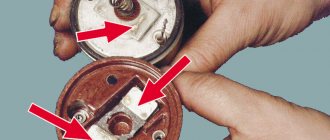
To replace the diaphragms, you need to unscrew the nut by 10 in the upper part of the rod. Next, we remove the damaged elements, and in their place we install parts from the repair kit.
The kit includes three diaphragms: two working and one safety. The latter serves to prevent unauthorized fuel from entering the carburetor if the first two are damaged. It is installed at the very bottom of the rod immediately after the lower “plate”. We place spacers on top of it on the rod: first a small one, then a large one. We place the working membranes and the upper “plate” on them. We secure the resulting structure with a nut.
The mechanical fuel pump has 3 diaphragms
Replacing the pusher, thermal spacer and gaskets
The thermal spacer does not need to be replaced unless it is damaged. Inspect its mating surfaces, especially the outer one, to which the lower part of the pump housing is attached. It should be perfectly smooth. Otherwise, oil leakage may occur at the junction of parts during engine operation.
Replacing the pusher is carried out by removing the old one and installing a new rod in its place. There is no difference in which end where it will be installed.
Now about the gaskets. There are only three of them in the repair kit, and they have different thicknesses:
The first is intended for installation between the thermal spacer and the auxiliary drive housing, and the gaskets “B” and “C” are used to adjust the protrusion of the pusher above its mating surface.
The adjustment is made as follows:
- We install the thermal spacer with the first gasket and a new rod into the auxiliary drive housing.
Installation of gaskets and thermal spacer
The thinnest gasket is installed between the spacer and the accessory drive housing
The pusher should protrude 0.8–1.3 mm above the mating plane of the spacer
After the adjustment is completed, the fuel pump is installed in place and secured with nuts.
CORRECT DISASSEMBLY AND REPLACEMENT PROCEDURE
In order to properly remove the fuel pump, you must perform the following sequence of actions:
- Buy a repair kit right away.
- Remove the air filter and its housing.
- Disconnect the gasoline supply and return hoses from the fuel pump fittings.
- Unscrew the nuts that secure it.
- Remove it carefully so as not to damage the gaskets.
- After this, inspect each part for cracks, check all its valves for leaks.
- Make sure that the discharge and suction fittings remain motionless in their sockets.
- The diaphragms must be free of peeling and ruptures.
- The filter must be absolutely clean and undamaged.
- Wash all filter parts with gasoline and then rinse with a compressor.
- Replace all damaged parts, it is also recommended to install a new pump gasket.
- When installing the gasket, apply Litol-24 type lubricant to its surface.
- If the housing is damaged or there is other irreparable damage to important parts, the pump will have to be completely replaced.
- Then you need to move on to installing the pump in place.
- In this case, you should immediately adjust its supply using spacers.
- To do this, you need to measure the protrusions of the pusher.
- If the protrusion is too strong, the gasoline pressure will be increased, which will easily break the carburetor shut-off valve.
- If the distance is lower than required, when the load increases and the vehicle speed increases, insufficient gasoline will flow into the carburetor.
- Install the gasoline pump in reverse order.
- Make sure that the arrow located on the body points towards the carburetor.
- When installing the diaphragm unit, the holes in its gasket should be located away from the muffler pipe.
Thus, you have outlined detailed instructions for removing and disassembling the fuel pump, which will help you carry out this operation yourself. You can finish here, you shouldn’t have any difficulties.
Replacing a mechanical fuel pump VAZ 2108/2109
Replacing a mechanical pump assembly will take no more than half an hour. To implement it you will need:
- key to 13;
- screwdriver with Phillips bit;
- container for draining gasoline.
- Unscrew the screws of the fuel hose clamps on the inlet and outlet fittings of the pump.
- Remove the hoses from the fittings.
- Using a 13mm wrench, unscrew the fuel pump mounting nuts.
- We dismantle the pump. We drain the gasoline from it.
Removing a faulty pump
Securely secure the pump with nuts
Pump gasoline into the pump by pressing the manual pump lever
Cause of fuel pump failure
There are usually two reasons. The first is severe contamination of the fuel filter, the second is the car owner’s habit of driving with a half-empty tank.
We have figured out the purpose and location, now I bring to your attention instructions for replacing the fuel pump, that is, further we will talk about how to replace the VAZ fuel pump with your own hands.
1. First of all, you should prepare the car for this procedure; to do this, use a rag to clean the engine, cylinder block, as well as the fuel pump itself from dust and dirt, using white spirit or a special cleaner.
2. For the next stage, you will need two M8 bolts to plug the holes in the hoses, since when they are disconnected, fuel will leak out.
3. Next, using a Phillips screwdriver or an “8” wrench, loosen the fastening clamps that hold the fuel hoses and remove the hoses from the fuel pump fittings.
Now you can actually plug the ends of the fuel hoses with the previously prepared M8 bolts.
4. Replacing the VAZ fuel pump continues and the next step will be to remove the fuel pump; to do this, unscrew the two fastening nuts that secure the fuel pump to the cylinder block, using a key set to “13”.
5. When everything is ready, you can begin to remove the fuel pump from the studs, while paying attention to the condition of the gasket and, if necessary, replace it.
6. Remove and clean the heat-insulating spacer from dirt and dust, just as in the previous case with the gasket; if necessary, replace the gasket located between the cylinder block and the heat-insulating spacer.
Checking the performance of the fuel pump on injection VAZ 2108/2109
If in Sputniks and Samaras with carburetor engines, fuel pump malfunctions are associated only with its design, then in injection vehicles they can also be caused by problems with the power supply of the device.
Diagnostics of the electric circuit of the fuel pump
To check whether voltage is supplied to the fuel pump, turn on the ignition without starting the engine and listen. When you turn the key, you should first hear the click of the relay, and then the characteristic “squeal” that the electric motor of the fuel pump emits. If these sounds are absent, the search for the problem should begin with the pump circuit protection devices.
The fuel pump relay and fuse are located in an additional mounting block, which is located under the glove compartment. The pump relay (R2) is installed in the middle, and its fuse (F2) is located to the left of it.
The fuel pump relay and fuse are located in an additional mounting block under the glove compartment.
We check them in this order:
- Disconnect the negative terminal from the battery.
- We remove the fuse from the socket and test it with a tester. If it is faulty, we replace it.
- We connect the terminal to the battery and turn on the ignition without starting the engine. We switch the tester to voltmeter mode and measure the voltage between the relay output to which the pink wire fits and ground. The device should show 12 V. If there is no voltage, the problem must be looked for in the wiring or contact group of the ignition switch. If power is supplied to the relay, use a screwdriver to close the terminal to which the pink wire fits with the terminal connected to the gray wire. This way the pump circuit will be closed directly (bypassing the relay). The fuel pump is working - we change the relay, if not - we check whether voltage is supplied to the pump itself.
- We remove the back seat. We bend the carpet underneath and find the hatch. Unscrew the screws (2 pcs) securing it. There is an electrical connector under the hatch. Disconnect it from the pump. Turn on the ignition. Using a tester turned on in voltmeter mode, we measure the voltage between the “plus” (gray wire) of the pump and its “ground”. There is voltage - the problem is in the pump itself, if not - the reason should be sought in the wiring.
Checking the fuel pressure in the system
If the diagnostics show that the pump is working, but the above signs of its malfunction are observed, you need to check the fuel pressure in the system. For this you will need:
- a pressure gauge with a measurement limit of 5–7 atmospheres (a regular tire gauge will do);
- a piece of petrol-resistant hose with a length of 50 cm and an internal diameter of 10–12 mm;
- nipple cap;
- 2 hose clamps;
- dry rag.
We check the pressure in the following order:
- We find a special fitting on the fuel rail. It is located on the right side of the device (when viewed from inside the car).
The fitting is located at the end of the ramp on the right side
Unscrew the spool with a nipple cap
We connect one end of the hose to the pressure gauge, the other to the fitting on the ramp
The pressure when the ignition is on should be 2.8–3.2 atmospheres
Where is the fan relay VAZ-21099 injector
Checking thermal valve clearances on engines of VAZ 2108, 2109, 21099 cars
Quite often a problem arises with the Ninety-Nine when the engine fan does not turn on and the coolant begins to boil. If such a malfunction occurs, first of all they check the functionality of the fan itself by applying voltage directly to it from the battery, but there may be other problems.
In order to check the entire circuit, it is important to find where the VAZ-21099 injector fan relay is located, since it is responsible for turning on the airflow. We find this part in the front of the car, on the passenger side, it is installed under the glove compartment, at the passenger’s feet
The required relay in the picture is indicated by an orange circle, and here you will also find a fuse that blows when the cooling fan is short-circuited.