Depending on the configuration, the layout of the Lada Kalina stove may vary. In one case, the design of the ventilation and heating system is simple and reliable, in the other, temperature control in the car interior is controlled by automation and electronics. Let's look at the operating principle of the Lada Kalina heater in different modifications.
Instructions for replacing the stove
Before removing all the necessary parts, cables and other components from Kalina, prepare a new radiator, pipes and clamps. The pipes will be required in case the old ones are worn out or they have never been changed over the years of operation. As practice shows, hoses are most susceptible to wear due to temperature changes, so in any case they need to be changed from time to time.
Instructions on how to change the radiator are presented below:
- We begin the replacement procedure in the engine compartment. First, place a container under the drain hole and drain all consumables from the radiator. If you notice that the coolant is already old and has exhausted its service life, which can be understood by its color and deposits, then it is also better to change the antifreeze.
- You need to ensure the most convenient access to all pipes and hoses of the radiator assembly in the engine compartment. To do this, dismantle the power unit air filter housing, the battery, and its platform. Next, you need to disconnect all the lines from the radiator unit in the engine compartment. Having done this, you can use a wrench to unscrew the nut that secures the metal casing to the engine shield. This nut is located next to the pipes that go into the Kalina's interior.
- Next, we move into the car interior. You need to remove the gas pedal; to do this, unscrew the three nuts. As for the brake pedal, it cannot be removed, so just move it to the side as far as possible.
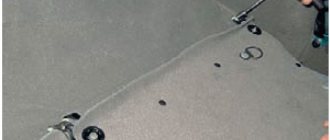
- Now you have to cut the steel casing as shown in the photo, and then cut off the tubes of the radiator assembly. Having done this, you can dismantle the device from the pedals, but to do this you will also need to unscrew the bolts that secure it.
- Before installing a new radiator device, it will be necessary to carefully sand its tubes. Please note that they should be as even as possible. After all surfaces are ready, a line with a widened end is put on the upper tube, and a line with a narrower end is put on the lower tube. The remaining outputs must be connected in the engine compartment instead of the old ones. Also note that on the side of the Kalina’s interior, it is advisable to treat the place where the lines exit into the engine compartment with sound-insulating material.
1. Disconnect the pipes from the radiator system.
2. Cut off the casing and saw off the tubes as shown in the photo.
3. Remove the assembly clamp and replace it with a new one.
Price issue
The range of radiator units for Kalina is not particularly large. On average, prices for radiators are as follows:
1. Radiator device from AvtoVAZ (price - about 940 rubles)
2. Device from DAAZ (price - about 1 thousand rubles)
Wiring diagram for the Kalina stove regulator
Greetings, friends!
Hopefully most are on holiday weekend (like me) :-)
And as time allows, “we” continue to refine the classics and improve their comfort and convenience.
Today the next step is to modify the heater, namely: adding intermediate rotation speeds by installing a heater rotation speed controller from LADA KALINA, a heater RESISTOR from SHEVINIV
, as well as installation and refinement of all this goodness - into the “beard” of the VAZ 2107.
I read about this modification many times on the pages of fellow drivers. And so, once again passing through the shelves of car dealerships... I purchased what I needed)
The regulator itself is from Viburnum. 4 speeds + Position illumination.
Heater resistor from ShNiva (or 10). Happens at 3rd and 4th speed. I took it to 4 so as not to use the original one in combination. + Also, I didn’t forget the block for it.
The second question arose: where to insert it?!
It’s a collective farm thing to insert it into some hole and just leave it with the position illuminated - I didn’t want to.
“...H.Z. what it regulates, nothing is clear..."
-
the guest in the car will say.
Not our option, this doesn’t suit us :-) We’ll do it “like from the factory”)
For this, (not without difficulty) a Kalinov “plastic mask” was found from this switch.
Which fits him perfectly (well, still)
Well, since I have “Beard” from 2107, we will insert it all there
I “got” the idea from one of the drivers (sorry, I didn’t remember the nickname).
We cut out as much of a square as possible in the panel, in the place where the backlight rheostat was (I removed it, it’s still of little use)
Next, we cut up (whatever is convenient for you) a square of “plastic mask” of the required size.
In the light, it all looks a bit messy - there are a lot of gaps.
To do this, it is better to buy a small piece of Oracle advertising film (black, opaque - 641st), and cover the chamfers with it:
After this, everything looks much better)
Note:
I tried black electrical tape instead of Oracle - a very bad option. Not only is the electrical tape thick and weakly adhesive, but it also constantly “peels off” when you try the square in place.
After that, we put everything in place, adjusting the stationery. with a knife.
BE CAREFUL, don't overdo it. The main rule, as usual, is Measure Seven Times, Cut Once!
Further…
But now the task is even more difficult - to make the backlight so that the numbers and pictogram glow.
Nothing came to mind better than making a plastic box in which to place the lighting. I took superglue and plastic from the CD box and started assembling the fret box for lighting:
I placed an LED strip inside and brought out the wires from the back.
I placed it on top, on the resulting protrusion of the plastic square, and secured it with several “glue dots.”
I tried everything on, and it turned out something like this:
I immediately decided to change the position illumination in the switch itself, because... pale green didn't suit me. I disassembled and re-soldered the SMD LED to bright white:
Then it was the turn for the resistor.
Everything is simple here - remove the old one, mark the place for the new one (be careful not to touch its blades!):
Well, the final step is wiring. There are plenty of circuits on the drive, for example, I used THIS
I used it to connect everything. I had to buy additional “mom-pap” ones, including “EURO” (thin):
As usual, I paid great attention to the wiring: I soldered it where necessary and hid it in corrugation.
Well, the end result:
As usual, the camera highlights in some places.
The backlight turned out to be a little bright, I think I’ll turn it down a little later...
Well, now the review:
Let's imagine that the old switch divided the speed in half, 50% and 100%, respectively. If we take this into account in relation to the result, then subjectively, the distribution of speeds looks like this:
I think many will agree with me.
The first one is a little quieter than the stock one, but just as loud... and the air flow is also strong. I would like one that is very quiet, so that the air escapes slightly... so to speak, to maintain the temperature in the city, when it is not very cold.
The second one - let it be like the first one now, even slower...
The third - let it be almost like the second... or a little faster, because even at this speed the stove is enough for me
Well, the Fourth is like the third now.
Those. It turns out that, in fact, 4th speed (in such a state as it is) is not needed.
And the distribution of others also needs to be decided...
Therefore, the question of more precise modification of the resistor is still open to me and is a matter of time.
If you have any thoughts or advice, I'd love to hear it!
Selection of spare parts
The choice of a stove radiator should be approached carefully, since changing it is quite inconvenient. The majority of motorists choose an original part that is available for sale. But few people know that there are several analogues.
Let's consider the heater radiator options for Kalina, their catalog numbers:
- 1118-8101060 – this is the article number of the original catalog number of the heater radiator for Kalina. It fits perfectly and does not require any modifications. The average cost in the Russian Federation is 1500-1700 rubles.
Original heater radiator and hoses - There are several analogues that are in no way inferior to the original in terms of quality. Thus, spare parts from the following manufacturers are suitable for Kalina: Pekar (1118-8101060), Fenox (RO0001O7), Luzar (LRH 0118) . The average cost of an analogue is 1200-1500 rubles.
Kraft stove radiator
Reasons for failure
There are not many reasons for the failure of a stove radiator, but you need to know them. Let's consider the main ones:
- Radiator clogged, which led to pressure, resulting in a breakdown of the inner tube.
Antifreeze flows into the cabin due to a breakdown in the heater radiator - An air lock can also cause a radiator leak.
- Wear . Frequent use of the stove leads to wear on the inner walls of the tubes.
Perhaps these are the main reasons, but others may arise due to the operation of the car.
DIY heating system repair
To change this or that part of the heating system, it is not at all necessary to seek help from specialists. This will help save time, but not money. If you follow the recommendations, you can replace some system components yourself.
Heater fan
Even beginners can replace the Kalina stove fan. The main problem is its location. For this reason, most of the time is spent not replacing the part, but dismantling it.
Fan replacement with panel removal
The method is recommended by AvtoVAZ engineers, but it is not the simplest. Not everyone decides to use it in a regular garage. When performing work, you must follow the instructions:
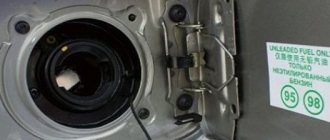
- First, turn off the power to the on-board network by disconnecting the battery terminals.
- Drain all coolant and remove the cabin filter.
- After unscrewing the fastening nuts, lower the steering column to its lowest position.
- Release the brake light switch from the wires, unclip the clips, and remove the upholstery from the pillars.
- Unscrew the screws and remove the front panel (cladding), then remove the dashboard along with the deflectors.
- Now you can begin dismantling the fan. To do this, you need to disconnect the terminal with wires from it, remove the ventilation hose, and unscrew the fastening nuts.
After installing the new fan, all further actions are carried out in the reverse order of dismantling. The procedure requires attention and accuracy and takes a lot of time. At some points, the help of a second person will be required.
Replacing a fan without removing the panel
It is not practical to remove the entire dashboard just because of the heater fan. You can replace the device without removing the dashboard - you just need to lift its right side. Next, you should “arm yourself” with a knife and a flashlight and crawl under the panel. The noise insulation is cut off, the fasteners are unscrewed, and replacing the Kalina stove motor becomes much easier. This method will significantly save time and nerves, although it will create some inconvenience.
Before you start replacing the electric fan, you need to make sure that this particular device is faulty.
Replacing the temperature controller
To dismantle the part and replace it, it is necessary to remove the control unit assembly. The procedure looks like this:
- the on-board network is de-energized by removing the “negative” terminal from the battery;
- the radio tape recorder (if any) is removed, and the terminal block of wires is unhooked from it;
- the damper control lever is removed;
- Next, the handle for controlling the temperature and direction of air flow is dismantled;
- there are plugs located at the bottom of the control unit - they need to be removed and the fastening screws underneath must be unscrewed;
- the center console should be carefully pulled towards you;
- After removing the console, disconnect the terminal blocks from the switches.
After replacement, everything is assembled in the reverse order. This operation is simple and only requires a couple of different screwdrivers to get the job done.
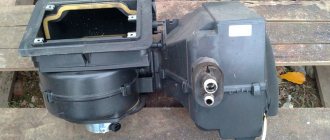
Replacing the heater core without removing the panel
Changing the heater radiator on a Lada Kalina, as on all front-wheel drive VAZ cars, is not an easy task. You will have to remove most of the front panel. To work, you will need a new heater radiator, hoses, clamps, an angle grinder and a standard set of tools. First you need to carry out some manipulations in the engine compartment:
- drain antifreeze from the cooling system;
- remove the battery and air filter housing, ensuring unhindered access to the heater pipes;
- you need to disconnect all the rubber pipes from the stove in the engine compartment, unscrew the nut securing the metal shield that covers the hoses going to the stove into the cabin.
Repair and replacement of faulty parts
Many novice motorists ask questions: how to remove the heater regulator on Kalina, what LED is in the heater switch on Kalina, what should be done when the heater mode switch on Kalina does not work. Answering these questions, I want to say that initially it is necessary to dismantle our entire mechanism, after which we proceed to disassembly according to the following scheme:
- First of all, disconnect the negative terminal from the battery. This is done to de-energize the system so as not to short-circuit any of the sensors during the disassembly process.
- We remove the radio and turn off the power coming from the wiring harness.
- We remove the damper switch lever, then remove the temperature regulator and the air flow distribution regulator.
- At the bottom, remove the plugs behind which there are 2 screws, unscrew the fastening screws and gradually begin to remove the instrument panel console.
- After our panel is removed, it is necessary to disconnect the power supply connectors located on the back.
- After eliminating the malfunction, assembly is carried out in the reverse order.
To carry out this work, we only need a flat and Phillips screwdriver from the tools.
Difficult or impossible switching of the temperature regulator may be due to a breakdown of the switch itself. On a Lada Kalina car, replacing the heater switch is quite easy (provided that work has previously been done to remove the heater control mechanism). On the rear console of the control panel, unscrew the four screws securing the switch block. We remove the cable fastening clamps, then remove the cables from engagement with the drive unit. We replace the broken switch and reassemble it in the reverse order. When performing this work, I give you useful advice: the location of the cables on the lever block must be marked with a marker; this is done in order to install the rods in their original places during assembly.
The dashboard of a Lada Kalina car disassembled
When the stove temperature regulator does not work on Kalina, the main reasons for the breakdown may be: a disconnected connection wire or a failure of the thermistor. Such malfunctions are treated by soldering the wire and replacing the broken element. It happens that the stove regulator on Kalina does not work due to a breakdown of the temperature sensor, which happens quite rarely. This sensor is located inside the car interior lamp. If it is found to be damaged, it must be replaced with a new one.
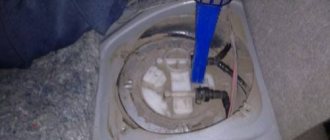
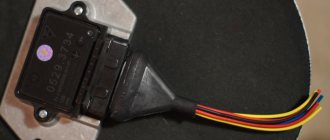
Visual instructions for removing the fan resistor
Answering the question about what kind of LED is installed in the stove switch in Kalina, I want to say that there are LED lamps with a power of 3 Watts and a voltage of 12 Volts. This lamp is quite enough for illumination, but some motorists install LEDs with a power of 5 Watts. This does not affect the work process, the backlight just becomes a little brighter.
Lada 2107 ##SeMeRiK ExCluSivE## › Logbook › 4-speed heater and regulator from viburnum)
I think all classicists are not satisfied with the noise from the stove. Well, one day I was driving with a friend, the heater was turned on at 1st speed and we almost couldn’t hear each other. Well, I decided to make a 4-speed stove, I took the regulator from a viburnum, and a resistor from a Chevy Niva.
Then I went to connect the whole thing. For convenience, I removed the heater body with the fan. I attached a resistor to the heater body so that it would also be cooled. I think it will be clearer in the photo.
I connected all this equipment according to this scheme
Next, I bought moms, dads and euros to connect to the regulator. But before that, we had to figure out where to “plug” this regulator. At first I thought of plugging it in instead of the instrument brightness control. But having considered all this, it was decided to do it differently to make it more beautiful.
I went and bought this record, also from Viburnum.
I cut a square out of it.
Dimensions 53 by 45 mm.
The green numbers didn't suit me. I decided to redo it. Carefully cut out the green numbers. Then I bought blue oracal film, which allows light to pass through. I peeled off the black film, glued the blue one under it and the factory black one with the numbers cut out on top of it. Let's see what happened.
I took the photo on my phone, so I can’t feel all the beauty. In fact, the live view is better. Then this square needs to be attached to the place where the instrument lighting was adjusted.
Then the task was to highlight these numbers. A blue diode strip was purchased in advance. I cut a piece of tape, soldered the wires, and began making a box. Taking a box measuring 54 by 46, I glued diode tape on the inside and brought the wires out to the back of the box.
I glued the diode tape in a circular pattern on the sides of the box.
Then I was not happy with the green indicator on the stove control. I decided to make it blue. I soldered a blue SMD diode, connected it and it was unsuccessful... Then I decided to solder a white diode, connected it and everything works.
Then he began to connect all the wires and accidentally, in a hurry, tore the wire out of the diode strip, took it to solder again, soldered it and installed it back. This time I connected everything carefully. Well, here's a photo of the result.
The last photo shows that there are highlights. This is my mistake, when I was gluing the box, I rubbed the black film with my fingers. But this matter can be fixed. One of these days I’ll buy black varnish and paint it over. And it glows very beautifully, I like it.
Well, now about the operation of the stove.
1st speed (40%) - has become much quieter, a little weaker than the 1st stock speed 2nd speed (70%) - a little stronger than the 1st stock 3rd speed (90%) - a little weaker than the 2nd stock 4th speed (100%) - blows stronger than the 2nd stock
OK it's all over Now. Thank you for your attention! Follow the blog!
Source
The principle of operation of the heating system in Lada Kalina
Before you independently look for a problem in the car’s heating system, you should study the principle of its operation.
The heating system control unit analyzes the data received from the ceiling temperature sensor. After this, he compares the obtained parameters with those set by the driver on the stove panel. If the difference in readings deviates by approximately 2 degrees, the heater control unit sends a command to the micro-gearbox. The latter, in turn, opens and closes the heater dampers, through which a heated air flow enters the cabin.
For this reason, if in a Lada Kalina a hot or cold stream of air is blowing from the heater, it does not matter how the knob is installed on the heater panel - it is worth checking the cabin temperature sensor.
Is the stove heating poorly? Try it.
Recently in our VK group I saw one post that talked about solving a problem with the stove. And the problem was this: even at an engine temperature of 80-90 degrees at full speed, the stove did not warm up the interior well. Moreover, everything is fine with all the equipment of Kalina’s heating system, and the thermostat is working, and there is no air lock, but it heats - well, not as it should! Read about the solution to this problem below, but for now a few words about observing your car.
I remember the first winter, the stove fried really well, and on the highway I almost never turned on second gear, since even in first it was hot in the cabin, and at fairly low temperatures - down to -25 degrees. In subsequent winters I did not experience any sensation of heat, although I never froze. But there is one BUT - now the first speed of the heater was not enough for a comfortable temperature. But until recently I didn’t bother about this, it’s warm at speed 2, and it’s normal!
But when I read one article, I realized that the problem is not isolated and most likely my Kalina also has such a problem. And it lies in the following: even with the temperature control knob in the extreme position (at the maximum “hot”), the heater damper does not open completely, and accordingly, the temperature of the air flow from the air ducts is not maximum. The lever of this damper can be seen if you look at the heater body on the driver’s side; there is also a cable that goes to it:
The essence of the modification is to ensure that the damper moves as far forward as possible (in the direction of travel of the car) when turning the lever to the extreme “hot” position. If you doubt that you have this problem, you can do as I did.
First, I brought the temperature sensor from the multimeter to the central deflector and measured the temperature at the 1st heater speed in normal mode, as it was before, without changing anything. This is what it looked like in practice:
Possible heater malfunctions and ways to eliminate them
Removing the heating system control regulator
If the stove blows very weakly or in the current mode it basically refuses to blow air, then there may be several malfunctions, as well as solutions:
- The heating system hoses are worn out. As a rule, if antifreeze leaks or the stove does not heat, this may be due to wear and tear on the pipes. To solve this problem, it is necessary to carry out a thorough diagnosis of each of the pipes. Coolant may escape through cracks or other damage.
- The heater valve has failed. If the stove control valve is broken, this can be indicated by traces of leakage of consumables in the vehicle interior.
- There are malfunctions in the operation of the control unit. If the problem lies in the unit, then first of all you need to check the quality of its connection to the on-board network. If it is connected correctly, then most likely the problem lies there. It is better to entrust unit repair to specialists.
- Wiring faults. Perhaps the unit does not turn on the heating system due to lack of contact with the on-board network. In this case, the problem is solved by checking the circuit to find the broken section.
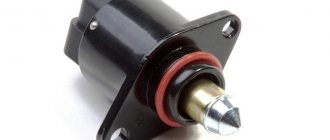
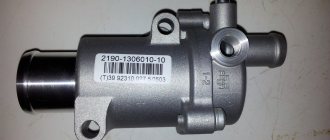
- The additional resistor is broken. This device is used to control the heater fan, so if the stove on Kalina does not heat, you also need to check the functionality of this element. If it doesn't work, then it will need to be changed.
- The Kalina heater regulator, located in the car's interior, does not work. If the heater only blows hot air, but does not react in any way when switching its mode from hot air to cold air, then most likely the regulator installed on the center console has failed.
- The radiator of the heating unit is broken. This problem is considered one of the most common on domestic cars, and it is especially relevant for Kalina. You can try to repair this device or change it yourself. We will tell you more about how to shoot and how to replace the device below (author - Interesting Video channel).
Types of systems
The standard (single-zone) version of the climate control system does not solve issues related to the characteristics of the organisms of different people. The essence of the problem should be explained with an example: when maintaining 22 °C in the cabin, the driver is comfortable, the passenger sitting next to him is stuffy, and the back row of seats is cold. In spacious cars, where a third additional sofa is installed, the effect of climate control is not felt by the rear passengers.
The solution to this issue was more complex climate systems:
- dual-zone climate control generates 2 air flows of different temperatures - for the driver and front passenger;
- a three-zone installation creates individual temperature conditions for the driver, the person sitting next to him and the rear row passengers;
- four-zone (otherwise multi-zone) allows you to supply air with different parameters to all seats - front and rear.
The supply of air masses of varying degrees of heating (or cooling) is organized through separate air ducts laid along the bottom and inside the side panels.
The control unit controls the temperature in each zone using separate sensors. So that passengers in the rear seats can independently adjust the air parameters, a panel with buttons, a display and deflectors - flow distributors - is installed between the front seats. It is almost impossible to predict the desires of car enthusiasts, provide for all possible situations and incorporate them into the climate electronics program. Therefore, vehicle manufacturers provide two buttons that allow you to turn on the air conditioning or climate control separately. Example: in winter you need to clear foggy windows, but the controller “doesn’t know” this and the cooler will not start. Then the driver turns off the climate control and forcibly activates the air conditioning with a separate button.
Main causes of malfunctions
So, what should we do if heat does not flow inside our car and cold air blows. Let's consider the main causes of such malfunctions:
- Failure of the Kalina heater switching control cable. The reason for such a malfunction may be that the latch has fallen off, and the cable stretches normally in one direction, but does not reach the opposite direction.
- On Kalina, the stove only works at speed 4. Associated with a broken thermistor.
- On a Kalina car, the heater switch often breaks when turned on abruptly, which is due to insufficiently strong plastic.
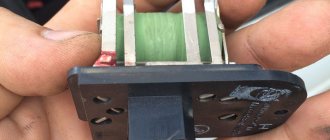
Faulty heater resistor of the Lada Kalina car
Here is a list of the main breakdowns that may occur. Next, we move directly to the repair itself and replacement of failed parts.
Summary
The Lada Kalina car is available with a ventilation and heating unit or with an air conditioning unit. For the first option, it is impossible to provide a cabin climate whose temperature will be lower than the ambient temperature.
The Lada Kalina air heater is considered one of the best in terms of heat performance in the VAZ family, but is far from the most reliable in operation. Problems begin almost at the car dealership, as many motorists say. But most of the problems are completely solvable, and often even without the involvement of car service specialists.