I ran into a problem that on the Internet all the articles on replacing the fuel pump were made with a fuel pump completely different from mine. And since I climbed there for the first time, it was a little boring... I had to do everything using the method of scientific knowledge. I took photos for myself so as not to forget what, where and how later.
First you need to relieve the pressure in the fuel pump. To do this, just pull out the fuel pump fuse, which is located behind the plastic partition on the passenger side, near the “brains”. In theory, the fuse will be the first on the right (closer to the engine compartment, mine was 15 A). We pull it out and start the car until it stalls.
We recline the rear seats. We see a black hatch. Unscrew its two screws and remove it.
Judging by the abundance of dirt, I am the first to climb here. We disconnect two pipes, I had to tinker with the second one, because it did not want to come off, resting against the back wall. When disconnecting the pipes, prepare a cloth; a little gasoline may leak out of them. Disconnect the power plug. Using a 10mm wrench, unscrew the 8 nuts.
After that, I vacuumed and washed there so that when pulling out the pump, dirt would not get into the gas tank. We remove the piece of iron, which was held by 8 nuts, and remove the seal under the piece of iron.
After this, we pull out the fuel pump module, carefully tilting it so as not to tear off the fuel level measurement float. We let the gasoline flow back into the tank) And then we carry the patient to the operating table. Let's start to sort it out. First I unscrewed the spring from the first metal rod.
Then, from the second rod, carefully prying it with a screwdriver, remove the metal ring.
Then we disconnect the pipe by simply pulling it to the side.
Then I disconnected the electrical plug.
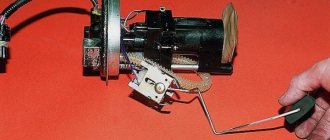
To remove the fuel pump from the housing, you need to bend the latches and carefully pull it up along the plastic “rails”
We gained access to the filter mesh. Having looked at the state of my mesh, I doubted whether it was even capable of letting anything through itself... We simply remove it by pulling it towards us.
The next stage was the most difficult for me. It was necessary to remove the old corrugated tube and then put on a new one. These tubes are crammed in so hard that you can't even take a horseradish away. I had to use an industrial hair dryer. First heat it up and then pull it out.
I took a new BOSH motor bought for 1300 rubles and a corrugated tube for 50 rubles. Putting the tube on was a pain in the ass... First I warmed it up, then put it on. To be sure, I tightened one end with a zip tie.
It turned out to be a little easier to put it on the motor. We put the fuel pump in place. We turn on and turn off the ignition a couple of times so that it sucks in gasoline)) And that’s it. let's start.
Bottom line: firstly, the terrible squeaking noise when I turned on the ignition disappeared, secondly, the car began to behave much more cheerfully,
A gasoline pump is a part of a car that is responsible for supplying fuel from the gasoline tank to the nozzles.
For the first time, an electric gasoline pump was invented in the USA in the 70s of the 20th century. In the mid-90s, almost all automakers switched to this system, abandoning the mechanical one. Replacing a gasoline pump on a VAZ-2112 is quite easy and does not require special knowledge or skills.
Video on replacing the fuel pump on front-wheel drive VAZs, including the VAZ-2112:
The video material will tell you how to replace a gasoline pump, and also give some recommendations and tips.
The process of replacing a fuel pump on a VAZ-2112
General view of the fuel pump module
The gasoline pump on the VAZ-2112 is located in the fuel tank.
The type of part is called submersible. Therefore, to replace it you will need to pull it out from the gas tank. It contains the FLS (fuel level sensor), which transmits readings.
- Disconnect the battery.
Removing the battery terminal for repair - We are dismantling the rear sofa.
Pull the loop to remove the rear sofa - Unscrew the two screws securing the top plate.
- Remove the hatch cover.
Unscrew the fastening screws and remove the fuel pump hatch cover. - Disconnect the power connectors on the fuel pump.
Disconnect the power cable connector - Using a 17 wrench, unscrew the fuel supply pipes.
Unscrew the fuel supply pipes - Now, release the pressure ring and dismantle it.
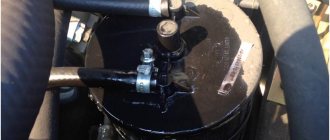
Remove the sealing ring - We carefully lift the fuel pump and remove the float from the tank cavity.
Remove the fuel pump from the tank - We dismantle the gasoline pump.
- We change the rubber o-ring, which is located on the lower seat.
- We carry out the assembly in the reverse order.
Now the gasoline pump has been replaced and you can continue driving. The average service life of a new product is 150,000 km.
Reasons for fuel pump failure
So, let's look at the main ones:
- Low-quality fuel leads to clogging and failure of the mechanical parts of the gasoline pump.
- Wear of internal parts of the fuel pump.
- The appearance of scuffs and shells, which occur mainly in winter, when the water in gasoline turns into ice.
- In the summer, when the heat is intense, gasoline loses its lubricating properties, which can lead to failure.
Choice
The choice of an electric fuel pump should be approached responsibly, because if it fails on the road, the car will not be able to continue driving. When assembled, this part has the article number - 2112-1139010
. It is used both for the original product produced by AvtoVAZ and for analogues.
The second most popular manufacturer is Pekar
, which has been producing fairly reliable spare parts for VAZ family cars for many years.
The pricing policy for electric submersible gasoline pumps of the 10th-12th generation fluctuates around 1,200 rubles.
Replacing a mechanical fuel pump
Unscheduled replacement of a mechanical type device takes place in the following order:
- We dismantle the air purification filter.
- Remove the fuel supply line to the fuel pump.
- First loosen the tightening of the clamp.
- Remove the fuel supply line to the carburetor.
- Unscrew the fasteners of the product.
Installation is in the reverse order. At the same time, do not forget to look at the arrows on the products showing the direction of movement of fuel to the carburetor.
The question is often asked, how to check the VAZ 2110 unit in operation? To do this, it is necessary to tighten the screws on the cover with the pump lever depressed and test the carburetor accelerator pump.
- Volkswagen Tiguan 2021 photo, price, equipment, video Tiguan 2017. Volkswagen Tiguan 2021 has been awaited in our country for a long time. Lyuby.
- New Hyundai Solaris 2021 photo, price, equipment Hyundai Solaris 2021 model year. New Hyundai Solaris 2021 photo, price and configuration ass.
- New Ssangyong Tivoli price, photo, video, characteristics. The new Ssangyong Tivoli has arrived in Ro.
New Lada 2021
- Lada X Ray Sport photo, technical specifications, price Lada XRay Sport. Lada X Ray Sport was officially presented at the capital's av.
- Lada Vesta Sport photo, technical specifications, price of Lada Vesta Sport. Lada Vesta Sport is officially shown on the Moscow auto show.
- Lada X Ray Cross photo, technical specifications, price Lada XRay Cross. Lada X Ray Cross 4x4 will not appear yet, it has become known.
- Lada Vesta Cross photo, video, technical specifications, price Lada Vesta Cross SW. The Lada Vesta Cross station wagon was shown last year.
- Lada Vesta Cross sedan photo, technical characteristics, price of Lada Vesta Cross. The Lada Vesta Cross sedan came as a surprise to many. X.
- Lada Vesta Signature photo, video, characteristics, price Lada Vesta Signature. The long-wheelbase Lada Vesta Signature was shown to the general public.
conclusions
Replacing a gasoline pump on a VAZ-2112 with your own hands is not difficult. The total time of the operation is about 1.5 hours, unless force majeure occurs in the form of a break in the power contact group or a breakdown of the pipeline connector.
Good afternoon. Today a VAZ 2110 came to our service center. The car stopped starting. Checked the spark plugs, excellent spark. The owner said that he had dried it out several times before. In this situation, we need to check the functionality of the fuel pump. We removed the fuel filter to see if fuel flows. But it didn't work. In this article we will show you how to remove and replace the fuel pump on a VAZ 2110, 2111, 2112. The instructions are suitable for all models of the tenth family.
| Article: Fuel pump - 2112-1139009 |
| Tools: To replace the fuel pump you will need wrenches and a set of sockets |
| Removing and replacing the fuel pump VAZ 2110, 2111, 2112: |
| First of all, disconnect the terminal from the battery, then tilt the rear seat to the side and unscrew the fuel pump cap. |
| Next, remove the connector from the fuel pump. |
| After this, loosen the clamp on the fuel line. |
| Then unscrew the 2 fuel lines. |
| Next, remove the gaskets on the fuel pump lines. |
| After this, unscrew the 8 bolts on the fuel pump. |
| Then remove the O-ring. |
| After that, pull out the fuel pump with the float. |
| Next, remove the rubber seal. |
| After this, insert the new fuel pump so that the arrow points to the rear of the car. |
| Connect the lines and close the fuel pump cover. |
| So we learned how to change the fuel pump on a VAZ 2110, 2111, 2112 with our own hands. The whole procedure took us about 20 minutes. Sometimes it’s enough just to wash the filter on the fuel pump and it will work like new. After this, the engine started, but not the first time. First he pumped fuel into the line. Try not to drive with an empty tank! Good luck on the roads! |
One of the most important tasks in the fuel system of a car is performed by the fuel pump or, as it is called, the fuel pump. It is he who supplies fuel through the fuel system and a lot depends on him. On injection VAZs, an electric fuel pump is installed, located in the tank. We will tell you in detail how to replace the fuel pump on a VAZ 2110-2112 in this article.
Description of the work
The location of the VAZ 2110 injector fuel pump is in the gas tank located under the bottom of the car, in the area of the rear seat. It is accessible from the cabin, so no inspection holes or other additional devices are required. Only tools needed:
- open-end wrench 13 and 17 mm;
- Phillips screwdriver;
- 7 mm tubular socket wrench.
Instead of a long 7 mm tubular wrench, you can use a small open-end wrench, but this will be inconvenient and take more time. Before starting repairs, you should completely remove and pull out the rear seat to gain access to the gas tank. Two more preliminary operations that are done in the engine compartment.
- Loosen the nut securing it to the negative terminal of the battery, remove the clamp along with the wire.
- Relieve pressure from the fuel line. At the end of the ramp, near the outer nozzles, there is a bleed valve with a rubber cap on it. Having removed it and substituted a plastic cup, you need to press the valve stem. Fuel will leak out from there and the pressure in the system will drop.
Under the bottom of the rear seat there is a square hatch that provides access to the gas tank; it will need to be removed. The subsequent disassembly diagram looks like this.
- Using a Phillips screwdriver, unscrew the 2 screws securing the hatch cover, remove it and put it aside.
- Disconnect the fuel pump electric drive connector and move it out of the way.
- Using an open-end wrench, loosen and unscrew the 2 nuts that secure the fuel line pipes to the fuel pump fittings.
- Pull the tubes out of their sockets. The round rubber rings attached to their ends must be removed and replaced with new ones, since they are designed for one-time use.
- Using a long tubular wrench, unscrew the 8 nuts that hold the flat flange that presses the VAZ 2110 fuel pump to the bottom surface. Remove the flange from the studs.
- There is a rubber gasket on the mounting studs under the clamping part of the body. The latter must be removed from the studs, otherwise it will not make it possible to pull out the fuel supply device. Then carefully remove the fuel pump from the tank cavity along with the float. If the rubber gasket is worn out, then it is better to replace it too.
When removing the unit, gasoline will flow out of it, so you should place a rag underneath and quickly move the fuel pump out, placing it above a wide pan. The mesh is located at the end of the suction tube and is secured with a plastic ring. You can remove it manually.
If the ring is strongly stuck to the tube, it is recommended to pry it off, for example, with a flat screwdriver. Next, a new mesh is placed and fixed by pressing the hand all the way. Now you can reassemble, which is done in reverse order. There is an arrow stamped on the top of the unit; it should point to the rear of the car.
We recommend tightening all connections with little force. To avoid distortion when tightening the 8 nuts of the clamping flange, a star tightening pattern is used.
If it is necessary to replace the fuel pump on a VAZ tenth model or repair it, then the system is disassembled as described. When replacing, you need to remove the float and level sensor from the unit and move them to the new pump. The entire procedure, if performed in conjunction with replacing other consumables, will take you no more than half an hour.
Signs of a malfunctioning fuel pump (gasoline pump)
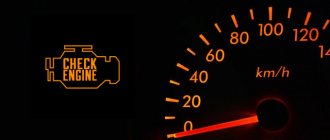
One of the main signs by which you can safely determine that the fuel pump should be replaced is poor engine draft, in the absence of other visible reasons. Over time, the fuel pumps less efficiently, as a result of which the pressure in the system drops, hence the poor engine thrust.
To make sure that the fuel pump is faulty, you should measure (the ramp). If the pressure is weak, then the cause is either the fuel pump or the check valve, which is responsible for the pressure in the system.
A faulty fuel pump may make a loud noise, and you will clearly hear the sound of its operation. This may be another sign that characterizes a “dying” pump.
Is it possible to damage the fuel pump?
Yes, you can, the fuel pump is constantly immersed in fuel, if there is very little gasoline in the tank or it runs out, the fuel pump will run “idle”, as a result of which there is a high probability of its failure.
Which fuel pump to choose for replacement
BOSCH fuel pump 580454138 is installed from the factory.
. Its service life depends on the quality of the fuel used, as well as on operating conditions. It is also worth noting that this pump is suitable for most other cars, including imported ones. The cost of a BOSCH fuel pump at the moment is from 1,700 rubles. Cheaper analogues are also offered on the market:
- WEBER FP 453-453 from 600 RUR
- ATS 2112-1139010 from 550 RUR
- PEKAR 2112-1139010 from 600 RUR
- FENOX EFP35005O7 from 700 RUR
- HOFER HF 830 301 from 550 RUR
- StartVOLT SFP 0153 from 750 RUR
- VOLTON VLT2112-1139010 from 650 RUR
Any of the above fuel pumps will be suitable as a replacement for the original one, however, not all of them are of the same quality as the original. In addition to the pump itself, you may need a corrugation to replace it, and if the fuel pump mounting ring is damaged, you can order it or purchase it using the following article number:
- Electric fuel pump ring /2110/ metal price from 120 rub.
- Fuel pump corrugation /2110/ 1.5 white from 50 rubles per piece
- Fuel pump corrugation /21101/ 1.6 long from 60 rubles per piece
If you decide to replace the entire fuel module assembly, you can select one of the suggested modules below.
- Electric fuel pump module /21101/ V=1.6 assembled PEKAR price from 2500 rub.
- Electric fuel pump module /21101/ V=1.6 assembled “UTES” price from 3200 rub.
- Electric fuel pump module /21102/ V=1.5 assembled “UTES” price from 3000 rub.
- Electric/fuel pump module /21102/ V=1.5 assembled HOFER price from 2000 RUR
If you decide to change only the fuel pump, we recommend that when replacing it, you immediately carry out a complete inspection of the module - check the check valve and both corrugations, and also, if necessary, replace the fuel grid.
Instructions for replacing the fuel pump
To begin, move the rear seat to the side and fold back the piece of carpet that covers the fuel module hatch.
A fuel module with two tubes will be visible in front of us.
Before unscrewing the pipes, it is necessary to relieve the pressure in the fuel system. To do this, you will need to remove the fuel pump fuse, or turn off the power to the module and start the engine. After the remaining fuel in the system has been used up, the car will stall and you can begin replacing the fuel pump.
Our fuel module can be of different types - quick-release and screw-on, depending on the year of manufacture of the car. If the fuel pipes are on nuts, unscrew them with a 17mm wrench; if they are on quick releases, then simply tighten the clamps and remove them from the module.
Now, using a 7mm wrench or tube, unscrew the 8 bolts securing the fuel module clamp.
We move the fuel pipes to the sides, lift the clamp and carefully, so as not to spill gasoline, pull out the fuel module.
Disconnect the fuel pump plug
Remove the lock shown in the photo
To install a new fuel pump and perform assembly, you will need to put a new corrugated hose on the pump. To ensure that this hose does not allow air to pass through, it must be heated when it is put on the pump.
Then we reassemble in reverse order.
The fuel pump is the main element of the car's fuel system. Its role is to select gasoline from the tank and supply it to the engine under pressure. Any malfunction of this unit leads to interruptions in the operation of the power unit, or its stop. Replacing the pump on VAZ 2110–2112 cars is possible without a trip to a car service center.
Fuel coarse mesh in the fuel pump - why is it needed?
The initial cleaning of the fuel is ensured by a mesh mounted on the fuel pump body, and when the car begins to move jerkily and the fuel supply is difficult, first of all you should check the condition of this mesh, because it can be contaminated to such an extent that its initially snow-white color is very difficult to recognize.
Note! The main reason for grid contamination is poor fuel quality!
When to change the screen in the fuel pump?
In order to understand when it is necessary to replace a particular component in the fuel system, and specifically the grid, you need to know about the presence of pressure in the fuel rail. You can learn how to take measurements correctly from this article.
You can also find out about its insignificant condition by the following signs:
- When the ignition is turned on, a very prolonged and loud hum occurs, since gasoline is hardly sucked into the system through a clogged mesh. This can significantly reduce the working life of the fuel pump itself and the contamination of the entire fuel system as a whole.
- While driving, when switching to third or fourth gear and then pressing the gas pedal, there is no increase in power.
- Also, a clogged mesh can cause a loss of speed while the car is moving, since the required amount of fuel simply does not enter the combustion chambers.
What kind of fuel pumps are installed on VAZ 2110/2112 cars
VAZ 2110/2112 cars, depending on the year of manufacture and the type of engine installed, may differ in the method of supplying fuel to the cylinders.
Table: features of fuel supply systems to engine cylinders depending on vehicle modification
| Model/ modification | Year of issue | Engine volume, cm3 | Number of valves, pcs | Injection system |
| VAZ 21100 | 1996–2000 | 1500 | 8 | Carburetor |
| VAZ 21101 | since 2004 | 1600 | 8 | Injection |
| VAZ 21102 | since 2004 | 1500 | 8 | |
| VAZ 21103 | since 2001 | 1500 | 16 | |
| VAZ 21103M | since 2001 | 1500 | 16 | |
| VAZ 21104M | since 2001 | 1600 | 16 | |
| VAZ 21120 | 1999–2008 | 1500 | 16 | Injection |
| VAZ 21121 | 1999–2008 | 1600 | 8 | |
| VAZ 21122 | 1999–2008 | 1500 | 8 | |
| VAZ 21124 | 2004–2008 | 1600 | 16 | |
| VAZ 21128 | 2004–2008 | 1800 | 16 | |
| VAZ 21123 | 1999–2009 | 1600 | 16 |
Only the first modifications of the VAZ 2110 were equipped with a carburetor injection system. From the factory they were equipped with mechanical fuel pumps of the DAAZ brand (catalog number 2108–1106010). Previously, they had proven themselves well on cars of the Sputnik and Samara series.
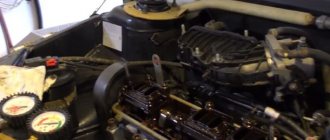
A mechanical fuel pump was installed in the engine compartment of the VAZ 2110 to the right of the engine valve cover, and was driven by the camshaft.
All injection VAZ 2110/2112 are equipped with submersible fuel modules. The design of such a module includes:
- electric fuel pump;
- coarse filter;
- fuel level sensor.
The fuel module is installed directly into the vehicle tank. In other words, the gas pump is completely immersed in gasoline. Injection VAZ 2110/2112 were and are equipped with electric fuel pumps of domestic, joint or imported production. These are products of the Utes, Pekar, Saratov plant, as well as the world famous one, the pumps of which are equipped in all modern VAZs. The catalog number of the stock electric pump is 2112–1139009. There are also modifications whose numbers have two additional digits: 02 or 03. Depending on them, products may differ in length and diameter.
When is it necessary to replace the mesh on the fuel pump?
The condition of the unit can be judged by its performance and the pressure developed. To do this, you need to connect a pressure gauge to the fuel system through a special adapter. Such diagnostics are done at a service station. An easier way to diagnose a fuel pump at home is something like this:
- The ignition is turned on, but the VAZ fuel pump does not work, there is no characteristic hum or makes a loud noise, which entails an overload of the unit and shortens its service life.
- The pump performance decreases, which is clearly visible when driving at third and fourth speeds on a flat road. The car does not respond when the driver presses the gas pedal.
- If a VAZ 2112 car “spontaneously” slows down while driving. This most likely indicates that there is a problem with the fuel supply to the gas tank.
- The reasons may be: clogged coarse or fine filters. The fine filter must be replaced, and the coarse filter (mesh) can be washed. But this will only give a temporary effect; after a short period of time, you will still need to replace the fuel pump grid on the VAZ 2112. Any car owner can purchase it at a car store without any problems. The price of the part is small, the DIY process will take a little time, but the reliability of the gas pump will increase for a long time.
How to clean the fuel pump screen
To work you will need:
- Compressor.
- Fuel pump seal.
- Gaskets for fuel line fittings.
To clean the coarse filter, as the instructions indicate, you need to remove the fuel pump from the tank. This is done this way:
- The car is de-energized.
- The cushion is removed from the rear seat.
- The screws are unscrewed and the hatch cover is removed.
- The electrical connector is disconnected.
- The fitting on the tube through which fuel is supplied is disconnected.
- The tube is pulled to the side.
- Similarly, the fitting is disconnected and the drain pipe pipe is moved to the side.
- The pressure ring is removed.
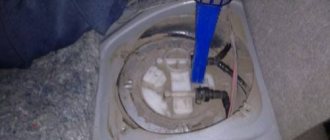
- The fuel pump is lifted, the float is removed from the tank opening and the fuel pump is removed simultaneously with the fuel level sensor.
- At the bottom of the fuel pump there is a mesh, which is a coarse filter. The general view of the mesh is shown in the photo.
General view of the VAZ 2112 fuel pump grid
Contamination of the mesh is not always detected by eye. Very small particles are often translucent and the filter appears clean.
https://youtube.com/watch?v=IEqEQgPaywE
- Using the same detergent and a brush with fine bristles (or a toothbrush), the mesh is washed well.
- Blown with compressed air from a compressor. In the absence of the latter, you need to give the filter time to dry, you need to make sure that dirt and dust do not get in.
- After the mesh has completely dried, the fuel pump can be assembled.
- The VAZ 2112 fuel pump is assembled in the reverse order of its disassembly.
- The car starts, the quality of the operations performed to eliminate defects is checked.
How to correctly replace the fuel pump mesh on a VAZ 21124 can be clearly seen in the video. If on a VAZ 2112 car the fuel pump mesh is replaced regularly and correctly, then major problems with the supply of fuel from the tank to the engine can be significantly reduced.
Design features of fuel pumps for carburetor and injection fuel injection systems
Mechanical fuel pumps, which were installed on the first modifications of the VAZ 2110/2112, have a simple design. It is based on a set of membranes made of special rubberized fabric that is resistant to the chemical action of gasoline. The pump body has two valves: inlet and outlet. The membranes are driven by a rod (pusher). It is driven by a cam mechanism rotated by a camshaft.
Such a mechanical fuel pump can serve for decades until the drive rod wears out or one of the membranes breaks. And even then, if this happens, you can replace these elements in half an hour.
The first modifications of the VAZ 2110 with a carburetor injection system were equipped with mechanical fuel pumps
With an electric fuel pump, things are much more complicated. Its design is based on a small electric motor. It is no different from a regular one, although it works completely immersed in gasoline. The pressure in the system here is created not by a membrane (although there are such pumps), but by a specially shaped impeller mounted on the electric motor shaft.
The service life of the electric fuel pump is 150–200 thousand km. But it can fail much earlier. The main cause of breakdowns when the resource is not used up is additives added to gasoline, as well as various kinds of mechanical impurities. The former destroy the brushes and commutator, while the latter clog the valve mechanisms.
In the injection VAZ 2110/2112, the fuel pump has an electrical design and is part of the submersible fuel module
The principle of operation of the mechanism
Product diagram for injection engines:
Mechanical products are used in cars with a carburetor fuel system, where fuel is supplied under low pressure, and electric fuel pumps in vehicles with fuel injection equipment, where gasoline is supplied under high pressure.
1. Fuel pump on vehicles equipped with a carburetor as a dispenser. The drive lever (pusher) is in constant friction, but the diaphragm shifts to the lower plane only when it is necessary to fill the product chamber with fuel. The return spring moves the diaphragm to the upper position, thereby supplying fuel to the dispenser. Composition of a mechanical fuel pump:
- Fuel filling chamber;
- Inlet and outlet type valves;
- Diaphragm seal;
- Return spring;
- Pusher (drive type lever);
- Cam;
- Camshaft.
2. Electric fuel pump on injection cars. Such a device is similar in operating principle to a mechanical prototype: the core is pulled into an electromagnetic valve until the contact group opens, blocking the flow of electric current. Composition of this product:
- Fuel filling chamber;
- Inlet and outlet type valves;
- Diaphragm seal;
- Return spring;
- Electromagnetic valve;
- Fuel pump mesh;
- Core;
- Contact Group.
For beginners, we inform you where the VAZ 2110 fuel pump is located: it should be looked for under the rear seat cushion of the car.
Signs of a faulty fuel pump VAZ 2110/2112
Signs of pump malfunction appear the same, regardless of its design and type of injection system. These include:
- difficulty starting the engine;
- unstable engine operation at idle speed (vibration, tripping, stopping of the power unit);
- failures during acceleration in motion;
- reduction in power and traction qualities of the engine;
- absence of the characteristic sound of a fuel pump starting (for injection engines);
- presence of traces of fuel leakage (for carburetor power units).
Determining a fuel pump malfunction on your own is quite problematic, because the first three signs, which are the main ones, may indicate other problems in the fuel system, such as:
- fuel filter clogged;
- problems with sensors for mass air flow, throttle position, oxygen level, etc.;
- clogging of one or more nozzles;
- failure of the pressure regulator.
In addition, similar symptoms are observed when problems with ignition occur. It can be determined that the cause of the listed symptoms is the fuel filter by checking the device.
Causes of malfunction
During operation, VAZ 2110 car owners may encounter some difficulties associated with this element. Malfunctions of the VAZ 2110 injector fuel pump can be as follows:
The very first sure indication that the VAZ 2110’s fuel pump is faulty is the following symptom: the engine “jerks” during operation, especially at medium and high speeds. This indicates that the fuel pressure is insufficient. But this is precisely what the fuel pump is responsible for. But sometimes the reason should be sought in the injectors, as well as the RTD.
Fuel pump VAZ 2110 disassembled (in the photo you can see the dirt in the glass)
There are main signs of a malfunction of the VAZ 2110 injector fuel pump, in which you should definitely take action to check this component:
Each of the VAZ 2110 fuel pump malfunctions must be carefully considered in order to understand what to do if you encounter them.
How to Test a Mechanical Fuel Pump
To check a mechanical fuel pump, you will need the following tools and tools:
- slotted screwdriver;
- key (head) 10;
- key to 13;
- 2 clean dry plastic bottles with a volume of 2 liters;
- a piece of hose (50 cm) of the same diameter as the fuel one;
- 1–1.5 liters of gasoline;
- caliper (ruler);
- stopwatch (clock).
Let's start with performance. A working VAZ 2110 mechanical fuel pump with a obviously clean filter should pump at least 1 liter of fuel per minute. The verification algorithm is as follows:
If the amount of fuel pumped per minute is less than a liter, the pump is faulty. The reasons for this may be:
- faulty valves;
- rupture of one or more membranes;
- clogging of the pump grid;
- wear of the drive rod (pusher).
We carry out further checks in the following order:
- Disconnect both fuel line hoses from the pump.
Disconnect the inlet and outlet hoses - Checking the intake valve. To do this, plug the corresponding fitting with your finger and press the manual fuel pump lever several times. You should feel the vacuum (suction) with your finger. If it is not there, the valve has failed.
- Checking the exhaust valve.
Place your finger on the outlet fitting and press the lever. The air pressure should be felt at the outlet. Otherwise, the exhaust valve is faulty. When you press the manual pumping lever, you should feel a vacuum at the inlet fitting, and a pressure of air at the outlet - If everything is in order with the valves, check the condition of the filter mesh.
Using a 10mm wrench, unscrew the pump cover. We remove it from there and inspect the mesh for clogging. The grid is fine - let's move on. The mesh filter should not show signs of damage or deformation - Using a 13mm wrench, unscrew the pump mounting nuts.
- Carefully, so as not to damage the gaskets, remove the device from the studs, drain the gasoline from it, and remove the pusher.
Unscrew the two nuts and remove the fuel pump from the studs. - Using a slotted screwdriver, unscrew the 6 screws connecting the 2 parts of the pump housing.
We disassemble the device, remove the rod with membranes. Unscrew the top nut with a 10mm wrench and remove the membranes from the rod. We assess their condition. They should not have cracks, breaks, or signs of deformation. To disassemble the pump you need to unscrew 6 screws around the circumference of the housing. - Using a caliper or ruler, measure the length of the fuel pump drive rod.
It should be 82.4 mm. If it is less, or the rod has signs of wear on any of its ends, it is unsuitable for further work. The length of the pusher should be 82.4 mm
Checking the electrical circuit
Unlike a carburetor engine, where the fuel pump is mechanically driven, on the injection VAZ 2110/2112 a special relay and fuse are responsible for the operation of this device. Therefore, before moving on to diagnosing the pump itself, it is necessary to check the indicated elements. If any one of them is faulty, the pump will not work at all.
Turn on the ignition without starting the engine and listen. When the fuel pump is running, it emits a characteristic “whistle” when started. If it is not there, it means that either the pump itself has failed, or one of the elements of its power supply circuit has failed.
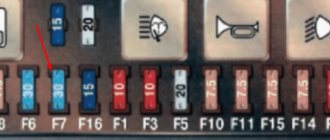
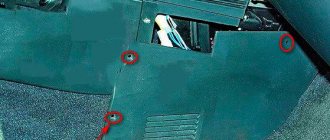
The pump relay and fuse are located in an additional mounting block located inside the vehicle's center console. It can be accessed by removing the plastic trim (near the front passenger's left foot). It is secured with several screws. Under the cover you will find three relays and three fuses. Typically, the fuel pump circuit protection elements are located centrally.
The relay and fuse are located in an additional mounting block under the cladding
To check the fuse, remove it from its socket and “ring” it with a tester. If necessary, replace it, observing the rating (15 A). It is unlikely that it will be possible to check the relay for functionality without special equipment. But you can take another relay, for example, the radiator fan (far left), and install it in place of the one being diagnosed. Turn on the ignition and listen to see if the fuel pump starts working. If yes, buy and install a new relay. If the problem persists, continue diagnostics.
To check the fuel pump relay, you can install the radiator cooling fan relay in its place.
Wiring to the fuel pump
On most cars, the wiring to the fuel pump consists of three wires: “plus”, “minus”, and also a wire for indicating the amount of fuel in the gas tank. If the fuel pump does not pump, then the cause may be a lack of power.
To check the power to the fuel pump, just take a 12-volt light bulb and supply it with power from the external connector of the fuel pump. After turning the ignition, the control lamp should light up. If this does not happen, then the problem is in the external circuits. If the lamp comes on, it will indicate the need to check the internal contacts of the fuel pump.
To check the external wiring, you should alternately connect the positive and negative contacts, which are removed from the fuel pump power connector, to the ground of the pump. The contacts must also be connected to the fuel pump relay. If you place the negative contact on ground, after which the ignition is turned on and the light comes on, then this means that this contact is faulty. If the light bulb does not light up, then problems with the “plus” are obvious. If you place a contact on the relay and the light comes on, there is probably damage to the wire on the section that connects the relay and the fuel pump itself.
Checking the fuel rail pressure
But even the fact that the fuel pump starts pumping when the ignition is turned on does not mean that it is working properly. The main indicator of its operation is the pressure in the system. You can check it using a regular pressure gauge with a measurement limit of 5–7 atmospheres, which is used to measure tire pressure. In addition, you will need a piece of gas-resistant hose with an internal diameter of 9 mm and two clamps of the appropriate size.
The verification procedure is as follows:
For engines with a volume of 1500 cm 3 it should be 2.8–3.2 atmospheres, and for power units with a volume of 1600 cm 3 – 3.6–4 atmospheres. If the device indicators are lower, the pump is unsuitable for further use.
Performance check
Checking its performance will help make sure that the fuel pump has failed. For this you will need:
- screwdriver with Phillips bit;
- a piece of gas-resistant hose (50–80 cm) with a clamp;
- key to 17;
- empty 2 liter plastic bottle;
- a piece of insulated wire;
- stopwatch.
Performance testing is carried out as follows:
- We remove the back seat. We lift the carpet and find the gas tank hatch under it. Unscrew the two screws (diagonally).
- Once you remove the hatch, you will see the top of the fuel module. Using a 17 wrench, unscrew the nut of the outlet fitting. We put a hose on it and secure the connection with a clamp. We lower the other end of the hose into an empty bottle.
- Disconnect the pump power connector. Using a piece of wire, we supply power to the positive contact of the device from the corresponding battery terminal. We connect the negative one to ground.
- We begin counting the time from the moment the pump starts.
A working fuel injection pump for a VAZ 2110/2112 should pump 1.5 liters of fuel in one minute. If this indicator is lower, the pump must be replaced.