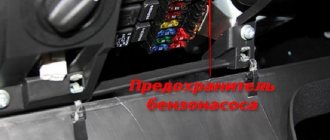
Hello to all subscribers! One of the common situations that happens, usually unexpectedly, is that the usual buzzing of the electric fuel pump in the rear of the car is absent when the ignition is turned on. As a result, the car engine refuses to start. I present an algorithm of actions if such a disaster suddenly happens. To begin with: photo 1 shows a fragment of the electrical circuit of the fuel pump.
Attention, working with electrical equipment is dangerous. If you are unsure, seek the help of a qualified professional.
First of all, the driver should first remove the side console on the passenger side (there are 3 relays with fuses there). Our electric fuel pump relay is the lower one. (Some cars from 2007 have 2 relays, but the fuel pump relay is the top one - see the repair manual). Directly above the bottom relay is our fuse. The first step is to make sure that this fuse is working properly (photo stage 1).
If the fuse is working and its contacts and its connector are not oxidized, then you need to make sure that the relay is working properly. You can immediately install a known-good relay and turn on the ignition. If the situation is corrected, then install the side console and have a good trip. If nothing has changed, then it is necessary to determine where the problem arose. To do this, you need to have a voltmeter or multimeter or a probe. But we will not determine the voltage value with a probe, and in this situation you need to know the voltage value - I’ll tell you why later. The second step (photo step 2) is to determine whether there is control voltage at the fuel pump relay. We connect the multimeter, turn on the ignition and determine the voltage value. If there is no voltage, then there is an open circuit coming from the main relay or from the ECU. If there is tension, then move on.
Stage 3 (photo stage 3) is to determine whether the power goes further directly to the fuel pump itself. If the power does not come out, the culprit is most likely the relay due to possibly burnt contacts. If the voltage goes away, but its value is 10 volts, then most likely the relay contacts are also burnt. At this voltage, the pump motor will not start. We change the relay and check. If the power goes further and its value is 12 Volts, then the culprit is the wires going to the electric motor of the pump or the pump itself.
Pinout BN VAZ 2113, 2114, 2115
— block headlights; — gearmotors for headlight cleaners*; - fog lights*; — ambient temperature sensor; - sound signals; — engine compartment lamp switch; — electric motor of the engine cooling system fan; — generator; — low oil level indicator sensor; — washer fluid level sensor; — front brake pad wear sensor; — wire tips connected to the common windshield washer pump**; — windshield washer pump; — headlight washer pump*; — wire ends for connecting to the rear window washer pump on VAZ-2113 and VAZ-2114 cars; — low oil pressure indicator sensor; — engine compartment lighting lamp; — wire lug for connecting to the wiring harness of the engine control system; — gear motor for windshield wiper; — starter; — a block connected to the wiring harness of the ignition system on carburetor cars; — coolant temperature indicator sensor; — reversing light switch; — low brake fluid level indicator sensor; - accumulator battery; — low coolant level indicator sensor; — relay for turning on fog lights; - mounting block; — brake light switch; — plug socket for a portable lamp; — hydrocorrector scale illumination lamp; — switch for the parking brake indicator lamp; — block for connecting a backlight lamp; — switch for instrument lighting lamps; - Understeering's shifter; - hazard warning switch; — front seat heating element relay; — ignition switch; — rear fog light circuit fuse; - fuse for the front seat heating elements; — door lock circuit fuse; — front ashtray illumination lamp; — ignition relay; - cigarette lighter; — glove box lighting lamp; — switch for the glove compartment lighting lamp; — heater fan electric motor; — additional resistor for the heater electric motor; — heater fan switch; - heater switch illumination lamp; — lamp for illuminating the heater levers; — gear motors for electric windows of the front doors; — power window switch for the right front door (located in the right door); — gear motors for locking front door locks; — wires for connecting to the right front speaker; — gearmotors for locking rear doors; — wires for connecting to the right rear speaker; — door lock control unit; — wires for connection to radio equipment; — headlight cleaner switch*; — rear window heating element switch; — relay for turning on the rear fog lights; — block for connection to the heating element of the right front seat; — rear fog light switch; — switch for the heating element of the right front seat; — fog light switch*; — switch for external lighting lamps; — left front seat heating element switch; — block for connection to the heating element of the left front seat; — wires for connecting to the left front speaker; — power window switch for the left front door (located in the left door); — power window switch for the right front door (located in the left door); — wires for connecting to the left rear speaker; — side direction indicators; — courtesy light switches on the front door pillars; — courtesy light switches on the rear door pillars; - lampshade; — ceiling lamp for individual interior lighting; — block for connecting to the wiring harness of the electric fuel pump; — trunk light switch; — instrument cluster; — trunk lighting lamp; — display unit of the on-board control system; - trip computer*; — block for connecting the wiring harness of the engine control system; — rear exterior lights; — rear interior lights; — pads for connecting to the rear window heating element; — license plate lights; — additional brake signal located on the spoiler.
What is a fuel pump
We change the fuel filter on a Lada Kalina with an 8-valve engine.
The gasoline pump is a key component of the power system; its job is to ensure an uninterrupted, timely supply of fuel to the system.
In each model, the design and location of the fuel pump is unique; for the Lada Kalina, this device is located on the opposite side of the power unit.
On the one hand, this arrangement allows you to benefit from the technical capabilities of the machine, but on the other hand, the device requires more powerful operation than models in which the fuel pump is located closer to the engine.
In order for Kalina’s fuel pump to cope with its job, it is presented in an electric version. Its advantages are:
- simplicity of design;
- good fuel supply;
- safety.
But, as one might expect, Kalina’s electrics are not yet a strong point; they often break down, which is the main disadvantage.
In addition, the disadvantages of the Lada Kalina gas pump include increased noise levels, sensitivity to the quality of gasoline, and the fact that it requires cooling.
The issue of high-quality gasoline in our country, unfortunately, still remains unresolved; this is one of the reasons why the fuel system of the Lada Kalina fails.
Filters become clogged, which disrupts the operation of the entire mechanism and ultimately leads to pump failure.
This is why filters, or meshes as they are also called, need to be changed regularly.
We’ll talk about this, but first, let’s figure out what malfunctions happen with the Kalina fuel pump?
Types of faults:
- One of the most common pump malfunctions is a rapid decrease in pressure after the engine starts. This fact indicates serious violations that can be caused either by a valve defect or a breakdown of the pressure level regulator; it is quite possible that the injectors are also clogged. A sharp drop in pressure leads to problems in starting the engine, which, if the breakdown is not corrected, can even lead to engine failure.
- It also happens that the engine loses power, or the engine does not start at all, even when cold or hot. All this happens when a membrane or spring breaks, a rod wears out, or filters become clogged, and the latter happens more often than anything else.
- In any case, having discovered that there is something wrong with the fuel system, you should first check the condition of the filters, because, due to low-quality gasoline, they become clogged quite quickly, and it is better to change them in a timely manner, without waiting for problems. Now let’s talk about how to change the mesh from the pump yourself.
Replacing the fuel pump on a Lada Granta
How to change the fuel filter of a Chevrolet Lacetti with your own hands?
The fuel pump of the Lada Granta car is equipped with electric submersible fuel pumps. The pump supplies and circulates the mixture in the fuel system. Recently, the car has been equipped with an electric submersible fuel pump from the Bosch brand. This device has the following characteristics:
- rated voltage - 13.5V, operating - in the range from 6 to 15 volts;
- maximum volume of pumped mixture
- the frequency of replacing the fuel filter is 1000 operating hours;
- range of fuel classes: AI-92 - AI-95.
Signs of a fuel pump malfunction
Fuel pump breakdowns are reflected in the following “symptomatic series”:
- pressure drop in the fuel system;
- noticeable decrease in car power;
- inability to spin the engine to the cutoff;
- extraneous sounds (grinding) when the car is running.
The presence of these fault markers requires a complete replacement of the part or maintenance of the element - clean the Lada Granta fuel pump and replace the mesh.
Replacing the fuel pump on Grant
Before changing the fuel pump on a Lada Granta, the motorist must relieve the pressure inside the fuel lines. To “zero” the car’s fuel system, you must:
- Put the Granta at neutral speed;
- Apply the parking brake;
- Remove the rear sofa;
- Disconnect the wiring from the fuel pump;
Start the Lada and wait for it to stall; Crank the starter for a few seconds.
To work with the fuel filter, the car enthusiast will need:
- flathead and Phillips screwdrivers;
- spanner set to “10”;
- hammer;
- rags.
After resetting the fuel lines, it is necessary to remove the terminals from the battery so that the possibility of supplying power to the fuel pump is completely excluded.
Installing a new fuel pump
The first step is to open the fuse panel (on the left side of the front panel) and remove the element responsible for the operation of the unit.
Next, dismantle the rear sofa and remove the plastic trim. Below it is the fuel tank flap (on the right side). The hatch cover is held on by four screws - remove them using a screwdriver. Next, disconnect all the fittings from the cover of the old fuel pump.
Using a “10” wrench, unscrew the nuts of the pressure ring of the fuel pump, of which there should be 8 pieces along the entire diameter of the ring. Next to the clamping ring there is a pin with which the ground wire is in contact. We throw off the wire, and then completely remove the clamping ring. The ring unscrews counterclockwise; for ease of dismantling, it needs to be tapped with a hammer.
You need to make sure once again that all wires and lines adjacent to the part are disconnected. Only then can you remove the used unit and place a new one in its place. You also need to install a new O-ring between the tank opening and the pressure ring - it is made of rubber and wears out quite quickly.
Installation of a new pump is carried out in the reverse order. Before disassembling, draw a diagram or photograph the original location of all fittings and hoses on the fuel pump cover.
Cleaning the part
Replacing the Lada Granta fuel pump in some cases is not the only way to get rid of fuel supply problems in some cases. To restore the functionality of the fuel pump, it requires thorough cleaning. To do this, you need to dismantle the unit using the method described above.
Next, unscrew the lower part of the fuel pump cup. The glass has a filter mesh that needs to be removed using a screwdriver. The mesh will need to be cleaned with a rag and rinsed in solvent. After this, the remaining elements of the fuel pump are cleaned.
After cleaning is completed, it is recommended to install a new coarse mesh, as the cells on the old one may be damaged.
Before performing work, read the operating instructions so that you know in advance where the Lada Granta fuel pump is located, as well as how to attach it. It is better to carry out work in a well-lit room away from open flame sources. For protection, use gloves to avoid damaging your skin with gasoline or solvent.
P O P U L A R N O E:
Recently, amendments to the traffic rules were introduced in Russia, one of which is: driving during the day with low beam headlights, fog lights or daytime running lights . Now you need to drive with lights on during the day. Driving with low beams or fog lights on additionally creates a load on the generator, reduces the service life of the lamps, and also increases fuel consumption (more than 0.5 liters per 100 km). Therefore, it is better to drive during the day with the running lights turned on, the light-emitting element of which is LEDs , which consume much less power than incandescent lamps. You can buy DRLs, or you can make them yourself from scrap materials.
A car battery ( AK battery ) is one of the most important parts of a car . The battery provides electricity to: electric lamps in the headlights, instrument panel and interior lighting, the vehicle's electronic ignition system, fuel pump, car radio and other vehicle components, as well as the most consumed load source - the starter when starting the engine. Normal operation of all vehicle components is possible only with a properly used battery. It must be serviced and charged on time.
Another charger circuit is very similar to the previous one, but differs in the way it turns off when charging is complete. The charger is started by pressing the “start” button on the front panel, while the supply voltage is supplied to the circuit, relay K1 is activated and provides “self-recovery”. Read more…
Schematic electrical diagrams, connecting devices and pinouts of connectors
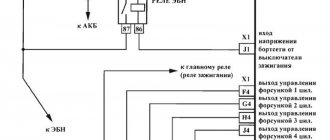
The fuel pump on a car is designed to supply fuel to the combustion chamber. Its operation is controlled using a relay. On a VAZ (depending on the model), the fuel supply unit can be electrical or mechanical - it all depends on the fuel supply system. On a fuel-injected car, the fuel pump is located in the tank. When the ignition is turned on, voltage is supplied to the terminals of the unit and it begins to pump fuel. If the required pressure is created in the system, the relay automatically turns off the fuel pump - the engine is ready to start.
When the ignition is turned on, the relay creates pressure in the fuel lines by turning on the fuel pump (BN) for a couple of seconds. After this, the BN will work either when the engine is cranked by the starter, or when the engine is running.
Sometimes this system needs repairs - there is nothing complicated here, and the editors of the 2Skhema.ru website will tell you how to do it yourself. Let's start with the BN pinout, then we will indicate it on the diagrams and at the end there will be instructions for replacing the fuel supply elements.
Operating principle and specific purpose of the filter
How to replace a Chevrolet Niva fuel filter
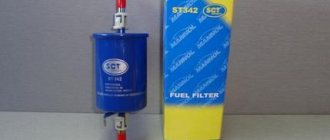
Any car, regardless of its design, has a fuel filter. (pictured is a fuel filter on a VAZ-2115)
Naturally, it differs in terms of fuel type and its supply to the car. But still, there is a filter. In the case of the Lada Granta car, this is a traditional filter element used everywhere in injection-type cars.
The main task of such a filter is to catch and sift out particles of dust, rust and other inclusions so that they do not penetrate into the fuel line. If such a filter did not exist, the motor would very quickly fail, since a lot of solid particles that could damage the cylinder walls would get into it.
The filtration system has an established principle of operation, which involves two degrees of purification. The first stage involves catching the largest contaminants, followed by the second stage of fine cleaning, which is usually called a fuel filter in the traditional sense of the word.
Fuel filter cross-section
Fuel filter from Granta in a section (removed from the car, not new)
But it must be located in front of the engine and after the fuel tank.
Given the increased pressure in the fuel line, the filter must be made of metal or high-strength plastic.
Which fuel filter should I choose?
As you know, all variations of the Lada Grant are equipped with an engine with the same displacement of 1.6 liters. The differences are only in the power that this power unit can produce.
This injection engine, unlike its “carburetor counterparts,” requires a much greater degree of cleaning. So, many experts recommend not stopping at the basic recommendations for a purification degree of 10 microns, but turning to a more significant level of filtration that would guarantee the retention of solid particles with a size of 5 microns. The operating pressure, in the case of the Lada Granta, will vary between 3 and 5 bar.
When to change the fuel filter?
And, of course, you need to say a few words about when exactly it is appropriate to replace the fuel filter.
On average, a fuel filter loses its characteristics closer to 25 thousand kilometers. But this applies to optimal conditions when the highest quality gasoline is used. In reality, the need for replacement may occur earlier.
Signs of a dirty fuel filter
To find out exactly when you need to replace the fuel filter on your Lada Granta, you need to monitor the main signs of its contamination.
- This usually concerns the engine starting, which will be uneven and delayed.
- Next comes insufficient traction.
- And, with sharp acceleration, the power unit can even stall.
- As for idling, if the filter is dirty, it will be uneven.
Of course, some of these “symptoms” are also typical for problems with the air filter or injectors. But, in any case, this is already a sign that it is necessary to begin a thorough check of the fuel filter, and, if necessary, replace it with a new one.
VAZ 2110 fuel pump connector number
Dear visitors of the “Cars” website! We will be very grateful for your comments on the video clip “VAZ 2110 fuel pump connector number”; registration is not required for this. We also ask you to let us know if you have any problems playing the video.
a question. and always after the engine is turned off. When the pressure gauge is connected, the pressure in the rail should be maintained. that is, the arrow should not fall even a little. and what does it mean if it falls?
07/25/2017 – 06:49 Oleg 1974
Good afternoon, I’ll ask you a question as I’ve already asked others, but I don’t know a specific answer. The question is that I have an injection branded pickup truck with an engine capacity of 1. 3, the same one is installed on a ZAZ Sens. I decided to measure the pressure on the fuel rail 1 turn of the key without starting the engine 2. 9 kgcm. after 15 seconds it drops sharply to 2.0kgcm. 2starting the engine 2. 3kgcm. I sharply give the speed 2.9 kgcm. 4 I compress the return line 6. 0kgcm. After stopping the engine, the pressure remains for several hours. The fuel pressure regulator changed the readings to the same as described above. The fuel pressure regulator from the factory is 2112, the same as on VAZs, only on VAZs for some reason the pressure is 3.0 kgcm. constantly and this is considered the norm, maybe it’s the volume of 1.5 and 1.3 engines that makes such a difference. Or maybe the old R.D.T. failed and the new one was defective. I really hope for a clear answer from a specialist.
07/02/2017 – 03:37 VLADISLAV OLEGOVICH
if your car service wants to shoot normal videos, then first get a normal camera
06.24.2017 – 18:45 dushaa
Good afternoon, 2110 without return, pressure 4, when running it jumps 3 to 4, gradually drops. Problem when changing gear from 3 to 4 choking. Is there a problem with the fuel pump? kkvv 0.92
Can't see anything in the car service, no portable lamp? black screen. you speak to the blind. failure.
06/03/2017 – 17:39 Joe Joker
When the ignition is turned on, the pump pumps and pumps 3 bar, only the pump stops and the pressure drops to 0. When the internal combustion engine is running, it shows 2.5-8 bar. When the hose is removed from the turbocharger, the fuel pressure regulator increases to 3 bar. I put it on and it drops to 2.5-8 bar. The engine runs for about 10 minutes, the check light comes on, the engine starts to titrate, the pressure in the ramp at idle increases to 2.9 sometimes up to 3 bar. When I turn off the engine, the pressure immediately drops to zero and as a result the engine does not pull and develops power poorly. but when you start it, it pulls and tears out from under itself, about 10 minutes pass, the check light comes on and it’s like they’re holding it by the ass, you turn it off and start it right away again it tears everything fine. car vaz 2110. tell me what is the reason?
05/11/2017 – 19:16 Dmitry Demidov
Hello. Everything is about the same for me, but the pressure is a little lower. And the needle is not like yours - it stands rooted to the spot, but shakes within 0.1 atm. Could you please comment? Here is the video of the measurement
05/06/2017 – 22:15 Sergey Vladimirovich
I have 2.2-2 with the engine running and idling. 3 atm. I remove the hose from the RTD and it rises to 3 atm. Put it back and it drops to 2.2 atm. mesh and filter are replaceable. At idle I pinch the return hose and it rises to 6.5 atm. Why doesn’t it even rise to 2.5 atm at idle? engine 8 cl 1.5 with return.
04/23/2017 – 08:04 VAZIK BASHIN
a friend tell me, I'm already tired of the car at the bottom, kickdown, you're pushing the engine into a choke, I changed everything until I got to the fuel system, I measured the pressure = with it turned off, 1.5 atmosf. When I start 2.5, when I accelerate, the hose drops a little, but the hose does not rise, I pull off any changes, should I change the pump in conjunction with the RTD?? 2115 8klp
Features of draining gasoline from the Lada Granta tank
The fact is that you won’t be able to drain the fuel using the “old-fashioned” method through the neck.
The reason for this is the low location of the fuel tank, as well as the specific design of the neck. The same applies to other modern VAZ models, as well as foreign cars produced since the 90s.
Method 1: Using the fuel line under the hood
In this situation, the simplest method is to use a fuel channel.
- To begin with, you will need to unscrew the nipple, which is located at the end of the injector ramp.
- After this, a regular hose is put on this ramp, the other end of which is immersed in any container that is sufficient to hold gasoline. Despite the fact that almost any hose will do, experts recommend using special types of hoses that are used to refill home air conditioners. This will allow you to screw the hose onto the fuel rail without unscrewing the nipple at all.
- After this, you will need to force the gas pump to pump gasoline. The most obvious solution is to turn on the ignition, which will make the pump work.
- But there is one peculiarity: the pump will not be able to function in this mode for more than a few seconds. In order for the duration of its operation to be increased, up to constant operation, you will need to turn on the ignition, and then insert the corresponding jumper into the gasoline pump relay (number K12 in the fuse box). An alternative to this may be the need to bridge contacts number 11 and 16, which are located in the diagnostic connector. This will make it possible for the pump to operate even without ignition.
Factory fuel filter
You can also use the area after the fuel filter to drain. To do this, you need to dismantle the fuel filter from the injector side, and put a hose on its outlet, which is lowered into the drain container.
Method 2. Removing the gasoline pump
There is another option that may be easier for many people. We are talking about completely removing the gasoline pump. This is done by raising the rear row seat, after which you need to unscrew the pump mounts. Next, you get direct access to the fuel, so you can pump it out using the traditional method.
This is a fairly simple procedure that does not require prior preparation. In the case of the Lada Granta, the entire fuel module will have to be dismantled.
- To do this, the rear seat cushion is folded down.
- After which the parts of the mat, previously cut by the manufacturer, are raised. Under them you will find four screws that secure the cover. They will have to be unscrewed. A Phillips screwdriver is used for this purpose.
- After this, you will need to disconnect the block with electrical wires from the pump itself.
- You will also have to remove the fuel hoses that hold the device in its position.
- Now you can carefully grasp the pump pressure ring by unscrewing it counterclockwise. For this purpose, it is recommended to use a flat-head screwdriver and a hammer, if necessary. As a result, the ring comes off easily.
- The fuel pump itself is removed by slightly tilting it to the side. This must be done in order not to damage the gas gauge sensor lever. In addition, this way you will protect the float on the lever from turning around its axis. If it is misaligned, it may result in subsequent false readings of the amount of fuel in the tank.
Assembly is carried out in reverse order. If necessary, the sealing ring can be replaced with a new one, otherwise the smell of gasoline will be felt in the cabin. The arrow drawn on the fuel module cover should point to the rear of the car. Also follow the readings on the fitting arrows, which will tell you the direction of fuel movement.
Where is the fuel pump relay located?
Where is the fuel pump relay located? The installation location of the relay varies depending on the make of the car. Most often, it is located under the hood, in the fuse and relay box.
The fuel pump relay is designed in the circuit to prevent accidental application of high voltage to the fuel pump winding. The relay is standard and consists of a plastic body and coils with contacts. It is located in the car interior near the console. To access it, you need to remove the protection cover.
In appearance, it is a small box that resembles a “plug” with an American type of output. Each terminal has a marking that indicates the following: 31 – mass; 30– +12V constant (regardless of ignition); 15– +12 with the ignition on; 50– +12 when the starter is running; TD – signal from the ignition system; TF – engine temperature signal from the injection control unit KE. Outputs: 87 – supplies power to the fuel pump; 87H – oxygen sensor heating; 87V – turns on the starting injector.
But sometimes the fuel pump does not turn on when the key is turned in the ignition. With what it can be connected? First of all, the fuse, although if it had blown, it would not work at all. Maybe the contact is bad?
If the electric fuel pump does not show any signs of life when the ignition is turned on, this does not mean that it has burned out. The cause of the malfunction may also be a relay. The easiest way to test your hearing is that when you turn on the ignition, the relay should click. If you don’t hear a click, there is a high probability that the “relay” is faulty.
It’s easy to check the functionality of the pump itself, so we do this:
- remove the protective casing, under which there is a block with relays and fuses;
- we unscrew the fastenings of the block, remove it, it remains attached to the wires;
- we pull the RB out of the block, place a jumper between two opposite contacts, thus directly supplying power to the BN;
- if with such a connection the electric motor of the pump begins to make noise, it means that the BN itself is working, most likely the fault is hidden in the relay;
- if there is no voltage on any of the contacts on the RB block, you should look for a break in the wiring; there may also be poor contact at the place where the wire is attached to the terminal.
Step-by-step replacement instructions
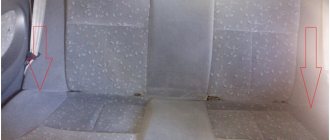
- We open the rear doors of the cabin, raise the seats, then remove the carpet from the interior floor.
- There is a small hatch under the carpet, secured with four screws. We unscrew them using a Phillips screwdriver and remove the hatch cover.
- Under the cover, as a rule, there is a lot of dust and dirt. Before disassembling the pump further, you should remove this dirt using a compact car vacuum cleaner.
- Manually remove the terminal from the fuel pump, and also remove one from the battery (to avoid sparks and fire).
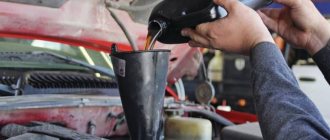
- We remove the engine casing, unscrew the cap of the gas line, use a Phillips screwdriver to lightly press the breather and drain a little gasoline (this will significantly reduce the pressure in the gas line).
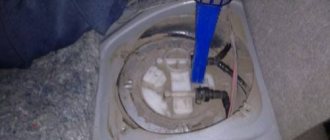
- After cleaning the fuel pump cover from dirt using a vacuum cleaner, you should manually remove the fuel lines, and then use a flat screwdriver to pry and remove the locking plate holding the fuel pump.
- After removing the plate, the fuel pump can be removed.
- Then you should remove the sump from the fuel pump. It is attached to the pump with four latches that can be easily opened by hand. Together with the sump, the fuel hose, sensor, and float are removed.
- After removing all these parts, you can gain access to the fuel pump mesh, which is held in place by a retaining ring. Press the latch, loosen the ring and remove the old mesh.
- We install a new mesh (and when installing the mesh, a characteristic click of the locking ring should be heard) and assemble the pump.
Open the hatch
Removing dirt
Removing fuel lines
We take out the pump
Removing the mesh
Removing and disassembling the Lada Granta fuel module
Tools:
- Open-end wrench 10 mm
- Medium Phillips screwdriver
- Medium flat screwdriver
- Small hammer
- Pliers
- Side cutters
Parts and consumables:
- Clamp for fastening the corrugated fuel supply pipe to the pump fitting
- Fuel pump (replacement if necessary)
- Strainer retaining washer (replacement if necessary)
- Engine oil
- Rags
Notes:
The work is performed to clean the strainer, replace the fuel level sensor, fuel pressure regulator or fuel pump.
1. Relieve pressure in the power system as described here.
2. Disconnect the wire terminal from the negative terminal of the battery as described here.
3. Inside the vehicle, remove the rear seat cushion as described here.
4. Bend down the soundproofing flap located under the seat cushion.
5. Unscrew the four screws securing the fuel module hatch cover and remove it.
6. By releasing the clamp of the wiring harness block, disconnect the block from the fuel module connector.
7. Remove the fuel hoses from the fuel pump cover, which are secured with clips (see first photo). Use one screwdriver to press the latch on one side. Using another screwdriver, pry the fuel hose in the direction of the arrow and remove it.
8. Wipe the pump with a rag.
9. Remove the retaining ring using screwdrivers and a hammer. The arrows in the first photo indicate the direction of torsion. The system of "pits" and "grooves" makes it easier to remove the retaining ring.
Note:
As soon as you loosen the ring, some gasoline will flow out (this is normal).
10. Carefully, being careful not to damage the fuel level indicator sensor float, remove the fuel module from the tank.
11. Remove the rubber gasket.
12. Cover the opening in the fuel tank with cloth or cardboard to prevent foreign objects from getting into it. Disconnect the ground wire terminal from the slip ring terminal on the fuel pressure regulator housing.
13. Press the antennae of the fuel pressure regulator mounting bracket on both sides and remove it.
14. Remove the slip ring (if equipped) from the regulator body. The photo below shows fuel pressure regulators with a removable slip ring and a contact soldered to the regulator body.
15. Using pliers, remove the fuel pressure regulator from the module cover socket.
Note:
The regulator connections are sealed with two rubber rings.
16. Using a slotted screwdriver, press the latch (indicated by an arrow in the photo) of the wire block and disconnect it from the cover connector. Similarly, disconnect the wire block from the fuel pump connector.
17. Using your fingers, press out the upper latches of the fuel level indicator sensor and slide the sensor along the grooves of the module cup.
18. Remove the fuel level indicator sensor assembly with the float, wires and wire blocks.
19. Carefully press out the three plastic clips and remove the lower glass.
20. Use a slotted screwdriver to pry and remove the strainer.
21. Remove the lock washer from the slot in the strainer housing.
22. Having pressed the latch (indicated by a red arrow), remove the fuel pump from the holder, and also use side cutters to cut the clamp securing the corrugated fuel supply tube (indicated by a blue arrow).
23. Heat the corrugated tube (you can pour boiling water on it) and remove the tube from the pump fitting.
24. Using a slotted screwdriver, push the tip of the fuel drain tube out of the socket in the glass.
25. A valve is installed in the fuel module cup to prevent fuel from leaking out.
26. Assemble and install the fuel module in the reverse order
When installing the strainer, pay attention to the condition of its lock washer (item 21). If the lock washer is dented, it must be straightened or replaced.
If the lock washer is dented, it must be straightened or replaced.
27. Replace the clamp securing the corrugated fuel supply pipe to the pump fitting with a new one.
28. Before installing the fuel pressure regulator, apply a thin layer of engine oil to its O-rings.
29. When installing the fuel module into the tank, arrow 1 on the fuel module cover should be directed back (towards the trunk). Arrows 2 on the bosses of the cover fittings indicate the direction of fuel movement.
30. Place the tips of the fuel pipes onto the fittings of the module cover until the spring clips click.
31. Having connected the wire terminal to the “negative” terminal of the battery, start the engine and check the tightness of the connections of the fuel pipes.
The article is missing:
- Photo of the instrument
- Photos of parts and consumables
Important points
The procedure outlined above seems quite simple, but, nevertheless, there are a couple of nuances that should be mentioned.
Firstly, gasoline. When the gas lines are unscrewed, it begins to flow directly onto the cap (this happens especially often if the car owner forgot to relieve the pressure in the gas line using the breather, as mentioned above). Yes, a little gasoline leaks out, but the smell of gasoline in the cabin is not what a car owner needs, right? Therefore, before removing the fuel lines, you should put a cloth on the pump cover and carefully insert it with a screwdriver into all the cracks. The rag will absorb the leaked gasoline, then you can throw it away, which will help get rid of the smell in the cabin.
Secondly, the fuel pump retaining plate. As practice shows, this is a fragile thing, and breaking it by carelessly prying it with a screwdriver is not just easy, but very easy. But it’s difficult to find this part on sale; it is only sold complete with a complete fuel pump, and this is a waste of money. The matter is further complicated by the fact that it is not always possible to move this plate out of place with just a flat screwdriver (especially if the car owner is trying to disassemble the pump for the first time), so sometimes you have to resort to using a hammer and chisel, and this, in turn, increases the risk many times over plate breakage.
As you can see, there are no difficulties with independently replacing the pump grid on the Lada Kalina, and if you strictly follow the above instructions, even those who are doing it for the first time will not have any problems. The main thing is to be patient and follow safety precautions. It is imperative to remove the terminal from the battery! Otherwise, a banal mesh replacement can turn into a fire.
The gasoline filter is the most important element of the fuel system of any modern car. Failure to replace it in a timely manner can lead to dire consequences. This is especially true for injection engines that are installed on cars of the Lada Granta family.
Features of the electrical circuit
The circuit in which the pump motor is connected contains one fuse (F21) and one relay (K12). Both parts are installed in a single mounting block. We discussed in detail how to access them earlier. In a Lada Kalina car, the fuel pump relay is 4-pin. Two contacts go to the winding, two more are closed when triggered.
Mounting block VAZ-2192/94
The above parts can be dismantled using a special tool, which is secured under the unit cover. If the fuel pump is faulty, the pressure in the fuel rail is equal to atmospheric pressure. The same pressure can be reduced forcibly: by turning off fuse F21, you need to start the engine and wait a few minutes. When the gasoline pressure decreases, the engine will stall.
The fastening of components related to the fuel system should not be loosened without ensuring that the pressure in the rail is reduced to a minimum. The way to achieve this has just been discussed.