When to change brake pads on a VAZ 2110: instructions and useful tips
Front pads for a VAZ 2110
It turns out that not every motorist, even an experienced one, knows when to change the brake pads of a VAZ 2110. Some say it needs to be changed often, others say rarely. But this approach to the issue is fundamentally wrong, since it all depends on the driving style, the brand of pads and much more. So, when to change brake pads on a VAZ 2110?
Replacing brake pads VAZ 2110
Tools required for repairs
To carry out work on removing and installing new pads you will need:
- wheel wrench;
- ruler or caliper;
- screwdriver;
- pliers;
- key to 8;
- metal brush;
- sandpaper.
If the drum has not been removed for a long time, then a brush will most likely be needed to remove dirt from the pads and axle shaft, and sandpaper to clean the seat on it.
To perform the repair you will need the following tools:
- wheel wrench;
- brush with metal bristles;
- ruler;
- sandpaper;
- keys;
- jack;
- pliers.
In car services, this service is provided inexpensively as of February 9, 1019 - on average, the price of installing rear brake pads on a VAZ 2107 is 600 rubles. But you will save time on travel, and at the same time, during the work, you will do your own inspection of the car.
Pad wear
There is, as a rule, a standard service life of the pads, which is 10 thousand km. But again, everything is transparent. In principle, when always buying brake pads, you should be careful and pay attention to the service life of these parts. As a rule, no manufacturer is able to provide accurate information about the service life of the pads. What does it mean? And the fact is that you need to monitor the wear of the pads, and only then draw conclusions.
Replacing brake pads on a VAZ 2110
Each type of brake pad has a concept called acceptable wear. So, for almost all pads it is no more than 85 percent. In other words, if it is noticed that the pads are worn out by more than three quarters, they need to be replaced with new ones. You can say it another way: the thickness of the brake pads should be more than 1.5 mm. If the thickness is less, then there is a possibility of damaging the pistons of the master cylinder when braking, and this will not lead to anything good. The front brake pads, as a rule, are different from the rear ones. We are talking, again, about wear and tear. Rear brake pads are more durable and can work effectively not for 10 thousand kilometers, but for all 60 thousand kilometers. Well, again, it all depends on the degree of wear, driving style, etc. As for the degree of wear, here, like the front ones, it is at least 1.5 mm.
Note. Today, brake pads are known that are equipped with a special wear indicator. The essence of this technology is that a built-in metal plate, which rubs against the disc when excessive wear occurs, thus gives a signal that it is time to change the pads.
Important aspects of selecting brake pads
The quality of brake pads is determined primarily by which manufacturer produces them. Therefore, before purchasing them (regardless of which cars - domestic or foreign cars), you need to pay attention to the following general aspects of choice.
The originality of the product is the first of them. This is a very important point. It's no secret that the auto parts market is literally filled with many fakes. In addition, there is a certain difference between products of the same manufacturer: the market offers original spare parts produced for the assembly line on which cars are assembled, and at the same time there are original spare parts produced directly for sale in the wholesale and retail chains.
It makes no sense to consider pads intended for the conveyor, since they are quite expensive and quite rare on the market - their quantity in the total volume of this product, as a rule, does not exceed 10%. Original products for sale can be found much more often, and their cost is 30–70% of the price of conveyor ones. There are also pads that are significantly inferior in quality to the original ones, but are produced at the same factory along with them. These products are aimed at a wide range of different consumers, including those from developing countries. The price of these pads is 20–30% of the cost of the original.
How to check pad wear
To independently check the degree of wear of the pads on a VAZ 2110 car, you should follow the process described below.
Front pads
- wheels are removed;
- the disk is cleaned of dust and dirt;
- a caliper is taken and the thickness is measured.
Note. Like pads, discs must have a certain level of wear. As a rule, the permissible wear of discs is 10.8 mm and no smaller. If the disc is too worn, it needs to be replaced.
- A visual inspection of the brake pads is carried out.
How to check pad wear
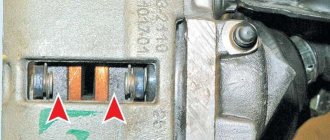
Note. You can determine the condition of the brake pads by looking through special holes designed for this purpose. As mentioned above, their thickness should not be less than 1.5 mm.
- The ease of movement of the pads is also checked.
Note. The ease of movement of the pads is checked with a screwdriver. If the pads are difficult to move, then it is likely that they are pinching the disc. You will have to replace the disc or caliper.
Rear pads
In order to check the brake pads at the rear, you should do the same, only after removing the wheels, you also need to remove the drum. Drum wear must also be measured. To do this you should:
- measure the diameter of the working surface of the drum.
Note. You should know that the maximum permissible wear should not exceed 201.5 mm in this case.
The following are situations when it is necessary to replace brake pads:
- if the thickness of the pads is less than one and a half millimeters;
- if the friction linings of the pads have traces of oil on the surface;
- if there is a poor connection of the linings with the base;
- if you hear a characteristic creaking noise when braking;
- if there is a beat when pressing the brake pedal.
How often should brake pads be changed: general recommendations
Many manufacturers recommend carefully inspecting the front brake pads at each regular maintenance: some of them do not always reach half their service life after 10 thousand km, while on drum pads wear can be only 5–10% over the same mileage.
But how often should you change your front brake pads? There are no exact instructions on the timing of replacement here and there cannot be. It all depends on the factors listed in the first part of the article. However, there are a number of general recommendations, following which will allow you to choose a more appropriate moment for replacement:
- Be sure to check the condition of the brake pads at every maintenance. Most often, disc pads last for 1–3 cycles, or 10–30 thousand km. Drum ones last up to 5 times longer.
- Pay attention to both the outer and inner pads. Wear is usually uneven, so use the more worn pad as a guide. The remaining thickness of the friction lining must be at least 2 mm.
- If you notice any extraneous sounds (squeaking, grinding), vibration, or a subjective feeling that the brakes have become less effective, be sure to check the condition of the pads.
- If your car has brake pad wear sensors, keep an eye on the dashboard. Or listen to sounds when braking, if there is a mechanical sensor in the pad that makes a characteristic squeak when it is critically worn.
Do not allow brake pads to wear down to the metal plates. It is better to replace them in advance during maintenance if, judging by the residual life of the lining and wear dynamics, there is a possibility that the pads will not last until the next scheduled maintenance. This will keep disks and drums, which are quite expensive, in good condition.
The TopDetal.ru online store sells only high-quality brake pads. Do you want to feel confident every time you press the brake pedal? Order brake pads from the world's leading manufacturers from us!
Replacing front brake pads
Replacing brake pads VAZ 2110
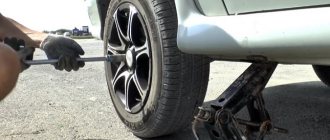
Before you start replacing the front brake pads of the VAZ 2110, you need to prepare the car. Started:
- hang out the wheel;
- remove it;
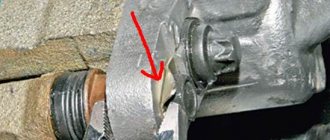
- Now you will need to bend the edges of the locking plate of the lower bolt that secures the wheel cylinder to the guide pin.
Preparatory work
Before starting work, set the car to speed, put stops under the front wheels, loosen the nuts, hang the wheel, unscrew it and remove it.
Don't put the car on the handbrake!
If the brake drum has not been removed for a long time, it can “stick” quite strongly to the axle shaft. If using “WD” does not help, then you can remove it from its place in two ways:
- if you unscrewed the guide pins, then screw them in again and tighten them evenly, one at a time;
- Unscrew the guide pins, start the car, accelerate to 3 or 4 speeds and suddenly squeeze the brake. This method always helps, even in very difficult cases when the brake drum cannot be removed in any other way.
We change the rear brake pads on a VAZ 2110 with our own hands
To find out when it is necessary to replace the rear brake pads of a VAZ 2110, you should focus not only on your own sensations or the appearance of squeaks when braking, but also on their actual wear.
You can assess the condition of the pads through the inspection window without even removing the drum. To do this, remove the rubber plug in the dust shield, pry it off with a screwdriver, and look at the pads. Their thickness should be more than 1.5 mm.
If it is less, then they will no longer provide a quick stop after pressing the pedal. In addition, with such a thickness, the piston stroke of the cylinder will be greater than normal. Hence, leaks leading to loss of fluid, a drop in its pressure, that is, the entire braking system is at risk.
How to extend the life of your rear brake pads and drums
If the car is used correctly, the rear brake pads last approximately 2-3 times longer than the front ones, lasting 50 thousand kilometers or more. However, you can “kill” pads and even drums much faster. Although replacing rear brake pads is relatively simple and can be done by yourself, there is still no need to rush this moment.
What determines the service life of rear brake pads?
As is the case with the front brake pads, the rear ones wear out more when driving too aggressively, including a sharp decrease in speed. Usually the front pads are the first to make themselves known, but if you have already replaced 2-3 sets, the rear ones are probably also on their way. If you drive carefully and take care of your car, then it is recommended to think about replacing or at least visually inspecting the rear pads after the odometer value exceeds 50 thousand.
One of the main nuances associated with the rear pads is the principle of operation of the parking brake. It blocks the rear axle, so if you often forget to “take off the handbrake” before starting to move, then the load falls on the friction linings of the rear pads. A similar fate awaits the pads if the handbrake is incorrectly adjusted, as a result of which there is no clearance left between the linings and the drums and it disappears only due to mutual friction during driving.
Of course, the quality of the rear brake pads is also an important wear factor. The difference in price between consumables produced in Russia and abroad in this case is very significant. There are different opinions on this matter, but the majority is inclined to believe that imported products are indeed of better quality and are worth the money. Apparently, for the same reason they are often counterfeited, so if you decide to buy rear brake pads from ATE, Ferodo, Finwhale, Lucas or other foreign companies, do not forget to check their authenticity. Many manufacturers today place a verification code on the packaging specifically for this purpose.
Thanks for subscribing!
Is it worth changing the rear brake pads and drums?
The normal service life of brake drums is at the level of 80-90 thousand kilometers. If you thought about replacing brake pads much earlier, you most likely won't need to replace the drums. However, during the procedure you will still remove them and will be able to visually assess the condition and make a final decision. If you managed to drive about 60-70 thousand on old pads, it might make sense to immediately replace the drums at the same time. Details on how to identify wear on the rear brake pads are described in detail in the article “Checking the condition of the rear brake pads and drums.”
Device
Before disassembling, you need to know the structure of the braking system. The VAZ 2110 has hydraulic brakes with distributed circuits. One circuit is the front right and rear left mechanisms, the second circuit is diagonal.
The hydraulic drive includes a (also dual-circuit) pressure regulator. It helps regulate the brake fluid pressure on the rear brake systems. It is through the regulator that the fluid flows to both rear mechanisms.
Adjustment is carried out through four chambers. Their design is as follows: two are connected to the main cylinder, and two, respectively, to both cylinders of the rear brakes.
For high-quality braking, it is necessary that the entire system works smoothly, there is correct adjustment and reliable mechanisms.
Parsing order
It is better to carry out the repair operation on an overpass (you can use an inspection hole), or just a flat area with a hard surface, because you will have to remove the rear wheels, naturally, first jacking up the car.
- Remove the wheel and disk;
- We unscrew the guide bolts, of which there are 2, and remove the drum;
- A common problem is the drum sticking, so sometimes it is not so easy to remove it. The problem has long been solved by tapping a drum with a hammer (through a board);
- Using pliers, remove the tension spring;
- After this, a fixing guide spring holding the block;
- We remove the block from the support bar that is not connected to the handbrake rod. To do this, pull its free edge to the side and along the shield;
- Loosen the upper spring. To do this, you need to turn the block to the side until you can disconnect the spring;
- We do the same with the spring of the second pad;
- Remove the spacer bar;
- Disconnect the handbrake rod from the cable;
- We note to ourselves or sketch how the connection to the rod is made;
- Unhook the spring, remove the cotter pin, and disconnect the brake pad.
Thus, the disassembly process is completed.
Order of Operations
On a note! All four pads on the rear wheels need to be replaced at the same time, even if the friction lining is worn unevenly. But, as a rule, the wear and tear is the same.
Work can be carried out without an inspection pit or overpass. The machine is placed on a flat surface and raised with a jack. Next, the following operations are performed:
- The car is set to speed, stops are installed under the front chassis, the rear wheels are “hung out” and removed.
- Behind the wheel there is a drum that needs to be removed. If the knot has not been removed for a long time, it is most likely “stuck.” You can use WD tools for removal.
- After removing the drum, the brake pads are accessible. They can be inspected and cleaned of dirt. If the friction layer has reached a minimum, you should continue repairing the rear brake pads of the VAZ 2107.
- Then the connecting springs are dismantled: first the upper one, then the lower one. The operation is performed with a screwdriver; if necessary, you can use pliers.
- Now you can remove the clamps. They consist of a rod, a spring and a washer. The last elements need to be rotated 90 degrees and removed through the slots. The same procedure is performed on the other block.
- After this operation, the pads are easily removed.
- Now the cotter pin securing the handbrake is removed, then the parking brake. Next, the lever is removed; first you need to remove the washer.
Attention! The parking brake tip must be disconnected and left hanging. The seat on the axle shaft is cleaned with sandpaper.
- All dismantled parts must be inspected and troubleshooted. If something is worn out, broken or malfunctioning, it must be replaced.
- Now you can install new parts. Assembly is performed in reverse order.
- After installing all the parts, you should check how easily the wheel rotates.
Replacement
In principle, assembly occurs in the reverse order, although there are some peculiarities:
- To achieve normal brake fluid pressure, in the future, it is necessary to drive the piston of the brake cylinder inside;
- Connect the handbrake rod and the block, be sure to insert the cotter pin;
- Connect the guide spring to the brake pad;
- Connect the cable to the handbrake rod;
- Connect the upper spring to the installed new block;
- You need to rest the second shoe on the heel of the brake cylinder and pull its lower edge. The spring is tensioned, the bar can be inserted;
- All that remains is to insert the second block and place it in the slot of the bar;
- Using pliers, engage the spring with the second block;
- After making sure that the cable does not get affected by the movement of the parts that make up the brake mechanism, it is necessary to install the brake drum in place;
- All that remains is to tighten the guide bolts, then install the wheel.
We do the same with the other wheel.
Adjusting the pressure
First, you need to adjust the parking brake. This device always requires adjustment after repair work.
Secondly, the rear brakes are adjusted so that the system locks the rear wheels a little later than the front ones.
Knowing the structure of the brakes, loosen the bolt securing the pressure regulator, using a screwdriver, move the bracket of the regulator drive lever to create a gap of about 2 mm between the lever and its spring.
We carry out a test - we accelerate the car to 40 kilometers, then sharply brake. Someone observing the process from the outside notes whether the wheels are locked correctly. If the front wheels lock later than the rear ones, then the adjuster must be moved in the direction of decreasing the gap. Then test again until correct wheel locking is achieved.
Replacing the rear brake pads of a VAZ 2110. Step-by-step instructions
Minimum permissible thickness of friction linings for VAZ 2110 brake pads
-1.5 mm. Replace the pads in the following cases:
- the thickness of the friction linings is less than the permissible value;
-the surface of the linings is oily;
-friction lining
not firmly connected to the base;
- deep grooves and chips have formed on the linings.
You will need: a 12" wrench, a flat-blade screwdriver, a mounting spatula, a hammer, pliers or a bit for removing the tension springs.
1. Engage first gear and install thrust blocks under the front wheels.
2. Make sure that the parking brake lever is lowered all the way down (the car is released).
3.Remove the wheel and clean the brake mechanism from dirt.
4.If the brake fluid level in the master cylinder
is at the “MAX” mark or is approaching it, pump out some of the liquid from the reservoir. Otherwise, when replacing the pads, it may splash out.
5.Remove the brake drum.
6.Remove the upper tension spring with a punch or pliers.
7.Remove the lower tension spring in the same way.
8.Remove the front pad guide spring and then the front pad.
9.Remove the expansion bar.
10.Remove the rear shoe guide spring and then the rear shoe by disconnecting the drive arm from the parking brake cable end.
11.Remove the cotter pin and the support washer from the pin of the rear shoe
.
12.Press the pin and remove the drive lever from the block. Remove your finger from the block.
Brake pads VAZ 2107
The basis of the safety of any car is the braking system, in which the main component is the brake pads. Let’s talk about the purpose of the pads, their types, malfunctions and replacement on the VAZ “Seven” in more detail.
What are they used for?
Today, almost all cars use the same braking systems based on the friction force. The basis of this system is special friction mechanisms located on each wheel. The friction elements in them are brake pads and brake discs or drums. The car is stopped by the action of the brake pads on the drum or disc using a hydraulic drive.
What are there
On the seventh model Zhiguli, the brake pads have a design difference, since there are disc brakes in front and drum brakes in the rear.
Front
The front brake mechanism of the car is equipped with pads with catalog numbers 2101–3501090. The part has dimensions:
- length 83.9 mm;
- height - 60.5 mm;
- thickness - 15.5 mm.
The front brake elements on all classic Zhiguli cars are installed the same. The manufacturer and supplier of original front brake pads for the VAZ conveyor is JSC TIIR.
TIIR brake pads are supplied to the AvtoVAZ assembly line
The design of the front brake mechanism is quite simple and consists of the following elements:
- brake disk;
- caliper;
- two working cylinders;
- two pads.
Design of the front brake mechanism of the VAZ 2107: 1 - guide pin; 2 - block; 3 — cylinder (internal); 4 — pad pressure spring; 5 — tube for the brake mechanism; 6 — caliper; 7 - fittings; 8 — tube of working cylinders; 9 — outer cylinder; 10 — disc brake; 11 — casing
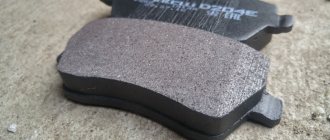
The condition of the pads must be periodically monitored to ensure that the thickness of the linings is at least 2 mm. If the friction material is thinner, the pads need to be replaced.
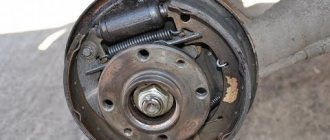
Rear
For drum brakes, pads with article number 2101–3502090 and the following dimensions are used:
- diameter - 250 mm;
- width - 51 mm.
The original product is produced by AvtoVAZ OJSC. As with the front ones, the rear pads are suitable for any classic Zhiguli model.
Products from AvtoVAZ OJSC are used as original rear brake elements.
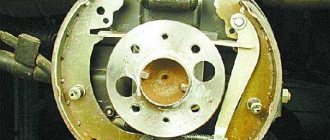
The rear axle braking mechanism has a simple drum design that works to expand. It consists of the following elements:
- drum;
- brake slave cylinder;
- pads;
- parking brake lever.
Design of the rear brake mechanism of the VAZ 2107: 1 - handbrake cable; 2 — parking brake spacer lever; 3 — rack support cup; 4 - block; 5 - cylinder; 6 — tension block spring (upper); 7 — expansion bar; 8 — tension spring (lower)
Which ones are better
There is no need to skimp when choosing braking elements. In addition, it must be taken into account that the design of the “seven” brake mechanism does not have any modern systems that increase the level of safety. Therefore, you should buy the products in question in accordance with the following indicators:
- the optimal friction coefficient according to GOST is 0.35–0.45;
- minimal impact on brake disc wear;
- long service life of linings;
- absence of extraneous sounds during braking.
If we consider brake pad manufacturers, then for active driving preference should be given to ATE, Ferodo. For a more relaxed driving style, when overheating and high loads on the braking system are not expected, you can purchase Allied Nippon, Finwhale, "TIIR". When purchasing a brake element, attention should be paid to the composition from which the friction lining is made. If the pad is made using large metal shavings, which is noticeable by characteristic inclusions, the brake disc will wear out much faster, while characteristic indentations will remain on it.
The best option would be those pads that are made from high-tech compounds that prevent rapid wear of the brake disc.
For active driving, it is recommended to install Ferodo front brake pads
We change the rear brake pads on a VAZ-2110 and choose which ones are better
The load on the rear brakes during braking is much less than on the front . However, this does not eliminate the need to monitor the rear brake mechanism. The VAZ tenth family is no exception. Replacement of rear brake pads on a VAZ-2110 is carried out as they wear out , and when, how and which pads are best to choose, we’ll figure it out together.
How to replace rear brake pads on a VAZ
There are several very important points that must be taken into account when replacing rear brake pads. For example, before starting work, you must lower the handbrake to the lower position. Both in the case of the front and rear, it is impossible to replace only a pair of pads, but all 4.
If you replace only one side, it may turn out that the new pads are much harder than the old ones or, on the contrary, they will brake better due to the complete absence of carbon deposits. Therefore, one side - with old pads - will skid during heavy braking.
Dismantling:
- First of all, remove the wheels and drums.
- Most likely, the brake system will be dirty, so it needs to be thoroughly cleaned. After this, you may not even need to change the pads themselves if the thickness of the gasket exceeds 1.5 mm. Using a brush you can quickly and efficiently clean the system. But never use strong solvents or other chemicals when cleaning.
- Remove the horizontal spring located on top. To do this, use a screwdriver or pliers to help yourself unfasten the element from one end, and then easily release the second.
- Once you remove the spring, you will notice a pair of bolts that support the piece that holds the pads in place. This is called a bowl. Press it down and turn it clockwise 90°, after which you can remove it. Before completely removing the bowl, feel for the rod on the back side and hold it, otherwise it will get lost.
- Remove the other compression spring that became visible after getting rid of the bowl. After this, remove the rod behind it. These elements prevent the block from being removed.
- The released block can now be removed. But both pads are attached to each other by a spring, which should be taken into account when removing them one by one.
- The opened spacer bar can be easily removed simply by hand. If you don't get rid of it, it will interfere.
- After you remove the front pad, only now can you remove the second (rear) pad using the same principle. During the process, you will be disturbed by the tip of the standing cable, which engages with the element being removed. It can be detached and just left hanging.
- The time has come to confirm or refute your assumption about the breakdown of the brake pads. Check whether they need replacing: use a caliper to measure the thickness of the lining in several places, which should be at least 1.5 mm. The replacement method, if necessary, will be described below.
- Using thin pliers, unpin the parking brake lever pin. Remove the released washer and remove the lever. As a result, the finger itself will be freed. The parking brake is commonly called a “handbrake”. All the parts you removed will then be installed on the new handbrake in the reverse order of dismantling. For the handbrake to work, it will need to be raised.
- Use a screwdriver or pliers to remove the upper spring;
- Remove the retaining cups from both pads; to do this, rotate the cup 90 degrees while holding the pin on the back side with your finger;
- In this case, it is better to start removing from the right, moving it down until the lower spring weakens;
- Remove the upper spring and spacer bar;
- Remove the left (rear) one from the handbrake cable;
- Remove the cotter pin, parking brake lever and pin. They are needed for installation on a new block.
We reassemble in reverse order.
Before installing the drum, apply pressure to the shoes to compress the brake cylinders. If the drum still does not sit in place due to the slightly larger size of the pads, then perhaps removing the shoulder on the drum will help.
To do this, you need to secure the drum with its back side on the axle shaft, start the engine, turn on the speed and grind it off with a file.
The second reason why the drum does not sit in place is the need to adjust the handbrake, but it must be adjusted after replacing the pads on both sides.
After installing the brake drum, guide pins and wheel, check that it rotates easily.
The choice on the auto parts market is quite sufficient, but I would like to make a few comments. Don't buy Chinese ones as they are of the worst quality. Firstly, the linings come off very often. Secondly, very low quality ferodo with a low coefficient of friction is used.
When to change the rear brake pads on a VAZ-2110
According to technical regulations, replacement of the rear pads should be carried out when the thickness of the friction linings approaches the critical level of 1.5–2 mm.
It is impossible to measure the thickness of the linings without disassembling the brake mechanism, but in this case the handbrake will help. If, when tightening the handbrake, the equalizer nut rests against the end of the rod, but the wheels are still far from being completely locked, and the wheels are not blocked when the handbrake is fully tightened, most likely the pads have worn out to the limit.
Knocks and squeaks
In addition, knocking in the rear brake mechanisms, squeaking when braking, contact with brake fluid or oil on the lining, chips and cracks on the surface, as well as jamming of one of the wheels due to a torn lining will force us to replace the pads.
Let's summarize
It is important that before installing new parts, the cylinder pistons must be brought together as much as possible.
If the drum still refuses to “sit” in its normal place, you can remove the collar. This is done like this: the drum is fixed on the axle shaft with the reverse side, the motor and speed are turned on. The bead is sawed off with a file. Despite the simple design of the rear pads, their installation is more difficult. But having performed this operation once, you will perform all subsequent repairs with ease.
Tool
For work, it is most convenient to use a lift or inspection hole, since some operations must be (or more convenient) performed from under the machine.
For our work we will need the following set of tools:
- plumber's hammer;
- rubber straightening hammer or wooden spacer;
- steel rod with a hook at the end for removing and installing springs;
- mount;
- standard set of tools and penetrating lubricant.
Essential tool for replacing pads.
Work algorithm
If you have all this at hand, including new pads, let's get to work:
- We put the car on a lift or inspection hole and remove the wheel bolts.
- We hang one side on a jack if we are working in a pit.
- We remove the wheel.
Jack up part of the body and remove the wheel.
Using a 12mm wrench, unscrew the two guide pins and remove the drum.
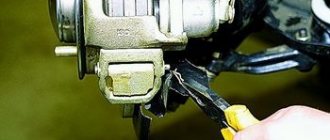
But if it doesn’t give in, we go down under the car and tap the perimeter of the drum with a rubber or wooden hammer. If it doesn’t work, generously apply penetrating lubricant to the place where the drum fits on the hub, wait 5–10 minutes and repeat the procedure. You can take a heavier hammer, but you can’t hit it directly on the drum, it will crack. We hit it through a wooden spacer, turning it evenly.
Remove the expansion bar.
Having disconnected the guide spring from the rear brake pad, we remove the manual brake pad drive lever from the cable end.
We inspect the pads and brake mechanism for damage, leaks, etc.
After dismantling
After dismantling, we thoroughly clean and check the condition of the brake mechanism, boots and working cylinder.
Pay attention to the condition of the brake cylinder and boots.
- We look at the brake fluid level; if the reservoir is full, we take a small amount with a syringe.
- We remove the handbrake drive lever from the old block and install it on the new one.
Installation of new pads is carried out in the reverse order , but during installation it is necessary to recess the pistons of the working cylinder as much as possible. This can be done with a pry bar, resting it against the side of the brake flap and a new pad. Don’t forget to adjust the tension of the handbrake cable after installation.
Video about replacing the rear brake pads of a VAZ-2110
Briefly about the process of replacing brake pads on a VAZ-2110
On average, the pads need to be changed every 30 thousand mileage.
First, let's look at the simple technology of replacing pads on a ten. Anyone can change them, spending at most half an hour. For our work, we will need a standard set of tools, a pry bar or a powerful screwdriver, and a rag. WD-40 penetrating lubricant and guide block lubricant may also . And, of course, new pads. We change them only as a set on the right and left wheels.