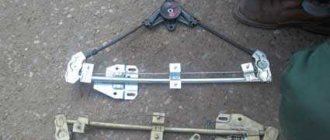
A misfortune once befell me - a short-term grinding noise in the starter area after starting the engine. It was decided to replace the bendix. Yesterday I got around to it and removed the starter from the car.
The Bendix or starter drive is a unit consisting of a clutch with a gear and a fork connected to a solenoid relay. The clutch is also called an “overrunning” clutch. Three types of starters were installed on VAZ 2114 hatchbacks: 29.3708, 423.3708. and also 5712.3708. The first two differ only in the shape of the fork, as well as in the design of parts not related to Bendix. And the starter 5712.3708 is a modern device equipped with a gearbox. The seating dimensions of all starters do not differ in any way. On any car, including the VAZ-2114, replacing the Bendix begins with dismantling the starter.
Detecting and eliminating bendix failure
Bendix often does not break spontaneously. Noise and characteristic clicks when starting the engine warn that the mechanism will soon deteriorate. Naturally, you should not delay repairs, because not only the overrunning clutch will break, but also the flywheel crown, the repair of which requires more serious and lengthy intervention. One way or another, repairing a Bendix requires certain skills and knowledge, which you will now learn. Before direct replacement, you need to purchase a VAZ 2114 starter bendix, the price of which varies depending on the authenticity and quality of the part. I would advise purchasing spare parts from reliable and trusted suppliers.
Diagram of a gear starter VAZ 2113, 2114, 2115 - 8 valves
Starter parts
: 1 – drive side cover; 2 – sealing gasket; 3 – lever bracket; 4 – traction relay anchor; 5 – traction relay; 6 – “negative” brush; 7 – gasket; 8 – back cover; 9 – brush clamp; 10 – “positive” brushes assembled with a connecting busbar; 11 – brush holder; 12 – stator; 13 – anchor; 14 – tie rod; 15 – armature shaft support; 16 – central gear; 17 – planetary gear; 18 – drive shaft with carrier; 19 – internal gear; 20 – sealing ring; 21 – drive shaft support with liner; 22 – retaining ring; 23 – drive assembly; 24 – restrictive ring; 25 – retaining ring.
Features of mechanism diagnostics
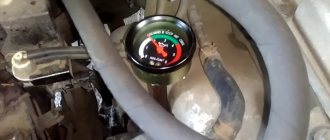
The starting unit is checked using a tester. After turning on the device, the voltmeter reading should not be higher than 8V, and the current should not exceed 23A.
You can check the windings using a tester; if it lights up, it means there is a short circuit. To perform a visual inspection of the starting unit, it must be removed and cleaned of dirt (video author - Irina Kuzilova)
When disassembling the device, each part should be visually inspected. Scores and scratches can be removed using sandpaper. Broken and worn parts must be replaced. It is also necessary to replace the VAZ 2106 starter bushings if they are badly worn.
A faulty collector cannot be repaired; it is advisable to replace it. The height is checked on the brushes. More than 12 mm is considered optimal, otherwise the brushes must be replaced.
Common starter problems and their causes
Regardless of whether 2106 or UAZ is installed, the problems are similar. If the car does not start, the VAZ 2106 is bad, first check the quality of battery charging. In addition, you should check how well the terminals are secured. If everything is fine with the charging and terminals, then the cause of problems with starting the engine may be in the starter.
The following malfunctions of the VAZ 2106 starter are possible:
- The device turns on, but the traction relay does not work: the traction wire is broken, the tips are not tightened well, there is a short circuit in the traction windings or to ground, the contacts have oxidized, the retractor armature is stuck.
- After switching on, a click occurs, the traction relay works, but the armature does not function or it rotates too slowly, the starter does not turn: the fastening bolts on the retractor are not tightened well, the brushes are worn out or stuck, the commutator plates are short-circuited or are burned out, the windings are damaged.
- When starting, the relay clicks, the armature works, but the crankshaft does not rotate: the buffer spring is broken, the clutch slips, slips out of the axle, or the clutch engagement lever is broken.
- The starter does not turn off when the engine starts: the relay or drive lever is stuck, the contacts are stuck together, the mechanism is skewed, the ignition switch return spring is faulty.
- Increased noise during startup: the unit is poorly secured, the bushings are worn, the teeth on the gears are broken.
VAZ 2109 starter - how to assess problems and fix them as well as a mechanic?
For owners of domestic cars, self-repair or assembly of vital mechanisms is familiar and accessible; in this article we will try to improve our skill level and replace the VAZ 2109 starter with our own hands.
Starter circuit and purpose
On all cars, without exception, and therefore on the VAZ 2109, the starter is responsible for starting the engine, or rather, spinning the crankshaft. Essentially, it is a small electric motor. The VAZ 2109 starter device includes a movable rotor, two windings, and a bendix with a set of brushes. How does it all work? Magnetic fields of opposite values are created around the starter and rotor windings, which drives the moving element into dynamics. It is quite easy to apply voltage to the starter, but for the rotor you need an intermediary - brushes consisting of graphite and copper.
What about the Bendix starter of the VAZ 2109, this element transmits movement to the flywheel. The part consists of the following parts: a fork connecting the mechanism to the retractor relay, an overrunning clutch that ensures movement in one direction, and a gear. Many motorists are familiar with the situation when this part is erased. The slipping of the Bendix is clearly audible and indicates that the installation of a new kit is inevitable. And although the cause is often contamination of the mechanism, cleaning it is not recommended. Due to dust and soot, Bendix is subject to wear, often unevenly, and even after washing it will no longer perform its function at the proper level.
There is a gear starter and a simple one. The scheme for transmitting torque to the flywheel is excellent. The gear starter has an additional element between the armature and the bendix. Many consider this design to be more productive and less voracious. True, the gear unit is more difficult to repair.
Starter mechanism malfunctions
If any difficulties arise with starting the car, this unit is the first to be suspected, but now, knowing the design of the VAZ 2109 starter, you will quickly figure out where to look. Various sounds similar to metal grinding should also alert you; it is quite possible that your VAZ 2109 will need to disassemble the starter. The reason may lie in the flywheel, and its crown will need to be replaced. In this case, the car will most likely start, just not right away.
But if the car does not start and there are no alarming sounds, then you may have to replace the clutch. Disassemble the starter and dismantle it, try turning it in both directions. If it rotates freely, then calmly throw away the failed part. You can understand that it is necessary to remove and replace worn starter brushes installed on a VAZ 2109 by a characteristic click, after which the expected engine start will not take place.
Starter VAZ 2106 how to remove and replace it
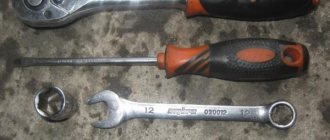
The scheme for dismantling the old device and connecting a new one does not require special forces from the car enthusiast. Anyone who is “armed” with the necessary tools (screwdrivers, a mandrel, several keys - 10, 8 and 13, a hammer, pliers), will be able to remove the gear starter and will carefully watch the video of this process (for many car enthusiasts it is enough to study the photo of the operation so that the disassembly of the mechanism will be “ without a hitch").
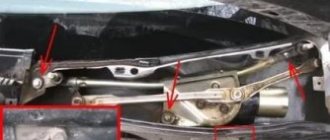
The diagram for such disassembly and connection of a working device is elementary. First, the air filter (or rather its housing) is removed. To do this, you need to use a 13mm wrench. Use it to disconnect all three bolts that secure the filter to the gearbox housing. After this, the wires are pulled away from the starter and dismantled. Now you can begin disassembling the mechanism in the following sequence.
Advantages of a gear starter for VAZ 2107
Often one spare part can significantly improve the performance of a car. Installing a gear starter on a VAZ 2107 ensures trouble-free engine starting. Replacing the starter with a gear modification provides:
- quick engine start;
- increasing the service life and intervals between preventive maintenance of the starter;
- increasing energy efficiency and starter power with smaller dimensions and weight of the device.
Thanks to improved energy efficiency, the gear starter allows you to start the car even with a very discharged battery in winter. According to the owner of the “Seven” with this type of starter, the car can be started even if the battery is almost completely discharged. The gear starter saves battery charge, which is important for frequent trips over short distances, when the travel intervals between engine starts are not sufficient to fully charge the battery.
Also, the gear modification of the starter has a significantly longer service life than the standard VAZ 2107 starter.
Instructions for removing and repairing the starter yourself
For diagnostics and repairs, the unit must be removed.
The removal procedure consists of the following steps:
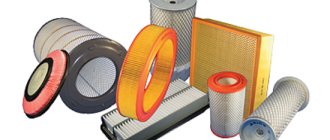
- To access the device, you must remove the air filter.
- The starter is attached to the gearbox housing using three bolts. To remove it, you need to use a 13 key to first unscrew the two upper bolts, and then the one at the bottom. It is more convenient to unscrew it from the hole.
- Then you need to disconnect the wires, and you can remove the mechanism and begin repairs.
For repairs you will need the necessary tools.
On a VAZ 2106, starter repair begins with disassembly, consisting of the following steps:
- First of all, the solenoid relay is removed.
- Next, the retractor anchor is pulled out.
- At the next stage, we dismantle the upper protective casing.
- Next, we dismantle the rotor shaft. In this case, you should check the short circuit to the housing.
- Then unscrew the screws securing the cover, winding and wires.
- Next, separate the cover from the body and remove the brushes.
- Then, using a mandrel, press in the rear bearing.
- At the next stage, remove the cotter pin, anchor with fork and rubber plug.
- Next you need to get the second bearing.
- Then, moving the washer away, removing the retaining ring, we dismantle the bendix.
This is where the disassembly ends. Now every part is inspected and problems are corrected. Assembly is performed in reverse order. Before assembly, you need to lubricate the parts of the starting unit. After installation, the starter should be connected. The connection should be made according to the connection diagram, and then check the functionality.
How to change Bendix on the starter
First of all, you need to make sure that the overrunning clutch is to blame for the starter malfunction, and not, for example, the retractor relay. The question of how to check Bendix is asked by many car owners who have encountered similar faults. Finding out that the Bendix starter needs to be replaced or repaired is quite simple - the electric motor of the starting device runs “idle” without cranking the car’s engine. Simply put, the bendix does not engage with the flywheel, slipping on the armature shaft.
The first stage of repair is to remove the entire device from the car engine. For most car brands, this procedure is quite simple. To do this you will need:
- Remove the negative terminal from the battery;
- Remove the positive wire from the solenoid relay;
- Unscrew the bolts securing the engine;
- Remove the starter from the engine compartment.
In some cases, you will have to remove the engine protection and pull out the unit from below.
Next, the question arises of how to remove the bendix from the starter without damaging anything. The designs of starters for passenger cars of almost all brands are the same, and in order to remove the culprit of the breakdown from them you will need:
- Remove the solenoid relay;
- Pull out the pusher;
- Remove the front part of the starter;
- Remove the retaining ring from the armature shaft;
- Pull out the overrunning clutch.
After removing the overrunning clutch, you must carefully examine its condition to make sure that repairing the starter bendix is impossible. Next, install the new unit, thoroughly cleaning the armature shaft. When choosing a new overrunning clutch, you must not make a mistake with its marking. Often it is not enough to simply indicate the make and model of the car engine - starters may be installed from different manufacturers at the factory and the repair product simply will not fit. For example, if the Bendix is being replaced with a Ford Focus, then the markings can be read on its body.
When performing assembly work on the starting unit and installing it on the car engine, it is necessary to pay special attention to attaching the wire to the solenoid relay. Next, we check the functionality of the car.
If the solenoid relay operates normally and the engine rotates confidently after turning the ignition key, then the repair work has been completed correctly.
How to replace the starter on a VAZ 2101-VAZ 2107?
Note! Be sure, before you start replacing this unit, make sure that its performance is not related to other reasons, for example, the battery is discharged, or its terminals are oxidized, or the wiring that goes to the starter is not working properly!
And also take into account the fact that replacing the starter must be done in the inspection ditch, otherwise it will be awkward and very problematic to remove it from the car!
Removal: 1) First, loosen the clamp that secures the warm air supply hose to the air filter housing.
READ How to install a clutch disc on a VAZ 2107
2) Then loosen the clamp that secures the hose to the air absorber itself.
3) And then remove this hose from the car engine.
4) Next, loosen the lower nut that secures the air intake.
5) Next, unscrew the upper nut, which strengthens the same air intake.
6) And after that, remove this air intake from the car engine.
7) Now unscrew both nuts that secure the heat insulation shield to the engine.
 And after that, using an extension joint with the socket head, unscrew the remaining bolt that secures the heat-insulating shield to the bracket of the right engine mount. (For information on how to unscrew the remaining bolt that secures the heat-insulating shield to the bracket, see the very bottom of the article in the “For Beginners!” section)
9) After unscrewing the bolt, remove the heat insulation shield from the motor.
10) Next, unscrew the lower bolt that secures the starter.
11) After this, unscrew the remaining two upper bolts, which also strengthen the starter.
12) Moving the starter a little forward...(Continued in Fri 13)
13) Disconnect the wire block from the starter traction relay terminal on the starter.
14) Then unscrew the nut that secures the wire to the upper contact of the traction relay.
15) And after that, disconnect the wire from the upper contact, and also remove the bolt and nut that held this contact.
16) Next, remove the starter from the car engine.
Installation: 1) Installation of a new starter is carried out in the reverse order of removal.
Fundamentally! 1) Before work, disconnect the negative terminal from the battery! (For information on how to disconnect this terminal, see the article: “About the battery”)
For newbies! Question: How to unscrew the bolt securing the heat-insulating shield to the bracket of the right motor mount. Answer: Using an extension joint with the socket head “2”, unscrew the bolt “1” securing the heat-insulating shield to the bracket of the right motor mount.
Additional video clip: To more thoroughly understand how to replace the starter, watch a fascinating video clip in which the replacement process will be carefully described:
Types of starters that are equipped with VAZ 2106
There are 2 types of such electric machines:
- with gearbox;
- without gearbox.
A car starter with a gearbox is more efficient and functional even with a low battery charging current. As a disadvantage, it should be noted that the rotation gear may be defective. Electric machines that are not equipped with a gearbox are simpler and provide almost instantaneous engagement with the flywheel ring. This significantly speeds up the ignition timing. The advantage is its high degree of reliability. As a disadvantage, the starter turns poorly in the low temperature range.
In the latest configurations of the “sixes”, the electrical system is equipped with starters of the ST-221 brand under the item number 35.3708 with an end receiver-collector. In some batches of vehicles, the installation of German or Belarusian electric vehicles is allowed. This starter is adapted to the performance characteristics of a standard product.
Basic tactical and technical data of the VAZ 2106 starter:
- The nominal power of the product is 1.3 kW.
- The nominal current value is 260-290 A.
- The maximum current value in non-operating conditions is 500-550 A.
- The maximum current value in idle mode without a relay is 35-60 A.
In the final modifications, some design changes were made to the VAZ 2106 starter device. In the last quarter of the twentieth century, when assembling the “six”, the ST-221 was mounted with a collector-receiver in the form of a cylinder, which had a different aft segment and a stator winding with a different set of shunt and serial coils. The basic design of the VAZ 2106 starter can be seen below:
1 – drive gear; 2 – overrunning clutch; 3 – leash ring; 4 – rubber rubber plug; 5 – drive lever; 6 – drive casing; 7 – relay anchor; 8 – relay winding; 9 – contact type plate; 10 – relay cover; 11 – bolts for contact; 12 – collector device; 13 – starter brush holder; 14 – anchor bushing; 15 – collector cover; 16 – protective cover; 17 – body part; 18 – pole element; 19 – anchor device; 20 – ring of intermediate fastening; 21 – limiter ring.
Replacing the bendix on the starter
First you need to disconnect the terminals from the battery. This will eliminate the possibility of electric shock, as well as damage to the elements of the machine's electrical supply system. Next, you need to unscrew the starter mounting nuts and remove it from the studs. Usually the starter is secured with three nuts, but there are exceptions. After removing the starter from the studs, you need to move it slightly to the side, ensuring easy access and visibility, and then unscrew the power wires. There should be no further obstacles to remove the starter from the engine compartment. You can start disassembling it. Most often, the starter cover is secured to the body with a clamp. To remove it you will need to unscrew the corresponding bolt. In this case, you need to remember what position the clamp was in. In addition, you will need to unscrew a couple of bolts securing the cover. Next, using a screwdriver to help yourself, you can push the internal elements of the starter out of its housing. This will require removing the starter fork. The bendix will be located at the top of the anchor. To remove the ring that covers the main corkscrew ring, you need a 13-size open-end wrench and a small hammer or other “impact” tool. The key must be carefully applied to the ring and gently hit it until the ring moves. After this, the thin retaining ring will become visible
It must be removed very carefully, avoiding bending. This is a rather complicated procedure
To do this you will need a screwdriver. It is best if there are several different sizes in stock so that you can choose the best option. After some effort, you should be able to pry the ring and carefully pull it out. After this, it is possible to dismantle the bendix itself.{typography legend_blue}It is worth noting that it is better to buy bendix in a store, taking with you the part removed from the starter. The fact is that different couplings can differ from each other in the smallest details that cannot be remembered visually. As a result, you can buy the wrong spare part.{/typography}Installation of a new Bendix is carried out in the reverse order. After putting it on the shaft, you also need to carefully put on the retaining ring using the selected screwdriver
It is very important not to bend it. After putting it on, you need to crimp it with pliers
Next, you can put the large ring in place. To do this, you can again use a 13-size open-end wrench and a hammer. All actions are carried out carefully. Next, you can insert the anchor with the installed bendix into place. At the same time, do not forget to reinstall the starter fork. At the same time, it is necessary to inspect the remaining elements of this unit. {typography legend_blue}If the plastic washer installed in the starter cover is cracked or worn, it needs to be replaced. If the insulation on the starter studs is damaged, it must be repaired using electrical tape. {/typography}After assembling the starter, you need to tighten the cover fastening nuts and also tighten the clamp. After finishing the work, you can begin installing the starter in place. First you need to connect the power wires, and then install the unit in place. After tightening the starter mounting nuts and connecting the battery terminals, you can check the result of the work performed.
Review: Gear starter StartVolt VAZ-2101 - A powerful replacement for the standard classic starter.
The next side shows the power of the starter, its starting speed, and the low temperature of its efficiency:
Starter power 1550W. significantly exceeds the power of the standard Zhiguli starter, which has a power of 1300 W. The starter kit comes with a passport with a warranty card, but it all consists of advertising parts for the electrical equipment of the car manufactured by the StartVolt company. The photo shows a receipt pasted by the merchant with the price of this starter:
The starter itself in the box is carefully placed in a foam shock-absorbing cell:
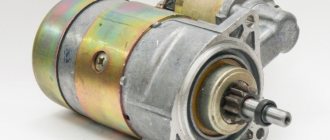
At the rear end of the starter you can see its power terminals and copper parts:
The starter itself is made in China under license and under the control of a Russian company, it is small-sized, and its weight is small, about 3 kg:
The working part of the starter is somewhat smaller than the similar part of a standard starter; the gear feed mechanism and the starter fastening itself are, of course, standard:
I would like to note the fact that the 13-spanner nut on the upper terminal at the top right in the photo (the lower nut on the copper bolt) was loosely tightened, and we managed to tighten it perfectly. When tightening this nut, the force may cause the black cage of the round insulator of the solenoid relay to turn slightly, from where the copper bolts come out. To prevent this from happening, you need to tighten the nut carefully, without unnecessary lateral forces, and hold the clip itself with your hands. If the clip still turns a little, you need to carefully return it to its place with your hands and force. In the working position, this clip is fixed with an internal lock, and you will feel this fixation with your hand. In the following photo you can evaluate the comparative dimensions of the new and old standard Zhiguli starter:
READ VAZ 2107 what oil to pour into the engine
The difference, as they say, is visible to the naked eye. After installing the new starter, the car's engine was started. To be honest, there was ecstasy when the starter was working. The speed of the crankshaft at startup is such that it seems that the spark plugs have been removed from the engine, and the compression of the cylinders has stopped interfering with the operation of the starter. The startup sound has also changed dramatically. I also liked the fact that when the starter is turned on, the voltage drop in the on-board electrical network is relatively small. So far, the operation of this starter on the car brings real satisfaction. All that remains is to wait for the winter cold and check the confidence of starting the engine in the cold. I think such a starter will be able to do it.
Progress
We start with preparatory measures.
First of all, you need to disconnect the negative terminal from the battery. Replacing the Bendix will require manipulation of the electrical wiring, so disconnecting the battery is a mandatory safety requirement. Next we move on to the solenoid relay. You will see two bolts on it: upper and lower. The first is connected to a conductor connecting the relay to the battery. It will need to be turned off, here you will need a key set to 13. Nearby you will notice a small wire that provides power to the winding when you turn the key in the ignition. It will also need to be turned off; just pull it slightly to the left. Next we move on to the procedure for removing the starter. On the front panel you will notice three nuts, located from top to bottom. They can also be removed using a key number 13. Dismantling is completed, the starter needs to be pulled out and prepared to work directly with it. You will need to disassemble this element, remove the non-working bendix from it and install a new one. But first things first.
After you have removed the starter, inspect it. Assess the current condition of the bushing, rotor windings, brushes and lamellas. If you notice any damage to them, you will have the opportunity to replace them immediately. Now let's move on to disassembling the device. It is performed as follows:
- The cover is fixed to the body with two bolts. Let's remove them.
- Next in line for dismantling will be the bolts securing the retractor to the starter and the nut that ensures contact with the power cable.
- You can now see the retaining ring on the rotor. We dismantle it.
- We arm ourselves with a 10mm wrench and remove the studs.
- The brushes are connected to the contacts using small bolts. The screwdriver comes to our aid.
The starter can now be separated.
It will separate into 3 parts. Finally, let's move on to the most important thing - dismantling the Bendix
To begin, you will need to carefully knock off the washer located on the rotor shaft. A small hammer will help you with this
There is a ring underneath that you will need a screwdriver to remove. And finally, the old bendix can be removed.
But what if the reason does not lie in the breakdown of this element? In fact, this is very easy to check. Try spinning the gear. If it grabs after 1/4 turn, then the bendix is working. If the gear rotates freely in both directions, you can safely throw away the Bendix. Installation is carried out in reverse order.
What is the design of the gear-six starter?
The VAZ 2106, produced after the 1980s, has a starter with an end manifold model 35.3708. Earlier cars from the Volzhsky plant had a different gear mechanism installed - ST-221, which was equipped with a cylindrical manifold. Their structure is approximately the same, so they are completely interchangeable.
Let's take a closer look at the design of the mechanisms that interest us, using model 35.3708 as an example. The “six” gear starter consists of the following main parts:
- field winding (i.e. stator) and housing;
- electric drive with anchor;
- three special covers;
- electromagnetic traction relay with two windings (one of them is retracting, the other is holding).
Using bolts, the starter housing is secured into one block with three covers. The armature of the mechanism we are interested in has a core, a commutator and a shaft. The last of these elements rotates in metal-ceramic bushings (there are two of them structurally provided). These bushings are pressed into the covers and must be impregnated with a lubricant. The starter drive is located at the end of the shaft. It includes a gear and a roller clutch, which is necessary to transmit torque to the flywheel.
On the front cover there is a relay consisting of a yoke, several flanges and a core. When the gear mechanism is turned on, two processes occur simultaneously: the armature is retracted, and the drive and gear mesh with the flywheel; a special contact plate closes the bolts. The result of these processes is the start of power supply to the windings of the device we are considering. As you can see, the circuit for switching on and operating the “six” starter is quite simple.
Design and principle of operation
Most overrunning clutches (let's call them the more popular word among motorists - bendix) consist of a driving race (or outer ring) containing rollers and pressure springs, as well as a driven race . The leading holder has wedge channels, which on one side have a significant width. It is in them that the spring-loaded rollers rotate. In the narrow part of the channel, the rollers are locked between the driving and driven clips. As is clear from the above, the role of the springs is to drive the rollers into the narrow part of the channels.
The principle of Bendix operation is the inertial effect on the gear coupling that is part of it until it engages with the engine flywheel. While the starter is inoperative (the engine is turned off or running in constant mode), the Bendix clutch is not engaged with the flywheel crown.
Bendix works according to the following algorithm:
Bendix interior
- The ignition key is turned and current from the battery is supplied to the starter motor, driving its armature.
- Thanks to the helical grooves on the inside of the coupling and the rotational movement, the coupling, under its own weight, slides along the splines until it engages with the flywheel.
- Under the action of the drive gear, the driven cage with the gear begins to rotate.
- If the teeth of the clutch and the flywheel do not coincide, it rotates slightly until they are firmly engaged with each other.
- The buffer spring included in the design serves to soften the starting moment of the engine. In addition, it is needed to prevent tooth breakage from impact when the gears engage.
- When the engine starts, it begins to rotate the flywheel at a higher angular speed than the starter previously rotated. Therefore, the coupling twists in the opposite direction and slides along the splines of the armature or gearbox (in the case of using a geared bendix) and disengages with the flywheel. This saves the starter, which is not designed to operate at high speeds.