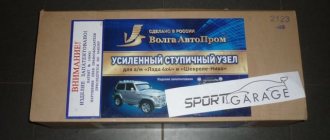
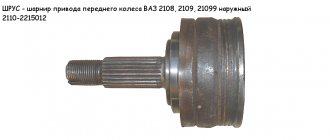
External wheel drive joint kit (CV joint, boot, clamp, snap ring, wheel nut). Article 21080-2215012-86 or 21700-2215012-87 (with ABS).
Kit contents
:
- 21100-2215012-00 or 11186-2215012-00 Outer hinge assembly (with ABS) - 1 pc.
- 00001-0040442-71 Nut M20x1.5 - 1 pc.
- 21080-2215030-00 External hinge cover - 1 pc.
- 21080-2215034-82 Clamp - 1 pc.
- 21080-2215036-82 Clamp - 1 pc.
- 21210-2215084-00 Retaining ring - 1 pc.
You will also need CV joint-4 lubricant.
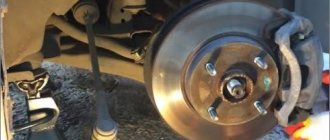
When to change the CV joint, signs of malfunction
As was said, the external grenade fails after about 40 thousand mileage. This is evidenced by crunching, creaking and knocking sounds in the area of the drive shafts. To determine which side of the CV joint requires replacement, you need to turn the steering wheel all the way and drive off. In 90% of cases, a worn drive will manifest itself as a crunching sound. For control, you can turn it first in one direction, and then in the other direction, and turn it back. If the CV joint is worn out, a crunching sound will be heard immediately.
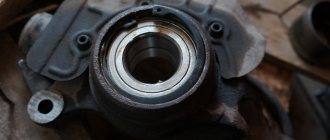
New and worn CV joint
This is the case when there are no visual signs of wear:
- Lubricant leaks near the outer joint.
- Cracks, tears on the boot.
- Lost or misaligned clamps.
- There is obvious play when turning the suspended wheel.
If there are visual signs of wear, we replace the CV joint on the Grant as soon as possible.
CV joint repair
As mentioned above, the hinge cannot be repaired. Conventionally, one of the repair measures includes washing the “grenade” after driving with a damaged boot.
Washing is carried out at the same time when the damaged boot on the pomegranate is replaced. The hinge is carefully knocked off the shaft, inspected for damage and thoroughly washed to remove any dirt and grease in gasoline or kerosene.
After washing, the assembly is filled with lubricant and mounted in place, having previously installed the boot. The procedure makes sense only if there are no obvious signs of a joint malfunction.
A crunchy or knocking part definitely needs to be replaced, since wear forms on the working surfaces of the inner race, and it is no longer possible to stop the destruction. Continued operation of the vehicle may be dangerous for the driver and other road users.
The inner CV joint is one of the most important mechanisms in the transmission system. Its purpose is to transmit torque from the transmission directly to the front wheels. Most modern front-wheel drive cars are equipped with this part, and each drive is equipped with two CV joints: internal and front.
Failure of this small part if not corrected in a timely manner can lead to wear and damage to other important parts of the transmission. To prevent such an unpleasant situation, the car owner must know:
- signs of CV joint failure;
- basic diagnostic methods.
And also be able, if necessary, to replace a damaged mechanism with a new one. This does not require extensive experience in car repair, therefore, if desired, almost anyone who confidently holds a wrench in their hands can cope with the task. Next, the features of replacing the internal CV joint will be described.
We change the outer CV joint of the Lada Granta with our own hands
There shouldn’t be any difficulties when replacing the CV joint yourself if you use simple instructions and have a basic set of tools. It’s also a good idea to have a puller on hand for side dishes of equal angular velocities. It doesn't seem to have an article number, but that's what it looks like.
Alternatively, you can use a simple impact puller with a welded hub nut, but any extra shock loads on the transmission will not be very useful for it.
- While the car is on the ground, unscrew the hub nut using a 30mm socket with a long wrench.
- Raise the car, remove the wheel and unscrew the hub nut.
- We unscrew the caliper without disassembling it.
- Unscrew the ball joint bolts.
- We remove the hub from the CV joint and at the same time from the ball joint, and move it to the side.
- We loosen the clamps and move the boot further along the drive, closer to the gearbox.
- Using a puller or hammer, we ask the CV joint to leave its location.
- Remove the retaining ring.
- We fill the internal cavity of the CV joint with the lubricant that comes with the kit.
- We put the remaining grease into a new boot and put it in place.
- Screw the nut onto the new CV joint and install it in place.
- With light blows of a hammer on the nut, we move the hinge all the way until the stopper snaps into place.
- We install the boot, check that it is without distortions and tighten the clamps.
We put everything back together in reverse order, core the hub nut and do a test drive.
Removing the left front wheel drive (outer CV joint) Lada Granta
Tools:
- Ratchet wrench
- Extension
- 8 mm head
- 10 mm head
- Jack or ditch lift
- Stand - 2 pcs.
- Wheel key
- Medium flat screwdriver
- Hammer medium
- Kerner
- Driver for socket attachment
- 30mm wrench attachment
- Torx wrench attachment E12
- Large flat screwdriver or spatula
- 17 mm straight box spanner
- Metal brush
- Funnel
- Hose
Parts and consumables:
- Technical capacity
- Transmission oil
- Aerosol lubricant type WD-40
- Wood block
- Rags
- Left front wheel drive (replacement if necessary)
- Boot of the outer drive joint (replacement if necessary)
- Boot of the internal drive joint (replacement if necessary)
- Inner joint shank retaining ring
- Grease
Notes:
Front wheel drives (CV joints) are often sold complete with boots and a retaining ring.
Carry out the work on an inspection ditch or overpass.
We carry out work to replace the external and internal joints of wheel drives, their dirt-proof covers, drive seals, as well as when dismantling the gearbox or power unit.
2. Drain the gearbox oil.
3. Lift the front of the car from the left side and remove the wheel.
4. Unscrew the left front wheel hub bearing nut.
5. Remove the two screws securing the ball joint to the steering knuckle.
Note:
Turn the steering wheel to the extreme right position so that the steering rod output is at its maximum value. This will allow the outer joint housing shank to be removed from the wheel hub without disconnecting the tie rod end from the steering knuckle.
6. Using a mounting blade or a large screwdriver, remove the hub from the ball and at the same time from the CV joint.
7. Remove the boot from the CV joint and remove all possible grease so that there is less dirt.
8. Knock out the “grenade” with a hammer.
9. Insert a spudger or large screwdriver between the inner drive joint housing and the clutch housing and push the joint housing shank out of the drive gear spline.
Note:
Do not damage the protective ring of the drive oil seal located on the inner joint housing.
10. Remove the left drive.
Note:
When removing both drives, after dismantling the first one, it is necessary to insert a clamp, for example, a wooden or soft metal roller with a diameter of 20 mm and a length of 150 mm, into the hole of the drive gear. Otherwise, the differential drive gears may become misaligned and the drives may not be able to be installed.
11. Before installing the drive, use a screwdriver to pry up the retaining ring of the inner joint housing shank, which secures the drive in the gearbox.
12. Remove the retaining ring.
13. Install a new ring into the groove of the inner joint housing shank.
Note:
Reuse of retaining rings is not permitted.
14. Before installing the drive, center the retaining ring in the shank groove using grease.
15. Insert the splined shank of the outer joint housing into the hole in the wheel hub, install the washer and tighten (do not tighten) the hub bearing nut.
16. Carry out further assembly in reverse order.
The article is missing:
- Photo of the instrument
- Photos of parts and consumables
- High-quality photos of repairs
Replacing the “grenade” with the Lada Granta
1) First, you need to place the car on a hard, level surface so that you can jack it up.
2) Remove the wheel using a wheel wrench.
3) Loosen the hub nut with a 30mm socket. If it is difficult to turn, use an iron pipe as a lever.
4) Remove the brake caliper.
5) Remove the 2 bolts from the ball joint.
6) Unscrew the hub nut completely, take the mounting tool and remove the hub from the CV joint (and from the ball joint).
7) Pull off the boot and remove the grease, otherwise there will be a lot of dirt.
 Using a hammer, carefully knock out the “grenade”.
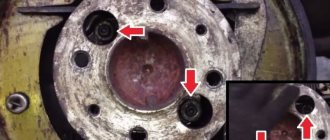
9) Don't forget to remove the retaining ring with a screwdriver.
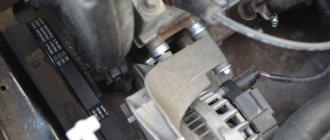
10) On the left in the photo is a CV joint made by AvtoVAZ, and on the right is Belmag. As you can see, of these particular samples, the VAZ one is preferable, since it has better calcination.
11) Take the grease and fill the entire grenade bearing with it.
12) Put on a new boot and put lubricant in it. Then install a new retaining ring.
13) Screw the hub nut onto the CV joint.
14) Hitting the nut with a hammer, hammer the “grenade” into place. During the process, it is extremely important to keep the CV joint straight in relation to the drive.
15) Tighten the boot clamps.
16) Unscrew the nut, then reassemble everything in the reverse order of removal. We recommend coating all bolts with graphite to prevent them from souring.
17) Do not forget to move the ABS ring from the old CV joint if it is not on the new one, otherwise problems with its operation may arise.
Replacing a CV joint is a difficult and quite responsible undertaking, since if you do something wrong, there is a risk of damaging other components and assemblies.
The scheme described above is valid only for an external “grenade”. To get to the inside, it is advisable to put the car on a lift, drain the oil from the gearbox, perform a series of manipulations to remove the hub from the CV joint, and then, using a mounting tool, carefully, trying not to damage the protective ring, pull the drive out of the gearbox.
After that, holding it in a vice, you can comfortably begin replacing it. That's all for today, good luck on the roads!
1. Replacement of the outer CV joint for the Lada Granta
2. Video: “Replacing the boot of the outer and inner CV joint (grenade)
Replacement of outer CV joint for Lada Granta
Still, I decided to change the CV joint today. because then there will be no time. I made a photo report, as detailed as I could.
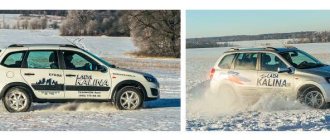
Lada Granta liftback Eleanor™ › Logbook › Replacing the CV joint or searching for crickets
Even in the spring, it began to “cut my ear,” and extraneous sounds are heard when turning the steering wheel. There was a crunching sound if you turned the wheel and started to move away.
We recommended a good car service. We called and was already with them at the appointed time. They lifted me and the car up to the ceiling on a lift. I started it, put it in 5th gear and “drove off”, smoothly turning the steering wheel almost all the way, then to the left, then to the right. The rattling sound was something. The front wheels were removed. While the car was hanging up, they saw a self-tapping screw on the rear left.
Minus 300 rubles and the wheel is ready to be darned.
Conclusion after inspection: “ Hmm.” 98% it's a grenade...
«
In vain, of course, in February, when replacing a wheel bearing, I agreed to install a grenade from a donor
. It “retreated” only 4,748 km.
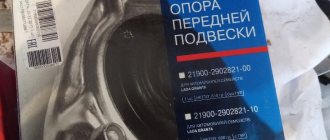
I went to a nearby store, where two and “Belmag” were presented.
They pulled out the old grenade, installed a new one... In 10-15 minutes they changed it.
They also tightened the handbrake, so much so that now it actually goes up to the first click.
We left the box. Started to spin.
I was a little upset that not all sounds disappeared. The service guys calmed me down a little... He said, sit down on the wheel and put your hand on the spring and at the same time began to turn the steering wheel to the right - there was no vibration. But when I moved to the side where the new grenade had been standing for literally 10 minutes and put my hand on the spring while turning the wheel, a vibration started in my hand. The mechanic said to generously spray the supports with WD and if the last “grasshopper” sound goes away, then the support will definitely be destroyed.
They gave a discount for the frustration over the sounds that didn’t go away completely.
Costs:
✓
Outer CV joint "BELMAG" - 1,462 rubles;
✓
“Removing a seed” from a wheel - 300 rubles;
✓
Work on replacing a grenade - 600 rubles;
✓
Adjusting the handbrake - 0 rubles
Peace for everyone! Good crews and “blind” cameras!
Price tag: RUB 2,362 Mileage: 43,372 km
Replacing the “grenade” with the Lada Granta
1) First, you need to place the car on a hard, level surface so that you can jack it up.
2) Remove the wheel using a wheel wrench.
3) Loosen the hub nut with a 30mm socket. If it is difficult to turn, use an iron pipe as a lever.
4) Remove the brake caliper.
5) Remove the 2 bolts from the ball joint.
6) Unscrew the hub nut completely, take the mounting tool and remove the hub from the CV joint (and from the ball joint).
7) Pull off the boot and remove the grease, otherwise there will be a lot of dirt.
Using a hammer, carefully knock out the “grenade”.
9) Don't forget to remove the retaining ring with a screwdriver.
10) On the left in the photo is a CV joint made by AvtoVAZ, and on the right is Belmag. As you can see, of these particular samples, the VAZ one is preferable, since it has better calcination.
11) Take the grease and fill the entire grenade bearing with it.
12) Put on a new boot and put lubricant in it. Then install a new retaining ring.
13) Screw the hub nut onto the CV joint.
14) Hitting the nut with a hammer, hammer the “grenade” into place. During the process, it is extremely important to keep the CV joint straight in relation to the drive.
15) Tighten the boot clamps.
16) Unscrew the nut, then reassemble everything in the reverse order of removal. We recommend coating all bolts with graphite to prevent them from souring.
17) Do not forget to move the ABS ring from the old CV joint if it is not on the new one, otherwise problems with its operation may arise.
Replacing a CV joint is a difficult and quite responsible undertaking, since if you do something wrong, there is a risk of damaging other components and assemblies.
Replacing the drive CV joint in Sandro's Garage
Greetings to all readers on the RtiIvaz.ru blog. Today we will look at a video in Sandro’s Garage, we will find out how the outer and inner CV joints on the drive are replaced. Remember, just in case, that the procedure for disassembling and assembling VAZ cars with front-wheel drive is the same.
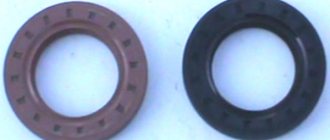
On the left is the inner boot of the grenade, on the right is the outer boot
So, the first thing to do while the car is still standing on its wheels is to remove the hub nut. Use the tip of a screwdriver to remove the hub boot and remove the nut (30) with a socket or a spanner using an auxiliary pipe.
Then lift the car with a jack, and be sure to place some kind of safety trestle under the car next to the jack. The support under the car must be reliable, and the purpose of the jack is only to lift and lower the car to remove the wheel. After unscrewing the wheel bolts, remove the car wheel and unscrew the loose nut (at 30) completely and set it aside.
Then, using the tip of a screwdriver, remove the washer from the hub axle and also put it aside next to the nut so as not to lose the grenade during the replacement process. Now you need to disconnect the front strut lever from the steering tip.
Replacing the inner CV joint
Owners of front-wheel drive cars claim that replacing the internal grenade is easier than replacing the external one. Perhaps this is indeed easier for an experienced motorist, but what about amateur beginners?
For those who have experience and skills, replacing the right inner CV joint (as well as the left one) will not be difficult. The procedure requires the same tools - a hammer, screwdriver, vice, pliers. Do not forget about the jack and that the replacement should be carried out either using a lift or an inspection hole.
Having examined the structure of the inner CV joint from below, it is easy to guess how it is removed. Experts advise removing it together with the external one - it will be more convenient. We start by removing and discarding the old boot (when reinstalling it, it is better to use a new one), the housing, the rollers (there should be three of them), as well as the locking ring (it secures the 3-spoke fork to the shaft). The grenade will be recorded at the checkpoint. After removing the pre-fixed fasteners, turn the wheels left or right until they stop. The CV joint can be removed without problems, since nothing will interfere with this.
Replacement of internal and external CV joints - affordable price, impeccable quality
In a car service, replacement of CV joints, internal and external, is carried out with a minimum of discomfort for the car owner: quickly and at an affordable price. Carrying out such a responsible operation as replacing the outer or inner CV joint on a car, our craftsmen guarantee the exceptional quality of the work performed and the spare parts used.
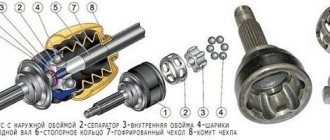
Replacing a CV joint (replacing a grenade) - the design and principle of operation of this unit
CV joint - or constant velocity joint - is a device that transmits torque from the differential to the wheels. The CV joint consists of the following parts:
- Frame;
- Separator;
- Clip;
- Balloons;
- Clamps;
- Retaining rings;
- Protective cover (dust boot).
The spherical body has grooves for the balls, just like the CV joint cage. The cage is designed to hold the balls in position (just like any regular bearing). Thanks to its design, this joint can transmit rotation at almost any angle of deflection of the shafts (up to 350 degrees), and transmit it evenly. The boot also protects the internal surfaces of the hinge from moisture, dust and dirt, which increase friction and prematurely wear out this unit.
Prices for replacing the CV joint boot
| Name of works | Domestic cars | Foreign cars: | SUVs, minibuses |
| Replacing the drive assembly | from 1,000 rub. | from 1,500 rub. | from 1,500 rub. |
| Replacing the CV joint | from 1,000 rub. | from 1,500 rub. | from 1,700 rub. |
| Replacing the CV joint boot | from 1,200 rub. | from 1,500 rub. | from 1,600 rub. |
Replacing a grenade (CV joint) - signs of a malfunction of this unit
A malfunction of the outer CV joint and the inexorably approaching replacement of the outer CV joint will show the following symptoms:
- Distinct clicks from under the wheels when turning;
- Barely perceptible jerks at the moment when the car starts moving.
These signs intensify on potholes, when moving over snowdrifts and holes. And replacing the outer CV joint (outer grenade) becomes obvious. Moreover, replacing the outer grenade is required somewhat more often, because it is these CV joints that are subject to increased loads, since the rotation angles at the hub of this joint are much greater.
There is another surefire way to make sure that the outer grenade needs to be replaced:
- Turn the steering wheel as far as possible;
- Start moving (slowly);
- If a crunching sound appears from below, you should carefully check the outer CV joint - it may have failed and needs to be replaced.
The inner CV joint is checked in a slightly different way:
- Grab the drive shaft with your hand.
- They shake it and try to rotate it around its axis.
- If the backlash is increased, then replacing the inner CV joint (grenade) is not far off.
Replacing the internal grenade (internal CV joint) - algorithm
- The car is raised (you can lift only the front or rear of it using a jack).
- Unscrew the hub nut.
- Remove the desired wheel.
- Unscrew the ball.
- Unscrew the 6 fasteners of the internal grenade to the gearbox flange and remove the axle shaft.
- Remove the stop ring.
- Remove the inner CV joint from the axle shaft.
- Change the boot.
- Mount a new grenade on the axle shaft and perform reverse assembly in a mirror order.
Replacing the outer CV joint (outer grenade) is an important nuance
A number of motorists believe that replacing a grenade is a simple operation, feasible even for an inexperienced driver. However, incorrect replacement of the outer grenade can lead to an unpleasant phenomenon when the car begins to noticeably move to the side where the new CV joint was installed. As a rule, a more correct, or even better, professional replacement of the outer CV joint eliminates this symptom.
There is another fairly simple but important operation with CV joints - replacing the grenade boot in the event of its depressurization. If carried out in a timely manner, it can protect against complete replacement of a CV joint that has become worn out due to dirt and moisture getting into the joint.
Service life and maintenance
A grenade in a car is a consumable item. It will have to be changed quite often. Fortunately, the cost of the unit and repairs is usually not the highest.
How much a factory part costs depends on three factors:
- Driving manners;
- Machine models;
- Timely service.
The first factor is critical. Grenades are especially afraid of the trigger falling down when the steering wheel is turned to the extreme position. At such moments the node experiences maximum load.
If you mostly move calmly, then you can look for a resource for your car on thematic forums. There are cars in which a standard product can cost more than one hundred thousand.
Timely maintenance means periodic inspection of the boots, their timely replacement and filling with lubricant. If a crack appears in the rubber, the death of the CV joint will occur in just a couple of weeks. And in rainy weather this can happen even faster. This is due to water, which, when it gets into the assembly, leads to corrosion and leaching of the protective lubricant.
Surely you will be interested to know that in addition to grenades, absolutely all ordinary cars have a TV! Be sure to read our article on this so you can be a knowledgeable car owner.
Anthers, by the way, are quite inexpensive. The lubricant is also cheap and is called tritely - “CV joint”. When purchasing, do not forget to check that the anthers come with clamps for tightening them.
Advice on how to extend the life of a grenade:
- Do not press the pedal to the floor when turning, especially when starting off
- Change boots and lubricant in a timely manner
The lifespan of external and internal grenades is very different. The first is subject to great effort, since it is forced to turn at significant angles, and therefore makes itself felt more often.
The internal part may well not be bothered for the entire service life of the car.
Repair methods
We have already found out that the main malfunction of the grenade is associated with a torn and damaged boot.
Accordingly, in order to fix the problem, you need to do something with this casing, which is shaped like a cone.
In the case of doing the repair yourself, there are 2 options:
- Emergency
. It is carried out when a breakdown catches you on the road. Literally in the field, it is necessary to partially reanimate the CV joint and its boot. In this case, the CV joint boot is not even fully replaced without removing the CV joint. But the method is still useful for emergency situations; - Garage
. Here you are already in the garage, you have a set of tools, a pit or even a lift at hand. Some are sure that there is no way to do without removing the hinge. It's a delusion.
Now we will talk about each repair method separately.
Both options can be used on various vehicles, be it:
- VAZ 2110;
- Lada Kalina;
- Renault Logan;
- VAZ 2114;
- Lada Priora;
- Chevrolet Niva (Shniva);
- VAZ 2115;
- Lada Granta, etc.
Yes, it is generally better to conduct such experiments on domestic cars, as well as on budget foreign cars. Their design is simpler, and spare parts are not so expensive if you suddenly need to correct your own mistakes.
But the price of a professional service for replacing the boot is quite impressive. This is another reason to do everything yourself.