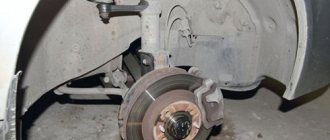
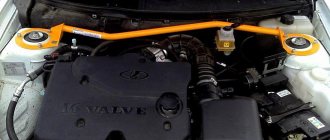
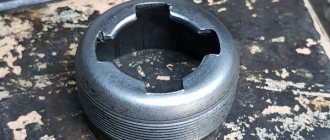
Upper support bearing – This is an important element in the design of the Granta front strut. The “supports” are involved in the rotation of the front strut during a turn, and also absorb axial loads and provide rigidity to the mechanism.
The “support” itself is a housing of two cups, inside of which the bearing itself is located, consisting of a rubber separator with balls inside. It also contains gaskets (vibration and noise insulators). The listed elements, as well as the design of the front support, are presented in the photo.
Video review of the SS20 suspension (front struts, springs, bearings).
Video: “SS20 suspension: briefly about the main thing”
Causes and signs of failure, diagnostics
The node takes a dynamic (variable) load, and failure, as well as replacement, is usually required for several reasons:
- Part wear, time to failure (service life);
- Accidents, frequent driving in potholes, aggressive driving style;
- Contamination of the support bearing from the inside, ingress of moisture and dust;
- Malfunction of suspension (shock absorbers, springs).
The main sign that a support bearing will need to be replaced is that the Granta rattles and creaks under the hood or near the struts. This appears after 80-100 thousand kilometers, under appropriate operating conditions of the car.
The design of the “support” and the front pillar is complex; the following elements can fail:
- The entire support, including the body (rarely) - position 4;
- Support bearing (more often) – position 8;
- Rubber gaskets wear out (more often) - position 9.
It is important to know:
Attention: To decide which element needs to be replaced , you should disassemble the entire assembly, the diagram of which is presented below.
Diagnostics of support bearings
To diagnose a breakdown, do the following:
- Raise the hood, find the front supports;
- Place your hand over the knot;
- Start to strongly rock the car from bottom to top (or ask an assistant);
- If you feel a knock or hear, as well as other incomprehensible sounds, it means that there are problems. It is worth disassembling or replacing the front support mechanism.
- Watch the diagnostic video:
How to check support bearings
Replacement of front suspension strut support for Lada Granta
There are two ways to replace support bearings on a Lada Granta.
The first method is simpler and faster. It involves removing the strut without the steering knuckle. In this case, all you need to do is just unscrew the two alignment bolts with nuts securing the strut to the steering knuckle, unscrew the tie rod end nut and disconnect it, and unscrew the three nuts securing the strut support to the body. And after that, you can remove the stand. But after this process, it will be necessary to go to the alignment. At the service station, most likely, this is exactly what they will do to you. Afterwards you will need to fork out more money for the wheel alignment.
The second method is longer and more complex. Using this method, it is necessary to remove the strut assembly with the steering knuckle, the hub, the brake disc and the caliper bracket. The advantage of this method is that after this there will be no need to do a wheel alignment. I did exactly this, and the further description will be about this method. I would also like to note the following - This method is only relevant if you do not need to do a wheel alignment after repairing the front suspension. If you plan to do a wheel alignment after repairing the suspension in any case (for example, when replacing tie rod ends), then all this is unnecessary. In this case, use the first method.
We will need:
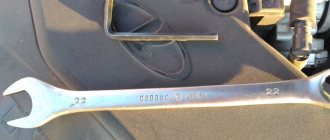
1. Jack. 2. Wheel wrench for wheel bolts. 3. Powerful wrench with a 30mm head, for CV joint nuts. 4. Ties for springs. 5. Steering wheel end remover. 6. Hammer, small chisel and small core. 7. Ring or open-end wrenches for 13 mm, 17 mm, and 22 mm. (and a 14 mm open-end wrench for spring ties, if used like mine) 8. Driver with 13 mm, 17 mm, and 19 mm heads. 9. 6 mm hexagon, for fixing the shock absorber rod 10. You will also need so-called Euro heads. E-8 and E-12. 11. Flat screwdriver. 12. Pliers. 13. VD-shka. (WD-40). Helps unscrew rusted bolts and nuts. 14. You may also need a 20 mm die. step 1.5, for running threads on CV joints. For example, I needed it. I unscrewed the nuts on my car for the first time, and they were very locked from the factory. When I unscrewed these nuts, the threads became a little slick. I had to drive him away.
Necessary tools for replacing the Lada Granta front suspension strut support
I also advise you to purchase some little things in advance:
1.
Tie rod end boot in qty. 2 pcs. It costs a penny, but it often breaks when the tie rod ends are pressed out using a puller.
Tie rod end boot
2.
Cotter pin for fixing the tie rod end nut in the stake. 2 pcs. Again, it costs a penny, but it tends to break or get lost. And then, in the absence of a replacement, a nail is usually inserted.)
Cotter pin
3.
Lubricant for guide supports. The presence of lubricant in the guides must be checked every time the suspension is repaired, or every time the pads are replaced. Well, if necessary, add or change it.
4.
The hose is transparent “food grade” or similar, with a diameter of 14 mm, approximately 1 m long. I pull it onto the first turn of the spring at the point of its contact with the steel cup of the stand. You can only tighten it onto the spring using silicone grease. This is purely my initiative, you can do without a hose. But I advise you to think about installing it. Some noises are made when the spring and cup rub together.
Hose transparent
5.
CV joint nuts in quantity. 2 pcs. If these nuts have not been unscrewed before, they will be tightly compressed on both sides. When unscrewing them, the threads may be damaged. It is better to use new ones when assembling.
Let's get started
1.
We place the car on a level and convenient platform for work.
2.
Pull the handbrake all the way and secure the rear wheels with wheel chocks (or bricks, for example).
3.
Take the “balloon” and loosen the bolts of the front wheels.
4.
Raise the car with a jack. For safety, we lower it onto the goats.
5.
Removing the wheels of the Lada Granta
Now we work on each side in turn. Next you will need an assistant.
6.
Using a flat-head screwdriver, remove the plastic protective cap from the hub.
7.
We take a hammer and a core. Using light blows, bend the pressing of the CV joint nuts as far as possible. If the nut is not very clogged, then you can try to unscrew it without this.
8.
We ask an assistant to press the brake pedal. Next, take a powerful wrench with a 30mm head. and unscrew the CV joint nuts on both sides.
Next, unscrew the tie rod end nut and use a puller to remove the pin from the bipod. For this:
9.
Use pliers to align the cotter pin and remove it.
10.
19 mm head. or use a wrench to unscrew the tie rod end nut.
11.
Carefully, without damaging the tie rod end boot, insert the puller into the bipod and squeeze out the finger with it.
If your car has ABS, you need to unscrew the wheel speed sensor. For this:
12.
Using the E-8 head, unscrew the sensor mounting bolt.
13.
We remove the sensor from its mounting location.
14.
We release the sensor wire and the brake hose from the U-shaped fasteners on the rack.
Next, you need to unscrew the caliper assembly with the piston from the bracket. For this:
15.
Using a flat screwdriver you need to slightly move the piston in the caliper, as in the photo. This must be done if there is wear on the disk. Otherwise, it will be difficult to pull the caliper out of the bracket; the pads will cling to the wear on the disc.
16.
Take a small chisel and a hammer. Using light blows, straighten the locking plates on the guide bolts.
17.
Holding the guide with a 17 mm open-end wrench, unscrew the guide bolts with a 13 mm spanner.
18.
We take out the caliper and piston assembly and put it aside. Place it so that it does not hang on the hose.
19.
We remember the location of the pads and put them aside. When assembling, they must be placed in their original places.
Next, you need to unscrew the ball joint bolts.
20.
Take the E-12 head and unscrew the two bolts securing the ball joint.
21.
After this, we pull the rack towards ourselves, while simultaneously pressing the splined CV joint inward. We fully extend the splined CV joint from the hub and move the drive to the side.
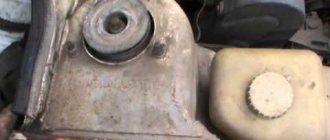
The strut assembly is now completely free and is held in place only by the three strut support nuts.
Front suspension disassembly
1.
We unscrew the three nuts securing the strut support to the body, while simultaneously holding the entire strut from below.
2.
We remove the stand assembly and place it in a place convenient for work.
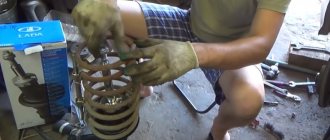
3.
We take the spring ties and install them on the spring. Place the ties exactly opposite each other. If they are not spaced evenly, then one of the ties may come off when tightening. Tighten the spring until it starts to wobble.
4.
After the spring is compressed, you need to unscrew the top nut of the strut. In order to fix the shock absorber rod, you will need a 6 mm hexagon. Hold the rod with it using a 22 mm spanner. unscrew the nut.
5.
Next, remove the strut support along with the bearing, metal cup and rubber damper. We take out the spring and the boot with the bump stop.
Next I'm posting a few photos for comparison.
Rack support:
On the left is a standard Grant support. On the right is the rack support SS20 Gold for Grants in set. “Norma” and “lux” (with modified castor, as in the stock support).
Strut support bearings: on the left is a standard Grant support bearing. On the right is the support bearing SS20, which is included in the kit.
Next is a short digression. I picked up and put a transparent hose on the lower coil of the spring to reduce metal-to-metal friction and reduce noise. Of course, you don’t have to do this, it’s up to you to decide. Yes, and one more thing, if you decide to do the same. Hose with a diameter of 14 mm. fits onto the spring very tightly. To pull it there, you will need liquid silicone grease. Without it, most likely it will not be possible to do this.
Rack assembly with new SS20 Gold rack supports
6.
We put a boot with a bump stop on the shock absorber rod.
7.
We install the spring on the stand, orienting the lower coil to the shape of the cup. Place the stock rubber damper and steel cup on the top coil of the spring.
8.
Next, we insert a new support bearing SS20 into this cup.
9.
After this, we put the rack support on the rod and secure it with a nut. After that, tighten the nut while holding the rod from turning with the same 6 mm hexagon.
Note No. 1: if the shock absorber is oil, the rod will smoothly move down. So assembly must be done very quickly, immediately after it is completely pulled up. With gas and gas-oil shock absorbers everything is simpler. Their stem is the opposite, always tending upward.
Note #2:
If a standard support is installed, it is necessary to place special metal washers on the bottom and top of the support damper, which were installed from the factory. And when installing SS20 Gold supports, they need to be removed. Similar washers are already present on the SS20 Gold supports.
10.
Release the spring ties. At the same time, we control the location of the support bearing in the steel cup. He can jump out of his seat. It can only be seated back when the spring is tightened again.
So, the rack is assembled and ready to be installed back on the car.
Reassemble in reverse order. When assembling, you need to pay attention to several points:
1.
Be sure to check the lubrication in the caliper guides. Lubricate them if necessary.
2.
Drive the threads on the CV joints with a die (20mm, pitch 1.5), if necessary. Very often, the end of the thread is licked off when unscrewing a heavily “clogged” nut. Also, when tightening, use new nuts. I don’t recommend stopping them, because they tighten very tightly. And spontaneous unscrewing is practically excluded. But keep the threads on the CV joints.
3.
Lubricate the splined part of the CV joint with lithol before installation. It is not lubricated from the factory, and it becomes tightly jammed in the hub. For example, I had to knock the CV joint out of its seat in the hub, because it was rusty in its seat.
4.
Place the reinforcement plate of the rack support and the support itself according to the arrow marked on their body. The arrows should point towards the front of the car.
After assembly, this is what the SS20 Gold strut supports on Grant will look like:
next article:
Lada Granta suspension tuning
Contents of the article: Tuning from “Lada-sport” for the Lada Granta Suspension tuning: front rebuild for the Lada Granta Tuning
Rating 5.00 [1 Vote]
Preparatory measures for replacing the support bearing Do-it-yourself grants
Replacing the support bearing of the Lada Granda strut can be done in two ways.
- Removing the front strut and unscrewing the wheel alignment bolts.
- Removing the strut module along with the rotating mechanism and brake disc assembly without unscrewing the adjusting fasteners.
Both methods cannot be performed without removing the strut, but using the second method, which is described below, you can avoid another wheel alignment.
Preparation for repair
It is advisable to carry out the replacement in an inspection hole, so you will save time on the convenience of performing operations to remove/install the unit. The car is in first gear; to comply with safety regulations, use wheel chocks.
Tools for work
- Any jack.
- Large wrench to remove chassis bolts.
- A long 30mm wrench for unscrewing the hub nut.
- Clamps for tightening shock absorbers.
- Tool for removing tie rod ends.
- Hammer, chisel, core.
- Set of keys (22, 17, 13).
- "Ratchets" on 13, 17, 19.
- Hex key for unscrewing the rod nut.
- Special heads. "Eshki" E8 and E12.
- Large negative screwdriver.
- Pliers.
- Penetrating lubricant such as WD-40.
- Torque wrench for tightening the rod nut.
Required set of new parts
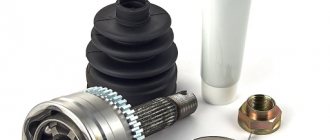
- Supports or individual support bearings, depending on the breakdown;
- Rubber gaskets (if you are only changing the bearing);
- Boot with tie rod cotter pin (if replacement is required).
How to remove the support bearing on a viburnum - step by step guide
Replacing the Kalina front strut supports begins preparing the car. Place the car on a flat surface, if there is a lift or pit available. Engage first gear and release the parking brake. Dismantling sequence in order:
- We unscrew the wheel bolts, then raise the car with a jack or a lift as in our case.
- We gain access to the brake disc, but you don’t need to remove it, nor do you need to unscrew the hub locknut.
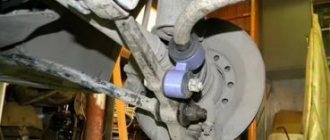
- Let's move on to the swing arm and tie rod. First, remove the cotter pin from the fastener. Next, unscrew the nut itself.
- After this, use a tip remover to press it out of the hole in the lever or, as a last resort, use a hammer. We install the device, tighten the thread and remove the tip.
- Now disconnect the brake hose and speed sensor wire from the front strut.
- Next, we find two bolts securing the strut to the steering knuckle and lubricate them with penetrating lubricant.
- To unscrew the nuts, we use a 17 socket wrench, as well as a head with a ratchet.
- The bolts will have to be knocked out; use a wooden guide to avoid damaging the threads.
- The lower part of the module is freed, let's move on to the upper part. Unscrew the three fastenings of the front pillar to the body glass.
- When unscrewing the last nut, hold the stand, or place a support under it, for example, a removed wheel. After this, remove the module with the support and shock absorber assembly.
- We install two ties on the springs of the removed suspension module. As shown in the photo, we compress the shock absorber spring evenly on both sides.
Note:
In garages and car repair shops, special machines are used to compress shock absorber springs; when using them, the replacement process is faster.
- We continue to compress the shock absorber until the upper support is freed from the spring tension, and only then unscrew the rod nut. We use the key at 19.
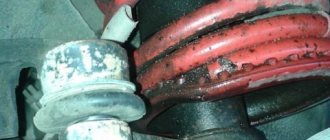
Attention:
The photo on the right shows the SS20 shock absorber mounts, the design is different from the standard mounts, as in the photo on the left. The essence of replacing and repairing the Kalina support bearing of different designs does not differ.
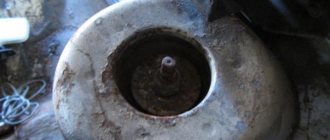
- Now we remove the upper part of the support (cup), under which the “support” is located. We remove the old part and proceed to replacement.
Recommendations for repair and assembly
Advice:
The videos will help you make a replacement and speed up the process of repairing your Grant.
Replacing the front shock absorber strut support:
Replacing the support bearing on Grant:
- If the shock absorbers are oil, then the rod goes down to the bottom. Therefore, we assemble the mechanism quickly. It is easier with gas and combined models, since the rod only rises upward. In the case of an oil product, do not forget to pump them and remove air.
- If you are installing the original front mount, replace the factory metal washers on both sides of the damper. When installing “supports”, for example SS20, this is not required; they are included in the kit.
Some Tips for Replacing the Front Shock Absorber Upper Mount
- When disassembling, the hub nut should be loosened before you remove the wheel; if the car is already suspended on a jack, it will not be easy to move it.
- If you do not have a ball joint and tie rod remover, the steering tip can be knocked out by hitting the joint joint with a heavy hammer, the blows must be sharp and precise. Even if the tip seriously “boils” in the connection, after several attempts it will still come off.
- To make it more convenient to disassemble the shock absorber strut after removal, you can immediately (while the shock absorber is still on the car) loosen the shock absorber rod nut.
- To make the nuts and bolts easier to turn off during the next repair, it is recommended to treat the fasteners and threads with graphite lubricant during assembly.
- When removing the shock absorber assembly with the hub and steering knuckle, it is a good idea to check the condition of all suspension parts on this side of the wheel. Such diagnostics will save your money and time, because it is often discovered that along with a defective support bearing, for example, a shock absorber is also faulty, or the outer CV joint has a large amount of play.
- You need to compress the spring with ties gradually, squeezing the coils little by little on one side and the other. The spring is compressed until the upper support begins to rotate freely; too much compression of the coils is not required, and in general it is unsafe.
In general, replacing the support bearings on the front struts is quite simple; to make a replacement, you don’t have to go to a car service center; you can do the work yourself.
Support bearings are elements of the front suspension of a car. Their main task is to smooth out shock loads on the body. Failure of these parts does not bode well. In addition to the fact that the suspension and body will wear out faster, the car's handling will also deteriorate significantly. And this already poses a certain danger for the driver and passengers.
In this article we will talk about what front strut support bearings are, how they are designed, what they are intended for and what their principle of operation is. In addition, we will consider the process of replacing these suspension elements using the example of a VAZ-2110 car.
Table of bearing sizes 8112n and technical characteristics
Characteristics Unit of measurement Value according to GOST (TU)
| Inner diameter of the tight ring, d | mm | 60 |
| Outer diameter of the tight ring, d1 | mm | 85 |
| Free ring inner diameter, D1 | mm | 62 |
| External diameter of free ring, D | mm | 80 |
| Installation height | mm | 17 |
| Dynamic load capacity | kH | 41,5 |
| Static load capacity | kH | 95,0 |
| Nominal speed | rpm | 3600 |
| Axial clearance | mm | — |
| Steel type | — | SHH-15 |
| Hardness of steel and rollers | H.R.C. | 61-65 |
| Contact angle | hail | — |
| Torque | kN*M | 220 |
| Ring roughness | Ra | 0.32 |
| Number of balls | PC. | 24 |
| Ball diameter | mm | 8,731 |
| Mounting chamfer radius, r | mm | 1,5 |
| Weight | G. | 295 |
Removing the shock absorber strut and disassembling it
We remove and disassemble the shock absorber strut when it is necessary to replace the upper support, bearing, spring, and telescopic strut. The telescopic stand is non-removable and cannot be repaired. We carry out the work on an inspection ditch or overpass, but you can get by on a flat platform. There are two options for removing the shock absorber strut. The first allows you to avoid subsequent adjustment of the steering wheel alignment angles, the second method requires less work, but after it requires adjustment of the steering wheel alignment angles. We replace the telescopic stand according to the second option. In the first option, remove the strut together with the steering knuckle, without loosening the nuts of the upper (adjusting) and lower bolts securing the strut to the steering knuckle. At the same time, disconnect the tie rod end from the swing arm of the shock absorber strut (see below). We disconnect the ball joint from the steering knuckle (see “Removing the ball joint”). We remove the outer CV joint from the wheel hub (see “Removing the front wheel drives”), and also remove the pad guide with the caliper and cylinder (see “Replacing the front wheel brake disc”).
How to determine whether support bearings are faulty
The first characteristic sign is a knocking sound in the area of the front pillar of the car (left or right). Other suspension parts may also be the source of extraneous sounds, but the check should begin with the support. The knocking is especially noticeable when overcoming bumps and driving over rough terrain during sharp turns. Another symptom is a slight decrease in controllability: the steering wheel responds sluggishly to the driver’s actions - the car seems to “chatter” slightly on the road.
It is possible to determine that the front strut support bearing is faulty under stationary conditions. You will need an assistant. Point-by-point diagnostics:
- Park the car on a level surface and apply the handbrake.
- Open the hood and remove the left or right “glass” cover.
- Lightly touch the top of it and ask an assistant to press on the fender to make the strut work on the side on which the spare part is being checked. If it malfunctions, a slight vibration will be felt and a knock will be heard.
- Test the second rack in the same way.
- Ask an assistant to turn the steering wheel to the right or left so that the spring is clearly visible. Place your palm on it: when you turn the steering wheel from side to side, you will feel the impact and hear the sound of metal.